


Manufacturer - VOIIO
Kit Number - 01101
Scale - 1/35
Available now only on pre-order
Price: AU$79.95 from BNA Modelworld.
Product Link on the VOIIO Website

Previous parts of this story:
- Build Guide: 1/35th scale M1A2 SEP V2 Abrams US Main Battle Tank from VOIIO.
Today: Build Guide PT II: 1/35th scale M1A2 SEP V2 Abrams US Main Battle Tank from VOIIO
Today: Build Guide PT II: 1/35th scale M1A2 SEP V2 Abrams US Main Battle Tank from VOIIO
VOIIO's new Abrams SEP V2 was a lot of fun to build up – great fit and engineering, nice detailing, and not too many parts. It's taken me a while to get around to the painting and weathering, but it's done now, so let's see how it came together in the end.
Before starting on the main painting, I wanted to tackle the tracks which are the old fashioned single-piece vinyl type that can often be problematic to paint. To ensure any subsequent paint and weathering adhered to the tracks I started by giving them a solid coat of automotive primer. This type of primer will bond more effectively to the vinyl and provide a suitable surface for the following paint layers.
 The tracks were given a few days for the auto primer to fully cure, after which they were base coated with AMMO Rust primer. At the same time I primed the wheels and lower hull with AMMO Black primer after which the tracks and wheels were installed. I needed to get these painted and in place at this stage to allow me to fit the side skirts. Once the skirts are added, access to the lower hull is quite restricted, but so is visibility so the black primer simply acts as a shadow coat.
 With the skirts on, the rest of the hull, along with the turret, were also primed in AMMO black. Before doing so, all the optical sights and vision blocks were masked off, along with any other areas that needed to be kept paint free such as the mounting post for the remote weapons station. As always with acrylic primers, it's good to give it a couple of days to fully dry before continuing with the painting.
 For the main painting, I used Tamiya acrylics which are the brand recommended in VOIIO's paint guide. Tamiya's NATO camo colours are well regarded and I've always found them to be a good match for the real thing. To start off, I gave the whole model a fairly solid coat of NATO Green, allowing just a hint of the black primer to show through in the corners to provide a little shading.
 Before moving on to the other camo colours, I decided to add some additional highlighting to the green. For this, I mixed a little XF-4 Yellow Green in the NATO Green and sprayed this lighted colour along the edges of panels and over smaller details to boost the 3D effect of the model. This paint mix also had a few drops of X-22 Clear Gloss added which increases the transparency of the paint and also leaves a smooth satin finish which will help when we start adding washes later on.
 Next up was the NATO Brown, again using the Tamiya shade. This too had a little clear gloss added to the paint. As with the green, I subsequently lighted the brown paint, this time with Tamiya Buff, and sprayed some highlights. These, however, turned out to be so subtle as to be almost unnoticeable, so probably not worth it in the long run. To add a little visual interest to the build, I masked off the CITV turret and the gunner's armoured shield before spraying the brown camo so they'd retain the base NATO Green colour.
 The camo was completed with NATO Black, although this time I didn't bother with any additional highlighting. All that remained now before the weathering could start were the decals and a little detail painting.
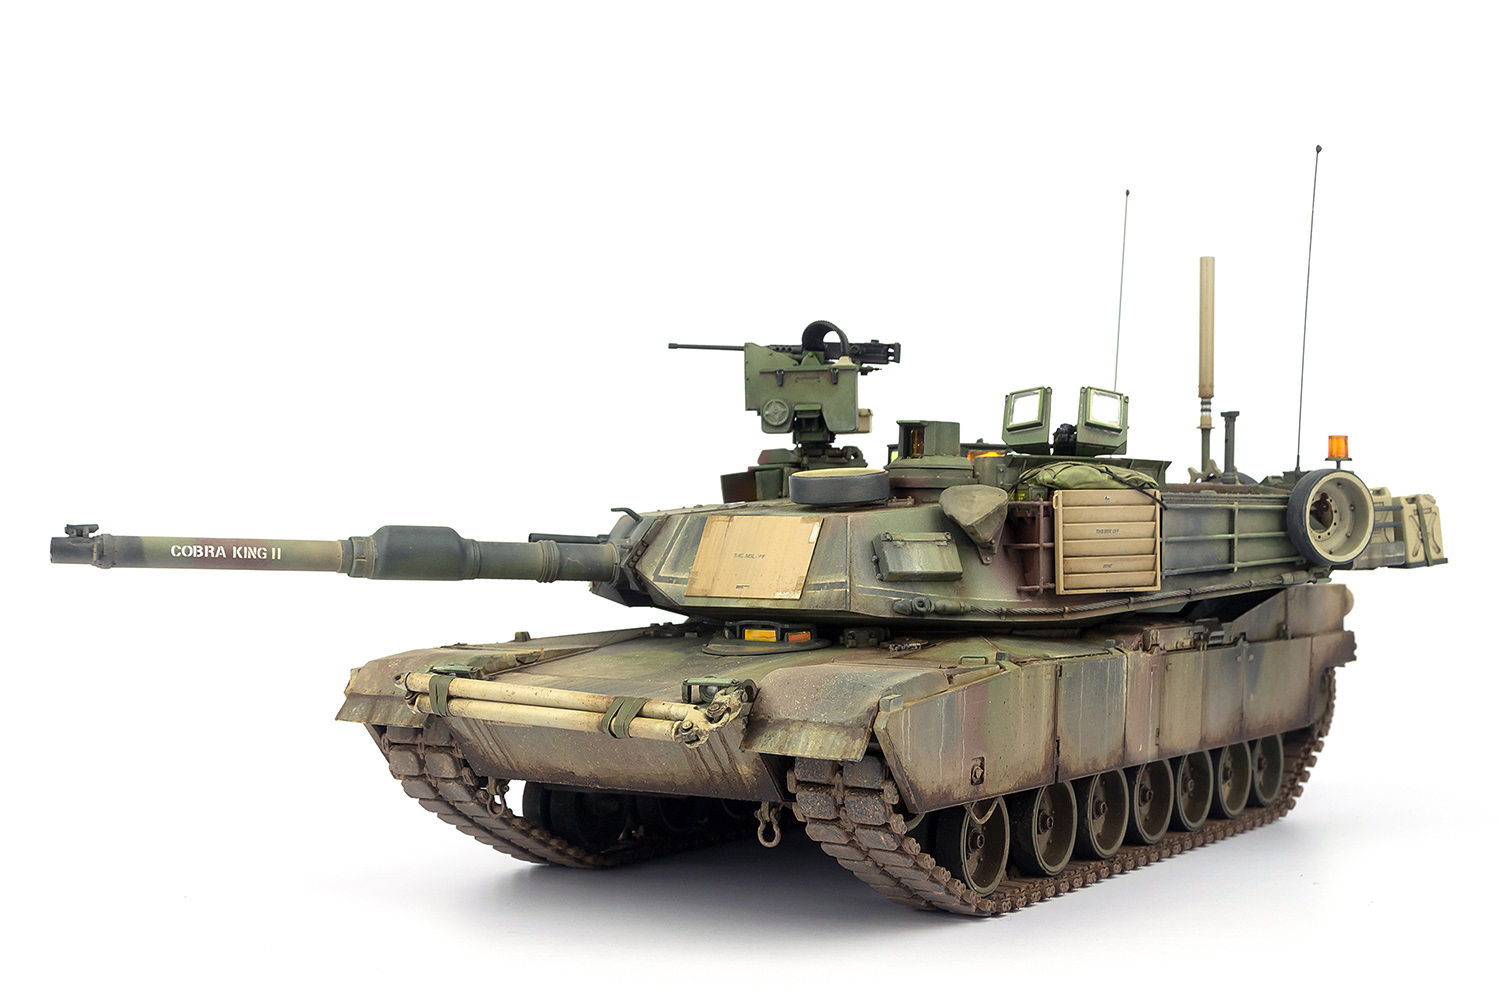
 VOIIO don't skimp when it comes to marking options with no less than nine different subjects, covering tanks in NATO tri-colour camo, all-over green, and desert tan. For this build I chose a vehicle of the 2nd Battalion, 9th Infantry Division, operating in South Korea during 2013 and carrying the name COBRA KING II on the barrel, the tank being named after the famous COBRA KING Sherman. VOIIO have turned to Cartograf for the decals and as you'd expect, the performed perfectly. There was however one small issue with the marking scheme I'd chosen, as VOIIO had mistakenly spelt COBRA with two B's. I didn't notice this until I'd got the first decal in place, but fortunately, I was able to lift it, remove the extra letter and re-apply it with no ill effects.
 With the decals applied, the remaining detail painting was finished. There's not a lot of this on an Abrams as the tanks don't have any external tools or other equipment. At this point, I also added some very subtle paint scuffs and scratches, mainly down the sides of the skirts, although most of these got covered later by the rest of the weathering.
 I also touched in many of the smaller details such as bolt heads with lighter shades of the base colours, and gave the anti-slip texturing a light dry brush to bring the detail out more, Again, as with the scratches on the side skirts, much of this ended up disappearing under the subsequent weathering.
 To start the main weathering process, I mixed a light earth shade from enamel paints and thinned it to a thick wash consistency. This was brushed quite liberally over the model, partly acting as a heavy filter to lessen the contrast between the camo colours, while also allowing the wash to pool around details to leave a dusty appearance.
 I then switched to acrylics to add heavier build-ups of earth and dust. This step was done in small areas at a time, blending the acrylics before they dried. On the side skirts, the paint was thinned and brushed in irregular vertical lines to represent streaks left by muddy water running down the sides of the tank.
 To add more texture to the mud on the hull I used a mud wash from AMMO, flicking the thick wash over the sides of the model with the aid of a toothpick. This was mainly concentrated around the rear sides and back panel of the tank with lighter applications over the front sides and glacis area.
 I'd kept the running gear and tracks unweathered up to this point as I still needed to add the tinted clear hubcaps to the road wheels. During the build, I'd mentioned that the hubcap design seemed to be incorrect, unless there was a newer design I wasn't aware of. Well, as it happened, this turned out to be the case. Thankfully, one of our readers pointed out the newer hub style via TMN's Facebook page (TMN has the best readers) and, after a more thorough search, I found some photos of the newer type. I was then able to add the hubs to the wheels knowing they were correct for this version of the Abrams.
 With the hubs in place, I started weathering the wheels with an application of dry earth-coloured pigment. This was fixed in place with an enamel wash and left to dry. Later on, I applied darker washes around the hubs to represent damper areas of mud.
 Darker washes were also added to the hull around the lower edges of the side skirts, and in any other corners where mud would accumulate and take longer to dry out. I used oils for this, mixing different shades from mid to dark allowing the effect to be blended more naturally.
 Moving over to the turret, I'd not yet added the Combat Identification Panels. These are included on the kit's photo etch sprue, but I decided to make some replacements allowing me to replicate some particular aspects of the those fitted to the vehicle I'm representing. After finding a photo of COBRA KING II on exercise, I noticed that most of the reflective tape on the corners of the panels had fallen off with only a few remnants remaining and I thought it would be a nice touch to replicate this on the model.
 I cut the new panels from 0.25 mm styrene sheet to the same dimensions as the kit parts, then added the remnants of tape to the corners using thin strips of Tamiya masking tape. In some places I left the ends of the tape peeled up, matching those in the reference image.
 The panels were painted up and had the decals applied, then they were attached to the turret. The areas where the tape had peeled off were painted in a darker shade to represent the adhesive residue left on the surface.
 Something else I wanted to replicate from the ref image was the dust build up around the detector belts which run around the perimeter of the turret and form part of the MILES combat simulation system. On the photo of COBRA KING II, the detector belts have been removed exposing a cleaner line with dusty edges either side. To reproduce this effect on the model I first applied strips of masking tape to the turret corresponding to the position of the belts.
 The same dust coloured acrylics I'd used earlier were then brushed over the masked areas and blended on either side of the strips. With the tape removed, the effect does a reasonable job of replicating the dust build-up seen in the photo.
 VOIIO include a rather generous assortment of stowage with the model, including jerry cans, ammo boxes and some nice water bottles. Some of these were painted up and added to the model, but I wanted to add something else in the form of the large tarp wrapped bundles often seen in the bustle racks on Abrams. To create this, I mixed a little acrylic paint with some PVA and brushed the mixture in an even layer over a pane of glass taken from a photo frame.
 Once the PVA had dried, I carefully teased a corner up with a knife blade then gradually peeled the PVA sheet away from the glass. The resulting sheet is quite flexible and can easily be cut to shape with scissors. You effectively end up with a scale tarpaulin sheet.
 I scrunched up the sheet into a ball to give it some wrinkles and creases, flattened it out again, then wrapped it around a wad of tissue paper that had previously been dampened and pushed into the bustle rack on the back of the turret and left to dry. The tissue paper formed the basic bulk and shape of the stowage bundle with the PVA sheet forming the tarp cover. Masking tape strips were used to represent straps and also hold the sheet in place. Any areas of the PVA sheet not secured by the straps were glued down with cyano adhesive.
 The bundle was sprayed with a dark green acrylic followed by a dry brush to bring out the folds and creases. Once dry, it was pushed into place to leave a very convincing looking stowage bundle.
 With the included stowage added, the turret looks nicely busy, the best bit for me are the clear water bottles with their appropriate decal labels.

 So, with those last details added, the build was finished. Considering that this is VOIIO's first release, it's remarkable what a well thought out kit they've produced. The engineering and fit were excellent, and they've not been tempted to over-complicate the kit with too many parts or a pointless interior.


 There are some really nice touches too such as the included stowage and the multiple marking options. This was the first Abrams that I've built, so I can't compare this release with any of the other M1 kits on the market, but if you're looking to add the type to your collection and want a simple, trouble-free build then VOIIO's offering comes highly recommended.
Andy Moore

Before starting on the main painting, I wanted to tackle the tracks which are the old fashioned single-piece vinyl type that can often be problematic to paint. To ensure any subsequent paint and weathering adhered to the tracks I started by giving them a solid coat of automotive primer. This type of primer will bond more effectively to the vinyl and provide a suitable surface for the following paint layers.


Some of the details of the kit and modifications in close-up


A walk around the whole tank...


Thanks to the people at VOIIO for sending Andy this Abrams to review & to build for you - you can find a link to their distributors at this link
