


Brand: Bandai
Vehicle: AT-ST
Scale: 1:48th
Item Number: 948694
6 injection moulded sprues plus decals and a sticker.
Price: ¥1,920 / USD $16.08; / €14.18
Available from HobbyLink Japan at this link
Model by Clayton Ockerby.
Review: Bandai 1/48th Star Wars AT-ST

Yes, it’s
true, I am a self-confessed nerd. Not a 'dress up and go to conventions' nerd,
but definitely a sucker for just about anything with a Star Wars logo on
it. Being a child of the 70's pretty much guaranteed i. The Star Wars
reach was impossible to avoid.
I have always been a massive fan of the Fine Molds Star Wars kits and was devastated when I heard they wouldn't be making them any longer. I guess when one door closes the next opens and along come Bandai with their Star Wars offerings.

So the AT-ST in 1/48 scale arrives on my workbench. WOW!
The
moulding is clean and crisp and the level of detail is very good. Far better
than I was expecting.
The model
comes across 6 injection-moulded sprues. You also receive a decal sheet and the
same thing but supplied as a self-adhesive sticker.
The BUILD
Quite
honestly, this kit just about falls together out of the box. The body and leg
joints were quite literally snapped together over an hour in from on the
television. I am yet to use a drop of glue and everything is tight but still
has some movement in the joints.


The
moulding and the detail on the interior is just beautiful. Each side is moulded
as a single piece. Simple, uncomplicated modeling at its’ best.

Although I
knew essentially this interior will never see the light of day, I couldn’t help
but paint it up. An overall coat of Dark Sea Grey went down and was then
lightened in parts to add some interest.
A black oil wash then helped lift the detail and the buttons and
elements were then picked out with a fine brush and Vallejo acrylic paints.
For the
Star Wars purists out there, forgive me if I have painted some of the details
incorrectly…I don’t care, it was just an exercise I have to go through and was
a really enjoyable thing to do. Now it’s
time to hide it all….

The freshly
painted cockpit sits nicely within the pieces of the turret. A further 20
minutes was all it took to essentially complete the major construction of the
kit. I did get a little thrill seeing everything coming together, and I have to
confess, I possibly made a few ‘pew pew noises out loud….

A coat of
Alclad white micro filler over the model. I don’t always prime my models, but
decided to start from a white base on this one.

I did toy
with working on an Imperial camouflage scheme for this fellow but decided to
stick with the stock standard light grey.
Whilst I used pictures from ROTJ as a loose reference, I didn’t want to
replicate the specific vehicle that Chewbacca captured. I just wanted to make a stock standard
chicken walker that could have served on just about any planet.

With a
highly thinned mix of NATO black from the Vallejo paint range I set about pre-shading
the model. These black areas would help
create some visual interest once the colours started getting laid down.

For the
overall colour of the model I used Light Ghost Grey from the Vallejo range of
paints. I sprayed a thinned mix of the colour a number of times over the model.
Light coats were employed to ensure I wouldn’t lose too much of the pre-shading
I had done in the previous step.
Lighter tones of the grey were created by
simply mixing in a little white.


You can see
the subtle effect of the pre-shading and the highlights. I would build on this
in later steps. A gloss acrylic varnish
was then set in place to protect our paintwork.
Tiny dots of
oil paint were touched on the model in a random fashion. White, blue, grey and
even buff was added.

A brush
moistened with white spirit was then dragged through the oils in a downward
motion. Slowly and carefully drag the
brush through the paint until all that is left is a subtle effect on the
colouring of your base layer.

Finished
result of the dot rendering. This technique is particularly useful when trying
to add interest to a monotone colour palette. The key is subtlety.

An oil wash
using a heavily thinned dark grey oil paint is now applied. Attention was paint to all of the details
over the model. Overflow and messy parts are easily cleaned up with a brush
moistened with white spirit.


But it was here we encountered some real
challenges with this kit. Here’s a
very important piece of advice for anyone thinking about building this
kit. BANDAI plastic does not like WHITE
SPIRIT.

The white
spirit used to thin my oil paints reacted poorly with the plastic and made it
as brittle as chalk. The first thing to
go was one of the leg joints. It literally just shattered in my hand. The next
thing to go was the armourment on the right hand side of the turret. It
literally just split open in front of my eyes.

I had read
about something similar happening to someone else, but they put it down to
stress on the joints. I can 99.9% tell you though, the Bandai plastic just doesn’t
like white spirit - so be very careful!

....Back to water based washes for the next build I
would think.
It is
really the oddest thing ever. I have never seen anything like it before. I tried to find as many of the shattered
parts as I could and rebuild it with super glue and plastic filler. It wasn’t
perfect, but the joins will be hidden and it will be very hard to detect useless
you were looking for the faults. I’m putting it down to a lesson learned. As long as you avoid white spirit you have no problems with Bandai plastic - a lesson learned..now back on track....
Superficial
chipping and scratches were added using a small piece of sponge with some white
enamel paint. Most of the paint is removed from the sponge before it is applied
to the model. I kept the chipping to a
minimum because I didn’t want to over weather the model.

No painting
awards here. Just a farewell to my little mate who will never be seen again… in
the cabin he went.
I think
there is potential here to add a few small LED’s in the cabin. That would be a
good way to at least be able to sneak a peek inside through the vision ports
and the entry hatch.
Using a
product from TRUE EARTH – Neutral Aging, I carefully added to the darker tones
in the paint. Again this effect is very
subtle but is set in place to help sell the look of an aged Imperial Walker. I have found this product can really get away
from you if you are not careful. It needs very light layers, built up very
gradually.

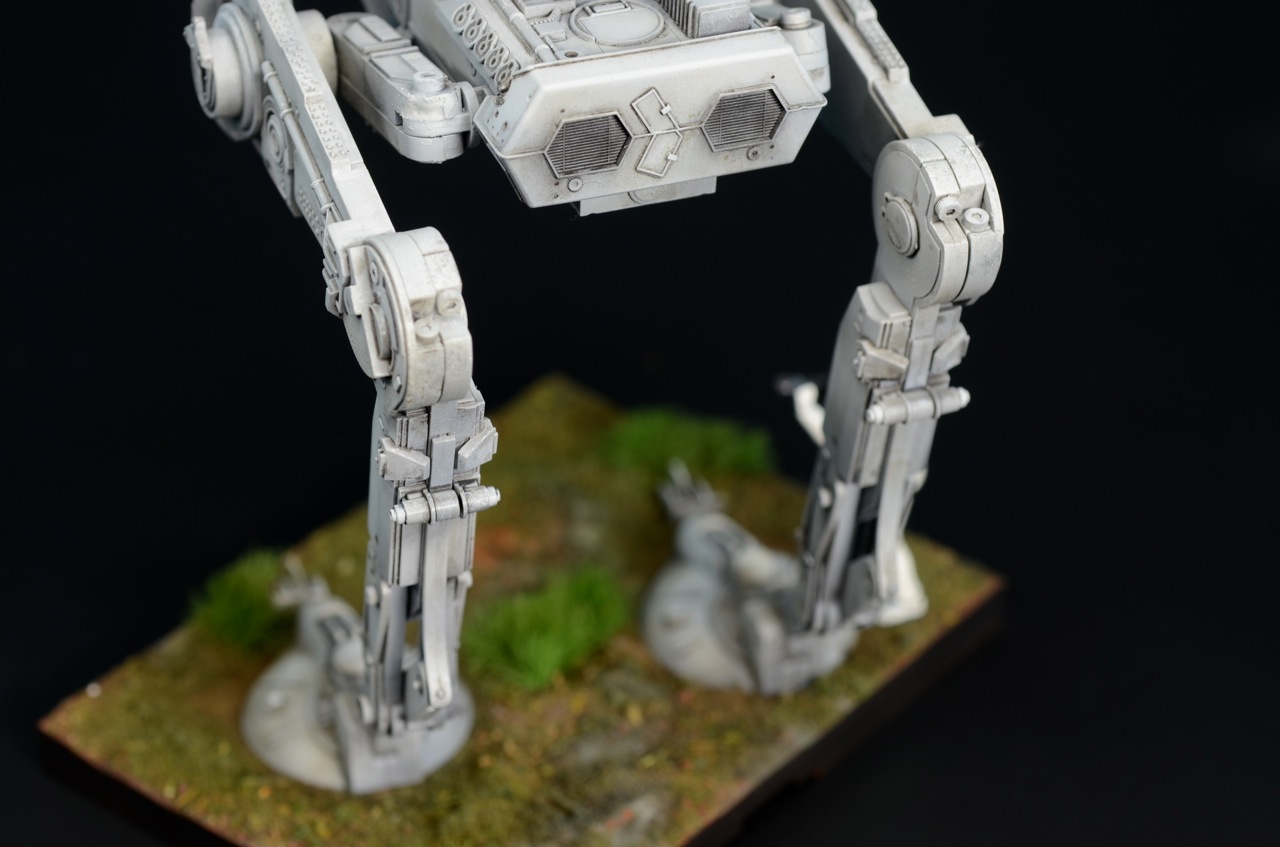
The base
was then covered in a PVA glue and sprinkled with vegetation. I used a ready-made
mix – ‘Nature in a Pot’. The landscape then received a paint treatment helping
to add to the texture, tones and natural look.
A deep brown oil wash and some scattered
pigment and grass tufts would later finish the base.


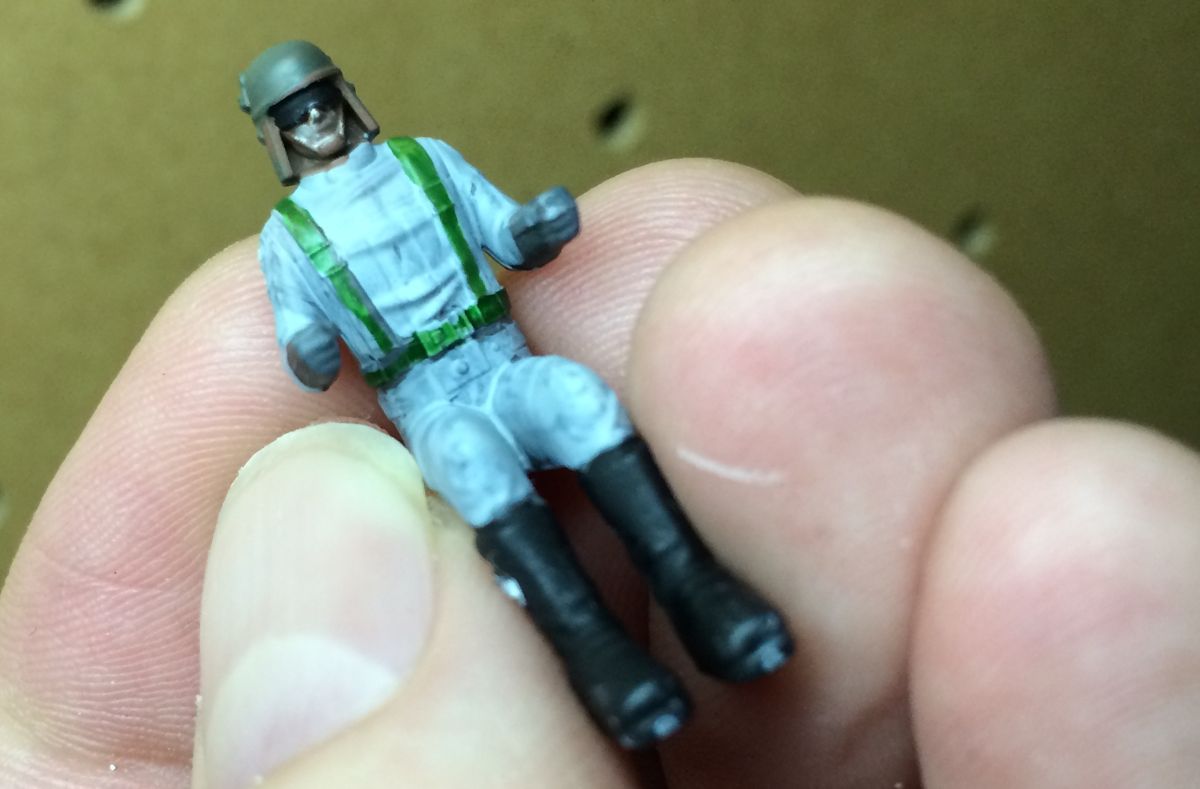
As luck
would have it, I stumbled on some little figures from a Star Wars role playing
game that were actually 1/48 scale. A
perfect match for the walker! The come pre-painted, but I decided to repaint
it. This picture shows the figure before I repainted it. I actually liked the
idea of the blue patches on the figure and would use a more basic version of
that on my figure. I thought that would
be a good idea to help distance the model from the AT-ST seen on Endor.

The figure
was primed with Alclad white micro filler and was hand painted with Vallejo
acrylics. The figure was made from a
soft, flexible plastic, so I was conscious to not hit it too hard with washes
and solvents.
As a final
step, Earthy toned pigments were lightly dusted around the feet of the walker
and on the landscaped base.
CONCLUSION.
I had been
on the look out of the old MPC kit of this subject. I used to own it as a kid
and I have been wanting to revisit it as an adult. Thank goodness my search had gone unrewarded
because this kit leaves the old MPC kit for dead.
Bandai have
managed to find the perfect middle ground with this kit. It will appeal to a
first time builder, right up to the seasoned modeler.
If is
uncomplicated but detailed. Parts fit. Parts fit so well that in fact, I didn’t
need one drop of glue on this model (except to repair the damaged joints and
cracks from the solvent). It really is amazing.
A walk around to see some of the details of the completed kit


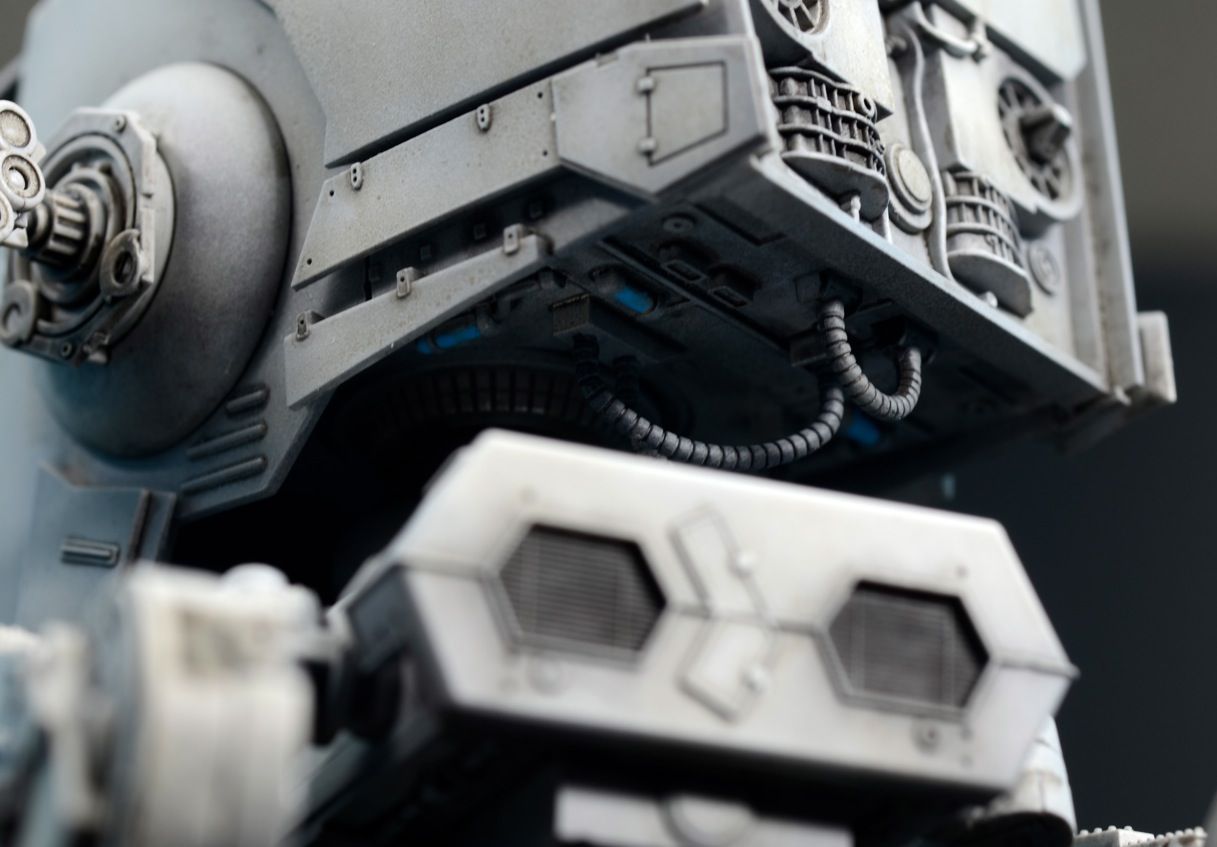


Bandai have
resisted the urge to up their part count on this kit and have done all the work
for you. Sure, you could pick on some of
the join lines where parts fit together and you could get at them with filler.
You could super detail the interior or add your own plumbing, but why bother.
It has all been done so well and so simply as it is. It would be a shame to over-complicate this build and it should be enjoyed for what it is.
With the base and the stormtrooper figure also in 48th scale included "Walkiiees"


I really
hope that the issue with the plastic and the white spirit isn’t an ongoing
issue for these kits. I suspect that an agent in the plastic to keep it soft in
order for the snap assembly to be effective is the issue. It is a problem and
it will catch out a lot of people.
To be forewarned
is to be forearmed, so make sure you use water based washes and I believe this
issue will be avoided.
And here it is all together


Unfortunately
for me, building this kit is going to cost me a lot of money... What I mean by
that is that I am now going to have to buy all of the other Star Wars kits Bandai
are planning to bring out. A snow speeder, a Y-Wing, Star Destroyer and even potentially
an AT-AT!

I better
start clearing the bench, because Bandai have just found themselves a groupie.
Clayton Ockerby
Thanks to HobbyLink Japan who
sent us this kit to review and make. This kit is now in stock.

See more of Clayton’s modelling on his website www.theworkbench.com.au or
his Facebook page
