

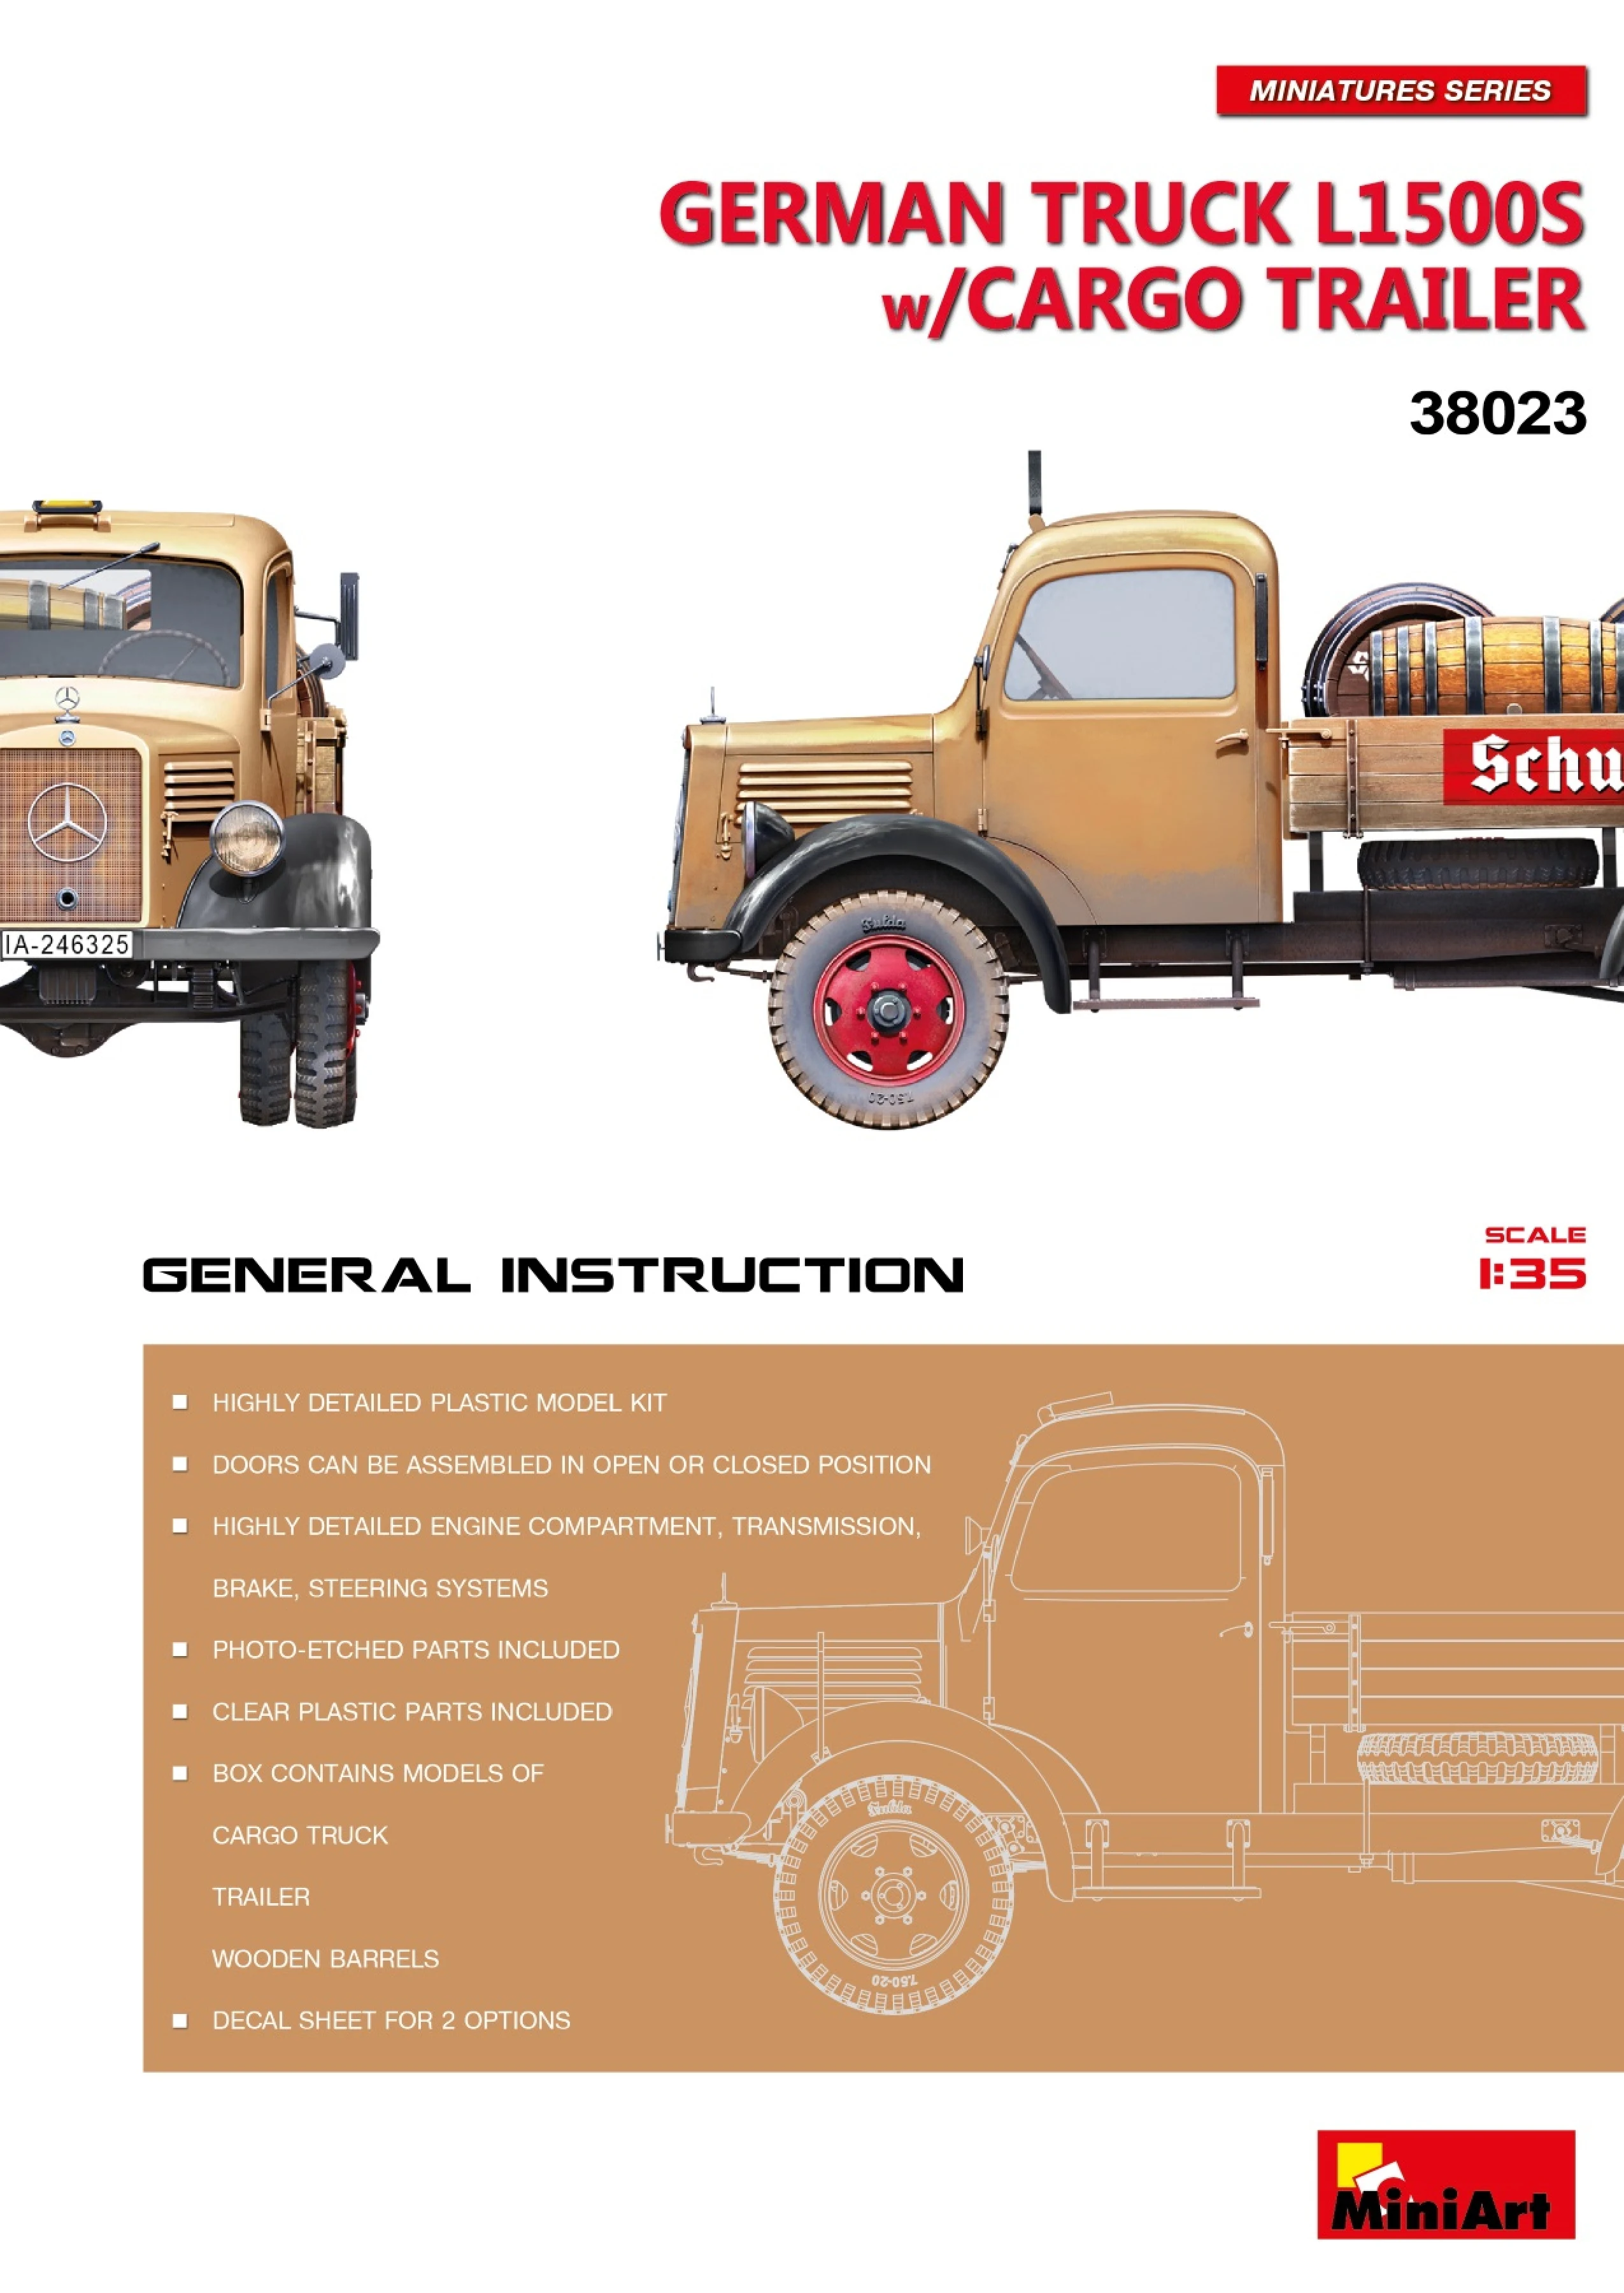
Andy King is halfway through his build of MiniArt Models 1/35th scale German Truck L1500s w/Cargo Trailer. He has put the kit together in the first part of his review before he paints & weathers it in the second instalment. See how it goes together in Pt I of his story.
 Paint & weathering guide Pt.II: German Truck L1500s w/Cargo Trailer.
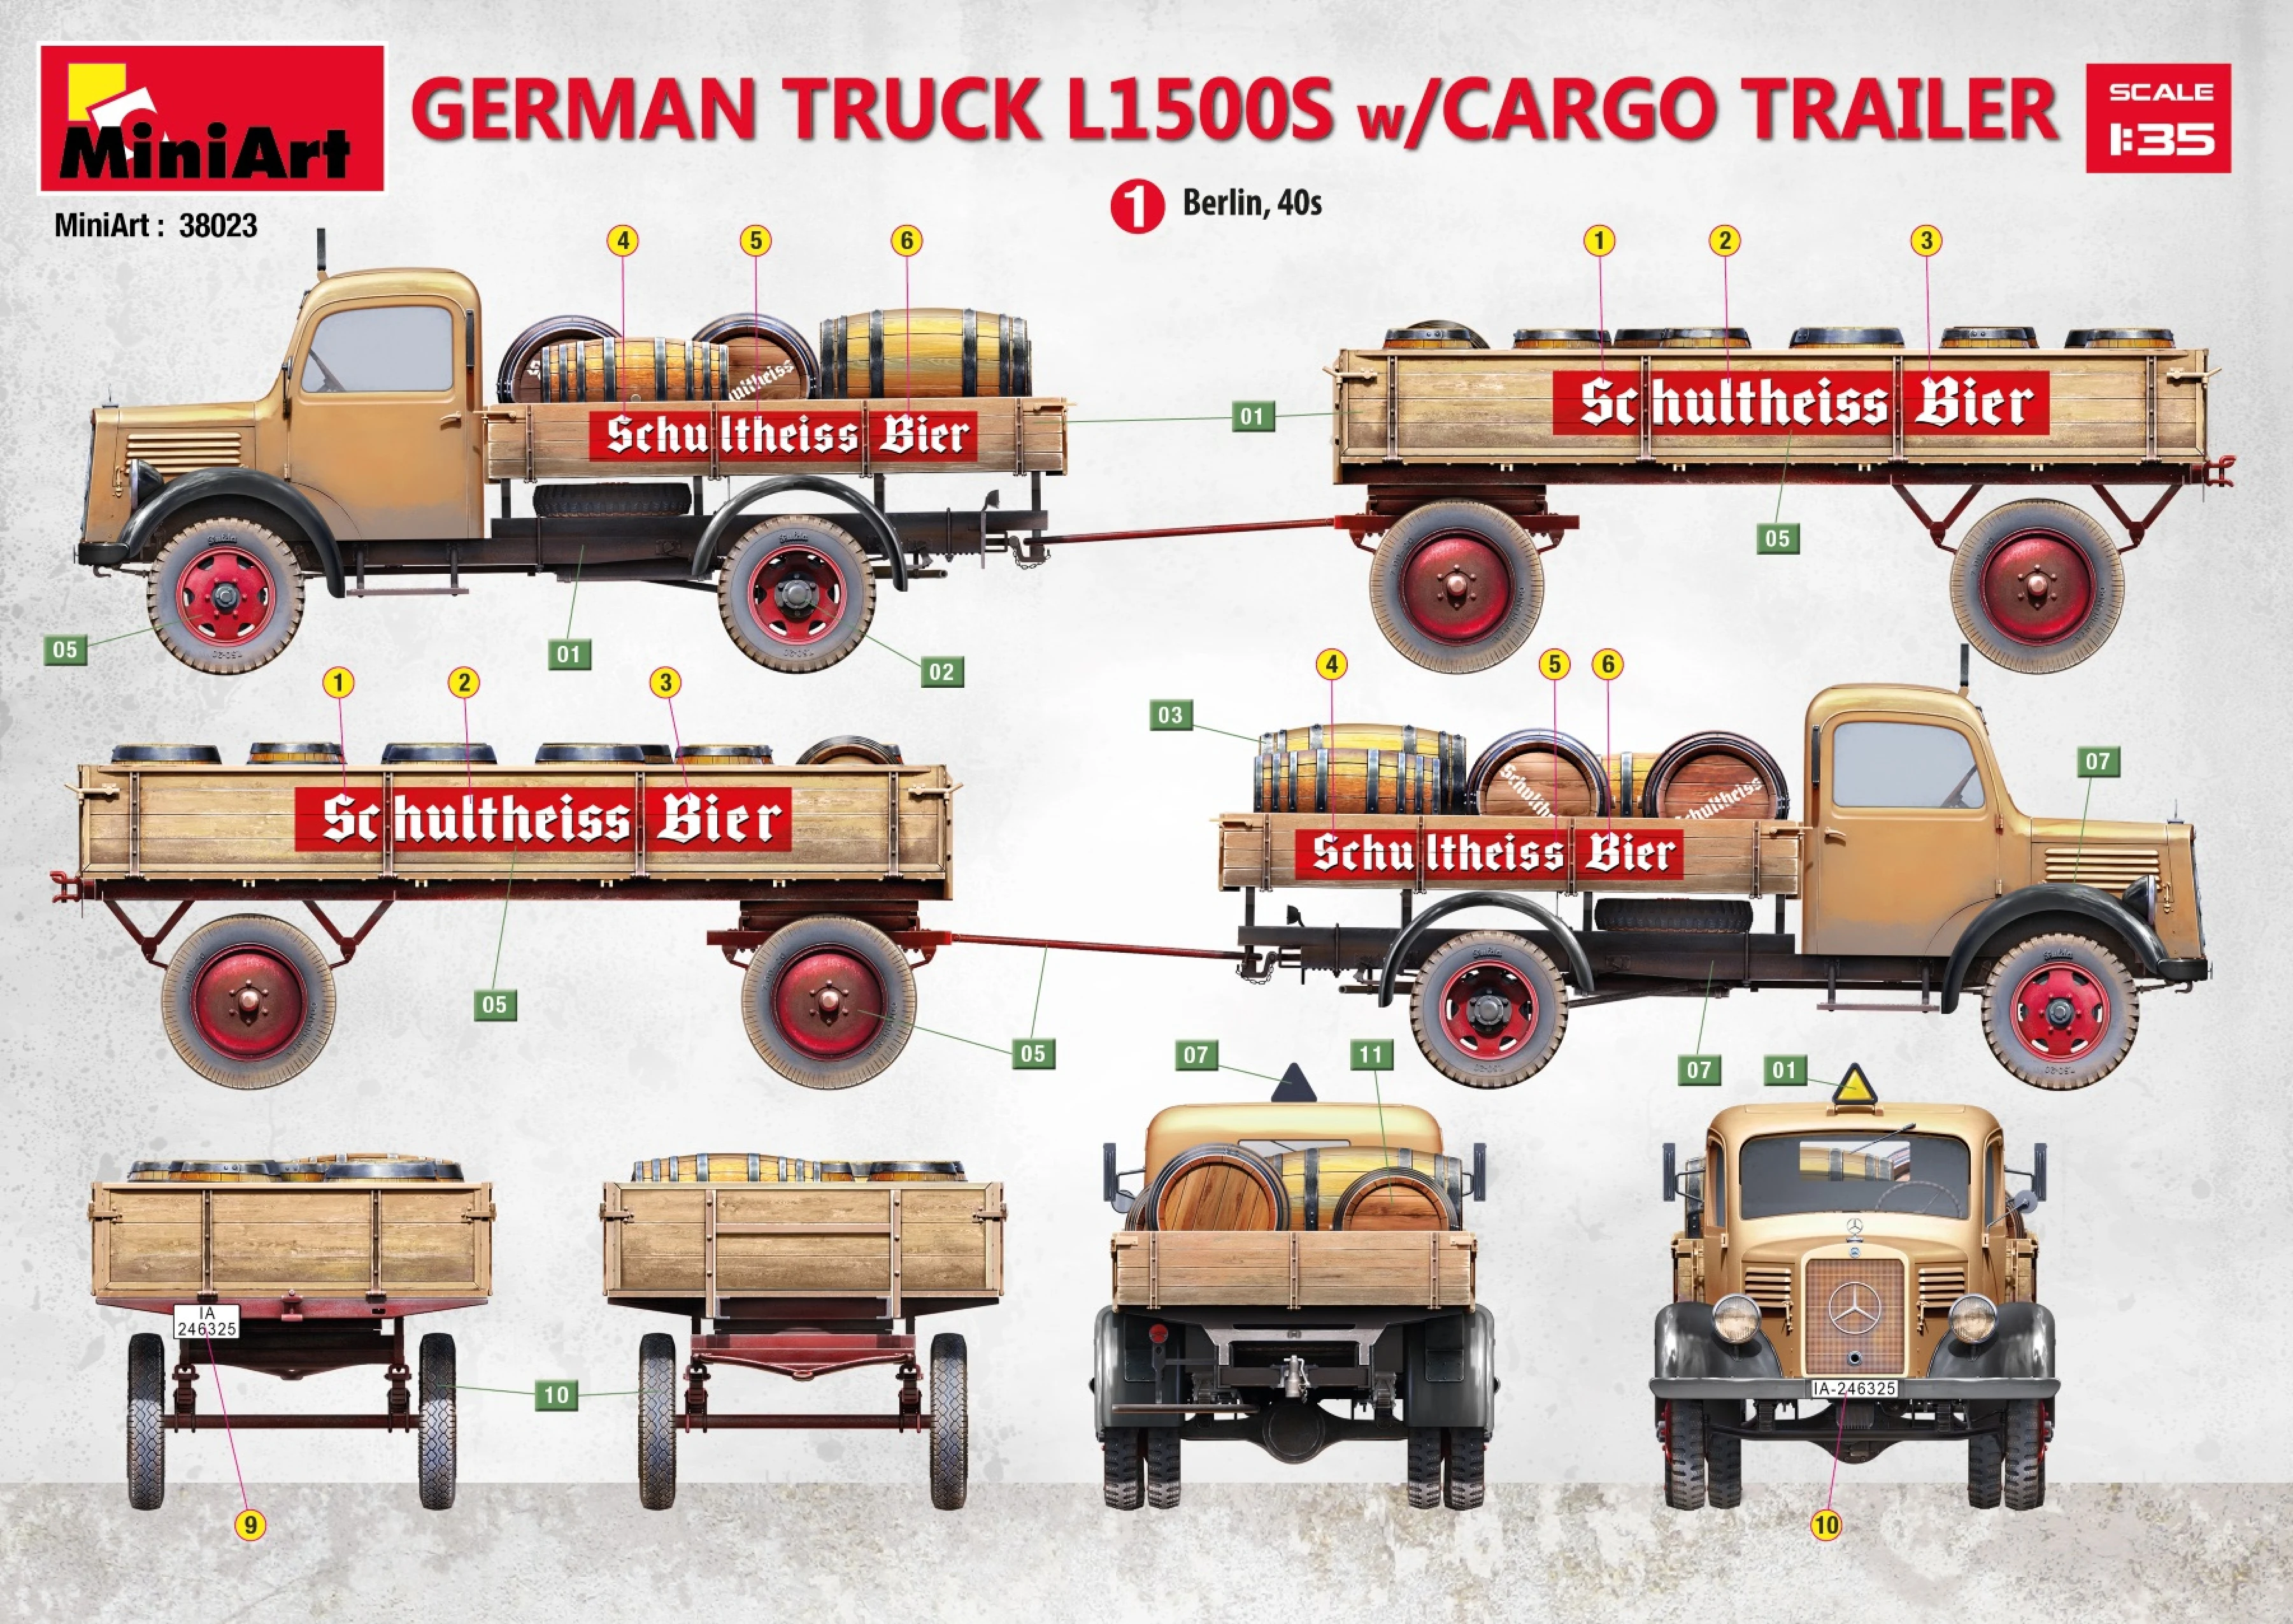
from MiniArt
Kit No #38023

from MiniArt
Kit No #38023
1/35th scale
Kit Features:
Doors can be assembled in open or closed position
Highly detailed engine compartment, transmission, brake, steering systems
Photo-etched parts included
Clear plastic parts included
Box contains models of: cargo truck, trailer, wooden barrels
Decal sheet for 2 options
Product Link on the MiniArt Website


 I like to offset the front wheels on my models and luckily it is easier to do on this kit than the tow truck I built previously, the only thing to watch here is that the front axle is very delicate so great care is needed when handling the assembly.


In a previous article I said that I got two Miniart kits direct from the factory in Ukraine before the war broke out between that country and Russia. One was the tow truck AA type, the other was this.

The box is well stuffed with parts due to the addition of the trailer and barrels and usually at this point I would look at the sprues and post photos of them, however it's a Miniart kit so there is no need as their moulding and detail quality is very good. Having said that there is a little bit of flash here and there, particularly on some parts such as this piece from the trailer.

You can see it on the inner edge of the reinforcing strap. Also, bear in mind that the plastic Miniart use is on the soft side and while it makes parts easier to cut off the sprues, it can be pretty delicate and easily damaged too. So with that public safety warning, it was time to make a start and the first thing to construct is the engine along with the chassis.

As you would expect from Miniart, the engine is quite well detailed as supplied in the kit and all that is missing are the plug leads, fuel lines, etc. Should you wish to have the bonnet (hood) displayed open. I keep threatening to super detail this area on one of these kits but not this time around as I was going to glue the bonnet shut due to time constraints. The engine itself went together well with no issues so I got on with the chassis.

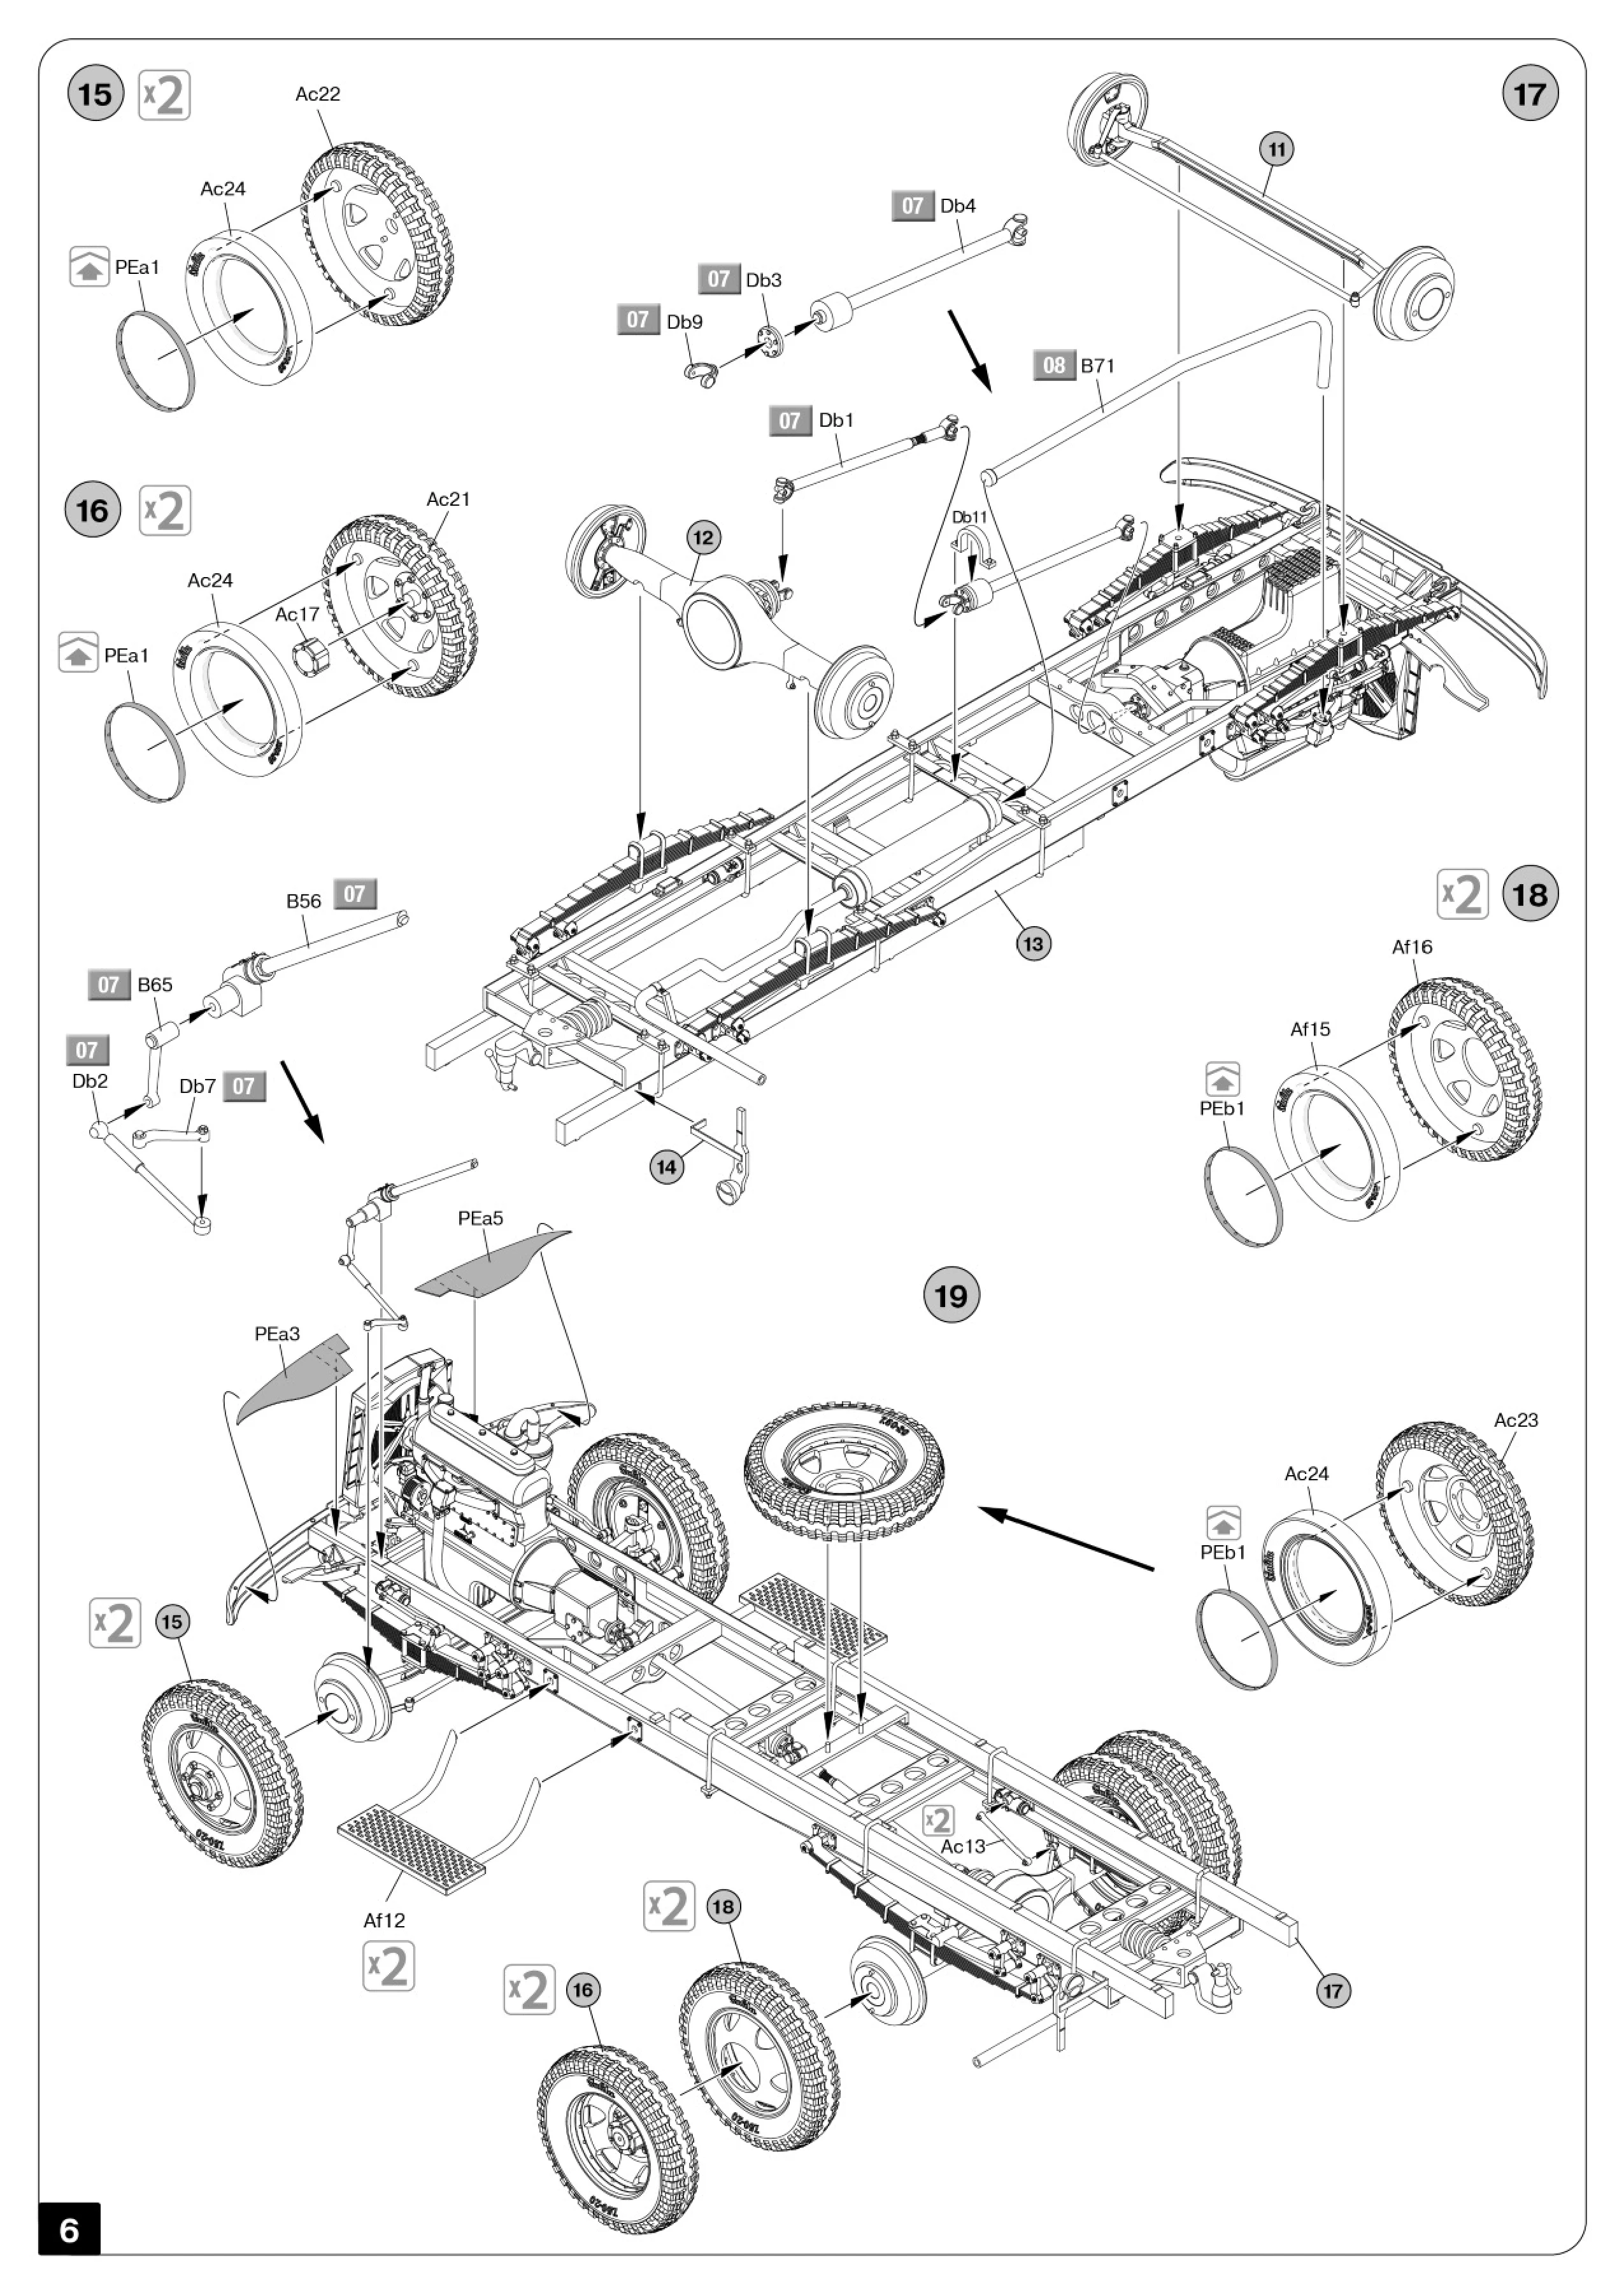
Like most other Miniart kits, the chassis is a multi-part assembly, so care is needed to make sure it is square and flat. To start the chassis construction parts B50, B81, B84 and B85 were glued together as shown in step 6 and this was quite tricky to get together due to the tiny mating surfaces.

I have to point out that as well as using liquid cement for joints I back it up with superglue as the tiny mating surfaces on this kit need all the help they can get strength-wise plus it speeds up assembly. With the afore mentioned assembly built, the rest of the chassis cross-members were glued to one side.

After letting them set for a few minutes, the other chassis rail was glued into place, again applying superglue to every joint and making sure the chassis was flat and square. The end of the exhaust pipe was drilled out before it was glued into place and the towing hitch was also stuck onto the chassis, however do NOT glue part B59 at this stage as you won't be able to put the towing hitch of the trailer onto it. Ask me how I know....
With the basic chassis built, your model should look like this.

The next job is to assemble the springs, axles and steering and this part is very fiddly due to the very small contact points for the springs so again superglue is necessary to give them some support.


One problem when fitting the engine is that Miniart didn't include any rear engine mountings, just the two very tiny front ones. This basically means that the engine is hanging in mid-air and virtually impossible to fix into place.

To help I made mounts from plastic strip using the instructions from an ICM L1500S as a guide.

To help fit the propeller shaft, I cut the end off it and drilled it out, then glued a length of plastic rod into the hole. A hole was then drilled into the end of the transmission as by doing this it didn't matter if the shaft was too short or too long and gave me some wiggle room when fixing the shaft into place.
With the axles and prop shafts in place plus the wheels glued together the chassis was finished and put to one side.

At this point the wheels are held in place with Blu-Tack and although I had fitted the rear light bracket as per step 14 it's not really worth doing until the model is up to the painting stage as I kept knocking the damn thing off.
The cab assembly was next and you need to decide whether to include the detail on the firewall as you can leave it all off if you are keeping the bonnet sides closed. For the sake of this article, I included it just to show you how it looks.

The cab interior detail is nicely done but very fiddly due to the etched parts.

The door cards and furniture was assembled. Everything inside will need to be made up, as it is to be painted before the cab goes into place.

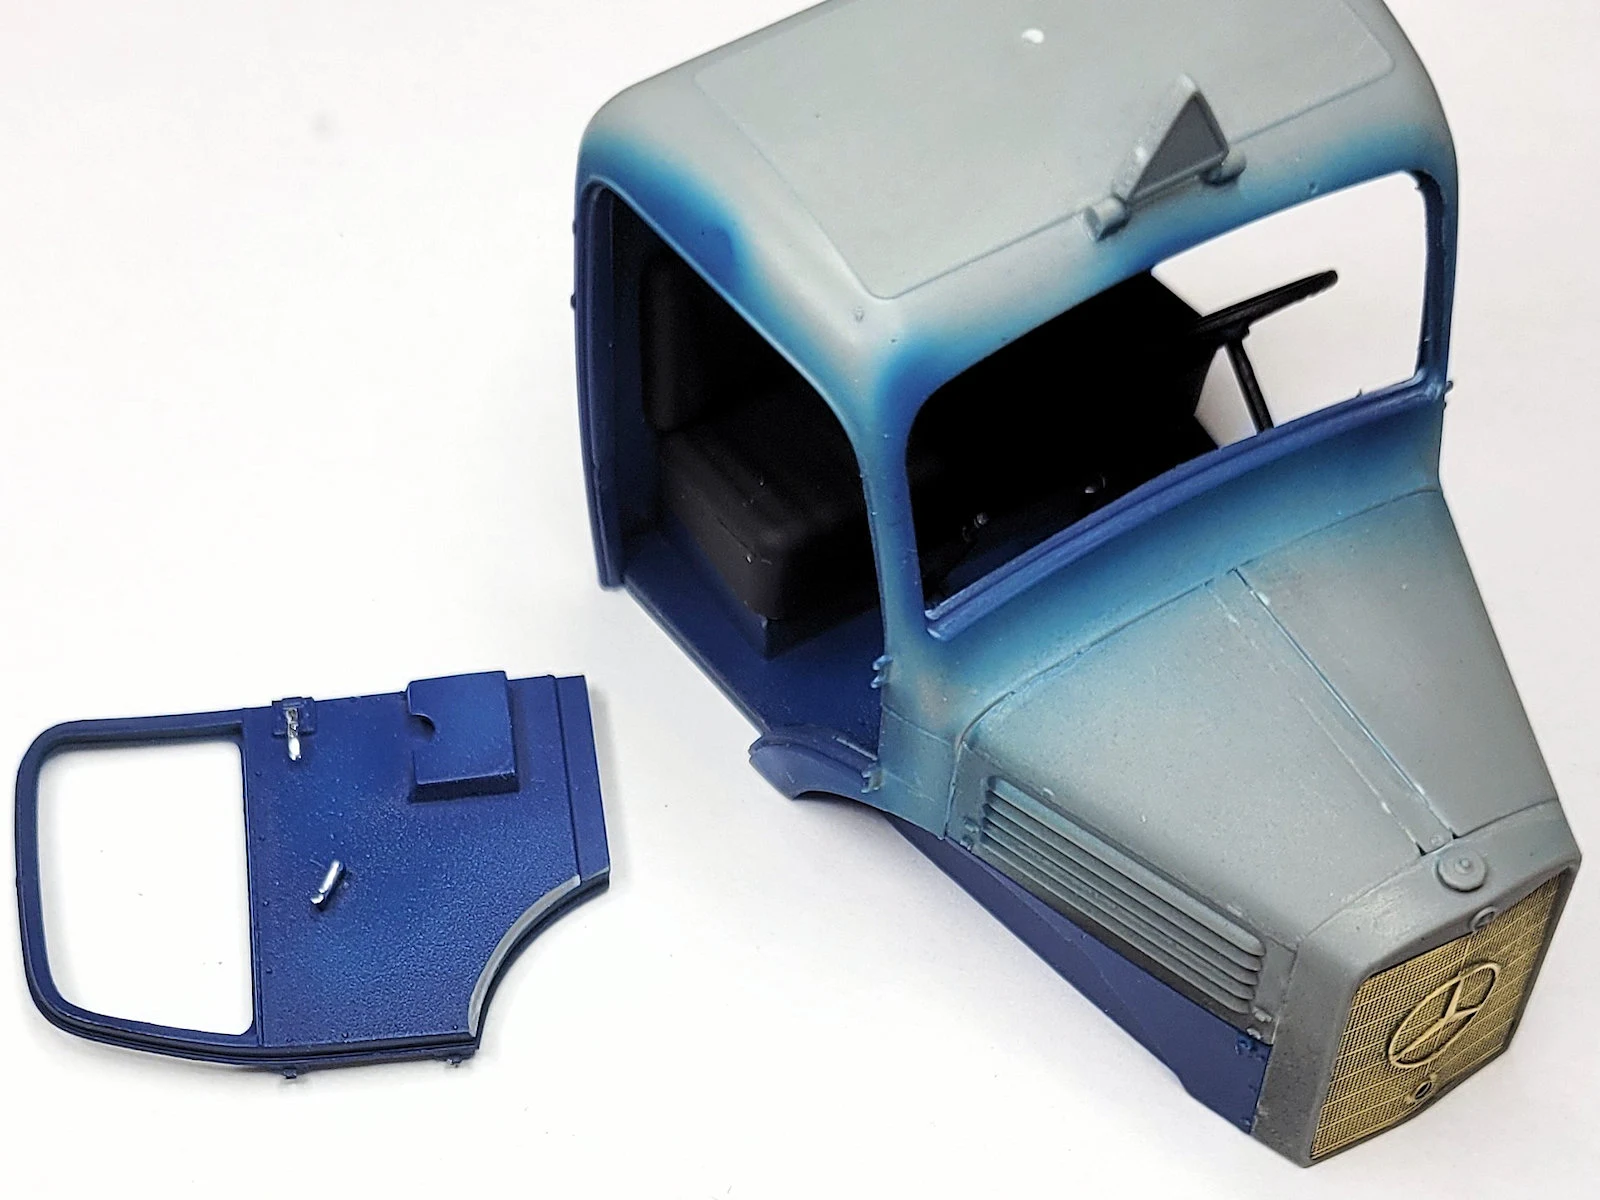
The way the cab is moulded as one piece dictates that it needs painting before gluing it to the floor so you really need to pick your colour scheme at this point. I didn't go berserk with painting and weathering either, as I was keeping the cab doors shut, I also deviated from the instructions at this point and glued the bonnet sides, top and radiator to the cab.

When the interior had been painted, the cab was glued to the floor, and the doors added after they were assembled but leaving the windows out. Fixing the doors into place proved problematic, as there were huge gaps all around them.

I figured that the cab floor was the suspect, so after carefully prising the back of the cab from the floor, I sanded the rear edge of the floor until the doors fitted properly. I also trimmed the inner edge of the curved bit of the doors as they were being fouled by the cab floor.

One thing of note is that Miniart provide two types of radiator front, one moulded solid and the other hollow for an etched piece to fit in.

The etched piece fits quite nicely, but it does need gentle bending to conform to the shape of the radiator. For obvious reasons, I left the tiny Mercedes logo off the top of the radiator until the model is finished.
The front fenders presented a couple of problems, the first being the headlights as again the locating pins are virtually non-existent so these were drilled, pinned with wire then superglued into place.

The other problem was to do with the colour scheme as the fenders were going to be red, so they needed to be left separate, which is going to make fitting them at the end interesting to say the least. Anyway, I'll worry about that when the time comes.

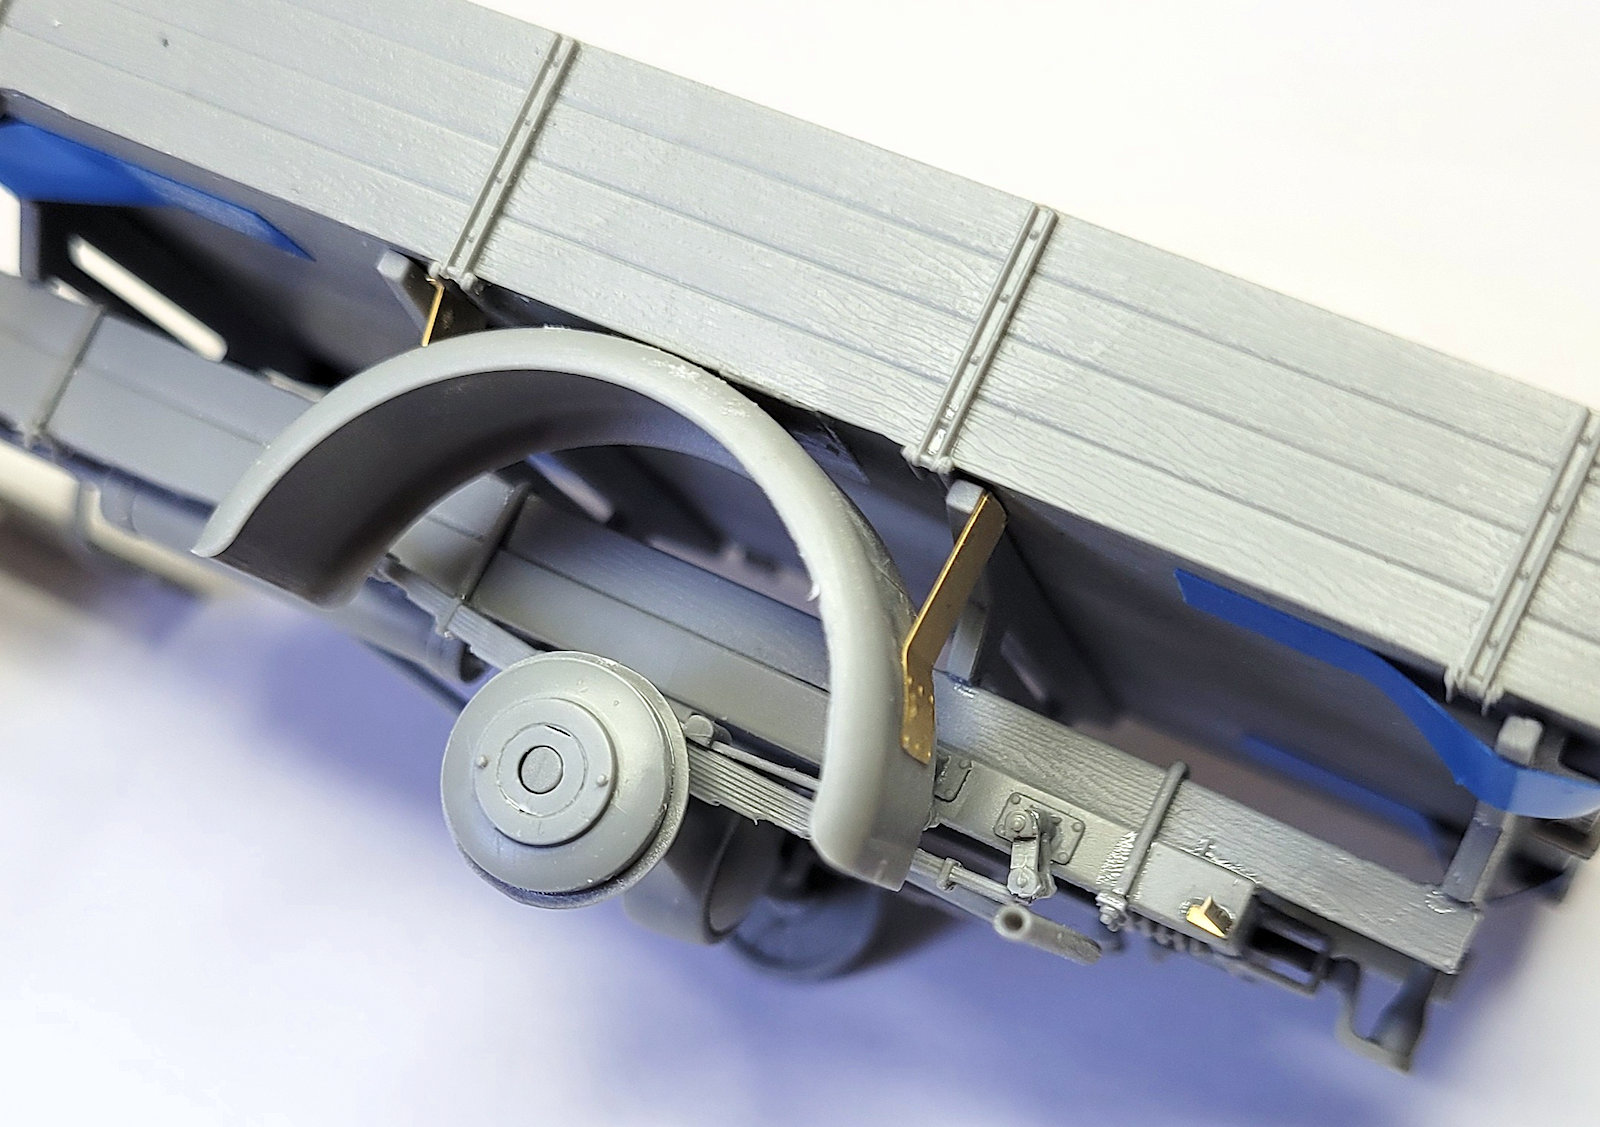
The next bit for the build involves the cargo bed, and this required some planning as the colour of it is different to the chassis. The cargo bed was pretty straight forward to put together however I had to cut the locating lugs off parts Af6 as they were too big for the holes in the etched parts PeB1 and PeB2, these being replaced with bits of heat-stretched sprue cut to length..
The two cargo bed supports (parts Af11) were glued to the chassis and as I found out the hard way, they need to be fitted a specific way otherwise the cargo bed sits too close to the cab. If you look closely at the chassis rails, there are faint marks on them where the cargo bed supports are located, so with the front of the chassis to the left of you, the supports should be glued just to the right of these faint marks. It sounds confusing, but does make sense when looking at the model.

The tricky bit now is to fix the other two supports (parts AF 10) as the instructions show to glue them to the cargo bed. Of course you can't do that as it makes painting that much more difficult, so my solution was to glue the supports to the chassis and before the glue had set, position the cargo bed onto the locating pins of the supports. Another way would be to tape the supports to the cargo bed then glue them to the chassis and leave the assembly to set.

The next 'fun' job was to do with the rear fenders as again they are a different colour to the cargo bed and need to be kept separate for painting purposes. The problem here is that there are two shallow holes for the locating pins on the fenders and that's it...nothing else! I tried for a few hours to hold the fenders in place and glue the etched parts (PeB 5 and PeB 6) to them but with not having a second set of hands it was impossible so I left it before the model went out of the window.

Having had a think about it, my solution was to temporarily tape the cargo bed to the chassis, put thin strips of double-sided tape either side of the locating holes underneath the cargo bed then fit the fenders, hoping they would stay in place long enough for me to superglue the etched parts to them. Luckily, the tape held on and I was able to get the etch positioned correctly.

Finally, the etched parts are fitted to the rear fenders. Note that the rear light had been knocked off for the umpteenth time.
The final phase of construction involved the trailer and again the chassis is made up of separate parts.

The rear axle supports just needed the four locating holes drilling out to help with the fit. The front axle assembly was a different story as one of the main parts was damaged.

I also had to remove some material from the inside rim of part B8 as part B7 just wouldn't fit in properly.

The wheels are a five part assembly each and were difficult to put together as it felt as though something was preventing them from sitting properly. Although each part has locating pegs, it may be worth cutting them all off, as from what I can tell it doesn't make any difference if they are there or not.

There are a couple of raised mould-pin marks on some of the parts which I removed, I even trimmed the inner rim of part Ad 2 but the wheels still wouldn't go together. In the end, I flooded them with liquid glue, put clothes pegs on to clamp them together and left them to set and hopefully they will stay together and not spring apart.

The instructions would have you glue the towing hitch (part B13) in place, but I thought “I can do better than that and have a working one”.

So I drilled out the two brackets where the hitch locates and the ends of the hitch itself, then carefully superglued 3mm long lengths of wire into the holes to anchor it.

All the barrels were glued together and at the time of writing they just need cleaning up. Finally, I usually like to assemble the model temporarily for the 'end-of-build' photos, unfortunately due to the way the wheels attach to the axles it wasn't possible so you'll have to put up with these images instead.

Although the model wasn't as involved as the tow truck AA type I built earlier, it still had a couple of areas that caught me out, as described in the text. The fine detail is really good, but that can be problematic too with things like the suspension and front axle due to the delicacy of the parts. This however, this doesn't detract from what is an excellent model as all kits have issues somewhere, it's just a matter of working out the best approach and dealing with the problem rather than spending the time moaning that a kit is unbuildable.
I have to say I do like Miniart kits and find it highly commendable that even in a time of conflict; they are still able to manufacture stuff.

The model will be cleaned up and prepared for painting next, so keep a lookout for part 2 of this build review at this link.
Andy King.
Thanks to MiniArt for sending this kit to Andy to make and review for you. See more about all of MiniArt's kits on their website...

Addendum: Kit Instructions


