
 The people at L.Z. Models bring us something new this month
– a conversion for the Dragon or Tamiya kit of the Hetzer 38(t) tank in 1/35.
This little tank was converted to a battlefield recovery vehicle and L.Z has
sent us a conversion for the late model kit – let’s have a look at it...
The people at L.Z. Models bring us something new this month
– a conversion for the Dragon or Tamiya kit of the Hetzer 38(t) tank in 1/35.
This little tank was converted to a battlefield recovery vehicle and L.Z has
sent us a conversion for the late model kit – let’s have a look at it...

Review - L.Z.Models
1/35 German Bergepanzer 38(t) Hetzer – Late version
Kit No: 35402
Kit type: Multimedia
- 130 resin parts, 300+ PE parts +
fine chain, copper rope, plastic parts, wires and balsa wood stick
Scale: 1/35
Assembly instructions on CD download here: click!
Available from: L.Z. Models

The Bergepanzerwagen 38(t) / Bergepanzer 38(t) was a recovery
vehicle based on Hetzer light tank, it had an open-top superstructure and only
often an MG42 for offensive/protective weaponry. Made by the BMM company in
Prague, the plans for this version of the Hetzer were approved in September
1944 and called for production of 170 vehicles before the end of 1944 of this
number just 101 vehicles were built. To meet the production plans it was
decided to convert 64 summer production´s Hetzer into armoured recovery
vehicles, but it is unknown how many were actually converted. Production was
much slower than expected and only 180 vehicles were produced before the end of
the war. Enough of all this history though - I am living in the past!

There have been two Hetzer Bergepanzer 38 (t) kits released
by L.Z.Models – the 35401: German Bergepanzer 38 (t) Hetzer – EARLY and the 35402: German Bergepanzer 38 (t)
Hetzer – LATE this is the vehicle we will be looking at – the late version
of the conversion.
The early version from L.Z.Models

These are meant to fit into the Tamiya or dragon kits - though
they could fit onto the trumpeter, Eduard or even the cheaper Czech version of
the Hetzer than can be found by a company called Bilek - this in turn being a
re-boxing of the Italeri kit. Anyway it’s meant to fit any of the Hetzers in
the market right now - it will make an interesting little dynamo of a repair
vehicle with all of the detail included in the box – let’s have a look at the
kit.
The sum of MANY parts

This Multimedia kit
features 130 resin parts, 300+ PE parts + some fine chain, plus copper rope,
plastic parts, wires and balsa wood stick and comes in a small white sturdy box
– mine arrived pretty quickly from L.Z. and there was a bunch of bubble wrap to
keep it all safe inside – I decided the best way for you to get to know what’s
in the box is a picture gallery and a bunch of comments to match it – I shall
be attempting to do a build of this in the new year so stay tuned to see how it
all fits together – I have however done a preliminary fit of some of the larger
equipment from this kit and the larger parts of the hull to give you an idea of
the kit.


The good thing is that instead of paper instructions you get
a lovely little CD rom inside the box which is just a wealth of information –
the PDF is available here from
the LZ site - so you can have a look for yourself before you purchase if you
like! LZ Models also show you a link to a built example on the Military
modelling site as well.


The cream resin on these parts is cast with just a little
clean up needed and no bubbles in the resin. The parts are there to be kit
bashed with a Tamiya kit preferably and as a second choice the Dragon kit.
Libor takes you step by step in the processes in these instructions from the
hull to the tools for repair, always pointing out helpful ideas and tricks he
uses – it is appreciated to have some help with this kit I can tell you – and a
nice personal touch to the kit making process.
the overhead crane is super detailed and works just fine


This i hope shows you the fine detail LZ achieved with this kit


Parts like the drive shaft which is exposed inside the hull are quite accurate in shape as to the pictures I have found of the insides of a Hetzer - and the from Photo etch beautifully compliment the resin inside. You have to have some skill soldering but not as an expert. The whole drive shaft fits neatly into the front of the hull here and has many P/E details around and as part of it.


The pedals and steering mechanism re all photo etch and look
amazing even unpainted and weathered (you see people often covering up detail
with depth and mud) while the ample wire supplied fills out the detail of the electric
cables inside the vehicle, while making the interior look suitably busy ( and
also they are accurate if you follow the instructions)
Again showing the kit
primed in the instructions


The other crew controls and seats are moulded in cream resin
and use some metal wire to support them, as does the internal winch which is a “cinch”
to put together, and looks impressive with the cable running through it.


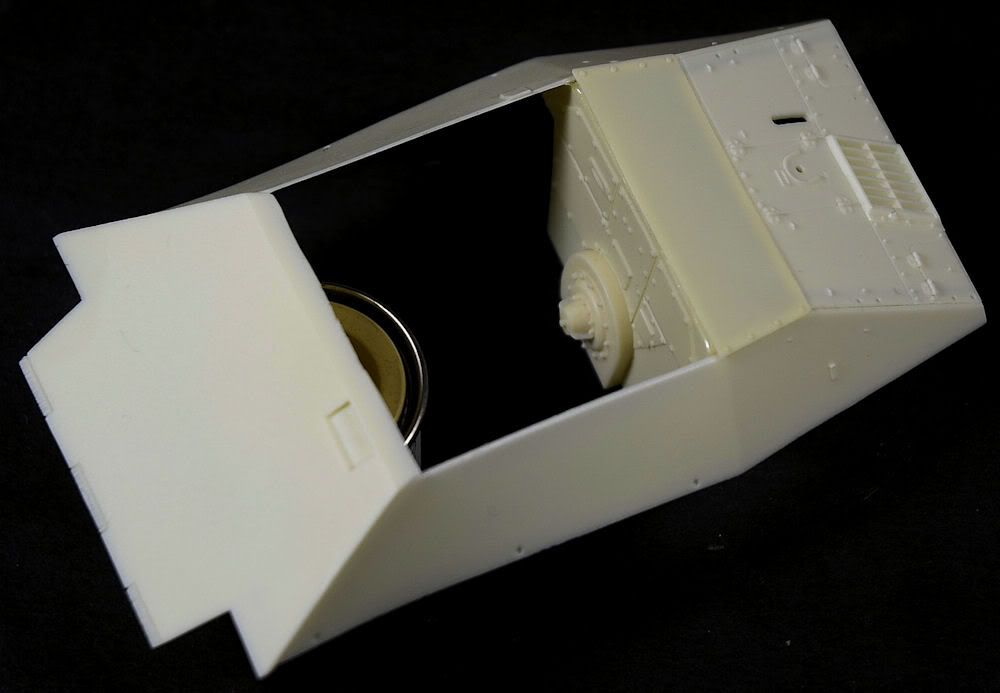
Instead of just looking at them I put the hull walls
together to show you how they fit and experience for myself the way they all
merge – the instructions helped me out a lot here are well and with some
superglue and accelerant they came together nicely. There is a school of
thought to put the sloped and angled parts together one by one piece by piece –
and I think that I would do that next time to ensure the best of fits to the
bottom donor hull. Apparently the Tamiya kit fits slightly better so that is
why earlier I mentioned the Tamiya kit first – it’s probably cheaper as well!


This the later kit gives you an excellent ‘dozer and
earthmover attachment for the front of your Hetzer – it is a simple
installation as you can see in the pictures and I was pleasantly surprised at
the look of it – for this I like this better than the earlier version also on
sale – but different strokes for different folks I say – I am sure the crane
would look just as well – I would by some extra chain for it to reach a faraway
object though as I have 22cms of it and more is always better! The good thing
is LZ give you instructions for both for you to work out which suits you
better.


Colours mentioned are quoted from Osprey´s
New Vanguard 36 -
“the early Bergepanzer was painted with thin coat of Rot -
RAL 8012 (red primer) with stripes and patches of well thinned Dunkelgelb - RAL
7820 (dark yellow) and Olivgrün - RAL 6003 (dark olive green) applied over at
least half of the primer base. The interior was painted in Elfenbein - RAL101
(ivory) on the walls, and the floor and part of the lower sides were painted in
Rot - RAL 8012 (red primer)”
-So from this I would say you have the lee-way to paint
whatever you want under these colours – an ambush scheme or a heavily oxidised
red primer Hetzer would be my choice – I think this vehicle would look best
beaten up!
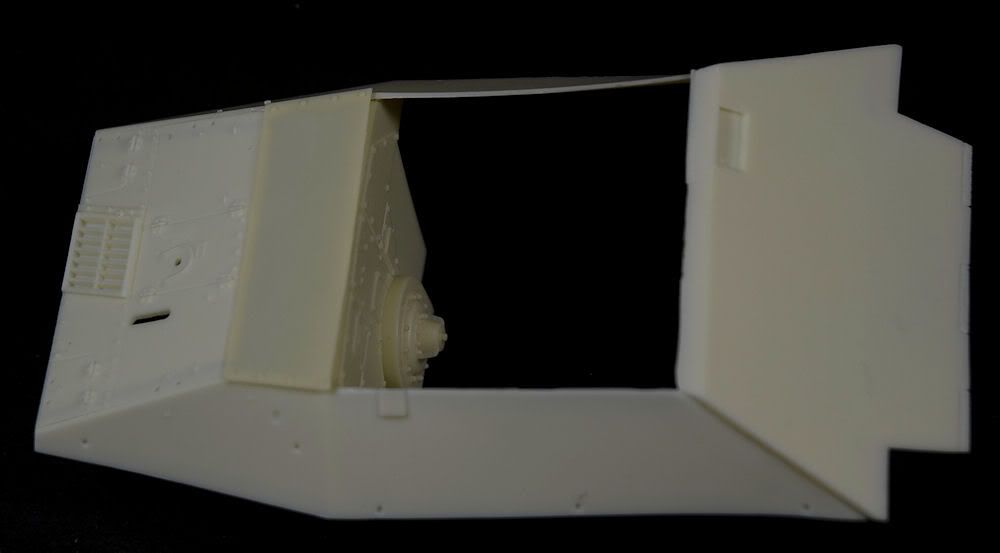
The hull secured together - this needs to be applied to a donor kit very soon
This kit is truly an amazing piece of work – I am usually a
fan of LZ’s work but this one is just great from start to finish – you have to
bring your skills with you though but if you are up for a challenge then this
is a really potentially rewarding kit you could learn a lot from if you made
it!
Adam Norenberg
– below are some pictures of the completed kit
from LZ’s site which show you how very good this kit could look if you applied
yourself – I for one am up to the challenge!


Thanks To LZ models for letting me review this kit