

Revell have sent us a kit of their
new tool 1/72 Halifax B Mk.I/II GR II and we have had a long and hard look at
it – there has been lots of comment about this kit by all and sundry over the
various forums – lets show you what we think in our review…

Review:
Revell Kit No: 04670 - 1/72 Handley Page Halifax B Mk.I/II GR II
Scale: 1/72
Material: Styrene
Sprues: 13
No. of parts: 338 (including 49 clear parts)
Decals for two Aircraft
Length 305 mm
Wingspan 417 mm
Skill Level: 5

The Halifax been kitted in 1/72 scale a few times (not half as
many times as the Lancaster) so this is a good opportunity by Revell
of Germany to try and refine and update on the previous kits from
Airfix who made a Mk. III in the early sixties with raised rivet detail - Matchbox
who came out with a Mk. I/II/GR. II sometime in the early eighties – this was conceived
as accurate but had very “soft” panel lines if any at all. The Modelcraft
version is rare as hens teeth and has too thick transparencies and dodgy decals
– Well it seems high time for a new version doesn’t it?
First the basics of the kit – The model comes in the usual side
opening blue box that Revell OF Germany (ROG) have become known for – the
thirteen sprues of light grey-green are quite conveniently packaged in an
improved manner or only one two or sometimes three sprues at the most in one
plastic bag each and they are tight so they do not bounce around much inside
the box and deface the plastic surfaces (someone is listening) - there is also
one large sprue of clear transparencies in its own bag wrapped up safe and
sound.

Again true to form is the Revell instructions which come in their
usual busy paper A4 instruction sheet which always reminds me of a comic book!
The images are always packed together and may be a little trickier for those a
little less experienced and those with reading issues. The instructions for a
regular level modeller and beyond are easy to follow and most won’t have a
problem with them. There are 99 steps on eighteen pages of paper including two
full pages of marking instructions – each with colours allocated to Revell
paints.

The options of aircraft in this kit are actually extensive – the
parts enable you to build any of the Merlin engined Halifaxes except for the
solid nosed Z "Tollerton" fairing special versions. There are also four
blade props that hint at Mk.V version Glider Tug perhaps a little later down
the line. (Indeed the glider tog apparatus is shown as step 72 in the
construction?). The wings alternate extended separate wingtips the provision
for a later Hercules powered variant. (You can see them in the last three steps
of the instructions which hints strongly that this will happen) This is pretty smart
tooling from Revell - but more on the wings later in the review.

·
Halifax Mk II of Number 405 Squadron, Royal
Canadian Air Force, Topcliffe, England, July 1942 LQ-R (W7710) Showing a Train
on the nose with additional carriages - an extra truck was added to the nose
insignia after each mission. W7710 crashed near Liehuus, Denmark, on the night
of 1st of October 1942 whilst returning from a raid on Flensburg,
Germany,

·
GR II of Number 58 Squadron, RAF, Stonoway,
Scotland, early 1945, D (JP165). This was a Coastal command aircraft that ended
the war by crashing on 9th April 1945 on Beinn Nan Leac, Isle of Harris.


The decal held to the light to see thickness and minimal carrier film

I thought I will go through each of the highlighted features of
the kit in turn and comment on what I can. Also with the help of a trusty set
of Drawings from MR A Grainger whose line drawings are said to be the best on
hand for this aircraft as well as several pictures which are nearly always the best reference i think.
- Finely structured surface details with recessed panel joints –
well this is really the strong part of this kit and the best feature – The panel
lines are all recessed but we could have done with some riveting – then again
in 1/72 I can take or leave rivets – but the panel lines must be good and Revell
have done a great job here of replicating the surface.


Some good attention was paid to the surface detail

- Mk.I/II Wings – well these are well done in the surface texture
again – they feature positionable ailerons which although are a good idea I think
that they are best positioned in the neutral position – they just don’t look
that good in this scale in the drooped position. Like I mentioned earlier on
the extended wingtips are there as an option but the nacelle pit is unsuitable
for fitting in the Hercules engine which is a rounder radial and not a thin
inline engine.

The seperate ailerons and tail surfaces are very well detailed indeed

Tails are accurate in shape and well moulded in texture especially the control surfaces


- Detailed cockpit with seats and instrument panel the insides are well detailed but not completely accurate – they are by no means at aftermarket standard but they are adequate again for the purpose – it is what Revell does very well – make the internals just good enough as they will never be seen unless through some blurry transparencies. Saving cost and build time - a good philosophy for most builders.


- Interior details and partitioned radio compartment - well the
radio operators table is pretty basic in detail and maybe a little small and we
are missing a folding seat near the navigators table but again – this won’t be
seen by anyone but yourself when you seal it all up.


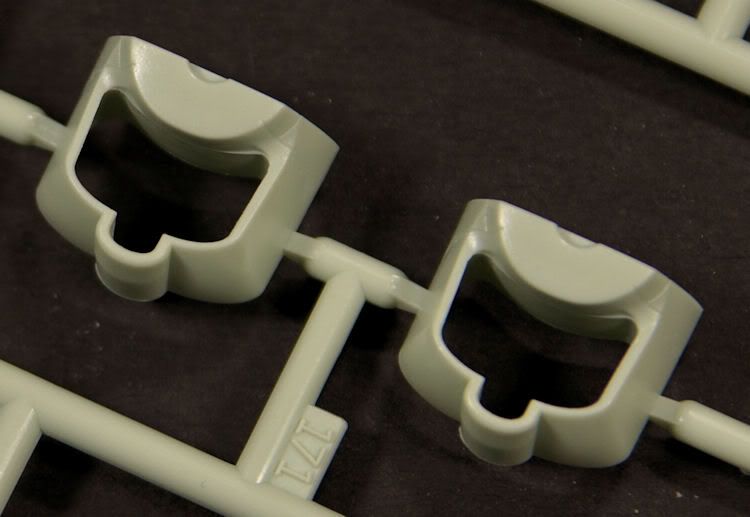
- Detailed bomb bay including pylons – well again this isn’t to an
Eduard “Big Ed” standard – but it does look good with the lattice work framing –
you will have to fill in the ejection marks inside the squares with sanding and
maybe some “hot” glue to soften up the tell-tale circles. There are bomb doors
in the undersides of the wings but there is no internal detail for these so if
you must show them open it is time to get out the old scratch building skills.


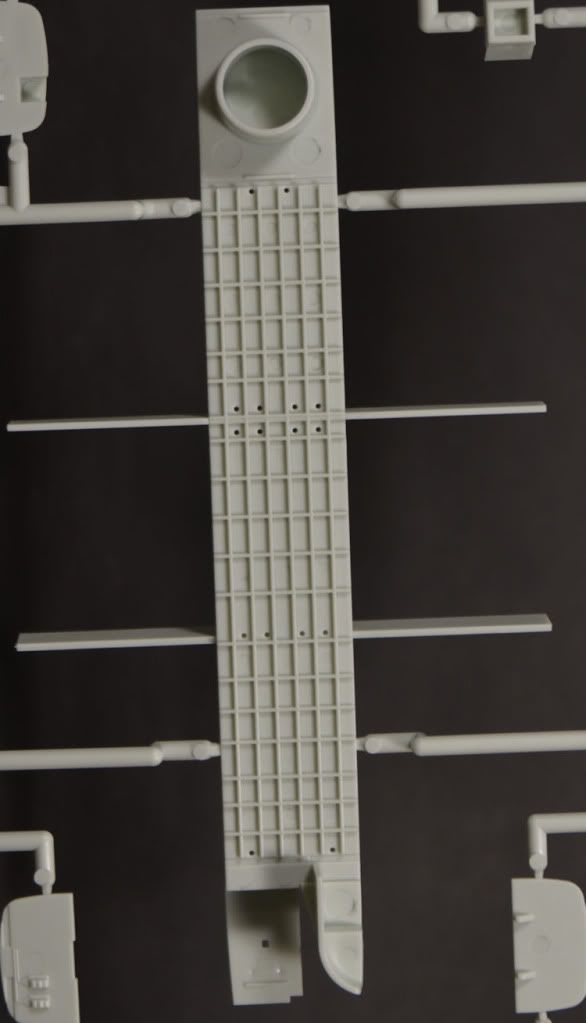

Closed bombay doors

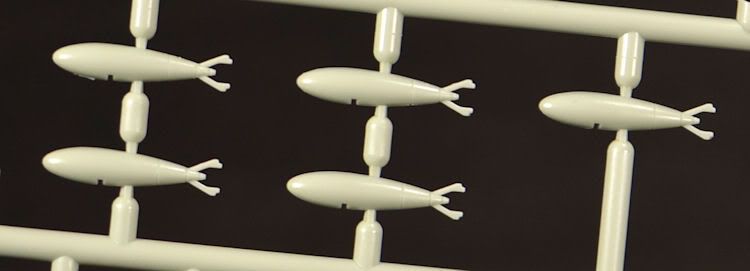
- 6 Bombs are well shaped for the bomb bay – maybe a variety of
different bombs or anti shipping stuff would be a good addition but at least it
comes with bombs – the way the model making business is going!!

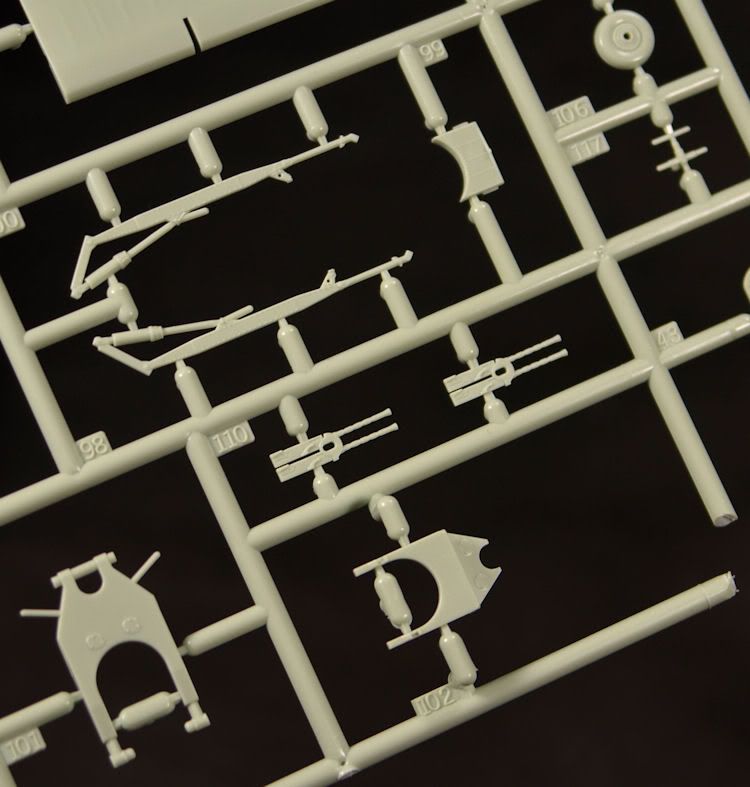
- Movable front and rear gun turret with finely detailed MG's –
Well there is a choice of turrets with this aircraft – the transparencies are
very well done on this kit – not too thick and quite see through. Though some of
the framing is incorrect for the front turret especially and the top Boulton Paul Turret sits a little too
tall for my taste on the finished kit, although the good part about this is you
can opt for either the A or C turret versions if you dislike either of their
shapes. (depending on the aircraft you want to portray of course.)


The main undercarriage bay - now this all looks accurate but a little on the capacious side – I have the Matchbox kit and by comparison this kit is much larger – the wheels and undercarriage are close to the real thing but the wheels are a little small – not by much – but they could have done with some bulge in the bottom – its always better to have very slightly larger wheels if you are not going to make them the right size – then you can sand off the bottoms or push them down on a hot surface to bulge them out a little.The undercarriage with intricate struts are actually well done by Revell – and apart from some wires and hoses you will have to add yourself you are well served here.


- The Rolls Royce Merlin engine nacelles – ok now here we have a
problem – it starts at the nacelles – they are far too fat when placed together
and they look like they need a mill or two trimmed out of the middle is how I would
fix them. This will not correct the fat shape completely but it will make them
look more tapered to the front and rear widthways.

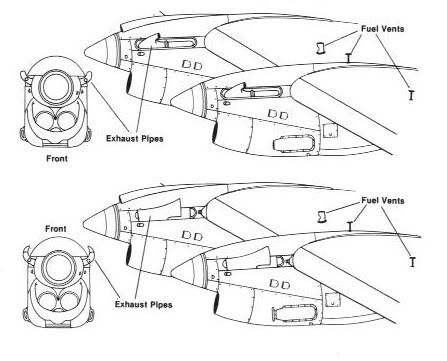

Not sharp enough front and rear and to wide

- 3 different radiator grills – well these are not great as well –
as are the intakes which are misshapen completely – it is best to maybe weather
these a bit darker around the edges to hide the shape of them – As for the
intakes – well you will have to do a bit of work on these to get them anything
as curved and pinched on the inside as they are on the Merlin engined Halifax.
They CAN be fixed – it will just
take some work.


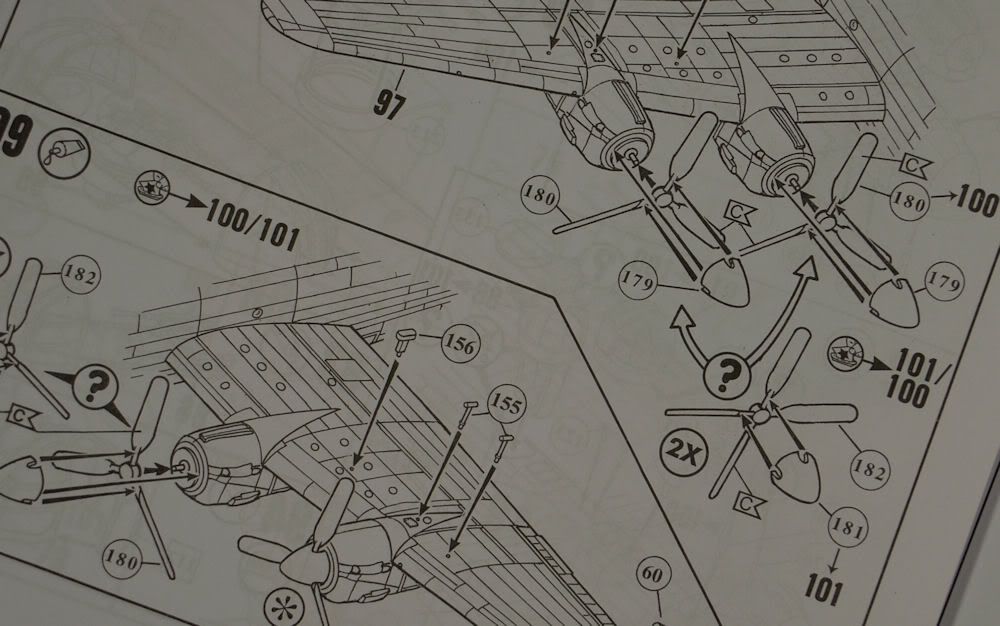
- Rotating propellers, with either three or four blades – Three bladed
for the Halifax Mk II and four bladed for the GR II. Some Halifax’s did have
the four bladed propellers mixed with three bladed props on the inside engines
to improve low level performance – though I would be careful and check your
references on your particular kite. Enough theory – the physical reproduction
of these props is not good – you would be hard pressed to turn their paddle
like look into the thinner props I am familiar with on these aircraft. Again it
is better to replace them with aftermarket replacements which are pretty
inexpensive.
The four bladed prop just doesnt "cut" it at all


The three bladed prop doesn't fare any better i am afraid


I have come to the conclusion that this is THE real inescapable
fault in the kit BUT one that can be fixed - There is a cheap alternative for solving
these problems - replace the whole nacelles, engines and propellers with three blade
or four blade propellers. Although Aeroclub is no longer in business they make
the best replacements in the market for these.
The spinners need to be sharpened off as well.


All of the little perceived mistakes of this kit are easily enough
to deal with and to tell you the truth if you fix the engines and props you
will have yourself a great little kit which I have seen built at the Revell
stand at the toy fair. For a kit costing only £19.99 RRP I can bare the extra
ten pounds getting the power plants right. If you do this you will have a great
little kit.
No it’s not perfect and maybe what a lot of people were holding
out for – but the four companies before them have all gotten it not 100% right
also – if you have a Matchbox kit like I do the best solution would be to kit
bash them both together and make yourself a great show model – but on the other
hand if you just want a Halifax with very nice surface detail for a quick uncomplicated
build make it straight out of the box and see how many of your mates can tell
the difference. I truly couldn’t if I hadn’t researched the real aircraft so
hard!
Adam Norenberg
For
further information on this kit visit www.revell.eu
Here
is this kit built by Dieter Wiegmann – as you can see it is impressive one
built – I for one would build this over my old Matchbox kit which is staying in
the stash a while longer!

