War is hell – especially when you are building up 500 or so pieces of
track for your MK.IV Female tank from Takom –After slogging through the tracks on the "male" version Clayton got the new easy
tracks in his “Female” MK.IV kit – but did it change his perspective of this kit?
Let’s have a look..
Build Review:
WWI
British Mk.IV Female (+ Cement free MK.IV Workable Tracks)
Takom kit #2009 (cement free tracks sold separately)
1/35th
scale
Highly detailed workable track-links and wheels
Accurate suspension and drive system
Photo Etched details
Two markings - English and captured German
tanks
You can get these through Takom’s
Distributors Worldwide.
Model
by Clayton Ockerby
Clayton’s MK.IV “Male” build is here
Some
of you may have seen the build
review I had done on the Male version of this kit from Takom late last
year, well the female version of this tank is essentially the same core kit
with a number of small differences.
The ‘female’ tank includes the light and reliable
7.7mm Lewis machine-guns
in place of the 6pdr Guns on the Male version. This kit also comes with an
interesting WW1 German military photographer.
For
the most part the assembly of this kit follows the same path that it’s male
counterpart, so I won’t repeat myself in this review, but will highlight any
differences I encountered.
The instructions are as the Mk.IV instructions of course - simple line drawings well put together.
The photo etch sprue has the finer parts of the kit included and as well as this there is a length of chain for detailing up the unditching block
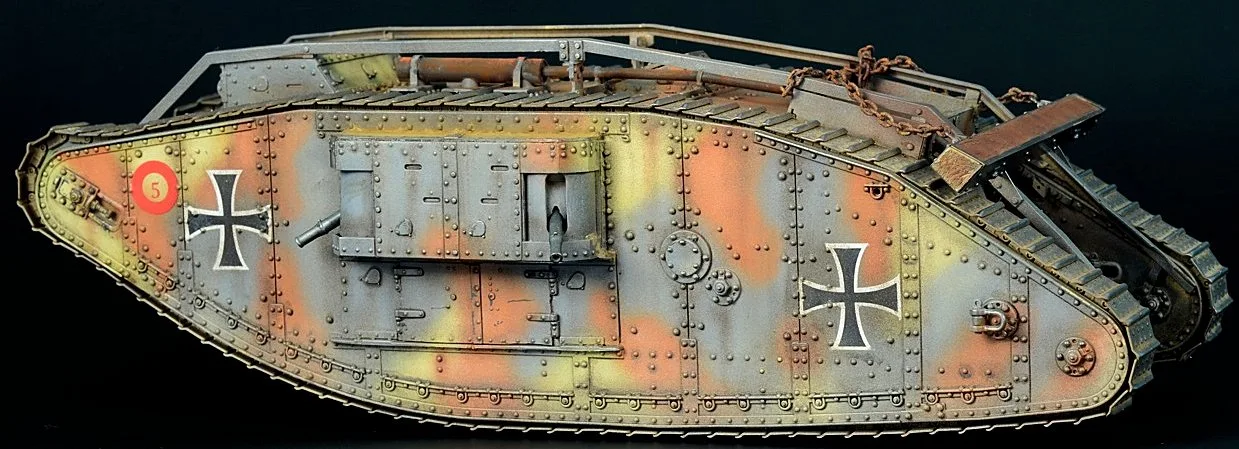
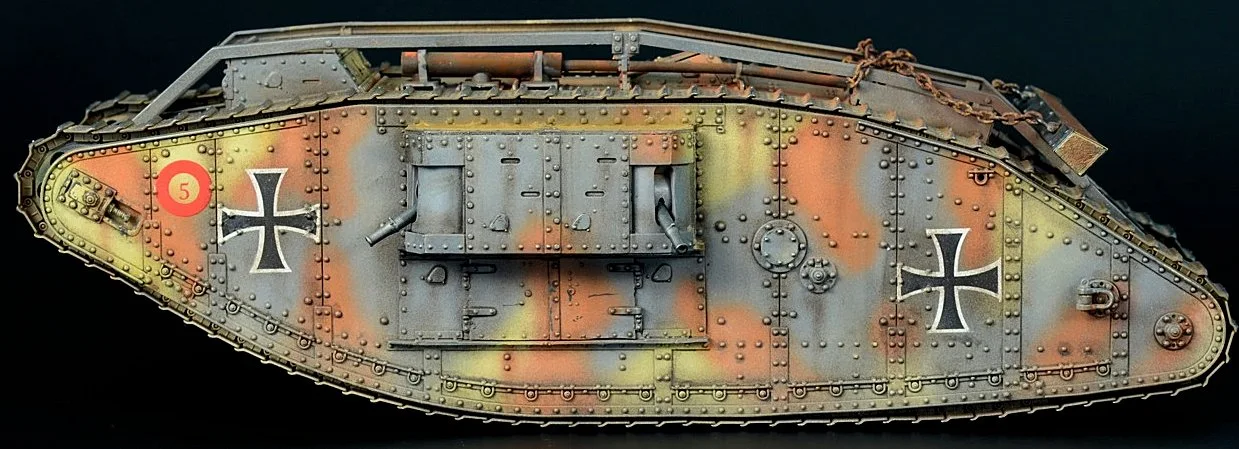
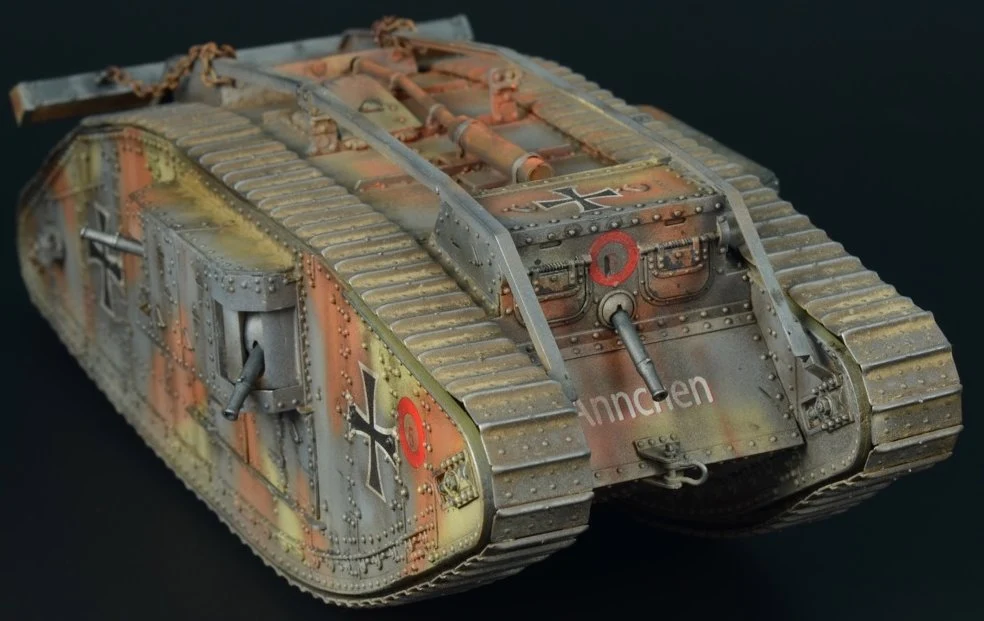
There are two markings included - one German and the other of the Royal Tank Corps of WWI. We are making the captured German version called "Annchen"
A few things of note with the sprues... Sprue A includes the several copies of the runnung gear roadwheels.
...and in close up
Sprue C includes two fo the same layouts. More running gear including the exposed inside sponsons gear and chain
The "Lewis" guns that make up the Female name are included - not the hollow barrel ends of the gun..
Several cogs and gear make up the running gear component
The riveted exterior is on sprue D -
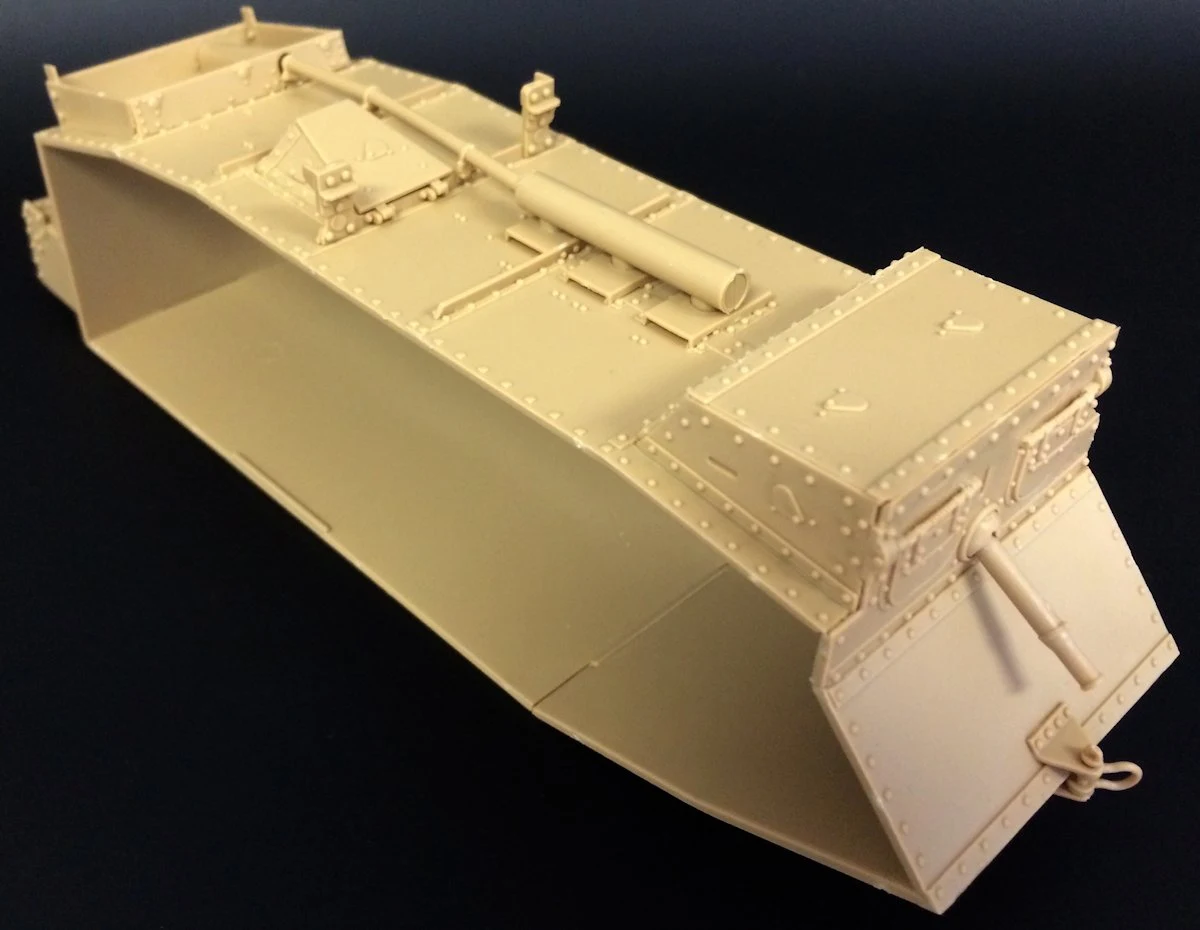
The top and rear of the hull make up most of the framework and the exterior is well moulded with no flash and injection faults. Any ejector pins are hidden on the inside of the kit.
The long exhaust pipes that run along the roof are evident here and the smaller chamber in
You can see the nice hollowed out exhaust here
Hinge and rivet detail will please a lot of modellers. Weathering will be easier on such a model
Sprue F is filled with the sponson inside and outside walls. The outsides are filled with rivets and folts and the insides fo the hull structure is detailed until the interior of the tank.
Sprue H - The rounded clasp gun mounts with access hatches and doors. Towing hooks and more Lewis gun armament.
The build.
I
did find the construction of this version of the tank seemed to flow a lot
better for me. Obviously learned from my experience the first time round as the
pieces were identical to the Male version. The pieces seemed to fit a lot
better when I used the main structure as the foundation for the build rather than
pre-make the parts and add on later.
As
with the Male version, the detail on the weaponry is very sharp. The detail is
quite delicate and the construction is quite complex. Unfortunately most of it
will be lost again once the tank is closed up. I am sure it is only a matter of
time before an aftermarket interior kit comes along.
The
sponsons assembled. The hatches didn’t seem to want to fit as cleanly as I was
expecting. I had to wrestle with then a little. Some minor filling will also be
required.
Because
of the different configuration of the Female tank there are some rivets to
remove from the molding. This is easily done using a sharp scalpel.
The
process of fitting the running wheels is a little fiddly as it is suggested not
to use glue at this stage. Because of the number of pieces a little patience is
required as the odd stray finger or slightest knock can send they scattering
across your bench.
I
made the mistake of rushing my construction here. I attached the sponsons to
the main structures and was planning to add the guns and the cover later (I was
needing to fill some gaps in the gun assemblies). This did give me some
construction issues down the track and on reflection I really should have
followed the instructions. If I had have I believe the sponsons would have sat
far better on the structure than they did. This wasn’t the end of the World,
but it is something I would do differently next time.
You
can see the fit issues I had in these pictures. The gaping holes around the
tops of the sponsons. I figure they would have been a little ‘unstructured’ in
reality, but I am going to need some filler here. Once she is painted up and weathered these
issues should become a distant memory.
All sealed up. Ready for some filler
and paint.
Slightly
off subject, but a feature of the kit nonetheless. The figure is really quite unique. It is an
interesting addition to the kit and is another nice point of difference. Having
said that the sculpting isn’t up to today’s standards. It reminds me of the
older style Tamiya figures, just with a more interesting pose. Having said that
a decent paint job could really help bring this little guy to life, and lets
face it, you are buying the tank, the figure is a nice little bonus.
In
reality the paint scheme was applied by brush in the field. This tank was a captured Allied tank and was
redressed to wear the scheme of the German army. Some pictures to better illustrate this tank and others in captured German service.
After studying images of the actual tank and
looking at the box art I trialed a number of techniques on my good old
sacrificial KV2 (It has about 10 layers of paint on it). I tried hand painting
the scheme, but it looked too hard edged and structured. I tried using oil
paints and feathering the edges, but it didn’t look right. I finally settled of spraying the scheme with
my airbrush and then blending the colours with oil paint. As so the painting began.
I
decided not to prime this time around. The AMMO paints of Mig Jimenez seem to
have enough body and grab not to worry about it. I started by giving the entire
model a coat of A.MIG-008
DUNKELGRAU. The mix was then lightened using A.MIG-017 CREMEWEISS and
highlights were added.
A.MIG-010
DUNKELGELB was used to paint the Dark yellow scheme. Given this captured tank
was initially painted in the British Green Moss I figured the areas under where
the track would soon sit would have logically been still in that colour, so I
painted them using A.MIG 074 Green Moss.
A.MIG-014
ROTBRAUN was then sprayed over the top as the second camouflage colour.
In order to achieve some tonal variation in the paintwork I first gave the entire model a light coat of white spirit. Small amounts of oil paint were dotted around the paint. I used Abteilung Oils ‘German Grey Highlight’, Buff and Shadow Brown over the appropriate base colours.
Then, with a flat brush moistened with white spirit I dragged the oil paint in a downward motion. Any excess paint was cleaned up at this stage and blended with the surrounding colours. By working the buff and the shadow brown around the edges of the camouflage the illusion of the softly hand painted camouflage is created.
A heavily thinned mix of the shadow brown is now applied around every panel line and rivet. This is where the paintwork really starts to come alive.
You can also see the subtle streaking we achieved earlier in the background colours.
Abteilung Oils…don’t leave home without them!
The Tracks (!)
Upon
opening the box of this beautiful Mark IV Female model kit I was again
concerned about the number of parts and the constriction required to make the
tracks. I have to be honest; the thought
of doing that really sucked all of my enthusiasm from the build.
The original kit track parts - lovely but so much work! 5 parts for each track link it adds up after a while..
Before
the first piece of plastic was clipped from the sprue I caught wind that there
was a new set of workable tracks on the way.
So I waited with bated breath for them to arrive...
The small box you get with these Takom tracks - note that they can be used with both the MK.IV male and female, Tadpole and Hermaphrodite kits
...To say Takom have answered my prayers is
an understatement. I could feel the joy racing back into the kit. These
workable tracks are so simple to assemble. They are articulated and detailed
and hold together incredibly well.
The alternative...Cement free tracks from Takom.
I
did notice part numbers molded into the underside of the pieces, so if you were
wanting to pose the tank with a damaged track this may need to be addressed. It
took me about 10 minutes to snap the track links to the lengths I required (92
pcs per side). To build the 5 piece per link tracks that came in the kit
literally takes hours and hours. What a
relief this tiny box was.
I
would consider this additional set as a crucial element to the enjoyment of
this build.
The
assembled tracks were then sprayed with a dark brown colour. Earth toned
pigments were they scattered randomly over the tracks and fixed in place with a
pigment fixer. Metallic pigment will be used on the tracks once they are fitted
to the model.
The
decals were very nice but are quite challenging to fit as they span over
numerous rivets. A decal softener was used and an old brush was used in a soft
stabbing motion to try and persuade them to sit nicely over the contours.
Some
fine brushwork was required to touch up the decals. In reality the markings
would have all been hand painted, so an imperfect finish would have almost been
guaranteed.
The
tracks have now been fitted and are starting to bring some life into the tank.
They were very easy to fit. The way they sat on the model was really
satisfying. They had a few lumps and bumps in all the right places and tracked
over the drive and idler wheels beautifully. A real triumph.
A
Heavily thinned mix of Schokobraun and black was now used to post shade the
model. Very fine amounts of the mix were applied to the panel lines and various
areas around the tank. Soft vertical strokes were used to simulate natural wear
and tear.
Using
one of the new paints in the AMMO range, washable dust, I now added a soft
layer of dust colour paint around the lower parts of the model. Whilst the washable dust is designed to give a
certain finish when scrubbed with a wet brush, I was happy to leave the dust
layer as it came out of the airbrush. A
coating of Alclad Matte then followed.
The
unditching beam received the treatment with the razor saw (as per the method
used on the Male Mk.IV build) and was painted and fitted. I had unfortunately lost a number of the tiny photo-etch parts that connect the beam to the rails. 1mm long pieces and the
floor simply don’t mix. I just connected the beam using a linked chain. I have
seen reference shots showing something similar, so I figured that was
plausible.
A painted piece of tissue was added as a bit of interest.
Conclusion.
Building
this tank for me was really a sense of deja-vu. In terms of the build this is
essentially the same as the Male Mk.IV (which I had built only a couple of
months earlier) but with a few changes in the weapons and the sponsons.
The
easy link tracks instantly made building this kit become so much more
attractive and I would highly recommend you factor them into this build. They
are worth every cent and then some. Don’t be fooled though, there is still a
reasonable amount of time required in the assembly. It is actually quite
deceiving.
A gallery of the completed tank in detail..
I
have read on forums that the colours outlined in the instructions may not be
entirely correct, but from the black and white pictures I have seen it seems
good enough for me.
This
release is a nice little point of difference because it gives the builder a
unique tank. Whilst very similar to the Male Mk.IV the fact of the matter is it
isn’t competing against another manufactures’ release and stands alone as the
tank of this type.
And a walkaround of our british maiden dressed up as a German female...
I
have fast become a real fan of the kits Takom produce. They build up really
well and provide interesting subjects at a reasonable price point.
Clayton
Ockerby
Thanks to Takom for sending this kit
to build - You can get this kit through Takom’s Distributors Worldwide.
You can see more of Clayton’s work
on www.theworkbench.com.au


.JPG)
.jpg)
.JPG)
.JPG)
.JPG)
.JPG)
.JPG)
.JPG)
.JPG)
.JPG)
.JPG&container=blogger&gadget=a&rewriteMime=image%2F*)
.JPG&container=blogger&gadget=a&rewriteMime=image%2F*)
.JPG)
.JPG)
.JPG)
.JPG)
.JPG)
.JPG)
.JPG)
.JPG)
.JPG)
.JPG)
.JPG)
.JPG)
.JPG)
.JPG)


-Takom%2BMK.IV%2BFemale%2B2009.jpg)
-Takom%2BMK.IV%2BFemale%2B2009.jpg)
-Takom%2BMK.IV%2BFemale%2B2009.jpg)
-Takom%2BMK.IV%2BFemale%2B2009.jpg)
-Takom%2BMK.IV%2BFemale%2B2009.jpg)
-Takom%2BMK.IV%2BFemale%2B2009.jpg)
-Takom%2BMK.IV%2BFemale%2B2009.jpg)


.JPG)
.JPG)
.JPG&container=blogger&gadget=a&rewriteMime=image%2F*)
.JPG&container=blogger&gadget=a&rewriteMime=image%2F*)
.JPG)


