

Kittyhawk’s
latest kit of the OV-10 Bronco is the next on François and Nic’s combined
working bench. This 32nd scale kit shows lots of promise and we
review it for you as they guys build the kit. See what it is really like in
Part I of II in this build.
.jpg)
Build Review: OV-10D
Kittyhawk Models
KH32003
1/32nd scale
Available through Kittyhawk’s Distributors Worldwide
Kittyhawk Models
KH32003
1/32nd scale
Available through Kittyhawk’s Distributors Worldwide
Model by: Nicolas Deboeck & François Laloux
For a model of an OV-10 Bronco to be as impressive as the
real aircraft, it needs to be big. I mean, the 1/72 scale Academy kit is nice,
but it’s like ... tiny. Then Kitty Hawk announced a 1/32 kit: finally the
possibility to build this cool looking aircraft in the size in which fits our
perceptions of this bruiser!
You got to love Kitty Hawk Models and their short history so
far. They select aircraft for scales that no-one thought of issuing and they make
pretty decent kits out of them. Though along the way this new company’s
learning curve is obvious for all to see and their kits are ever improving but
not perfect (what kit is?) We have built many here on The Modelling News and
this kit and others they have in the pipeline makes me wonder what other off
topic aircraft the brand will have in store for us in the future.
The box of this kit is completely filled with parts and
considering the price – about the same as the T-6 – you get a great deal. You
saw the parts here
on TMN earlier, but what we wanted to know is: can you build this all
into a perceptionally realistic looking Bronco? Once more, François and Nicolas
teamed up.
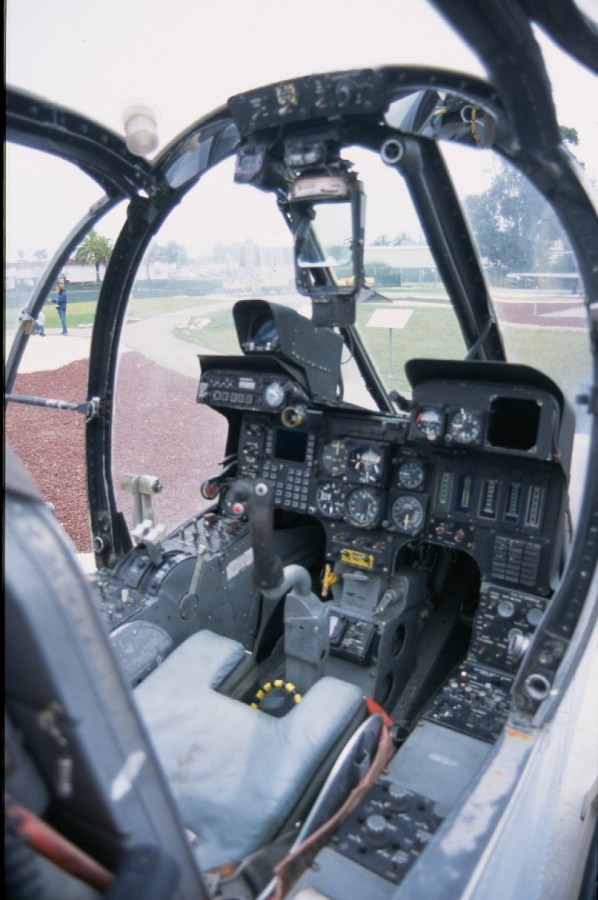
With a cockpit big as a glass house, where else would you
start building? Let’s take a look what is in the box:One of the first things we noticed when looking into the cockpit was the sidewalls were nicely pretty thin, but also that they had some ejector pin marks. Most of them will probably be invisible, but to make this work, we’d better get some putty out

Both sides now..

Some of these pictures which (we grabbed
from Zone Five) show just how much the glazed cockpit shows to the onlooker
outside the glazing – Some detail on
top of what is already there in the way of cables, wires and so on should be
added if we want this to look more convincing.

In order to see what
can be added to the cockpit, the parts were glued and the seats were built. It
looks passable at a glance, but a lot more can be added with scratchbuilding!
The instrument panel for the backseat looks too thin, so that will need to be
completely rebuilt.


Still a way to go on this if you look at the real thing...


So, here’s the result
of the fun of adding detail to the cockpit floors and walls

Behind the backseat, a lot (really) of cabling needs to be
added. Thin metal wires were twisted in bundles and glued in the plastic ends
of paperclips. The back instrument panel was re-done from evergreen and wiring
added. Next came the seats: top parts were cut off and replaced with card. Lead
foil was added to the seat’s back to make it look more realistic. The kit’s
belts were used. Next, rivets were made with a punch-and-die set and glued to
the seats.


This is what it looks
like inside the fuselage:

Some boxes were added to the back of the cockpit and details
added to the side walls. The wing was dry-fitted: fit looked quite good!

Time to get a little
primer on the cockpit. After this, the work went to François for painting.


And this is what can
be accomplished with some patience and talent. Looks pretty nice, me thinks!

The tiny details really work, like the black and yellow
handles on top of the seats and the different shades of wiring. With the
cockpit done, construction of the kit began. Kitty Hawk provides a weight to
make sure that the kit stays on its nose wheel, so that was glued underneath
the cockpit. The wing-fuselage joint had a near perfect fit on top, which was a
big relief. The underside however needed some work… For the nose, a little
putty was needed.

This photo shows the underside of the wing. Because the wing
is made up of 7 different parts, but have very thin connections, we inserted a
brass strut to make it stronger. This is a good investment, because the wing
will have to support the engine gondolas later on.


The construction of the engine booms is very
straightforward. The wheel wells are nicely detailed and – this is cool – the
kit provides detailed engines. We decided to show one in full detail (some more
scratching, yeah !)

The kits engines are
nicely moulded and the main parts are there, but some extra detail can’t hurt, right?


By this time, it was time to start thinking on what we’ll
hang underneath the Bronco. On the centreline: the big fuel tank.

Next step in
completing this Bronco is to mask the cockpit, the wheel wells, the gun bay.


And the canopy parts
of course, so out came the Revell masking tape:

Kitty Hawk offers a couple of very neat liveries for this
Bronco and we decided to do a two tone grey one. A bit of surfing and googling,
and we found the real machine we wanted to do:
US Marines ship: Bu No 55479 from VMD-2

This photo is a snapshot of the final result. How we did it
and what details we added, we’ll show you in another post soon. So far, this
was a most enjoyable build!
Part II Finishing and painting to be continued...
Text by Nicolas Deboeck
Text by Nicolas Deboeck
Model by: Nicolas
Deboeck & François Laloux
Thanks to Kittyhawk
for sending this kit to us to make – it is available through Kittyhawk’s Distributors
Worldwide
