
.JPG)
Skoda 30.5cm M1916 Siege Howitzer
Takom
1/35th scale
Available from Takom’s Distributors Worldwide
Takom
1/35th scale
Available from Takom’s Distributors Worldwide
Development
of this weapon began in 1906, when the Austro-Hungarian high command had the
desire to develop a weapon capable of penetrating the concrete fortresses being
built in Belgium and Italy. Four years after work had begun on the weapon the
first round was fired in 1910.
It’s armour-piercing
shell tipped the scales at around 384 kg and was able to penetrate 2 metres
of reinforced concrete at a range of almost 6kms. After a few refinements to
the initial design through 1911 an order for 24 of these guns was placed by the
Minister of War, Moritz von Laufenberg.
The weapon
proved to be extremely successful and became a real linchpin in the battle plans
of WW1. It played the role that the heavy bombers would later go on to play in
WW2, beating the opposition into submission.

In 1916 the
length of the barrel was extended to provide the M1916 version of this gun, the
one reflected in this Takom kit.

By the end
of the war, 51 of these guns had been manufactured. In 1918, at the end of the
war these weapons were distributed amongst the allies as the spoils of war.
Yugoslavia, Czechoslovakia, as well as Romania, Italy and Hungary divided up
the captured weapons and went about training to use them for their own defence.
AT the
outbreak of the Second World War, Germany seized 17 of the guns from Czechoslovakia,
along with one used for artillery instruction in Austria. After refurbishing
them they went on to use them against Poland, France and the Soviet Union as
well as for the defense of Germany.


The weapon
gained infamy after its devastating effect by the German forces when they used
16 of them against the Crimean fortress during the Siege of Sevastopol in 1942.
.JPG)
So here we
are again, Takom releasing something different, left of centre and quite
unique. When I first saw the box art I was quite excited at the prospect of
having a go at this one. I knew nothing
of the subject or it’s history. I just liked the look of it’s old fashioned
lumbering lines and the sheer presence of the thing.
The kit sprues:
.JPG)
.JPG)
.JPG)
.JPG)
.JPG)
.JPG)
The kit
builds up from parts found on 3 sprues. Also included in the box is the usual
Takom style instructions, nicely presented and reasonably simple in nature as
well as a couple of colour schemes researched and rendered by the team at AMMO by Mig Jimenez.
.JPG)
.JPG)
The BUILD
Construction
starts with some of the smaller pieces in the kit. Here you see the bolts that
will sit on top of the main structure of the mortar.

I found
using a piece of Blutac handy for locating these tiny parts so as not to make a
mess with any excess glue.

You may
also note that the 2 halves of the gun assembly didn’t join overly well. This
will need some attention later.

The gun
barrel is moulded in one piece and sits nicely in the previous assembly. The
rifling moulded on the inside of the barrel is very tidy. I have read on some
forums that a shortcoming of the kit is that the moulding doesn’t travel the
length of the barrel, however I didn’t see that posing too much of a problem.

Some fit
issues here for the components on the underside of the barrel. Again this will
need some attention.

The left
hand wall of the gun with the sights and handles attached. I would have liked a better understanding of
the relation of the gun position to the way the sight should be sitting. There
was a fair amount of movement on the location of these pieces, so some
reference would have been handy. I took
my best guess at it and moved on.
The right
hand side was assembled in a similar fashion and had less detail than the left.

The base
assembly is very basic. Detail was a little light on but from what I can gather
these bases were sunk into the ground when in position, so in reality most of
this structure would never be seen. That
said the shackles located around the corners of the base are all moulded into
it. It would have been nice to have these as parts that could be moved or
altered in some way.

The
ammunition cart and shells are now assembled. Again the fit isn’t perfect,
especially in the 2 halves of the trolley.
There will need to be some sanding and filling again.

The main
gun has now been assembled fitting the left and right sides to the gun’s base
plate. The gun is wedged between the two walls and has a certain amount of
lateral movement.
The gun
structure is then fitted to the base. I included that beautiful little figure
from Stalingrad Miniatures to give a sense of scale to the gun.

The patching begins…

A few more
minor elements are attached to the model. Again there are a number of fit
issues. Not drastic, but a touch bothersome.


Also note where
the pole dropping from the adjustment crank sits. There is a moulded section in the base plate
that looks like it should be housing that pole. It isn’t like it is even close
though, and with no reference photos I am just going to have to assume the real
thing looks like this and move past it.
Not sure if this is an error, but I have my suspicions. The instructions
also indicate that the way it has been moulded is correct.
Primed and started to sand some seams and join
lines.

After
studying as many pictures I could find of this weapon, it was here that I found
an inaccuracy in the kit. I kind of wish I hadn’t found it because I am sure no
one would have ever known, but unfortunately, once I had seen it I couldn’t
ignore it.


I sourced a
set of nuts and bolts from Plus Model and went about adding some bolts to the
kit. As you can see, the images aren’t
entirely clear as to exactly what they looked like, but there is no doubting
they are there, so I took an educated guess at the size, style and placement of
the additional bolts.

Bolts on!
The model is now given an all over cover of Dunkelgelb and then lightened with
Dunkelgelb aus ’44 from the AMMO range of late war German colours.


I had
actually been playing around with paints on this kit during the build and was
probably a little lazy in not cleaning it all up before putting this coat down.
As luck would have it though the layers of paint left underneath the yellow
gave an interesting effect that I really liked. You can see the texture in the
barrel section. In reality these guns
were repainted many times depending on when and where they were used. The model
I am building was captured by the Allies in Zweibrucken, Germany in April 1945. It had been repainted in the lighter tone of
the Dunkegelb.
A rough
wash was given all over. She looks a little messy here but I will come back and
clean this up somewhat and future weathering will mask a lot of this anyway. It
is really just to set some panel lines up.

Shadows and
wear lines were created using a mix of dark brown and black paint. The effect
was then tied together using an all over filter I had in the shelf from SIN
Industries. To add further interest I
then added touches of thinned Dunkelgelb ’44 from the MIG range of paints.

Using AK
Interactive True Metal I painted the inner part of the barrel and picked out
some edges on the model. The silver is probably a little bright at the moment,
but I will address that later. You may notice that there are a few handles and
pieces missing in this pic. The plastic seems to be very soft and is prone to
breaking in a number of weak spots. A
little more care was required obviously. You can also see here the little cart
that comes in the kit has been assembled.
The fit wasn’t the best and some sanding was required.

Not
entirely happy with the True Metal stage I went about softening the effect with
some lighter tones of the Dunkelgelb. Once satisfied with the duller appearance
I did another oil wash using Abt215
Flesh Shadow.

A few
pieces that got knocked off during the handling were reattached and the model
received an all over Flat clear (Alclad)
A little
more shading was applied with the airbrush using a paint colour called ‘Dark
Tracks’.

With no
colour references noted for the ammunition or the cart. I took a guess at what the colours might be.
To add further interest I sprayed one with a white band and the other with a
yellow. I used the hairspray technique on these to simulate some chipping on
those colours. I have absolutely no
information to lead me to believe this is actually what they looked like.
CONCLUSION.
This is an
interesting subject with an interesting history. The kit itself is pretty basic
and is not without it’s shortcomings. Detail was a bit old fashioned in places
but very tidy in others. There were fit issues also, but nothing that couldn’t
be corrected or hidden. The kit was adequate enough to make a reasonable model.
The highlight of this kit is the subject itself. It fills a void in the
modeling market and Takom should be congratulated for their forward thinking
and willingness to take a risk on a kit like this.
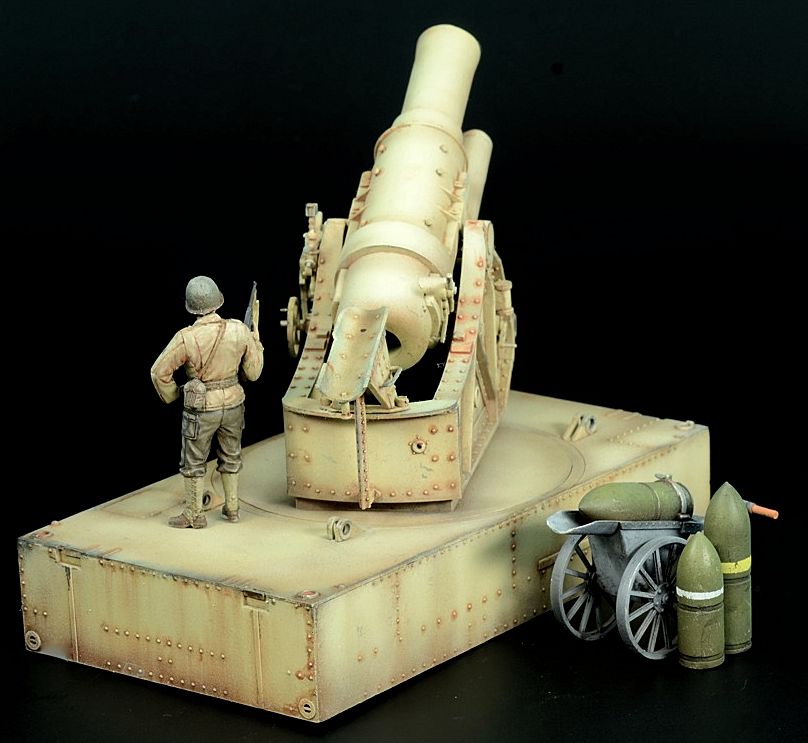
It is my
plan to ultimately build a little vignette with this one. I am planning to
replicate a captured 30.5 cm howitzer in a camouflaged positioned alongside the
road near Zweibrucken, Germany in April 1945 as per this image

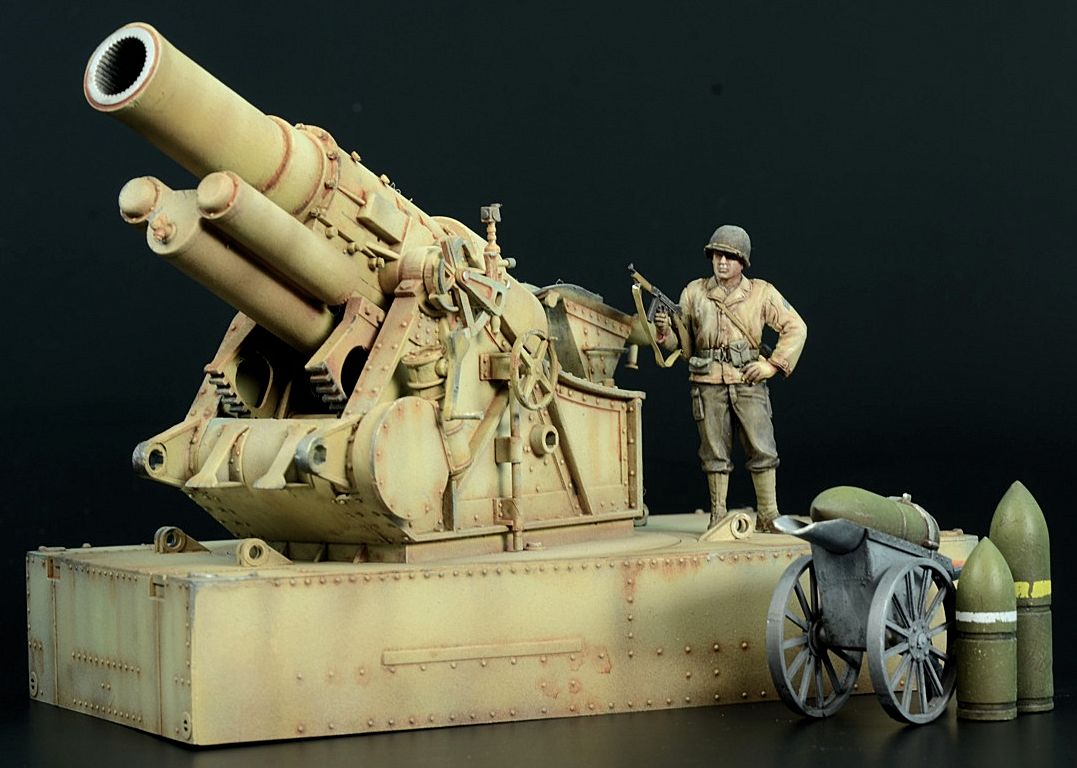
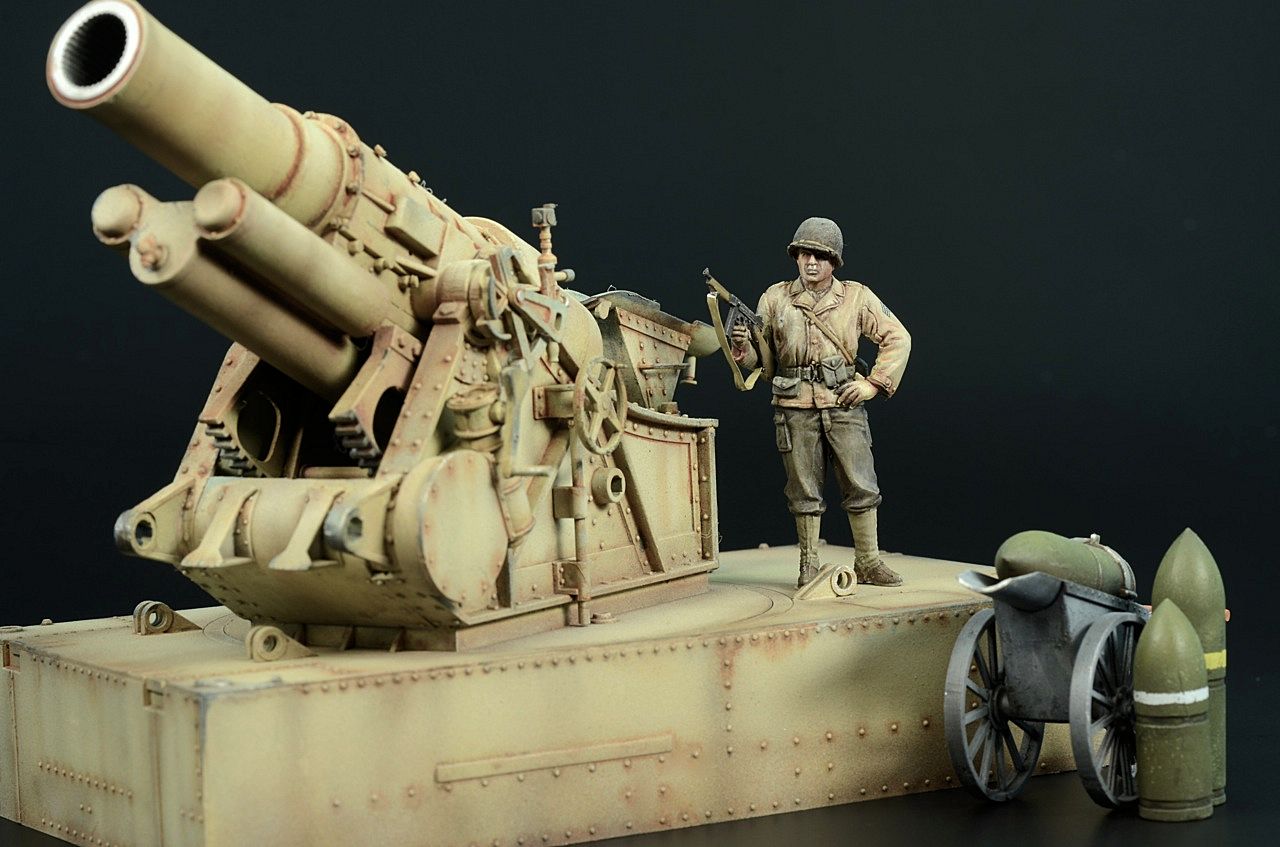
I have included a figure with these finished
build pictures. The figure is from the Dragon Allied Force ETO figure set and
the head is from Hornet. I think the figure is an important inclusion on a kit
like this to purely give the viewer a sense of scale around the subject.


So again,
well done to Takom for having the courage to present the market with something
new and unique.
Clayton Ockerby
Thanks to the guys at Takom for sending this
kit for us to build – It is available from Takom’s Distributors Worldwide
To see more of Clayton’s work go to www.theworkbench.com.au
or his facebook page: https://www.facebook.com/workbenchhobbies
Postscript:
The Instructions.JPG)
.JPG)
.JPG)
.JPG)
.JPG)
.JPG)
.JPG)
.JPG)