

We
have already seen Takom’s Mk.A Whippet
Medium Tank reviewed and then put together in two articles here on TMN, Now Andy Moore uses his AMMO paints and a lot of skill to bring this little tank to life in part III of the build. What are his final thoughts? Let's see...

Build review PT II
Mk.A Whippet Medium Tank
Mk.A Whippet Medium Tank
Takom
Kit no. 2025
1/35th scale
Available
from Takom’s Distributors Worldwide
You
can currently get this from HLJ.com for ¥6,120/ USD
$50.72/ €44.95 + P&P
Today Andy get's his painting and weathering skills out to show us all how to paint and weather Takom's new Whippet Mk.A into a showstopper...
Fist off after building the kit I gave the sides of the fuel tank and the bulkhead behind it a coat of AMMO black primer, then glued the tank in position.

With the fuel tank added, the whole model got a solid coat of AMMO black primer. As well as providing a base for the subsequent paint layers, this also worked as a shade layer in the recesses.

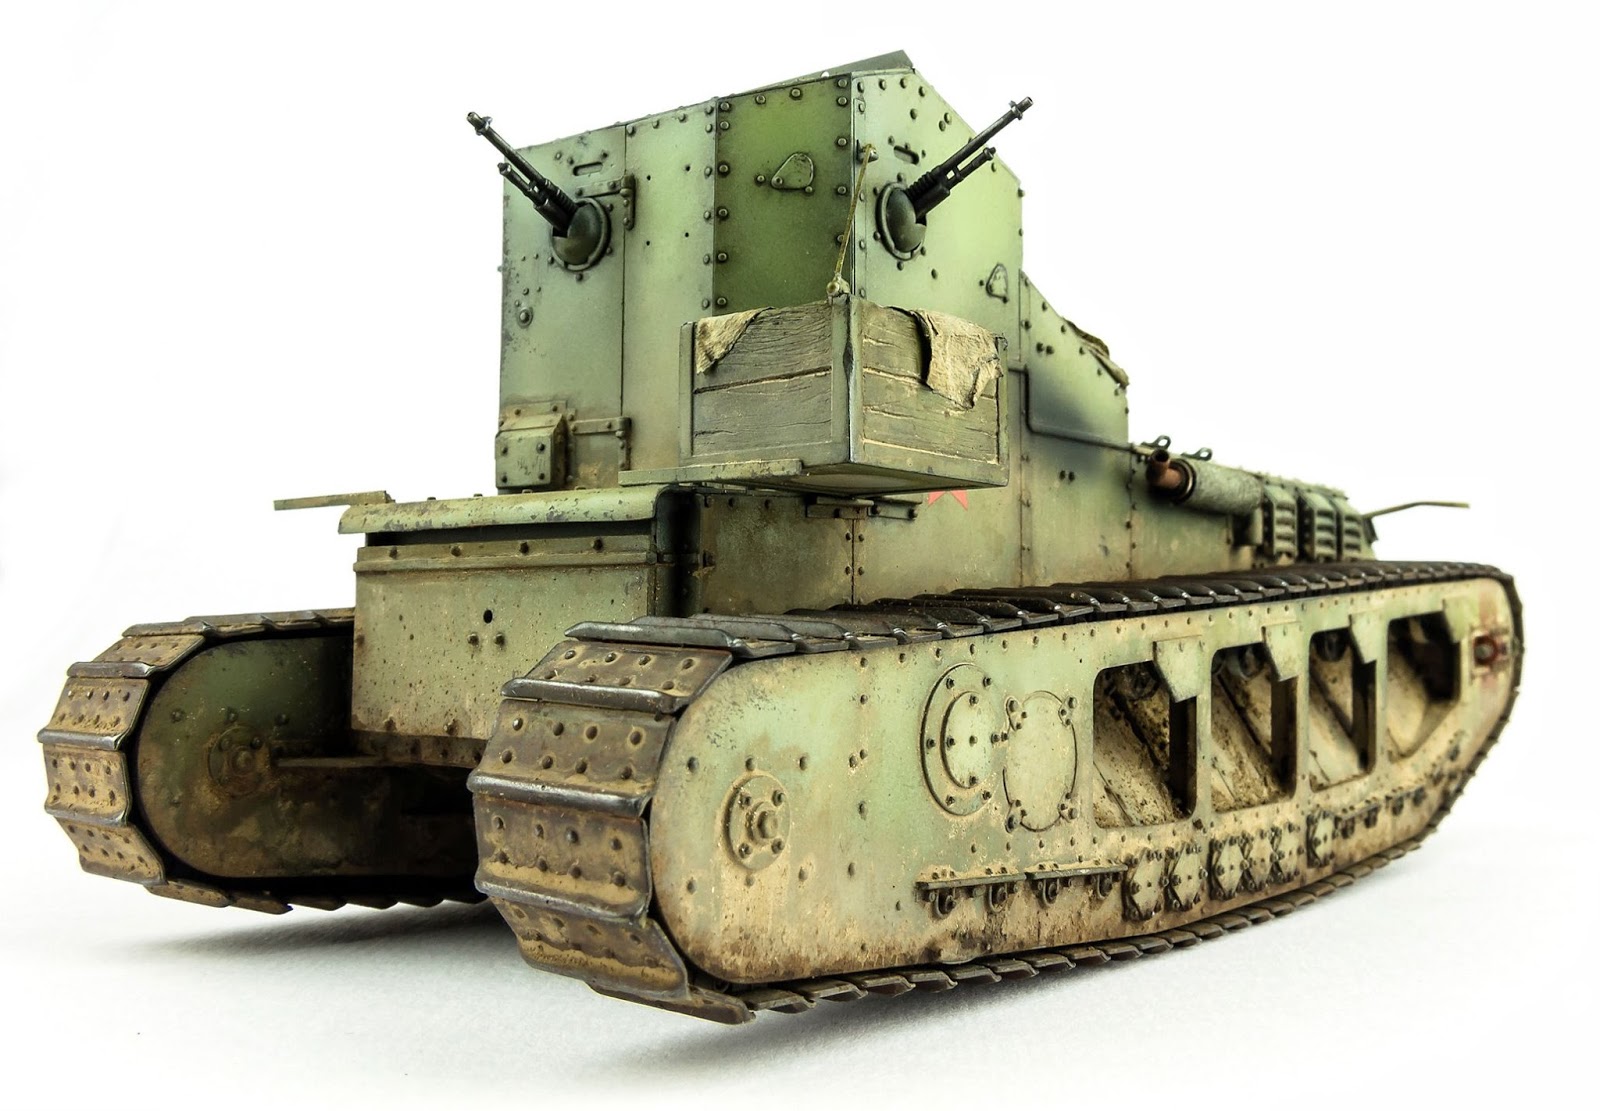
I'd decided to portray the marking option for one of the captured Whippets operated by the Red Army in the Russian civil war. Since these machines would have been heavily exposed to the elements, I wanted to show a faded and weather-beaten finish to the paint so, to start the process, I used a loose version of black & white shading, spraying white on the sides and upper areas of the hull

This was followed by a base layer of A.Mig-074 Green Moss from the AMMO British and German WWI set. I kept this mainly on the black primer areas, letting some of the black show through to add some shading.

To get the faded look, I mixed the base Green Moss with A.Mig-219 (RAF) Interior Green in a roughly 50/50 mix. This was sprayed in a patchy fashion over the areas that had received the white base. At this point, I wasn't trying to be too neat as the subsequent washes and weathering would cover any over-spray.

Now the base colours were on, I added the serial number decal. This was the original British serial that would have been applied before the tanks were shipped to Russia and would have been more worn and faded than the newer Russian markings so, once applied, they were given a light over-spray with the base green, followed by selectively over-painting the numbers white an off-white colour.

When building subjects like this, I always try to add elements that help tell a story and convey a vehicle that has a history. In this case, I wanted to add the remnants of the original British I.D. Bands at the front of the tank. The hairspray technique was the best means of getting the worn and chipped look I was after.
After masking the area off, I applied two light coats of hairspray and, after leaving it a few minutes to dry, sprayed a light coat of white. This was given a few more minutes to dry, after which the paint was scuffed with a damp, stiff-bristled brush. To avoid the need to seal the white and add more hairspray, the red band was hand painted, patchily, to match the chipping on the white areas.

The Russian markings were now added. All the decals settled down very well with the addition of a little Micro Sol. The contrast between the fresher Russian markings and the faded British markings shows up well here.

The tracks were also painted at this stage. After priming in black, they were sprayed with a dark, rusty brown tone, after which a stiff brush was used to splatter more rust tones over the surface.

Now the weathering got under way, starting with a dark brown pin wash to bring out all that rivet detail. A couple of filters were selectively added using ochre and sienna oils, to further break up the monotone finish.

A WWI era tank without mud would be unthinkable and the Whippet, with those huge mud chutes would get particularly filthy. A slurry was mixed up using plaster, garden soil, pigments and enamel earth effects and heavily applied around the running gear and lower hull.


Once dry, the mud really starts to add some character to the vehicle. Using garden soil in the mix adds a lot of crunchy, realistic texture. After all, if you want to represent mud, the best thing to use is mud.

The tracks were added and the same mud mix was watered down to a wash consistency and painted over them. I also added some fuel stains around the filler cap with a glossy brown enamel.


Once the mud wash was dry, AMMO Gun Metal pigment was rubbed over the high points on the track links to give them a polished sheen. It's far easier to rub this on with a fingertip than a brush, although you need to be careful not to get graphite fingerprints all over the model. The same pigment was applied to the gun barrels.

A last minute addition was a rolled tarp sheet made, like the one in the stowage box, from PVA soaked tissue. Once rolled up, this was placed in position to dry then removed for painting.


And there we have it. One Whippet, ready to run.

This kit was a real pleasure to build with only the cab roof posing any issue, and a small one at that. The only thing I'd like to see added would be an interior but that would no doubt push up the price. As it is, this is a great kit with plenty of marking options included in the box and lots of opportunity for weathering fun.
A gallery of the details of the completed in close up detail


...and a "Whippet walk around"


Takom are really starting to spoil us with their WWI releases and I can't wait to see what they come up with next (How about Little Willy, Takom; come on, you know you want to)
Andy Moore
Our thanks to Takom for sending this model to Andy to review and make and thanks as well to AMMO of Mig Jiménez for sending the paint to finish it with…
You can currently get this from HLJ.com for ¥6,120/ USD $50.72/ €44.95 + P&P
