


Construction Review: Carro Armato L35/c w/ Swiss Solothurn S18-1100 20mm Gun
Bronco Models
1/35th scale
Kit #CB35049
History
As early as 1928 the Italian authorities began to show an interest in a small two-man tankette. Twenty-five Carden Loyd MK.VI tankettes were purchased from the British in 1929, and an Ansaldo/ Fiat version was designed. This was designated as 'Carro Armato da accompaniment per la Infantry' standing for infantry support tank. After trials in 1931 and a number of modifications, it was accepted as the 'Carro Armato veloce Alsaldo', and full production began in 1933.
The new vehicle was now standardized as the C.V.33 series I and mounted a single air-cooled 6.5mm Fiat type AV machine gun. This series is recognized by its armament and a prominent track tension roller assembly. In 1935 the C.V.33 series II appeared mounting twin 8mm Fiat 1935 machine guns. It now also featured the simpler rear tension roller, and revised armour plate angles on the rear of the crew compartment. The riveted superstructure appears mainly on the later C.V.35 models starting in 1936.

A confusing number of upgrade alterations followed, until many of the earlier models were retrofitted to series II or the latest production C.V.35 standards. From that point on they were all usually referred to as the C.V.35. Then in 1938 the designation L3-35 became the standard, and finally just L35.
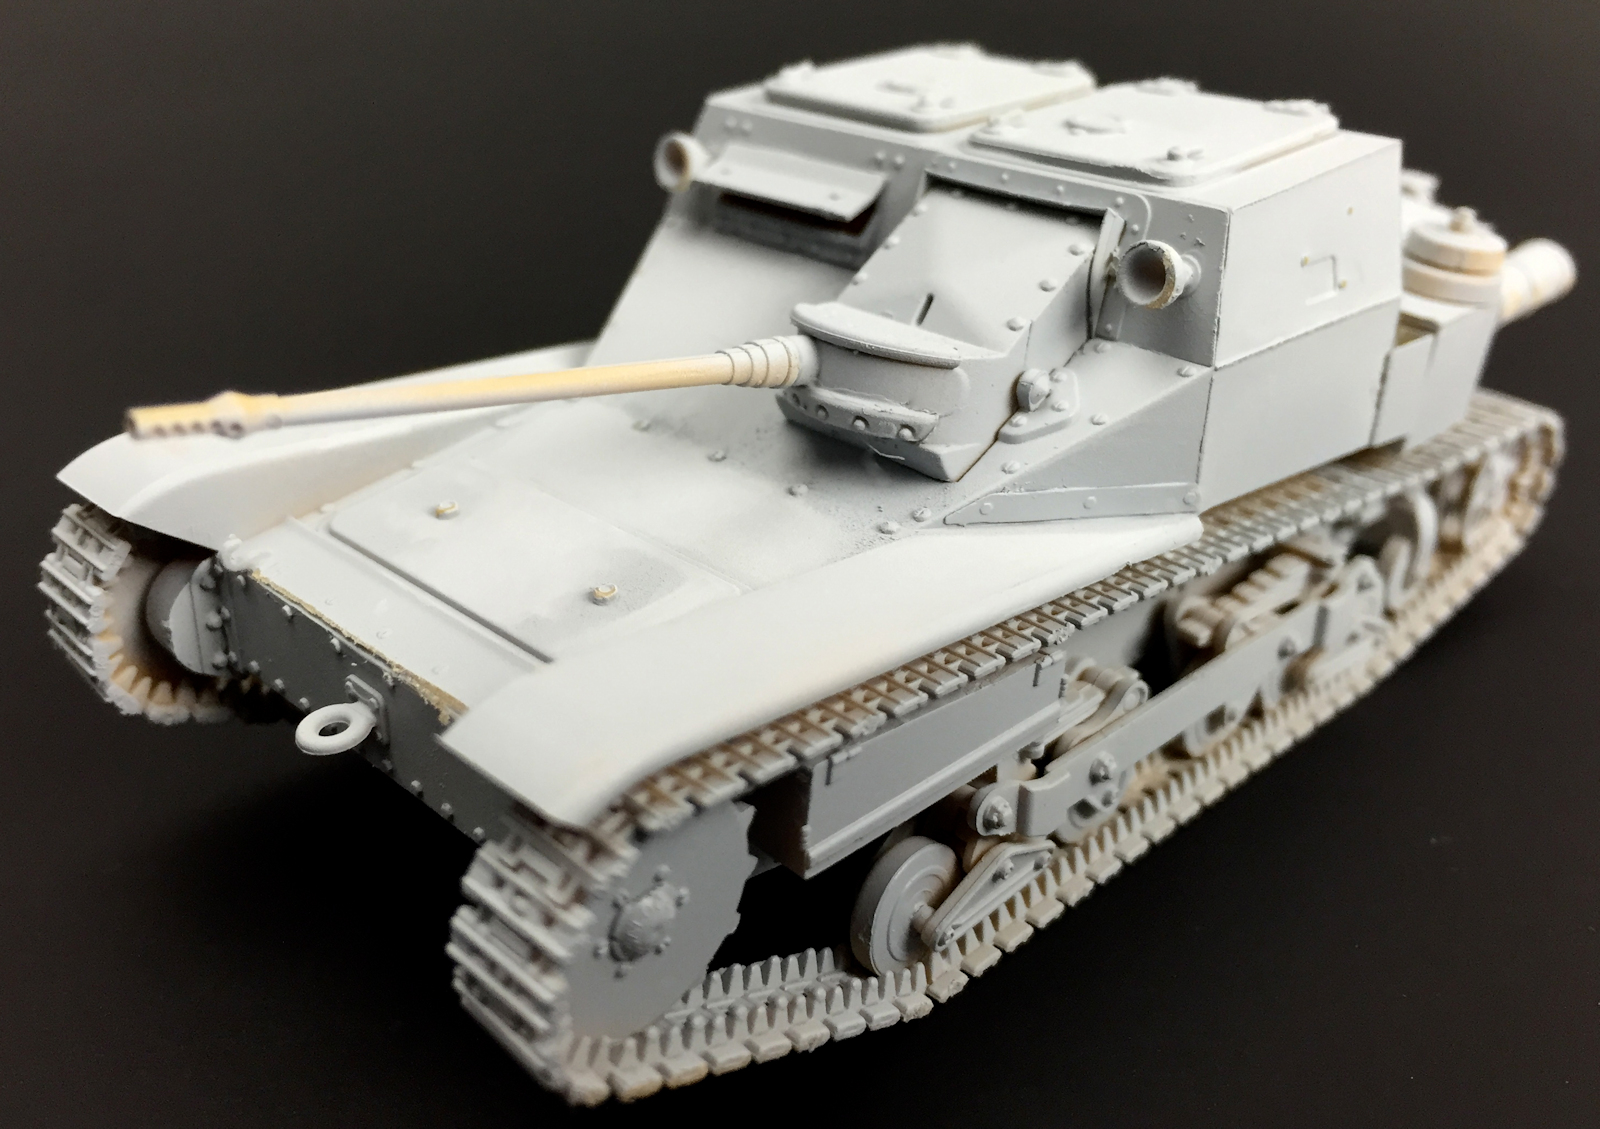
The interesting field modification shown here features the 20mm 'Solothurn' anti-tank gun fitted to a C.V.33 series II radio model and locally designated as L35/c. In 1941, when it was realized that the MG armament was now ineffective, a small number of vehicles were customized with this 20mm gun in an attempt to give the L35(C.V.33) some much-needed firepower. The modification utilized the same parts and supports as the mono armed early C.V.33, thus maintaining the original line of sight and fire. Ammunition stowage was also the same, so few changes had to be made.

(Taken from the notes on the Bronco Instruction Sheet)
I have always been attracted to these little vehicles…. I don’t know what it is, but these dinky little things really appeal to me, so I was very happy to see this new release from Bronco come across my workbench. I had previously built the older Bronco release of the CV3/33 (CB35125), and I always felt I could have done a better job with it. So now, I have the opportunity to redeem myself.

The box is quite large given the finished size of the model. The box art is in the familiar style of other Bronco releases.

Although the photograph would have you believe otherwise, the space the sprues takes up is really only a fraction of the space in the box. I can only assume the size of the box was to save on packaging costs or to maintain some presence on the shelf of the local hobby show. Not a complaint, just an observation.
The instruction booklet is again in the familiar Bronco style. A good quality glossy paper, stapled booklet. There is an extensive history on the vehicle included. There are only 15


Decals
A small, simple decal sheet for the two machines on the instruction sheet are included.

The sprues
Sprue A
Sprue a is a large one, but full of mostly smaller parts. Return rollers and main drive spokes are here, along with other suspension and hull hooks and clamps are all here on this otherwise nondescript runner.


Sprue B
The main parts of the hull are all on here. All but the top “turret” if you can call it that, are recreated with a lot of fine rivets and bolts to give us a lot of painting details to pick out. The simple construction here in a low parts counts are something refreshing from Bronco.

Sprue E
Sprue E contains the main top of the tanks as well as some of the exterior of the engine compartment, two access doors (for the older donor kit) and the regular releases guns.


The original kit’s main armament is hollowed out at the end with the help of slide moulding. This is great, cos I could not imagine having to hollow these out! This will not be used by many people, but just in case you want to make the earlier version the parts are here.

Sprue F
Sprue F is a little smaller than some of the others on this sprue because it has the parts that are specifically moulded for this kit. It has the correct crew access doors, along with the longer barrelled Solothurn 20mm barrel on part E 10. As you can see by the sprue runner that barrel is slide moulded with a hollowed out muzzle also.

Clear Parts
Two headlamps for the tankette are included…

Photo-Etch Parts
Only six parts of photo etch again make this build pretty simple and fast to finish.

THE BUILD
The Hull Structure
The opening steps are the structure of the tankette. The two sides and the rear all glue together giving the model its structure. The fit wasn’t the best, however, in the scheme of things this will be an easy fix and pretty inconsequential.


Running Gear
The next steps in the build are for the running gear. The instructions are easy to follow, but trying to get the parts in the correct positions cleanly can be a little challenging. I was a little concerned about glueing everything in place because I wanted to ensure all the running gear touched the ground…so even though the instructions didn’t suggest it, I decided to not glue some of the parts to make everything moveable. That did mean I had to take extra care with handling these parts, but it gave me the peace of mind that I wouldn’t have issues down the track.

As always, I gave the photo etch parts a light sanding on both sides to better hold the paint and the glue.

I had chosen to make the radio version of the model. The main difference with this version is the boxes on either side of the tankette. I believe they contained the radio gear. They also meant the spare wheel position was different to the standard tankette.
Locating these was just done with a single male / female joint, so there was a lot of play in the positioning of them. I just tried to square them up and hope for the best. I chose not to fit the PE part noted in the instructions until the end of the build so as not to have any issues lining parts up.
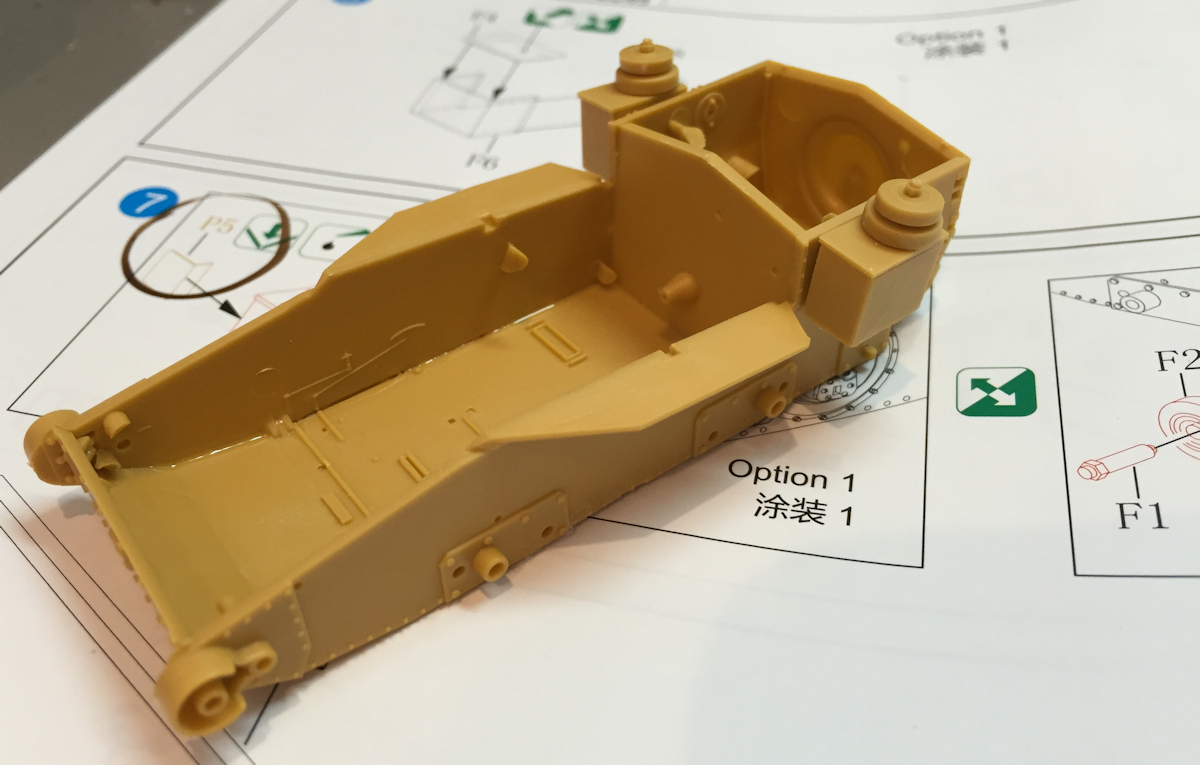
The running gear and drive wheels are now attached, and everything aligned well for me. It was somewhat fiddlier given that fact I didn’t glue a lot of the movable parts earlier.

Now the other side is fitted out, as well as the tools and the exhausts. The exhausts are a simple two-piece setup. The do require a little bit of cleaning up, but I will be painting these with a rusty look…so I wasn’t too fussy with this process.


Running the tracks around the model was reasonably simple. Just take your time to ensure all lines up correctly. Pieces can easily angle slightly and really spoil the parade…so keep an eye on them until they dry.
One issue I did have was the idler wheel spacing. I had stuck it together and fit it to the model, but when I tried to fit the tracks around it, the risers in the tracks didn’t align properly. I ended up removing the piece and trimming the gap down so the risers on the tracks capped the outsides of the idler wheel.

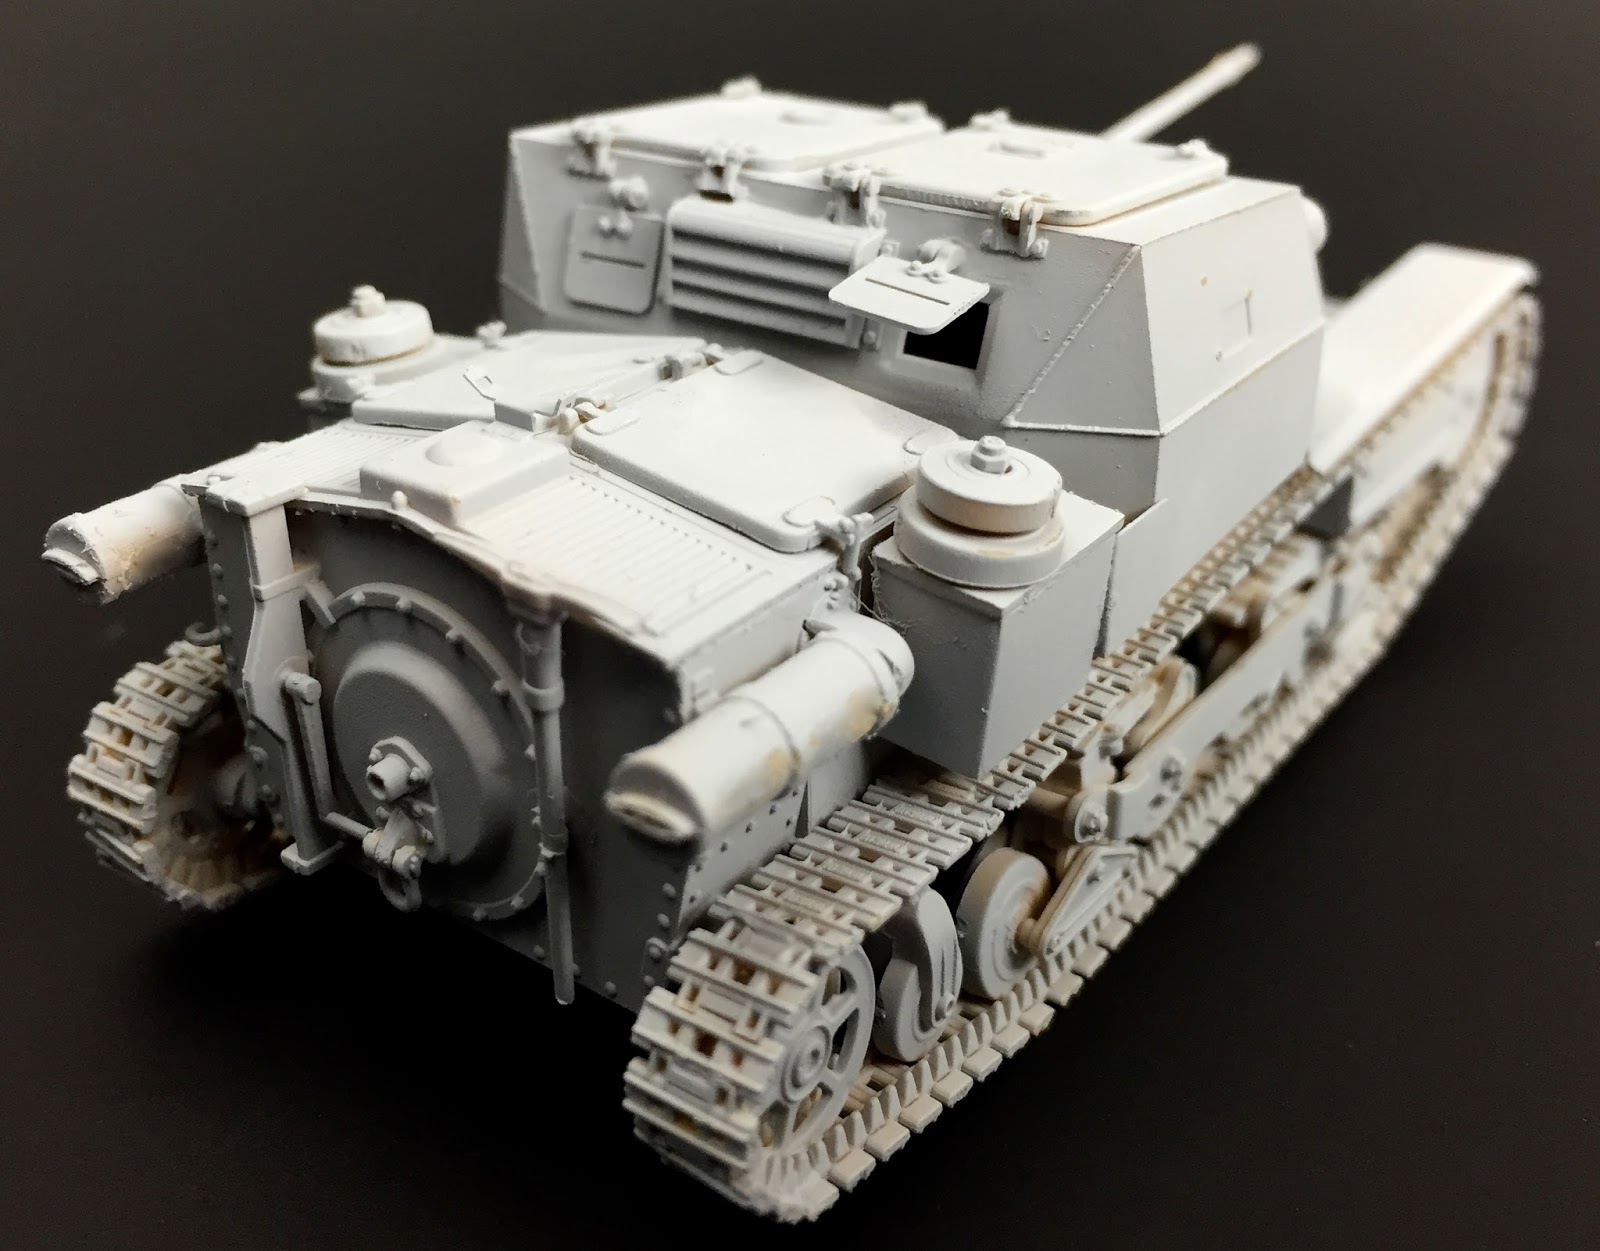
The topside of the model now comes together. There are some fine handles to fit to the hatches, but all removed well from the sprues. A small piece of PE fits into place here too. There was nothing to locate the position of the barrel, so be careful to have the cooling holes sitting on the horizontal plane.

The top side is now attached to the lower section, hatches and small details pieces are added and the model is now ready for paint. Only 15 steps in all and she is finished.


The model is now sprayed in an Alclad Microfiller. This does show up any imperfections in the build and allows you to tend to them as required. It also gives your model a stable base for the future coats of paint to adhere to.


Conclusion
Like I mentioned earlier, I really do love these little tankettes, so I was really hoping the model was going to deliver for me. Bronco have copped a bit of flack over the years for over engineering and over complicating their models. That’s not to say you don’t end up with a beautiful model at the end of the journey, but the complexity can scare some modellers away.


This release however, is a reasonably straightforward, enjoyable build and a really unique and interesting subject. For the most part, everything fits nicely and looks to be in scale. I guess an argument could be made for Bronco to include a basic interior in case you were wanting to pose the model with a figure, but that said, there were a couple of spares left over that you could probably use if you wanted to knock something up.
I really enjoyed building this model, and can’t wait to get some paint on it. Thank you to Bronco from giving this lovely little variation on this piece of Italian history.
Clayton Ockerby
See more of Clayton’s work at his (all new) website “Workbench Hobbies” or join him on his Facebook page
To see more of Bronco Models kits, take a look at their Website…
