The unusual looking Husky III is used as a mine detector by several countries around the world, and although it isn't going to win any beauty prizes, its unusual form has been an inspiration for modellers to make their own vehicle. Clayton was interested in Panda hobby's new kit in 35th scale - so he thought he would build one up for us. See how it went together today in Part I of his build.
Build guide & Review:
Husky MKIII – VMMD (Vehicle-mounted mine detector)
From Panda Hobby
Kit No# PH35014,
1/35th scale
Price: ¥3,600/ USD $32.34/ €30.13
Today: Inbox and build review
Initially developed in the 70’s, by South African company, DCD-Dorbyl Rolling Stock Division, the HUSKY (or CHUBBY system as it was previously known, was developed as a mine clearing vehicle for the South African Defence Force primarily on its missions through Namibia and Angola.
The vehicle has high sensitivity low metal content detectors, ground penetrating radar and powerful air blowers. Later generations of the Husky would see it house a crew of two as well as the addition of a robotic arm.
The Husky is powered by a Mercedes-Benz engine producing 150KM @ 2200rpm, with a top speed of 95km/h with an operational range of 750km, and interestingly was voted as one of the US Army’s top 10 innovative advances in Army technology.
Although the main operators of the vehicle are Canada and the USA, the system is also operational with South Africa, Australia, France, Spain, Turkey, Uganda and Britain.
THE KIT
The box and box art is in the typical fashion that we have seen from the recent Panda releases. The illustration is appealing and attractive, and a big draw card for the model.
Let's have a closer look at the model from Panda Hobby.
The kit comes with 196 moulded plastic parts over 6 sprues. There is also a Photo Etched Fret with 19 pieces, a basic decal sheet and 5 soft plastic tyres. The kit also contains a length of plastic coated wire.
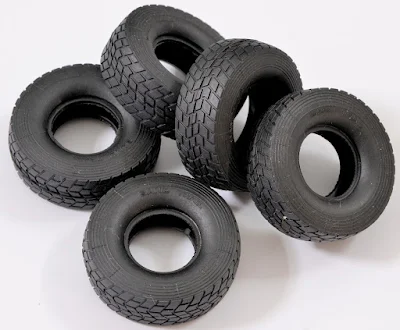
The kit comes with 5 moulded, soft plastic tyres. There is slight mould seam that runs through the centre line of the tread, so that will need some attention prior to fitting them to the model. I must confess, these soft plastic tyres make me a little nervous because I have had issues with this type of tyre splitting over time. I guess time will tell. That said, the detail and the moulding look great.
Here you see the PE fret, the decal sheet and the length of wire contained in the kit. The PE sheet contains the engine grill, the lifting points and a few other bits and pieces. Obviously, they will add the delicacies to the model and have become a given in the modern day kit.
The vehicle didn’t carry a lot of markings, so the decal sheet is small. Most of them are safety placards and warning labels. It is worth noting that the instrument dials are on the decal sheet, however nowhere in the instructions actually calls out for them. They are very dark and very small, so really, it is debatable if they are even worth applying to the model. However, on closer inspection, I noticed how horribly out of registration the decal sheet was. Probably the worst I have seen in a modern day kit. More on that and examples in the painting review.
The kit also comes with an A4 size (approx.) poster of the box art.
The third element in the picture is the wire that is included in the kit. Again, there is no mention of this element in the instructions, but the cabling and wires are very obviously on the actual vehicle. So on one hand, it is great they have included something to help replicate the actual vehicle, but on the other hand, you are on your own to find out where to put it.
The Instructions are made in the booklet style and include 7 steps from start to finish. 7 probably could have been triple that though, as each step has multiple assemblies. As I am writing this review on reflection, there were a number of steps that were a little confusing, but I will address this in the build part of the review.
The sprues
Sprue A contains the wheel guards and the main body of the vehicle, as well as the front and rear bumper.
The wheel guards are one of the defining things that give this vehicle it’s distictive look. They are moulded in single pieces.
The Hull of the Husky is supplied as a top and bottom piece. It terms on the moulding it all looks reasonably straight and as you would expect.
The Clear sprue in the kit has the 3 sections for the windows and the lenses for the front and rear lights. There is also a second layer for the blast windows supplied, obviously to replicate the real thing, but I wonder how necessary in a model of this scale they will be.
There isn’t a great deal to note on the other sprues. It looks to be a pretty basic build out of the box.
The Build
I was a little guilty of skipping and jumping stages with the build on this one, so instead of working methodically through the instructions, I will outline how I built the model, and share any thoughts I had along the way.
I began with assembling the rear axle section. The placement of the bracket that holds them to the frame section seemed to be a little open to interpretation, and I found getting the guards to be symmetrical and tight was a little awkward. Other than that the structure went together well.
I then moved onto the front section. Although the construction differs from the rear, I found the guard positions to be a little awkward again. Not drastic, just a little frustrating.
Back to the hull assembly and the cabin. The interior is very sparse and quite basic. There is notably a fire extinguisher missing and everything just feels visually soft. The seat belts are moulded in the seat and look a little bland. The positioning of the column of dials on the front left side running up the pillar is really clumsy and I was left feeling unsure if they were even in the correct position.
There is no mention of any decals for the instrument panels, but the decal sheet actually has dials present, so that seems to be quite an oversight in the instruction sheet. That said, I did try to use a couple of the decals on the panels, but they were so badly out of registration it just looked messy (more on that later). I figured given the internals were quite dark, and the nature of the windows on the vehicle, the interior would be difficult to see anyway, so I tried not to get too wound up on the internals.
I must apologise for no photographs of the cockpit. It was an oversight on my behalf.
It is also worth noting at this point that the grab handles were quite soft and were easily damaged trying to remove them from the sprues. Easy to fix with fuse wire, but an inconvenience none the less.
The two framework sections are now attached to the hull. The fit was tight but necessary with how they were connected. Now the beast starts to take shape.
Clear section are now masked and applied with PVA glue to the upper section of the hull
With the top section attached, I moved on to fitting the top hatches. I was pretty disappointed with the fit at this point. I’m not sure if it was something I had done, but the pieces just didn’t want to marry up. I would have liked to have posed the model with them open but felt the interior wasn’t really up for display.
The gap in the hatches is now filled with putty, the windows are fitted and the exhaust is attached.
Next the front bumper and the Rhino IED Pre- Detonation Device are attached. The box art shows the vehicle without this instrument, but I felt it added some interest to the model so I included it. It was a little floppy so some glue will be required to set it in a fixed position.
The fit of the front bumper felt awkward (there’s that word again), and had to kind of have the front guards nest up within it, but it created some further positioning errors with the front guards. Again, not drastic, just a little frustrating.
You can also see the photo etch grill is now added to the top section.
Some of the damaged grab handles are now replaced with bent wire. It's probably a little out of scale, but once painted it will be less noticeable.
The rubber tyres had a seam through the middle of them, so some sanding helped reduce this.
The two sensors and now constructed and fit to the model. I haven’t glued them as the hinge in the up and down positions and will be removed for painted. If you are wanting them in the ‘up’ position, you will need to modify the strut part to allow this. Unfortunately, there is no mention of this in the instructions, or at least nothing that I could find.
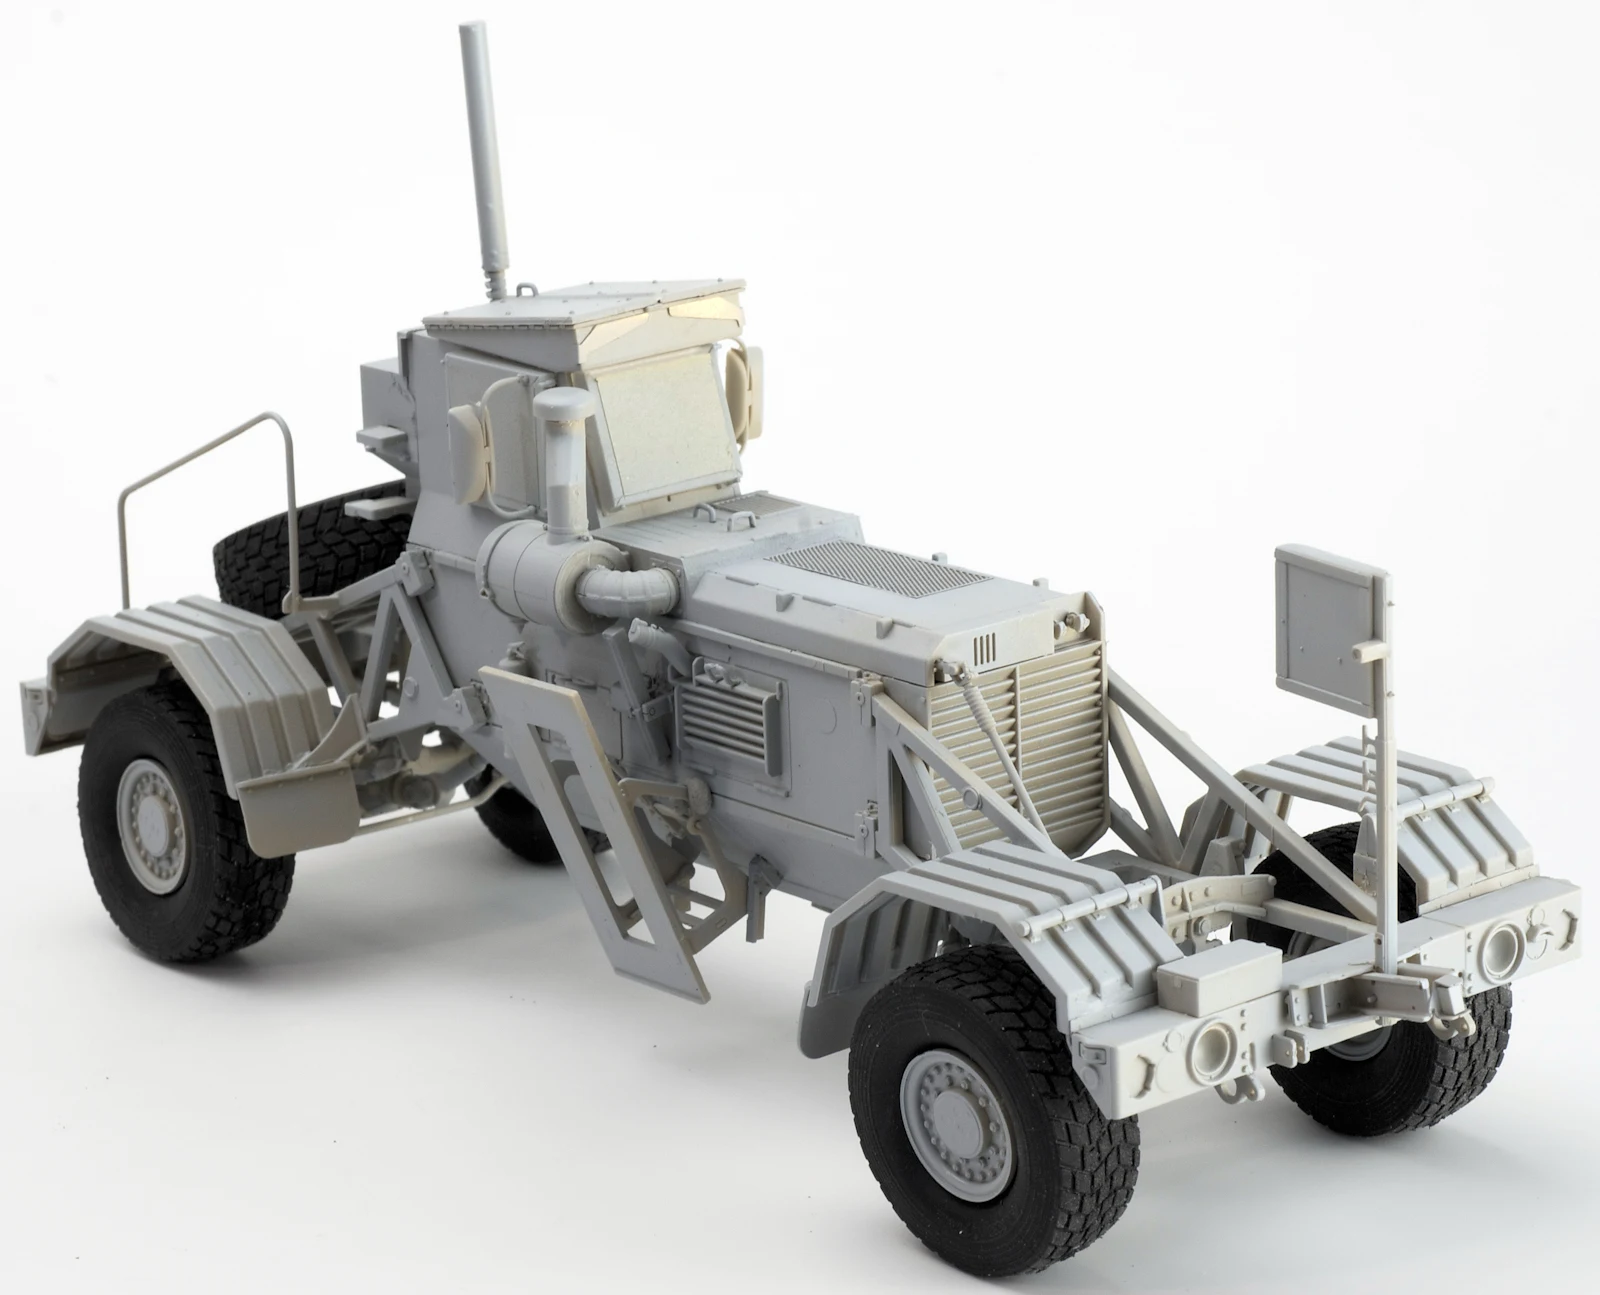
The model the received a loose coat of Alclad Grey Microfiller (excluding the rubber tyres).
It is worth noting here the wire that is supplied in the kit. The instructions make no mention of what this is for or where it should be used. After looking at reference pictures of the Husky, it is pretty evident that is has a web of cables strung over and around it, and the wire was obviously supplied to help replicate that.
It would have been nice to have been given some indication of where this should go. Even the box art seems to neglect this element of the vehicle.
I am planning on adding the wiring to the model after it has been painted, but I think, given this is one of the defining elements of this vehicle, and it was included in the kit, there really should have been some help with how to use it.
Conclusion
I was looking forward to getting my hands on this kit when I first saw it. It is a unique looking vehicle and something a little different from the norm.
This is the first Panda kit I have built, so I was looking at it with fresh eyes. As I got through the building process, it became really clear that there were a number of shortcomings with this kit. The lack of detail on the instruction sheet. Neglected and out of registration decals. Ambiguous placement of parts. Parts with no mention and some elements with soft detail.
It is really frustrating because these were things that would have been so easy to fix. The best way I can describe it is it felt like the junior at the company was given this as their first project. Is that harsh? Maybe. It really isn’t that bad. Just frustrating more than anything. It did build up into a reasonably looking Husky, and with a decent paint job, some wiring and some weathering, it should scrub up OK.
I am yet to see the AFV Club offering, so I will certainly reserve any comparison between the two kits other than the pricing. The Panda kit is priced considerably lower than the AFV Club kit (well at least here in Australia), and there is probably a good reason for that.
All this said, don’t let me turn you off the kit. Just go in with your eyes open. It is reasonably priced when compared to some of the other modern releases that are on the shelves, and with a little patience and some research, you will be able to build yourself a tidy little Husky. Or, if you were really adventurous, you could use the kit as the basis of a Mad Max inspired vehicle, or in a Zombie diorama or…. Well, you get the picture.
Painting and weathering review is at the link below if you would like to know hw to get the most out of your Husky III...
Clayton Ockerby
Thanks to Panda Hobby for sending us this kit to make up for you all, Check out their kits on the Kittyhawk/ Panda Hobby page...
See more of Clayton’s work at his website “The Workbench” or join him on his Facebook page


