


Construction Guide: M3 Lee Early – US Medium Tank
Manufacturer – Takom
Kit Number - 2085
Scale - 1/35
Price - ¥4,640 • $43 • £32 • €36 from Hobbylink Japan

When we last left Takom's new M3 Lee, it was fully built up,
minus the link and length tracks, and with the addition of some nice turned
metal barrels courtesy of RB Models. Time then to hit it with some olive drab,
and get it ready for a spot of Soviet lend-lease action.


The first step was to give it all a good coat of primer.
This will give a good base for the following paint layers, and also tie in all
the turned metal and etched brass components. In this case I went with AMMO's
regular black primer as this provides a strong base on both metal and plastic
parts, and leaves a nice smooth finish for the main paint coats.

With the primer dry, it was for the first base coat. As
mentioned above, this will be olive drab, despite the instructions calling for
4BO Russian green for this marking option. For the most part the lend-lease
tanks retained the colour they were originally supplied in. Here I initially
decided to experiment a little to get the olive drab tone, although I ended up
going in a more traditional route. The original OD applied to US tanks in the
war was actually a mix of black and ochre paint, and I thought I'd see if I
could try to replicate this. I mixed an ochre colour from Tamiya red and dark
yellow, then added black into this until the tone looked about right.

I was relatively happy with that initial coat, and decided
to press on and add a highlight coat mixed again from Tamiya acrylics. This
resulted in a nicely faded look but, to me, the overall tone just wasn't
working. I quite liked the look, but it just wasn't shouting 'Olive Drab' at
me.

After putting the model aside for a couple of days to think
it over, I finally decided to revert to a more traditional OD. For this I
switched to AMMO and used their Olive Drab Base (A.MIG-926) with a few drops of
Dunkelgelb (A.MIG-010) mixed in. This was painted straight over the Tamiya
colours, so they will have influenced the final look to some degree. Although
the new finish isn't as tonally interesting as the previous one, and is maybe a
bit on the conventional side, I was far happier with the overall look.

This too got a highlight coat, again using the AMMO OD Base,
but this time lightened with Ochre Earth (A.MIG-078), and Clay Brown
(A.MIG-079), to bring some of that ochre-y tone back to the finish. The end
result is maybe not radically different to what I had with the Tamiya colours,
but it looked more 'right' to me

With the main painting done, I gave the whole model a gloss
coat, as there a quite a few decals to apply for the lend-lease version. In the
past, I've always got on well with Takom decals, but the ones supplied here
proved to be quite troublesome. The main problem was that they were just too
thick, and no amount of setting solution would lessen the very obvious step at
the edge of the carrier film. In addition, despite initially laying down flat,
as the decals dried some quite noticeable air bubbles appeared under them. Once
they were fully dry, I pierced these bubbles with a pin, and added more decal
solution, but I couldn't eradicate them completely. In the end I hoped the
weathering would hide the worst of this, which to some degree it did, although
some silvering and the carrier film edges still showed up at the end.

When it came to the red star on the turret, I did initially
try the decal, after first trimming the carrier film right to the edge of the
printing. Again though, the thickness of the decal caused problems. The turret
features a very nice cast texture, but the decal simply wouldn't sink down into
that texture, despite copious amounts of Micro Sol being applied. I finally
decided it would be simpler all round to mask and spray the star instead. The
mask was traced from the star decal, then cut out from Tamiya tape.

The star was then sprayed with AMMO Matt White. I only cut a
single mask so, after giving the first star a couple of minutes to dry (aided
by blowing air over it with the airbrush), I carefully lifted the mask, and
reapplied it to the other side.

The edges of the stars were then masked with lengths of
0.4mm Aizu tape (handy stuff), and the main red area was sprayed. Doing the
markings this way resulted in all that subtle texture being retained and
removed any worries about the decals silvering. In fact, if I'd known in
advance that the decals would be awkward, I'd have hand painted the various
slogans on the main hull as well. What you can no doubt also see in the photo
is the fact that I managed to drop the turret on the floor whist spraying the
stars resulting in chipped paint on the barrel. Have I mentioned before that
I'm supremely clumsy?

With the main markings in place, the Lee was really starting
to look the part now (despite the chipped barrel). Next up would be the detail
painting.

There isn't actually all that much detail painting to do.
Mainly just the onboard tools, which were picked out in the appropriate colours
with AMMO acrylics.

Before starting on the main weathering, I applied some paint
chips, using a sponge, to the slogan decals on the hull. This was partly done
to give them a worn look, but also to help hide some of that silvering.

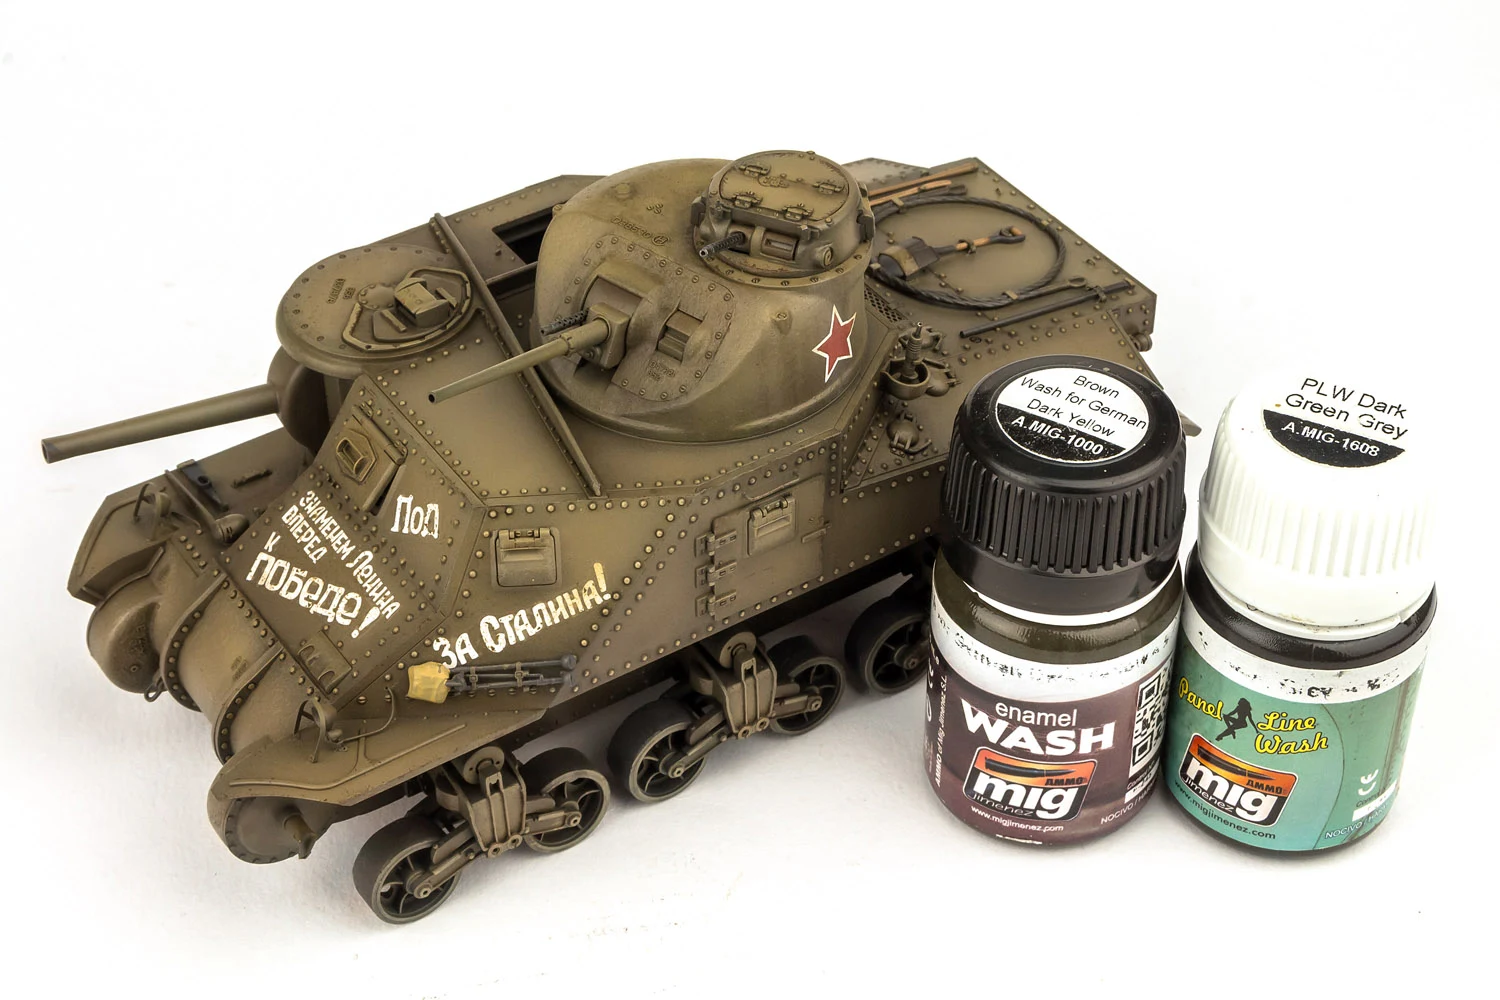
I now started on the weathering proper, beginning with an
overall pin wash to highlight all the raised rivet detail covering the hull.
This was done with a couple of different AMMO washes to give a bit of tonal
variety across the model.

Once the pin wash was dry I started to build up some shading
and highlighting over the hull. Rather than oils or enamels, I used acrylics
for this, mixed with a glaze medium to make them more blend-able. Various AMMO
and Vallejo colours were used for this, from blacks and dark greys through to
pale brown and sand tones.

This shading/highlighting stage helps to define the various
panels and sections of the model and prevents the finish from looking too flat,
which is always an potential problem with a single colour scheme. It's also a
really easy step to do, as the glaze medium keeps the acrylic paint workable
long enough to get smooth blends.

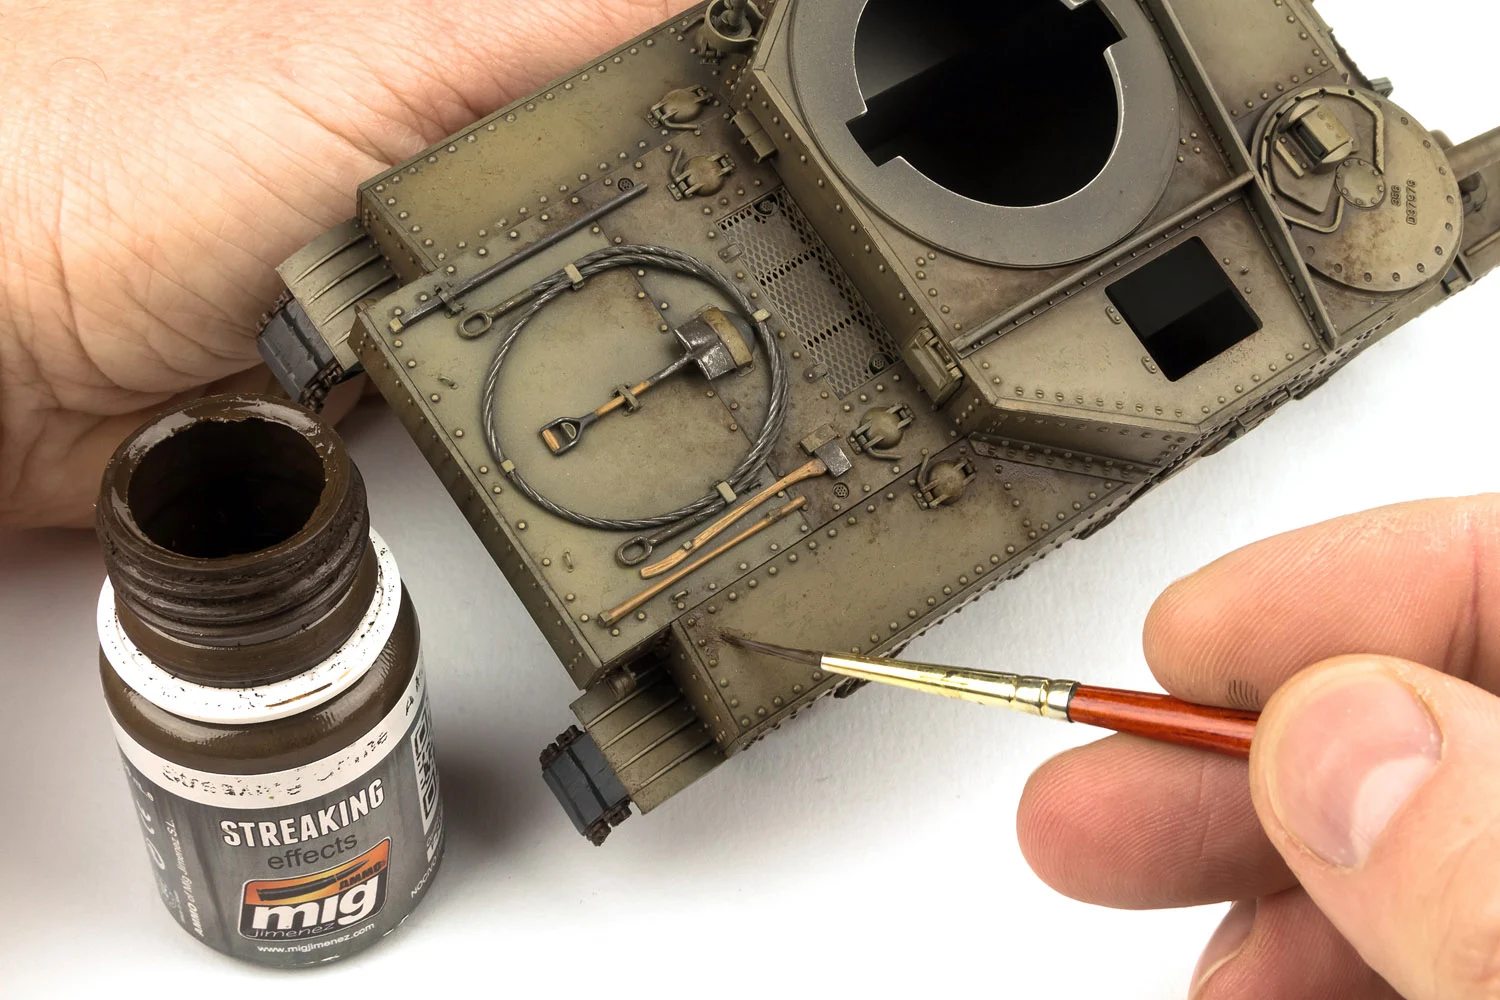
Further discolouration was added with AMMO Streaking Grime.
This was used to add actual streaks on the sides of the hull, and more diffuse
areas of dirt on the upper hull. This was applied in a stippling fashion to
keep the effect random.

My overall plan for the Lee was to give it a wintry look,
and I wanted the lower hull to have a heavy build-up of dark clumpy mud. To
that end I mixed up a gloopy concoction made up of dark earth pigment, garden
soil. Plaster, fine sand, green tea leaves and grass flock, bound together with
acrylic resin and a little water.

The mix was then daubed over the lower hull, with the
heaviest applications under the fenders and around the bases of the suspension
units.

Once dry the mud mix looks nicely cruddy, but will still
need more work to add darker, damper areas. The acrylic resin binder makes the
mud very robust, and you can easily add more weathering with oils/enamels
without damaging what's already there.

AMMO Heavy Mud washes and Engine Oil were used to add the
darker areas to the previous mud mix. These were applied both directly by
brush, and also by flicking the wash onto the surface.

Time to deal with the tracks now. The upper run had already
been built up on the supplied jig. This was painted with a dark rust colour,
after which the rubber track pads were picked out in dark grey. They got a
heavy coating of pigment which was fixed in place with a mix of pigment fixer
and streaking grime wash.

I'd already glued the single link tracks to the idler and
sprocket, and once painted, they were added to the hull along with the upper
run. I could then build up the remaining link and length sections to form the
lower run. I did run into a small issue here, as I ended up with a small gap
(less than one link) where the bottom track length met the short run down from
the sprocket. Sliding the bottom length forward only resulted in the same gap
appearing at the back end. In the end I had to trim down one of the spare links
to fit the gap.

Once painted though, the slightly butchered link didn't
really show up, especially as it was right on the bottom corner. Apart from
that, the link and length tracks worked very well. They certainly cut down on
the assembly time compared to full indi-link tracks.

The rest of the track run was then weathered in the same
manner as the upper run. I didn't bother with the base of the tracks of course,
since you'd never see this area unless you turn the model upside down.

I now needed to bring some of that muddy look from the lower
hull and tracks onto the upper areas, as they were looking quite clean in
comparison. To start with I added some dry pigment into the corners and other
nooks and crannies, fixing it in place with pigment fixer.

The same pigments were used to enhance the mud build-up on
the suspension units.

More pigments, this time mixed with a dark mud wash, were
flicked over the hull sides, especially towards the rear, where mud would be
flung up by the wheels and tracks.

AMMO fuel and engine oil washes were used to add stains
around the fuel filler caps on the engine deck. These were applied in several
light applications rather than a single heavy one, allowing the effect to build
up gradually.

Wet Effects (A.MIG-2015) was applied around the raised areas
on the hull, to show damp patches. This effect works very well when you've
already applied pigments, as the damp areas contrast well with the dusty finish
from the pigment.

Up until now I'd left the upper hatch off, as I was
intending to pose it open. Before painting the hatch, I added a few rivet heads
and a basic latch from plastic card, as the kit part has no detail on the inner
side. The hatch was glued in place, and to liven up the build a little more I
added a resin stowage bundle from Value Gear.

With the hatch open, I'd need to add a figure to disguise
the empty interior of the model. I found a suitable one from Evolution
Miniatures (EM-35134) which fitted the build nicely. The detailing on the
figure was excellent and, being essentially a single part casting, with just
the head and pistol holster as separate parts, the construction was a breeze.

For painting, I used a simple black and white basing
technique, which entails priming the figure in black, them simply spraying
white directly from above the figure. This instantly gives you a lot of the
shading and highlighting in one step. The main colours were then painted over
this, using thinned paint to allow the shadows and highlights to show through.
A little extra shading/highlighting was added to define those areas that
weren't picked out with the black and white basing. Finally, the face and other
small details were picked out and the figure was done.

One last step on the model to increase the wintry feel was
to add some remnants of melting snow. This was made with bicarbonate of soda
mixed with more wet effects. The resulting slushy mix was added in corners
where snow would accumulate and remain after more open areas of snow had
melted.

Once dry, the snow has a nice, frosty texture that looks
quite realistic, especially with the wet effects representing melt water around
the snow.

With that last step done, I could call the Lee finished.
Overall this has been a great build, with only a few areas during construction
needing some extra attention. Nothing major though, and certainly nothing a
little basic modelling skill can't easily deal with. The rather poor decals
were a surprise, as Takom are usually excellent in this area. The problems
could simply be down to me and my application method.
Here are some details of the Lee close up


I know some people would have preferred to see an interior
supplied with this kit, but I'm fine with its absence. It certainly makes the
construction quicker and unless you're going to pose all the hatches open it
doesn't matter anyway. For those that do want a full interior there are more
Lee's and Grant's in the pipeline from another manufacturer, but expect a more
involved assembly as a result. As of now though, this is without doubt the best
Lee (and Grant) available at the moment, and with more versions on the way from
Takom, there's bound to be one that'll take you fancy.
Here it is in a larger walk around showing the whole tank and its freezing crewmamber


Highly recommended
Andy Moore
Thanks to Takom for sending us this kit for Andy to review and build - expect his painting and weathering of the model to come right here in the next few weeks
Thanks to the guys at AMMO of Mig Jimenez for sending the painting & Weathering materials to Andy to use on this kit

This figure of the Russian tanker is available from Evolution Miniatures
