


From Meng Models
Product No# LS-007
Scale: 1:48th
Product Link
Previous articles in this build
In-Boxed: Gary examines Meng's new 48th scale Lockheed Martin F-35A Lightning II
Pt.I: Cockpit & Pilot
Pt.II: Bodywork & plumbing
Pt.III: Canopy, Weapons & sealing the deal.
Pt.I: Cockpit & Pilot
Pt.II: Bodywork & plumbing
Pt.III: Canopy, Weapons & sealing the deal.
Moving now to prepare for masking and paint I used the primer to check my construction and seam work. My primer of choice is Tamiya Fine Grey Primer which comes in a rattle can. I decant this using a straw into a bottle and then apply with my airbrush, giving me far more control. This paint is lacquer based and works well as a primer as the lacquer seems to lightly etch itself into the plastic resulting in a super smooth and resilient base coat.


As I approached the masking stage I had some idea of how much work the RAM panelling was going to be. My initial plan was to mask all the RAM panelling myself, but as I read a few other builds online I realised that I had grossly underestimated the work involved and was therefore pleased to find a pre-cut mask set for the Meng kit made by Galaxy Models (D48003). A quick eBay search located these for sale for around US$18 in China with free postage.

The Galaxy Models (D48003) mask set provides precision laser cut masks made from Washi (aka Kabuki) paper tape (the same stuff used by Tamiya for their tape). Much like Tamiya tape, it's very flexible and forgiving so you can remove and reposition several times to get the alignment just right. The set includes masks for canopy, wheels and of course the main attraction the RAM panels.

With the masking complete all I had to do was select the right colours and start spraying, sounds easy right? Well, it turned out to be anything but easy. The more photos of F-35's I looked at the more I became convinced it was a Lockheed Martin conspiracy to paint these things in a grey that was almost impossible to duplicate with any consistency. Of course, photos of aircraft at different times of day and at different angles to the camera all resulted in the paint looking anything from a very warm grey to a cold blue-grey. If you google for F-35 paint you will end up finding that they are all painted in a standard colour, FS36170 Camouflage Grey. At the time of writing, there are several model paint manufacturers that make FS36170 out of the bottle, including Mission Models, Mr Paint, Hataka etc. Many of the kit manufacturers will have you using FS36118 Gunship Grey and its the reason I included the reference photo below to sway you away from that idea.

As I had some good quality publicity photos of the RAAF aircraft, taken in what seemed like good lighting conditions I decided to settle on this grey as the basis for my paint matching. Perfect solution, no, the best option I could find given I did not have physical access to my very own F-35 in the backyard, yes. With this in mind, I did a bunch of test spraying using the pre-tinted FS36170 and found none of them to my liking (some were too dark, some too warm etc).

It just so happened that around this time I got my hands on some of the new Tamiya Lacquer range and while I was mucking around test spraying these I noticed that one of the new greys in this range LP-13 IJN grey (Sasebo Arsenal) actually looked like a pretty close match (at least to my eyes) to what I was after. Needing to make a decision I bit the bullet and covered the Meng airframe in this colour. The end result, I was pretty happy with how it looked.

With the base coat down, next came the masking and then more masking and finally more masking. After I applied half of the masks to the bottom of the model I found myself wondering how I ever thought I would do this manually. If you have this kit to build, do yourself a favour and order that Galaxy Models mask set now. Stop reading this and order it, seriously :)


 The weapon bays were masked with some large chunks of soft foam (quick and easy). The areas in-between the pre-cut masks were filled with small sections on Tamiya tape to cater for overspray.


The next colour I had to decide on was for the RAM panels themselves. Initially, I settled on Dark Gull Grey FS36231 but after a couple of tests decided it needed to be a bit warmer and liked the effect I got when mixing it 50/50 with FS36170 Camouflage Grey. I happened to have both these colours in the Mr Paint range but you could mix something similar from most any paint manufacturer.

One thing to note is that the pre-cut masks do not give you everything you need to mask the whole model. In particular, much of the wing leading slats and wingtip need to be masked by hand using reference photos. Likewise, the tail (vertical and horizontal) needs to manually masked. I have included a bunch of close up photos below to show how I did it to save you some time.


My RAM panel mix was again applied to the upper surface and the wonderful Galaxy Models masks removed (did I tell you to order those masks yet?). The pace was starting to pick up now and I was keen to get to decaling. Three light coats of Future gave me a deep solid gloss clear to protect the paint below and give the Ronin Graphics decals something to adhere to. Note how the gloss clear has considerably darkened the grey. This is normal and will lighten up once I apply the final semi-gloss Have Glass V finish.


I took the liberty of painting a couple of the wing and tail panels in the very distinctive epoxy primer colour. This was just to simulate some replacement panels on the aircraft (and break up all that grey). Mr Paint has this odd colour in their range as MRP-191 US NON-CHROMATE EPOXY PRIMER.

The hand silk screen printed decal sheet from Ronin is physically quite small, even though you are provided with enough serial codes to do any of the RAAF's first 12 aircraft (eventually we will get 72 with an option for more). The decals are very finely printed with even the smallest stencilling being readable under sufficient magnification. Even though it might not look it here on the blue backing paper the decals colours are accurate once removed from the sheet and applied to the model.

Speaking to Steve from Ronin about the best way to apply his decals, he recommends to not use commercial setting solutions rather plain water with a few drops of mild washing detergent to act as a wetting agent. I gave this a go and it worked but I'm a long time Microscale Set and Sol user and found myself reaching for these bottles after a while just because it made me comfortable :) The decals performed perfectly, being super thin and they nestled down into the finest of detail all by themselves.


I applied the major decals first and allowed to dry overnight. I then systematically worked my way around the airframe and applied all the stencils and safety markings. I regularly checked reference photos but could not find any markings that Ronin had missed, a testament to their attention to detail. When all decals were dry I sealed them with a final coat of gloss clear (Future in my case).

The last stage of the painting was the clear coat. It was now I had to decide if I was going to attempt to tackle the Have Glass V finish seen on the F-35. From what I can tell the Have Glass system involves the addition of metallic particles to the paint to reduce the radar signature of the aircraft. When seen in photos it has that shiny, almost slimy look to it from certain angles. Several paint manufacturers have now released Have Glass clear paints and I tested the Mr Paint option but was not happy with the finish it gave. To my eye, it was too matt and the suspended metallic particles too large which made them obvious when sprayed over the dark grey.


In the end (after much experimentation) I opted for a custom mix of my own using Mr Color lacquer paints. A 10:1 mix ratio of Mr Color C181 Semi-Gloss clear and C8 Silver was used and heavily thinned with Mr Color Levelling Thinner. This was lightly misted onto the entire model (over the paint, RAM panels and decals). I found that about 3 coats gave a reasonable effect without becoming too noticeable.


If you have ever used Mr Color Semi-Gloss clear you will know that it is anything but 'semi-gloss'. It's very glossy and so it was necessary to tone it down with some Mr Color C182 Flat Clear until I got the level of sheen I wanted. The inclusion of the Silver paint in the clear also had the expected effect of visibly lightening the grey paints it was applied over. After a bit of tweaking and adjusting, I was eventually able to get a finish I was satisfied with.

With the main airframe now complete my attention returned to the add-ons such as weapons, pylons and of course the exhaust nozzle. It seemed I had been mixing and blending just about every colour on this model so far, why stop with the nozzle. I used Mr Color C10 Copper as the base and added Red, Orange and White until I got close to the effect I wanted.

Once the paint was dry I sealed it with Clear Gloss and then used a dark wash to separate the petals and highlight the details. The Galaxy Model mask set had pre-cut segments to help mask the serrated tips of the nozzle.

As noted previously in my write up, I wanted to display my model in “Beast Mode” with all the external pylons fitted and fully loaded. I had already prepared the weapons from various sources and now I had to paint, weather and decal them. Working with modern ordinance like LGB and JDAM bombs means a lot of tricky masking as the weapon has several components that are different in colour. It means the bombs look way more interesting, it also means way more work.

The body of the bombs were first painted XF62 Olive Drab and them some weathering applied with a light overspray of XF60 Dark Yellow which made the Olive Drab look a tad faded. This was all then masked off and the Mr Color C308 FS36375 Light Ghost Grey components sprayed.
 I also opted to spray the tail unit on one of the GBU-12s in FS34095 Medium Field Green to mix things up a bit.


For the stencilling on the weapons, I used a combination of those provided in the Meng weapon sets and the excellent (now out of print) Afterburner USAF Armament Decal Set Part 2 for the JDAMs and GBU-12 LGBs. After decaling and final washes, I applied a generous Flat Coat to tone everything down a bit. In the end, I think they look good and add that bit of interest to the otherwise monotone F-35.

FINAL THOUGHTS - Meng F-35A Lightning II (LS-007)
Overall, I think that Meng has another winner here. As a follow-up to their very nice P-51D in 1/48th, I think they have improved. The way they have engineered this kit makes the build super simple, the fit of the parts is excellent and the accuracy (as best I can tell based on reference photos) is spot on. Even though it took me forever to sort out my paint choices and Have Glass solution that was no fault of the kit itself, just me being an old fuddy-duddy (more than usual).
I went back and looked at my initial impression in the Box Review and having now built and painted the model I believe that the RAM panelling is actually just about right for this scale.
With two Meng aircraft under my belt now I really like what they have been doing. I'm hoping they continue to work on new aircraft and that soon we hear of upcoming releases.
Close-ups of the model to show you the great detail...


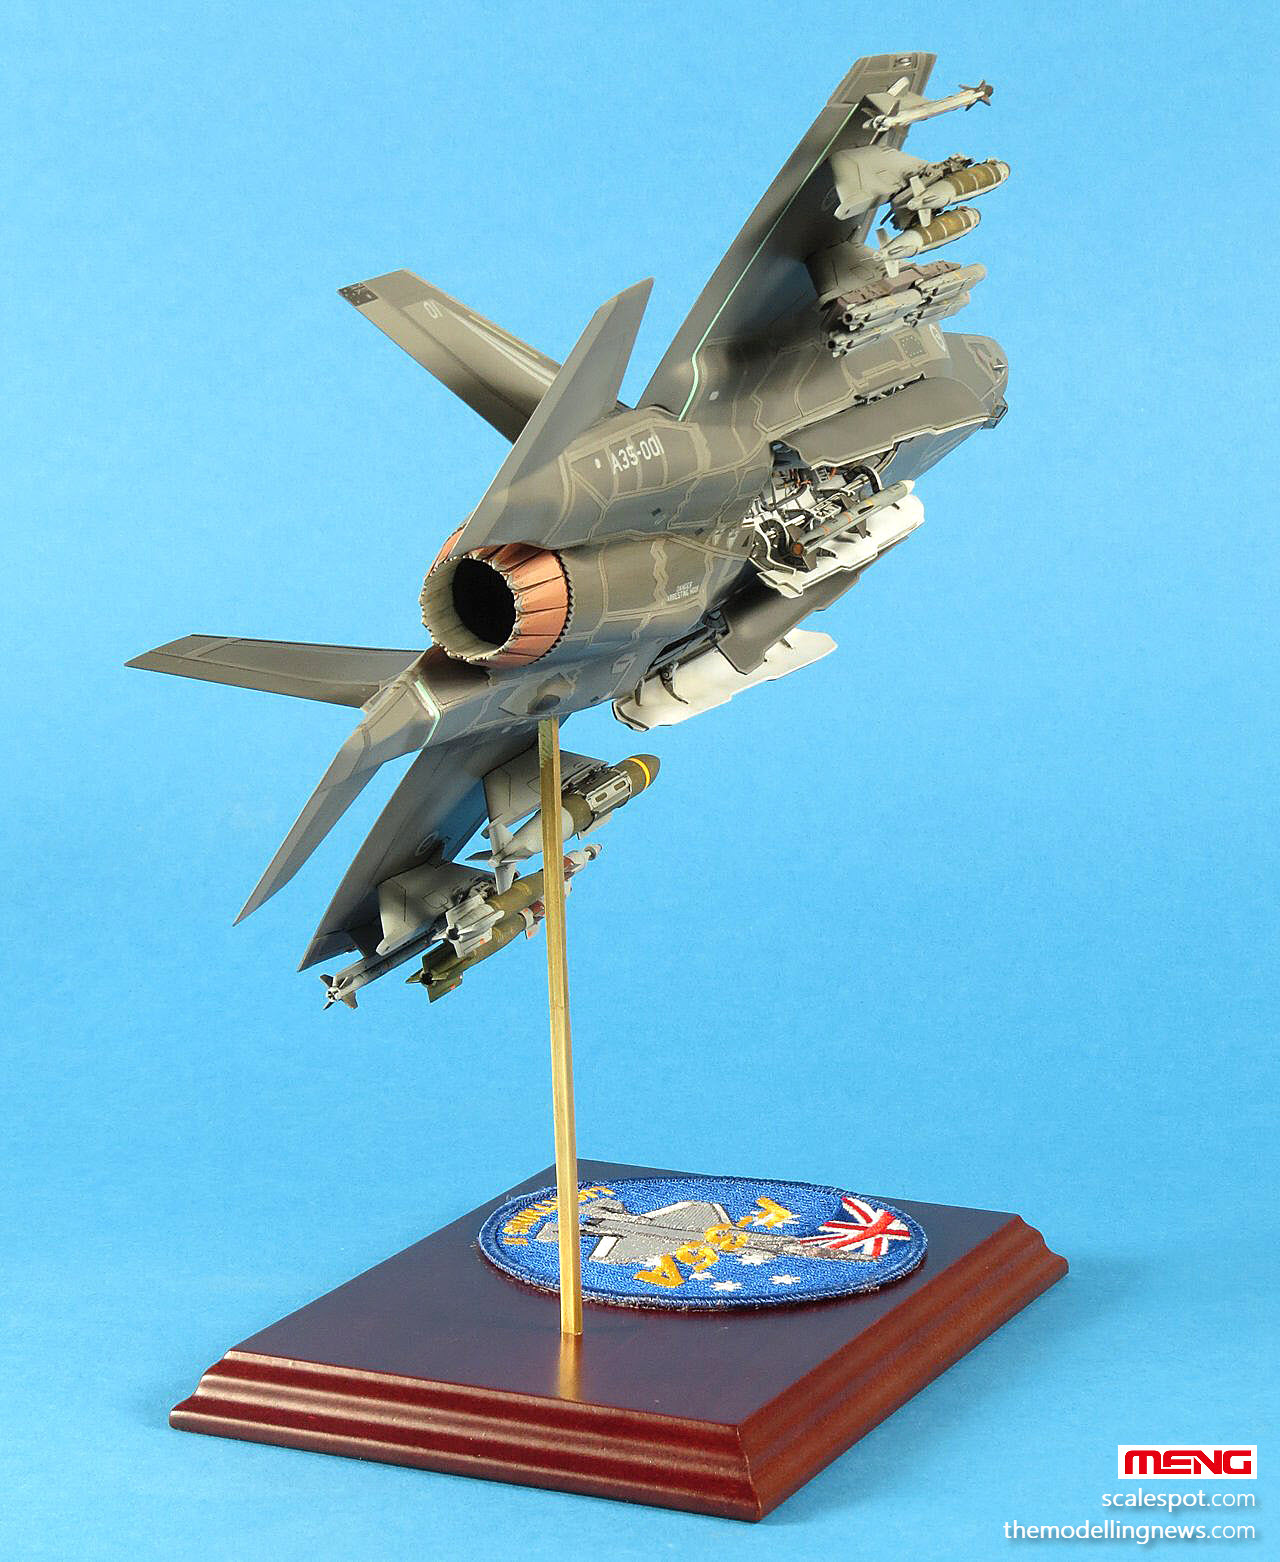
To finish off let me leave you with some photos of the finished model displayed in a tight bank to better show off all that extra work underneath. I'm happy with how it turned out and of course should I ever build another one there are things I would do differently, wouldn't we all.
Here it is in a larger walk around...


Gary Wickham
Many thanks to Meng Models for sending this kit to Gary to review and build.

See more of Gary's work on his website Scalespot.com