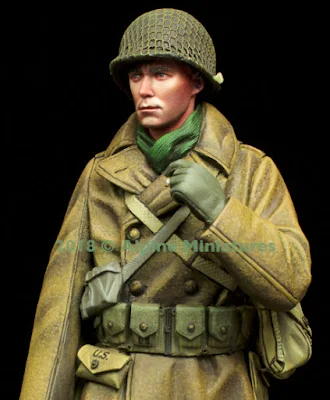
Alpine Miniatures has released another larger scale 1/16th figure from the WWII era. This time, the cold winter of 1944/45 in the European theatre is experienced by this GI sculpted by John Rosengrant. See what he is made of and how he goes together in our review...
Construction Review: WW2 US Infantry Winter 44-45
From Alpine Miniatures
Kit No# 16040
1/16th scale
Sculpture by John Rosengrant
Boxart by Dr. Jin Kim
Cast in light grey resin
The figure comes with 2 different heads choices.
Product Link on the Alpine Miniatures Website
Every few months Alpine Miniatures release a few different figures. Two in 35th scale and a single figure in 1/16th scale. It is rare we get to review these larger figures, and even rarer that we get one sculpted by John Rosengrant - so this one took our interest. Lucky for all of us we could put this one together in a review to show you what it is made of.
The Figure's Setting:
The subject of this figure release is that of a U.S. GI in the winter of 1944/45, wrapped up against one of the harsher winters there for a long time. He could be from the Battle of the Bulge or from the fighting for the Hurtgen forest, or even later before the last push into Germany who knows - the choice is yours.
The Package:
These larger figures from Alpine Miniatures feel kind of special to me. They always come in a large, blue box with a premium feel to the finish of it. Inside you find lots of padding and zip-loc plastic bags to secure the bits together and to make sure you haven't lost anything. the whole package is well presented and definitely, the match (and better) of any other figure sets you would see on the market.

Construction Review: WW2 US Infantry Winter 44-45
From Alpine Miniatures
Kit No# 16040
1/16th scale
Sculpture by John Rosengrant
Boxart by Dr. Jin Kim
Cast in light grey resin
The figure comes with 2 different heads choices.
Product Link on the Alpine Miniatures Website
Every few months Alpine Miniatures release a few different figures. Two in 35th scale and a single figure in 1/16th scale. It is rare we get to review these larger figures, and even rarer that we get one sculpted by John Rosengrant - so this one took our interest. Lucky for all of us we could put this one together in a review to show you what it is made of.
The Figure's Setting:
The subject of this figure release is that of a U.S. GI in the winter of 1944/45, wrapped up against one of the harsher winters there for a long time. He could be from the Battle of the Bulge or from the fighting for the Hurtgen forest, or even later before the last push into Germany who knows - the choice is yours.
The painted boxart example by Dr. Jin Kim showing just what can be done with this figure and a steady hand.
Notice, two constants in these pictures of US GI's during this winter 1944/45 period? The M1 steel helmet and the WWII melton wool overcoat
We will look at each of the package of the kit, the figure's parts in isolation, put the kit together, and compare the objects to the real things in this review.The Package:
These larger figures from Alpine Miniatures feel kind of special to me. They always come in a large, blue box with a premium feel to the finish of it. Inside you find lots of padding and zip-loc plastic bags to secure the bits together and to make sure you haven't lost anything. the whole package is well presented and definitely, the match (and better) of any other figure sets you would see on the market.
The Resin:
The resin parts inside are cast in a light grey colour, not too smelly with no excess release agent on it. There are some slight seams to deal with, but these are only minor and need a careful scrape with the knife. There are no surface bubbles on the thirteen parts of the figure kit.
Each of the resin parts comes attached to a stub that can be pretty easily removed. The only part that I had some problems with was the plain helmeted head choice, where the stub is actually on top of the helmet. Not that this was difficult, it was just a little more difficult to retain the same helmet texture surface detail once it was removed.
OK, we will look at each of the parts now...
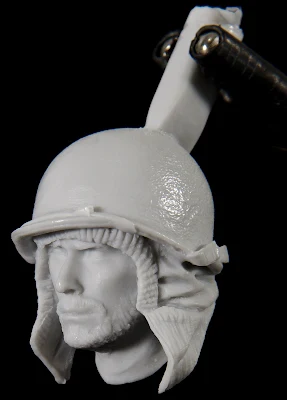
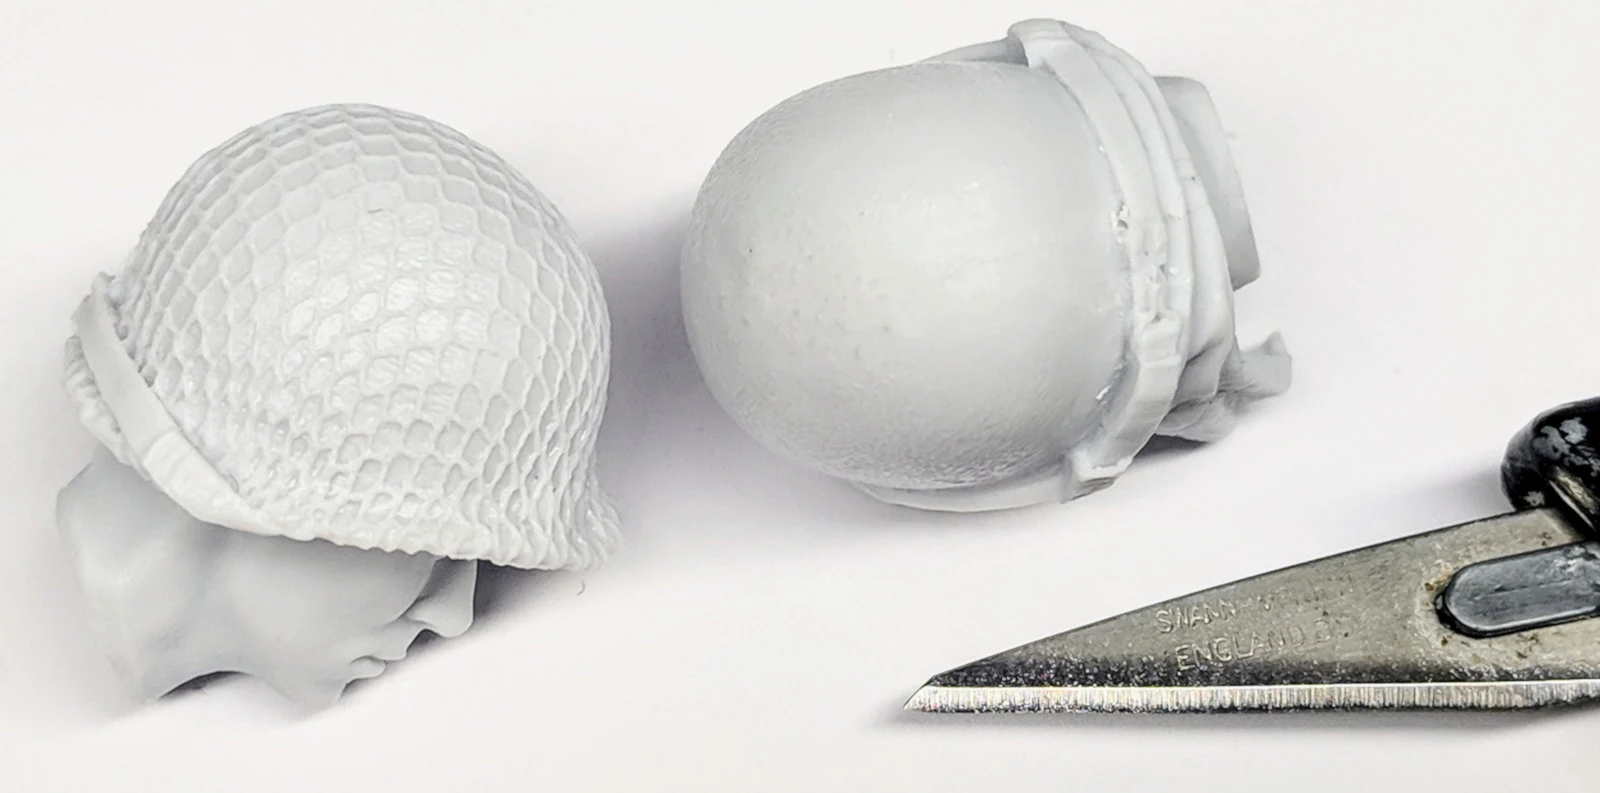
The head(s) - there are two headgear choices for this figure, both supplied with similar but not the same facial features. They are both the same guy - but one of the head choices (with the bare M1 helmet) features a heavily bearded face, while the alternate has a camouflage net covered M1 helmet with a freshly shaven face on the man. Smart I thought, as both choices give us an opportunity to show depth in either netting of the man's beard.
There is that resin stub on the top of his helmet, while the other choice is joined at the neck which is an easier removal.
Examples of both the bare and net covered helmet on a pair of GI's in January 1945 in the Ardennes.
The US standard issue WWII era M-1 helmet was developed as a replacement for the M-1917 helmet that had seen use since WW1. It was designed by using the crown of the M-1917, removing the brim and adding extensions to protect the neck, ears, and forehead. The resulting form was then used as a template for the production of a helmet body from a single piece of Hadfield Manganese Steel. The liner and suspension were developed after a modified Riddel Football helmet. Here you see the clean shaven GI and his M1 helmet with cloth net choice.
You can see the face of the man, with strong male features, the jaw, thick eyebrows and high cheekbones are all easily made out. Also, the netting on the helmet was very impressive to me, with dpeth of space underneath the net where the material stretches to fit over the brim and the lip of the edges of the helmet.
The pattern of the netting is reminiscent of the British pattern of a square shape, you can see on the side the man's ear and more of his jaw. I did not see until I blew this picture up many times the very slight seam that will need to be removed from the rear of the man's helmet. Not a big deal for a careful modeller.
The second choice is just as interesting and a little departure in the fact that usually, Alpine Miniatures releases have the same face, this one DOES, however, he has a very thick beard. So many soldiers that were cut off from their lines in places in the cut-off Bastogne pocket in the harsh winter of 1944/45 grew facial hair, and this choice gives you that hirsute GI that has been away from the regulated parade ground routine, fighting for his life against the enemy and the cold.
Again this man has the strong masculine features typical of Mr Rosengrant's work. He sculpts handsome dudes, and this alpha-male is only made tougher looking by his scruffy bearded appearance. Those of you with sharp eyes will notice the rough aggregate surface of the helmet, typical of those M1's made before 1951 when the finer sand was used on the helmets.
The thick woollen thermal liner of the helmet is another feature of this head choice. Wrinkled and folded at the neck and protruding down over the eyes, this is sculpted thickly as they looked in real life and add something really different to this alternate head choice in the kit. Again, there is a slight seam on the rear of this helmet that will need to be removed and the texture recreated.
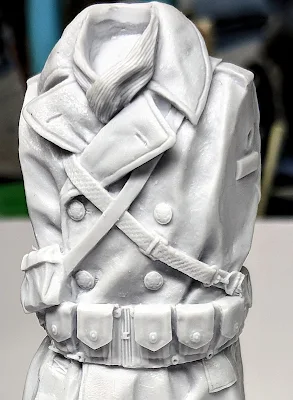
The torso is next. This torso of the figure features the WWII-era melton wool overcoat. In mid-1942 a developmental plan was initiated to replace the melton wool overcoat with a two-piece trench coat design consisting of a cotton shell and a light, removable wool liner. As events unfolded in the ETO during the winter of 1944-45, the Melton overcoat was unexpectedly called into front-line service. Prior to the onset of winter, failure to build up an adequate supply of the new, warmer M-1943/wool field jacket combo, and the decision to rely on the olive drab field jacket, left troops woefully short of warm clothing. Out of necessity soldiers became dependent upon their melton overcoats for warmth in the field. Photographic evidence from the ETO is plentiful showing the melton overcoat in use at the front in 1944-45
You notice int he comparison of the coat to the resin figure the similar wavy thickness of material that is depicted, the same collar and lapels that are pinched underneath the straps of the bags that the soldier is carrying. The picture below with a GI (with a very fancy helmet cover) shows how realistically the cloth is captured here in resin. If you look closely also you can see the American eagle on the buttons!
FYI most of the buttons in wartime were the plastic types with metals in short supply...
You may see the notches on the sides of the figure the notches that fit the arms into them to ensure the snug fit of the arms in the exact correct position. Before we go on, note the ammunition pouches for his M1 Garand rifle and lastly how the coat flares and sits heavy at the bottom where the weight of the fabric pushes it open at his knees.
You may notice on his feet under the wrinkled and folded thick pants the figure is sculpted in the four-buckle U.S. -issue rubber overboots with tire-tread soles. The boots, stock number 72-0-452, were made by a number of tire companies to include B.F. Goodrich and Goodyear Rubber Co as well as more traditional shoe companies that specialised in rubber-soled footwear such as Converse and LaCrosse and were based on the pre-war “Royal Walrus” galoshes made by the United States Rubber Company.
This well-known picture of a GI with a French girl on Valentine's day 1945 shows him wearing these boots - very well reproduced in this sculpt. You can see all of the catches and even the cross pattern of rubber on the toe soles
Moving on to the soldier's arms, these are attached to a casting block with a standard issue entrenching tool and two small bits of resin which I released were cigarettes - one spare you may be happy to know. Again you see the folds of the thick coat on the arms of the figure, The seam on the leather gloves he is wearing, and the flat but almost porous look of the canvas on the entrenching tool.
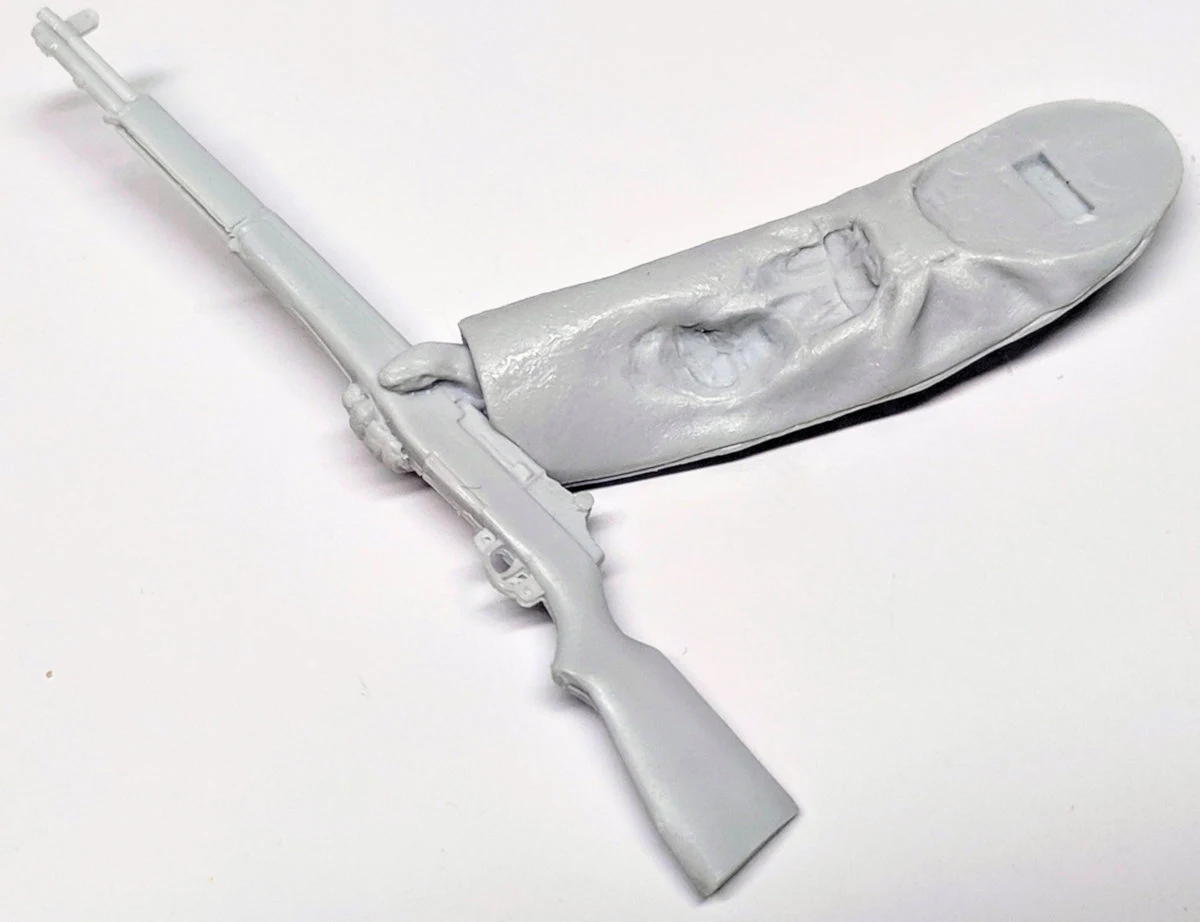
On the reverse side of these parts, you see the notches and sockets that fit into the body where I pointed hem out earlier. The only real work that had to be done on all of these parts to make them fit was the removal of the resin on the inside of these that connect them tot he stub. The hollow jacket sleeve will latter fit the other hand that is moulded holding on to his rifle neatly into the socket.
Another rein casting block houses some of this soldier's equipment. From left to right in the picture below, the U.S. Gas Mask Pouch (turned sideways here) identifiable by the three buttons on the front and canvas material, The standard issue canteen & canvas cover, and lastly the almost waffle textured M1942 Field Dressing Pouch. These are all shown wrinkly and full of texture details that painting will only enhance.
The reverse of these items shows again the notches, plus a little extra material on the water flask that fit into the holes in the torso we will look at in the next section of the review...
The last two casting blocks contain the M1 Garand and the resin strap that attaches to it. The hand, covered with a leather glove is holding onto the rifle in the balance point of equal weight distribution, the correct way to hold it at this angle which is important. Take a look at the gun, with the real thing below it - of course, pictures can show objects from a slightly different perspective, but this looks pretty spot-on for an M1 for me.
You can see the seam on the hand of the figure running down the thumb that he grasps the rifle with. Again the M1 looks like a great replica to me.
I know these two pictures below look the same, but they are from opposing sides of the strap. This will have to be bent into a flexible shape before they can be fixed to the rifle.
OK, so that is a round-up of the parts, let's look at how he goes together in our construction part of the review.
Construction & Engineering of the kit:
There are several parts to the kit, and only one way to put them all together. Easy you may think? however, in my experience, it is quite easy to misalign or to even put the wrong head choice on the wrong figure (ask me I have done it lol) so the notches and sockets that I have already shown you in the review we will look at quickly before we show you him all put together.
The heads - the helmet choice with the netting just needed a little seam clean up, while the other, plain M1 helmet choice had to be removed from that resin stub right on top of it. This created a smooth surface in the otherwise rough aggregate paint. I remedied this by adding a pitted texture gently jabbing it over and over with a hobby knife.
The head choices then fit inside the neck socket that quite nicely is covered over with the thick scarf the soldier is wearing - smart stuff.
The left-hand side of the torso of their figure shows the socket and lug for the arm, the entrenching tool and the hollowed out gas canister bag. these needed no adjustment before they fit perfectly.
You see the canvas bag and the entrenching tool underneath it sitting very naturally on the figure in this picture.
The right-hand side showing the canvas covered flask and joint that helps it secure to the body.
The right-hand side of the figure showing again the lugs and sockets that help secure the parts of this figure in place. The hand fitting neatly into the jacket sleeve socket, and the jacket fitting the lugs made for it.
The soldier's hand holding his rifle, note the hollowed out part of the sleeve where the packs of the body to sit inside. This allows the arm to sit naturally flat to the body. Notice here in this detailed picture the glove's texture on the hand.
To bend the rifle strap without breaking it I wrap it around a thick paintbrush so it bends a little more uniformly.
Once flexible enough and bent to shape the rifle sits on it's correctly moulded points on the M1, you can see here a little better the almost waffle texture of the medical pack and the eagle logos on the buttons of his coat.
Got a light? Lastly, we see the cigarett slip neatly between the sculpted left hands leading fingers. this for me is the icing ont he cake of this figure.
And here he is together! Firstly the head choice with a shaved face and netted helmet...

The second choice, and I think you can work out it is my favourite - the bearded version with a "clean" helmet.
Well, that is all I have to tell you about this figure.
The engineering is excellent and the construction took about fifteen minutes all up. The clothing, the equipment and weapon are all great replicas of the real thing, the details like the eagles on the buttons, the textures of the packs, the excellent overboots and canvas and the cloth of the overcoat. But I take my hat off to you Mr Rosengrant, at the effort you have taken on the faces that just top it all off to make a wonderful figure in 1/16th scale that screams "paint me".
Alpine Miniatures has a high bar for their figures, and this one reaches those heights with detail, fit and feel.
Adam Norenberg
Thanks to Alpine Miniatures for sending their figures to us to review for you. More about their range on their website.
Also here are both head choices painted up by the box artist Dr. Jin Kim - showing you what can be done with patience and a steady painting hand...


