


In-Boxed: Kawasaki Ki-45 "Kai Tei Toryu" (Nick)
Super Wings Series No. 13
1/32nd scale
From Zoukei-Mura
Plastic injection moulded kit
25 sprues total / four replicated in clear plastic. 2 sprues for transparencies
Vinyl canopy masks included
Markings for two aircraft.
60-page A4 full-colour instruction manual

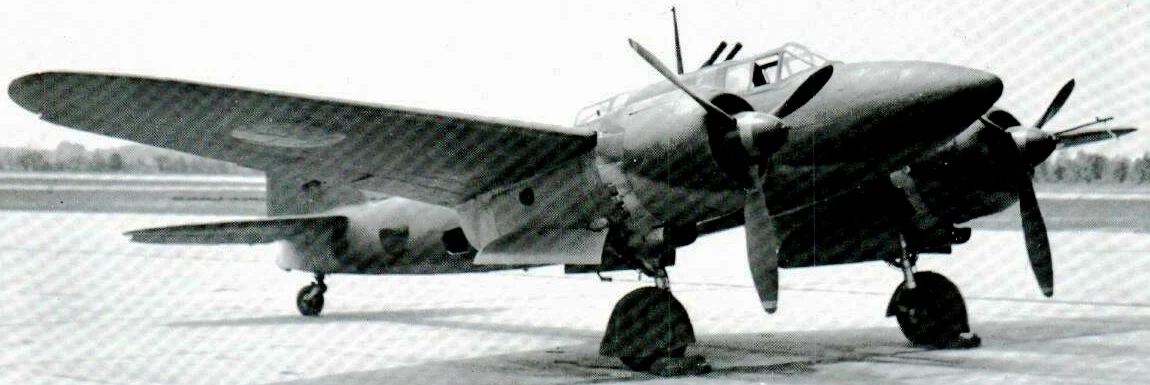
Zoukei-Mura's latest release is number #13 in the "Super Wing" series, it is the 1/32nd scale Kawasaki Ki-45 "Kai Tei Toryu" or "Nick" as the Allies in the Pacific war called it. We have it to review for you - but first, a little of the real aircraft's history to put some context into the picture...
The Kawasaki Ki-45 "Kai Tei Toryu" (translated roughly as Monster or Dragon Slayer”) was a two-seat, twin-engine fighter used by the Imperial Japanese Army in World War II who classified it as the “Type 2 Two-Seat Fighter.” During World War Two the Allied reporting name for this craft was “Nick”.

It was designed along the lines and to fill the same basic needs as the German Luftwaffe’s Me 110 twin-engined heavy fighters. Over 1600 of these often forgotten planes flew in the Pacific from 1941-1945. The first Ki-45-KAIa were delivered in August 1942 and entered into combat in October of that year. The solid construction, the heavy armament of the plane, the internal tanks and the armour made it popular among the crews from the beginning and enjoyed a good reputation as ground attack aircraft and anti-ship strikes.

A new version, the Ki-45-KAIb, was built specifically for these purposes: its frontal armament was revised; A 20mm cannon was added in the centre of the nose and a 37mm cannon in the dorsal tunnel. Subsequent copies of Ki-45-KAIb were retrofitted with Mitsubishi Ha-102 engines in longer, but slightly smaller diameter cells.
 However, with a top speed of just 290 knots and slow, ambling turns, they just couldn’t compete against single-seat fighters of almost any vintage put against them, being shot down by Flying Tiger’s P-40Bs over China as soon as they were introduced and had no more real success against other fighters the allies sent up for the rest of the war. Heavily armed with a manually-loaded Ho-203 37mm cannon mounted in the nose (that could fire just two rounds a minute) as well as 12.7mm and 7mm machine guns, the "Nick" found its niche as a bomber-killer.


The Ki-45 also did well in the attack role with its large cannon especially causing a lot of damage to shipping. In the last stages of the war, the Ki-45's were often stripped down, loaded with explosives and used as Kamikaze aircraft. The "Nick" will be remembered as the aircraft that initiated the series of suicide attacks against allied ships on the north coast of New Guinea on May 28, 1944, with four of these aircraft used in this original attack.

The next variants, the Hei and Tei, reinstalled the original 20 mm cannons but with an auto-loading mechanism and further twin 20 mm cannons behind the cockpit firing upwards. This new configuration proved to be extremely effective against the high flying B-29 super-fortresses which had started bombing the Japanese mainland in June 1945 but the aircraft struggled with maintaining the extreme altitudes and with the arrival of the P-51 Mustang and P-47 Thunderbolt as bomber escorts, the Ki-45’s career was soon over.
You can see in the picture below a Ki-45 (some say it is a Ki-46) diving through the B-29 formation in attack


The 1/32nd scale Kawasaki Ki-45 "Kai Tei Toryu" (Nick) from Zoukei-Mura
The Build up to release:
The Build up to release:
The option to make either the Ki-45 Kai Tei "Late Production" variant or the Ki-45 Kai Hei/Tei "Tai-Atari Special Attack Aircraft" bomber interceptor version are included inside this newly-tooled kit from Zoukei-Mura. There was one other variant of this aircraft in scale model form, but it was the very old now ID Models/ Tiger Models vacu-form model which is nice to have in the past, but something tells me that this kit is a lot more than we could have hoped for when the ID Models kit was created and so it would be unfair to compare the two.
 This model has long been in conception. I remember seeing the plans for this over two years ago, so the time that has been taken to create it is not significant. I know that Shigeta-san from Zoukei-Mura chooses the aircraft he feels passionately about, and so to say that this has been made with love made me very interested in the finished product. Seeing it at Telford and other model shows in 3D prototype and then test shot phase did not do anything to water down not only mine but other modeller's expectations of what this company could do with the subject.
 The test shot model featured on the "Old Man Blog" was something to be seen and it sure does "whet" the appetite for building this kit. Anticipation is therefore pretty high for the full release version of the kit to hit the market.

 In the informative illustration from Zoukei-Mura showing the two boxings that the KI-45 will be available in - we have before us today the "Long Nose" variant of the aircraft with two decal choices but a few options...


A full box:
On opening the second lid, you find inside lots of sprues, and here I go thinking "oww man not another complicated kit with lots of sprues" - but it isn't like that at all when you look into it. Along with the decal sheet, masks and instruction booklet yes you do have twenty-five sprues in both grey and clear, but four of the grey sprues are in fact clear copies of these sprues from the same mould. these give you the option of presenting your kit in a way that shows all of the internal detail that Zoukei-Mura gives to you with their models. There are also two completely clear transparent sprues included for the canopy and lights.
 Opening up the box you find that the box lid is simply a cover of a second strong cardboard box inside that ensures the safety of your parts, instruction booklet and decals. Each of the sprues is wrapped safely inside its own sprue bag, so no damage, scratching or damage was present on any of the sprues in the box.


The internal details of the alternate variant showing just how much effort goes into the recreation of these kits - and that word "recreation" is the correct term in a Zoukei-Muura model design.


The Full Release Kit:
Zoukei-Mura’s new kit of the 1/32nd scale Ki-45 Toryu comes in a fairly large box with the digital artwork that they have stuck with for the last few kits they have bought out. Not as evocative as other artwork styles I might say, but the scene of the attack on the B-29's is still effective nonetheless. 
A full box:
On opening the second lid, you find inside lots of sprues, and here I go thinking "oww man not another complicated kit with lots of sprues" - but it isn't like that at all when you look into it. Along with the decal sheet, masks and instruction booklet yes you do have twenty-five sprues in both grey and clear, but four of the grey sprues are in fact clear copies of these sprues from the same mould. these give you the option of presenting your kit in a way that shows all of the internal detail that Zoukei-Mura gives to you with their models. There are also two completely clear transparent sprues included for the canopy and lights.

The whole box at first looks like an imposing lot of plastic to put together, but in fact, it is a fairly straight forward kit when you factor in the lack of aftermarket you need to add into these kits along the way to get a similar result. To properly understand and fully take this kit in I would suggest you read first the instructions. These are provided in the novel way that Zoukei-Mura always create these - like a wartime instruction manual. We will start our review here, look at the two variants provided in the boxing, then the deals and masks supplied by ZM in this boxing.

Instructions


So you can read for yourself I had taken pictures of every page of the manual, but you can download the instructions from this page on the Zoukei-Mura website if you would like to see more.

Decals
 The instrument panel for this kit as we will see in the review has four options, two of them are covered here on the decal sheet. The instrument panel and centre console is nicely represented in scale as this 1/1 scale match illustrates.

The nylon mask sheet provided by Zoukei-Mura is good, however, these do sometimes shrink a fraction over some (long) time if not used so I always prefer kabuki tape masking sheets. It is great to see them included in the box though.

The Plastic - grey, transparent and the"clear" sprues in the kit:
One of the things that makes this kit special is one of the things that gives me pause in building it. This "clear" sprues that are provided as copies to the main fuselage sprues are not, in fact, clear. They are moulded in a frosted plastic that does not allow you to see through the model like glass, but a frosted image of what lies underneath them. The detail is there in this kit, but it is hard to see unless you sand these sprue parts completely clear and this is not something I want to do.
 I sanded clear the fuselage parts of the ZM Horten and It was not an experience I would replicate. However, those who do take the time to sand, buff and then polish the plastic to completely clear have an amazing model with a lifelike window into how the real thing operates at the end of their labours.
OK, let's look at the sum of this kits parts starting with the sprues:


 The grey sprue of the same part, showing better the surface and panel detail. These wings join to the wing spar supplied by Zoukei-Mura that gives the wing its rigidity and correct angle of the dihedral.


The version of the I.P. preserved in the NASM

Sprue E (x2)
 The fifteen round ammunition feed for the nose cannon is here along with a close up of the Type 99-Hi-2 radio ( I found the type's name in the instruction manual) that you saw the mounting bracket for on sprue.


 The forward nacelle firewall for the engine is really detailed very lovely with all of that plumbing for the engine with fuel and hydraulic lines tracing back into the rest of the aircraft. This will all detail up very nicely on the completed model.
 The internal wing tanks of the Ki-45 are moulded in two halves here, though they will only be seen if you chose the transparent wing option.


 The engine exhausts are moulded with thin, hollowed out ends - and this slide mould technology again affords us a lack of need to apply any aftermarket to the kit. Wonderful stuff.


 That is everything in the box covered...
So what do we think?
 This kit is designed with such care and love, the care for the complete package pours out of the instruction manual and everything written within it that gives the model builder such an understanding of the real aircraft, the parts breakdown with construction grouped within one or two sprues at any one time, the fine detail of the parts and last but not least the detail provided inside in the clear version of the sprues to expose.
The clear parts if used are something that could make the kit too difficult for some to take on. If you want to display the clear parts you will need to polish them clear, and this is a gimmick or a roadblock for some modellers, but a challenge and a potential display feature to others.
If you do take the time and care to show the insides of the kit with these clear parts polished up you will have a model unlike any others at the modelling competition tables. It is a kit with the highest potential that needs no aftermarket to complete and a kit for the most talented to show just how good they can be.
It is also a credit to Zoukei-Mura and their design concept of the Ki-45.
Adam Norenberg


Instructions
As has become the norm for Zoukei-Mura’s instruction manuals this one is something special. Physically the A4-size manual is sixty pages divided into five chapters. Marked (roughly translated) "Top Secret" Zoukei-Mura trading company" and Construction manual Ki-45" on the front cover, this instruction manual is presented as you might see a wartime manual for the real aircraft.

The "front" cover for all of us non-Japanese speakers on the front /rear of the book.

Inside you delve into the world of the "SWS Design concept" that shows and explains the real parts that make up the aircraft, guns, engines the cockpit the propellers and the general shape of the aircraft are noted in detail with notes behind the reasons, shapes and functions of the real thing.

The construction is broken up into the five chapters of the book
- Engine
- Cockpit
- Fuselage
- Wings and landing gear
- Final outfitting
All of these chapters have an overview of the parts to be used and what sprues they are from at the start of the chapter - and all of the parts are shown to us by name in the instructions as we proceed along into the build so you know what you are placing where and have a generally better appreciation of how the aircraft works - and THIS is the thinking behind the SWS concept. Give the modeller a similar fell to those who would be building the real thing, and this concept to me is admirable - I wish other model makers thought like this more often.

So you can read for yourself I had taken pictures of every page of the manual, but you can download the instructions from this page on the Zoukei-Mura website if you would like to see more.

Decals
On decal sheet is provided with the kit, it is printed by Cartograf who make thickly printed, good quality decals with minimal carrier film on display and no printing errors that I could see. The sheet includes the instruments, serial numbers and stencils as well as national markings and decals for both the aircraft options of this kit.


The two aircraft marking schemes provided in the boxing are:
Option #1: Ki-45 Kai Special Attack Aircraft of the Japanese Air Force First Kaiten Special Attack Unit led by Second Lieutenant Miosaburo Yamamoto of the 4th Sentai (Air Group).


 The same aircraft at Matsudo airbase Japan 1945, you can see the two upward firing guns atop the cockpit aft of the pilot. These fired into the enemy bombers wither in diving head-on attacks or from behind and below.

 The same aircraft in all over green with other dappled camouflaged aircraft from the same unit in 1945. See the red and white stripe and yellow tail motif clearly in this picture.

Vinyl Masks
I did not have a profile of this aircraft, so a side on view of the completed model is just as good in this case.

This unit's aircraft lined up before their fatal missions defending Japan against the waves of bombers. With weapons removed, rear seat covered and weight lightened as much as possible in order to carry out a Tai-Atari (ramming) special attack, these were used against allied bomber formations over Japan.
This aircraft was a Ki-45 Kai Special Attack Aircraft of the Japanese Air Force First Kaiten Special Attack Unit led by Second Lieutenant Miosaburo Yamamoto of the 4th Sentai (Air Group). The fate of these aircraft was a certain one, as these special attacks were their last missions. The Lieutenant's aircraft carried out his ramming attack and he was killed over Fukuoka Prefecture on 18th of April 1945. 

The decals that are particular to this aircraft, the Kanji emitting into the silhouette of the b-29 on the box in black (#3 decal) reads "Kaiten Tai". This was not a sign of victory, but a mark of unity for the Kaiten Tai, a Kamikaze patrol framed in the 4th Sentai. The white writing on the tail (#5 decal) says "Yamamoto" which is of course, after the pilot who flew her.

Option# 2: Ki-45 Kai Tei, 53rd Flight Regiment, 3rd Squadron

This Ki-45 Kai Tei, 53rd Flight Regiment, 3rd Squadron carried the two obliquely angled 20mm machine guns and the 37mm Ho-203 cannon in the nose. These heavy armaments were used to good effect by the late model Ki-45.


The yellow and white edged tail motif with the aircraft's number "59" as seen in the two pictures of this aircraft we have found. The white bands on the wings denoted that this aircraft was used for homeland defence.


The nylon mask sheet provided by Zoukei-Mura is good, however, these do sometimes shrink a fraction over some (long) time if not used so I always prefer kabuki tape masking sheets. It is great to see them included in the box though.

The Plastic - grey, transparent and the"clear" sprues in the kit:
One of the things that makes this kit special is one of the things that gives me pause in building it. This "clear" sprues that are provided as copies to the main fuselage sprues are not, in fact, clear. They are moulded in a frosted plastic that does not allow you to see through the model like glass, but a frosted image of what lies underneath them. The detail is there in this kit, but it is hard to see unless you sand these sprue parts completely clear and this is not something I want to do.

OK, let's look at the sum of this kits parts starting with the sprues:
Sprue A (1 grey / 1 clear)
The first of the duplicate sprues - we will look at both of each duplicate in this review to show the pros/ cons of using each type. This sprue houses the main parts of the aircraft fuselage, with an engine-to-tail fuselage body section, the rear spine of the fuselage, the flaps, wing root seam blend panel and the chin fuselage skin/ gun faring.

Looking at the same sprue in grey, we see a close-up of the fuselage. The surface details of fine recessed (no raised rivets) rivets are one that is carried right throughout the kit. The wing root seam fillers fit in neatly to the recesses moulded in that teardrop shape around the wing to provide what will be a seamless gap in one of the biggest places you can get it wrong as a modeller - no filling required. All of these main fuselage parts are added around the cockpit and wing root superstructure, giving the modeller another safeguard against making a small error that could get worse later on, I like that aspect of the engineering of the kit.
 The reverse side of this part sees the inclusion from Zoukei-Mura of the ribbing, formers and stringers of the internal structure that this company is so well known for including. There is included on both the clear and light grey versions of the sprue some wires on the cockpit walls, but unfortunately - and this can be avoided. Ejector pin marks happen where the mould is pushed out of the mould after the plastic is injected then popped out. Other companies are starting to master the art of eliminating this in parts where it can be seen on the model, and Zoukei-Mura could do well to study these newest methods to keep at the pinnacle of injection moulding. For me, it is simple, do not include a clear fuselage if it is full of ejector pin marks that need to be sanded in-between hard to reach aircraft ribbing.


The spine of the fuselage in both clear and grey sprues features a nicely detailed surface texture. This part is for Option B (the special attack version of the kit) and the part is not added until near the completion of the kit. The dorsal antenna mast and the instrument panel shroud are included on both duplicated clear and grey sprues.

The same part on the clear sprue, showing internal ribbing and rivet detail a little clearer.

The gun fairing that is covered up on the special attack version of the aircraft is here. Fine rivets of just about the right amount are again a feature on this part.

There are not many fancy control surfaces on this aircraft when compared to other, more maneuverable fighters and attack aircraft of the time, the flaps are positionable, however, and feature the same surface detail as the wings.

The underside of these slats show the latticed frames which give them their strength, with very thin trailing edges which is nice, unfortunately, those ejector pin marks rear their head in the worst of places and will need removal.

Sprue B (1 clear + 1 grey sprue)
This sprue is again duplicated exactly in frosted clear and grey sprues. The large plastic runner houses the wing halved top and bottom of both port and starboard.

The top of the starboard wing here on the clear sprue showing the surface details and those admittedly easier to remove and thinner ejector pin marks on the insides of the wings that will need to be removed.

The wing of the stored Ki-45 at the NASM


The bottom half of the port wing from squarely below showing panel, rivet and inspection panel detail to full effect. You can see here the aircraft navigation and leading edge landing lights will be added later and the covers can be found on the transparent sprues we will look at later.

A picture showing the underneath of the wings of a captured Ki-45


The same part on the Grey sprue. The ailerons and flaps can be posed and inserted into these wing halves latter into the build if you leave the internals of the wing at the rear unglued and just pop them in there.

A little more of the thin wing profile can be seen by this picture of the half.

Sprue C ( 1 Clear & 1 Grey sprue)
Again in the clear frosted and grey sprues, runner C gives us the horizontal and vertical tail surfaces, the posable rudder, vertical tails and two of the three instrument panels supplied in this kit (the third is on sprue I that we will look at later). The actuators and internal ribbing from the tails are present to be seen on both but only truly visible once constructed with the frosted clear sprue. In some smart design choices, the full span of the horizontal tailplane gives us a no mess solution that the tailplane also sits flush inside.

The instrument panel is recreated twice here in grey and on the clear sprue and shown below. You can either:
1/ Paint the whole thing yourself
2/ Apply decal over the top of the black painted IP
3/ Apply the decals to the rear of the clear version, then paint the front metal parts of the panel and switches yourself.
4/ Use a small circular punch and die set to punch out the individual decals for the dials, pain the I.P. and switches and insert the decals in the holes for the dials provided, then cover them with future or gloss to recreate the clear fascias - this is the method I would use...


The version of the I.P. preserved in the NASM

Sprue E (x2)
The first simple grey sprue in the kit so far, in fact, it is a pair of grey sprues that replicate all of the parts of the Mitsubishi Ha-102 radial engines. Can you also spot the cheeky addition of the engine mounts on the sprue?

The is one of the Ha102's in storage in the NASM
 You have seven apiece of the cylinders of the engine front and rear on each of the duplicated sprues. The (inside) rear of these crankcases show the pistons inside them. Something that will not be seen once they are put together, but interesting and fitting in with the SWS design concept of educating people about these aircraft and how they work.


The engine represented here was named by its maker the Mitsubishi Zuisei (瑞星 Holy Star). A 14-cylinder, supercharged, air-cooled, two-row radial engine used in a variety of early World War II Japanese aircraft. It was one of the smallest 14-cyl. engines in the world and the smallest diameter Japanese engine. The Mitsubishi model designation for this engine was A14 while it was an experimental project, in service it was known as the MK2, followed by the revision code letter, and known as the Ha26 & Ha102 by the Army (which is what it is referred to in the instruction manual) and simply the "Zuisei" by the Navy.
The is one of the Ha102's in storage in the NASM


The pushrods are made so that each of the two rows can only be placed in a certain way, eliminating any noobie errors that people like me often fall into.

The exhaust manifolds are supplied for all fourteen cylinders, note that the two versions of the aircraft require different exhausts and the instructions do note that as you go along in the build.

The cone for the prop and the magnetos for the engine are provided here on this sprue, you will also find beautifully detailed carburettors, turbines and all of the other parts of the engines. The only thing you will want to add to these are some lead wire ignition harnesses. They will represent detail on part with any resin engine as far as I am concerned. Again, the design principle of including everything in the one box is followed here and makes a saving for the modeller who all too often has to dip into their own pocket for aftermarket engines.

The spinner cone of the real thing

The parts highlighted underneath with arrows point out a little better what I mean about the engine stand parts. They make a very nice stand if you want to display the engine outside the aircraft in a museum or maintenance setting.

Sprue F (1 clear & 1 Grey sprue)
This sprue is presented in both grey and a crystal clear version. Puzzling in some ways as the sprue could very easily be split up to provide the clear parts that are required: landing, navigation and wingtip lights as well as the clear perspex panels for the windows on the rear spine of the aircraft. Maybe then the pitot and few of the other very small details maybe should be included on another sprue?

Sprue G (1 x clear + I grey sprue)
Sprue G is offered again in both the identical grey and frosted plastic runners. It carries a combination of the "furniture" that encapsulates the twin Ha 102 radial engines. The cowling ring, flaps, engine cover panels that blend with the wings and undercarriage doors are some of the parts here replicated in frosted and grey styrene.
 You can see the inner and outer lower cowling shroud panels, again with nice access panel, seam lines and rivets as a highlight. again inside these panels, you see internal ribbing that I forgot to take a picture of sorry cats.
 The insides of the main landing gear doors are just as detailed as the outsides, with rivets along them. Notice after you remove a bunch of attachment points from the supports the correct angle of these doors is presented so you have no problems with alignment and a firm hold on those gear doors which are always amongst the first to ping off a completed model.
 The cowling ring and flaps in the opened position are here on this sprue also, you have the option for open or closed cowling flaps with this kit.


Here is the reverse of that image, showing the activators of the cowling flaps with some small ejector pin marks to remove (these are not too bad). At least you do not need aftermarket or scratch building skills to show these open.

The panels that cover the rear of the engine and join with the wing are here also.

Sprue I
Sprue I is in grey only, and it is dominated by the almost full-width representation of the wing spar, added to this sprue are the two propellers, internal fuel tank, two bulkhead sections of the cockpit, internal instrument panels and consoles. This is actually a sprue packed with interesting parts so we will look at nearly every part.


Again the NASM I.P. from the Ki-45 for comparison.


 The supports for the box around the internal fuel tank give you a glimpse but only that glimpse to know that it is there.


The correct angle of dihedral is represented by the wing spar. The external port and starboard halves clamshell around this frame that also holds the wing and central fuel tanks. Underneath this spar sits the cockpit floor while these raised ribs offer the base for the no.3 & .4 fuel tanks.

The reverse view offering the space for the lower fuel tank. Note the plumbing/wiring of the main gear bays under the wing spar that the side walls make a frame for.

The two halves of the No.4 fuel tank for the centre cockpit section.

We looked at the other two instrument panels on sprue C, and now for the other version. This one is Option 1 in which you must paint the whole thing yourself. It isn't my preferred option but different strokes for different folks and some might like the "old skool" method of DIY.

Again the NASM I.P. from the Ki-45 for comparison.

The twin three-bladed constant-speed propellers were made in real life by Sumitomo/ Hamilton from metal with a diameter of 2950mm. These are nicely tapered and although it is hard to replicate the twist and shape of propellers I think these are pretty good in comparison to the real thing.


At an angle here showing the angle of the props.


Inside the rear cockpit, either side of the interior walls is moulded to fit inside with some minor wiring and cables attached in one simple part that is both easy to position and to paint before it goes into the pit.

A peek into the rear cockpit showing these side panels


The flight stick on the left, seat top and base with a folded harness already in place and other cockpit details littler this sprue and reduce the amount of work a modeller has to make to super detail the kit themselves.

The rear of both the rear gunner's and the pilot's seat are here along with two side console panels for the pilot.

The front view of the pilot's seat that the insert and top we just saw sit inside.

An inside view of the pilot's station of the real Ki-45 to give you some idea of how all of this sews together.

Lastly on this sprue, the bulkheads around the centre of the cockpit section complete with wiring that joins the other moulded on wires in the completed cockpit, notice they do not run perfectly along the walls, just like they might have in real life, this small detail copied here is noticed by modellers and it gives great authenticity to your model - very nice!

Sprue J
Sprue J has several smaller parts for the cockpit represented here, the largest being the front cockpit floor, oxygen tanks, ammo cartridges, another internal fuel tank, the two nacelle mountings and exhaust manifolds for the Tai-Atari version and lastly the Ho-203 37mm nose cannon parts.
 The front office floor of the Ki-45 is seen here with plenty of detail afforded for those super detailers out there to garnish in their kits. This floor sits atop the centre wing fuel tank in the kit. Note the uneven wiring again strewn over the cockpit floor that long with the rivet/ bolt detail will stand out nicely in your 'pit.
 Most of the parts of the Ho-203 37mm nose cannon parts are here. This was originally the long-recoil automation of the Year 11 Type direct-fire infantry gun, and in operation, in the anti-bomber role by the Ki-45 it was fed by a 15-round closed-loop ammunition belt in the nose.
 The real thing showing the oval shaped ammunition feed which is on Sprue K with the other parts of this weapon.
 Slide moulds have afforded the model makers with hollowed out barrels that are very nice - no need for aftermarket here even with the nose cone removed from the aircraft as is an option shown in the real thing below.
 These fuel tanks, even though nicely detailed are not in this variant, they may be for the other release of the short-nosed version to come in the future.


 Slide moulds have afforded the model makers with hollowed out barrels that are very nice - no need for aftermarket here even with the nose cone removed from the aircraft as is an option shown in the real thing below.

Sprue K
Sprue K has much of the detail of the cockpit, levers, switches for the seat, landing gear, tail wheel lock, flaps, oil pump, hydraulic pressure, switchboard, supercharger, high altitude gas, fuel cock, propeller control lever and toggles are here along with an oxygen bottle radio and fuel gauge amongst many other small parts that give the "office" so much more detail.


Sprue L
The linkage rods for things such as the rudder and elevator fill this rather nondescript runner, careful removal from the host plastic will be needed to keep these intact.

Sprue M
The tail-wheel, moulded in one part, the bulkhead for the rear cockpit, rear gunner's weapon mount (not used in this kit) seat frame and other aircraft framework are all here on the otherwise nondescript sprue M.


Sprue N
This small sprue features the very large machine gun and ammunition that is not to be used in the two versions offered in the instructions, so this must be for the short nose kit to be released in the future. Again the instruction manual is your friend when trying to identify all of these parts, and they point out by name here the under-fuselage bulkhead, cannon hydraulic cock, tail gear support lever, tail landing gear parts, electromagnetic control box etc.


Sprue O
This part took me some time to work out what it was, but it is the linkage rod from the cockpit to the wings.

Sprue P
This sprue features the parts for the main landing gear of the Ki-45. The struts, oleos, mainwheels, main gear legs, their supports, the joint poles, oil tanks, nacelle rear bulkheads and the small no.1 & no.2 wing fuel tanks that sandwich together inside the aircraft's leading edge. Great if you have transparent wings to show it all off.
 Of note in the instructions and a good bit of engineering in the kit is the main landing gear struts that are anchored into the bay nacelle in the construction phase making these so much stronger. The lines for the landing gear are also included and after cautious removal will add a lot to the kit for not much effort.
 The main wheels are not weighted in this kit. I have looked at a lot of pictures of the Ki-45's wheels and none of them look too much like they are sagging under weight so they must have kept them highly inflated. By adding some putty to either side of the wheels you can add some dag, or simply by sanding a little off the bottoms of the wheels. That should be enough to model the kit as it was in real life.


Two pictures below of the Ki-45 with not much sag in the tyres - just flatten them out.

Sprue Q
The medium sized sprue "Q" houses much of the material for the wings. The fuel tanks, forward nacelle engine firewalls, insides of the landing gear frames along with external fuel tanks are included here.


The late version bomber destroyer will use these external fuel tanks for the Ki-45, all you need to add here are the fuel lines that have the connections here as you can see.

Sprue S (1 grey & 1 transparent sprue)
Sprue S is the last of the "doubles" of light grey and transparent. This time the transparent sprue is that same frosted transparent final finish. The Nose cone, the top dorsal spine of the cockpit, late production cowl parts, radiator flaps as well as the oil cooler along with some other smaller parts are here.
Sprue S is the last of the "doubles" of light grey and transparent. This time the transparent sprue is that same frosted transparent final finish. The Nose cone, the top dorsal spine of the cockpit, late production cowl parts, radiator flaps as well as the oil cooler along with some other smaller parts are here.

A little more of this sprue so you can see the details of the nose (which you may want to display on or off the aircraft depending on the option of showing the nose cannon.


Sprue T
The last of the grey sprues in the kit is proved to house the parts for the "Late Production" Option B aircraft. This bomber destroyer had the nose cannon as well as the two obliquely firing 20 mm cannons, engine exhausts, feed chutes, ammunition and the empty cartridge box.
The last of the grey sprues in the kit is proved to house the parts for the "Late Production" Option B aircraft. This bomber destroyer had the nose cannon as well as the two obliquely firing 20 mm cannons, engine exhausts, feed chutes, ammunition and the empty cartridge box.


The two obliquely firing 20 mm cannons were, Ho 103 12.7 mm machine guns in fact, the receiver and other parts were enlarged to 20 mm calibre and fire 20 x 94 mm ammunition. Here they are moulded in two halves down the middle

Slide moulds allow for hollowed out muzzles of the cannons - no need for aftermarket here.

Here are the cannons showing the muzzles pointing up and forward, similar to the Shräge Musik installation of guns in several German nightfighters of the same era. This set up enabled the Ki-45 to attack enemy bombers without directly facing them in underneath and diving attacks. Our aircraft (option B) is seen in the background.

Sprue D
The transparent sprue of the cockpit glass is here in a very clear sprue (no frosting on this one) and no real flaws in ejector pin or other seams where they shouldn't be. In fact, the parts for both open and closed cockpits are here so you can show the aircraft at rest or sealed up and in flight. The frames of the cockpits are thick, but not too thick so masking and painting them will be easy with the vinyl masks provided in the kit.


The open cockpit canopy is folded up on one of the parts just like the real thing (below)

So what do we think?

The clear parts if used are something that could make the kit too difficult for some to take on. If you want to display the clear parts you will need to polish them clear, and this is a gimmick or a roadblock for some modellers, but a challenge and a potential display feature to others.
If you do take the time and care to show the insides of the kit with these clear parts polished up you will have a model unlike any others at the modelling competition tables. It is a kit with the highest potential that needs no aftermarket to complete and a kit for the most talented to show just how good they can be.
It is also a credit to Zoukei-Mura and their design concept of the Ki-45.
Adam Norenberg
Thanks to HobbyLink Japan for sending this kit to us to review….
