Amusing Hobby's new 48th scale Focke-Wulf Triebflügel was a bit of a surprise when announced last year - them being only an armour model maker before this time, it seemed a surprise to go with such a radical subject. The more you think about it, the more it fits into a lot of what Amusing Hobby has done with their armour kits - what-if subjects. Gary has taken on their new kit, see what he thinks of it as he puts it together in his dry-fit review...
Dry-Fit Review: Focke-Wulf Triebflügel
From Amusing Hobby
Kit No #48A001
1:48th Scale
Product Link on the Amusing Hobby Website
Amusing Hobby is a Japanese kit manufacturer with whom I am not that familiar with. As an aircraft modeller, I've had little reason to look at their wares in the past as they have focused on armour subjects, until now. Enter kit 48A001, the Focke-Wulf Triebflügel.
The Focke-Wulf Triebflügel, or Triebflügeljäger, literally meaning "thrust-wing hunter", was a German concept for an aircraft designed in 1944, during the final phase of World War II as a defence against the ever-increasing Allied bombing raids on central Germany. It was a vertical take-off and landing tailsitter interceptor design for local defence of important factories or areas which had small or no airfields.
The Triebflügel had only reached wind-tunnel testing when the Allied forces reached the production facilities. No complete prototype was ever built. [source: Wikipedia]
KIT OVERVIEW - Amusing Hobby 1:48 Focke-Wulf Triebflügel (48A001)
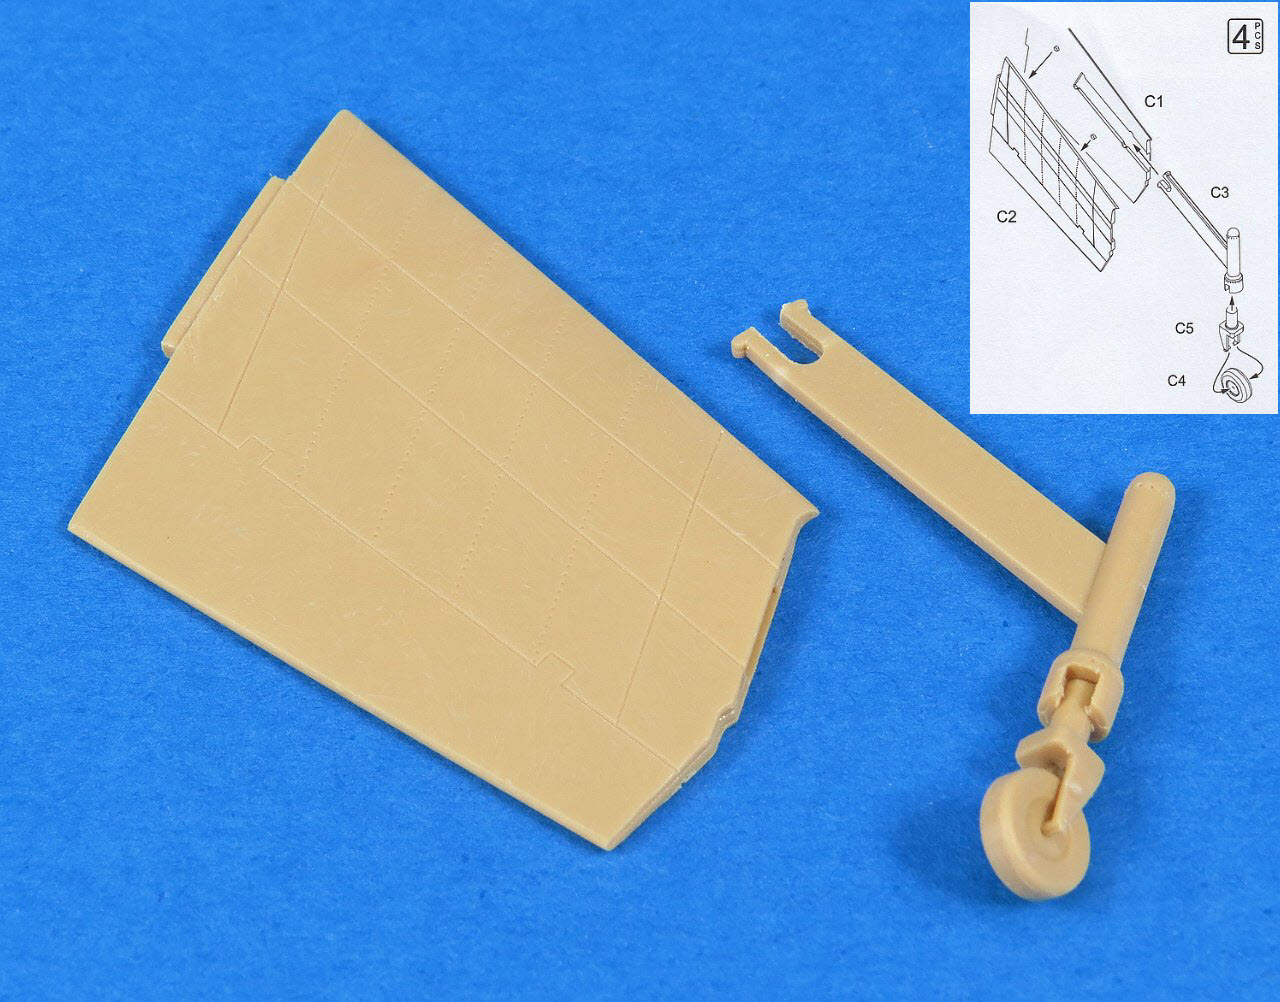
The Amusing Hobby Triebflügel is a fairly simple kit consisting of 3 unique sprues. The fuselage including cockpit is contained on Sprue D, the three rotating ramjet-powered "wings/rotors" are on Sprue B with the tailplanes and undercarriage are on Sprue C. The clear sprue A includes a windscreen and canopy.
The kit plastic is a tan colour and I have to admit I am not a fan. Give me plain old boring grey plastic any-day. The kits decals are provided on a small sheet and cover no less than four "what-if" marking options for you to use on your Triebflügel. The decals are printed by Amusing Hobby and appear to be quite thin and in-register.
Amusing Hobby has partnered with MiG Ammo for the paint colour callouts and for the first time (that I have seen) they also list the recommended MiG Panel Wash colour as well. Not a bad idea and clever marketing for MiG Ammo to sell more product I suppose.
DRY BUILD - Amusing Hobby 1:48 Focke-Wulf Triebflügel (48A001)
The build kicks off with the cockpit. Amusing Hobby (AH) have done a reasonable job of simulating a WWII era cockpit with raised instrument detail on both the side consoles and instrument panel. Once I had roughly assembled the parts one thing jumped out at me as being way off. That seat is about the size of a two-seater lounge chair and just looked silly. More investigation was needed.
I dug out a couple of other late war Luftwaffe seats from a Tamiya He 162 and Hobby Boss Me 262 for a comparison to see if it was just my imagination. As you can see the AH seat looks more like 1/32 than 1/48. With this confirmed, I thought about how I could (easily) correct it.
First up that lounge chair had to get tossed. I settled on the He 162 seat from Tamiya (I ordered a Quickboost resin version with belts) as I figured if these aircraft ever came to fruition then it would have been about the same time as the He 162, plus the seat looked perfect in both width and height. The first step was to move the side console parts inboard 'till they met with the seat. This resulted in the instrument panel needing to be likewise trimmed on the sides. So far so good.
As a result of moving the side consoles inwards, I now had a gap between the console and the fuselage. Thinking about it, I realised that AH had been super lazy in the cockpit design as they had simply made their cockpit fill up all the space between the fuselage sides and designed a super wide seat to take up that space.
Now the Triebflügel was to have nose-mounted cannons, two one each side of the nose (which meant they would have been fitted alongside the cockpit). I decided the best solution for both the missing cannon compartments and cockpit width problem were one and the same. I needed to make up some new interior sidewalls for the cockpit. These were fabricated from 15 thou sheet styrene and positioned to fit the new location of the side consoles. As you can see this also resulted in a cannon sized gap between this new sidewall and the outer skin. Job done.
After a bit of trimming and test fitting, the new cockpit took shape. Maybe this was a bit more involved than I would have preferred but I'm happy that now I have a far more credible cockpit layout than was provided in the box.
With the cockpit sorted the nose section clicks together and I cleaned up the windshield and canopy for a test fit.
My guess is that Focke-Wulf would have designed the canopy to open sideways (like the Me 262). Amusing Hobby provides no facility to display the canopy open in this way so I will eventually insert some brass pins along the hinge side of the canopy to hold it in place.
Speaking of the nose cannons, the muzzles are provided moulded into the nose. I took a couple of minutes to drill these out with a 0.7mm bit. This photo also reinforces what I was saying earlier about how the body of the guns would have run alongside the cockpit sidewalls.
The centre section of the fuselage, which housed the three-rotor/propeller assemblies, is designed to rotate freely. Parts D16 and D20 are glued to the nose and tail sections which leaves part D1 to rotate freely. During my dry fit, this idea seemed to work very well as the inner support is very rigid and as long as you get everything aligned properly it works well.
Before joining the rear/lower fuselage section you need to insert and secure the tailwheel bracket. Do not glue the actual undercarriage strut (D26) into the support yet as that is best left to the very end once we have the model sitting square on the four outrigger wheels.
The fit and alignment of the three fuselage section is pretty good. The movable centre section does need a little bit of adjusting to ensure it sits flush at all points around the fuselage. I've not decided yet if I'll worry about making it movable or just securing it properly with glue, probably the latter.
The three ramjet engines are relatively simple as shown by the assembly instructions. I found some extra parts on the sprue not mentioned in the instructions and they looked to be designed to fit in the back of the engine. I figured it was better than having the engine rear empty so I glued them it.
The rotor/propellers fit into the fuselage mounting holes via a friction fit. This allows you to change the pitch on them as desired. This photo also gives a good view of the surface panel line/rivet detail provided by AH on the model.
The four tailplanes and outrigger struts/wheels are quickly assembled. They use a friction/click fit to allow the outrigger struts to be inserted in both deployed and retracted positions. This seemed to work pretty well (with little slop) but I will most likely glue mine in place to ensure they don't sag over time.
A cruciform empennage at the rear of the fuselage comprised four tailplanes, fitted with moving ailerons that would also have functioned as combined rudders and elevators. The tailplane would have provided a means for the pilot to control a tendency of the fuselage to rotate in the same direction as the rotor, caused by the friction of the rotor ring, as well as controlling flight in pitch, roll and yaw. Here I have test fitted the main-wheel doors in the closed state, whilst the outrigger wheels remain deployed.
And that's pretty much it. I comfortably assembled this model over a couple of nights (that included the extra work I did in the cockpit). You can see here that it's a decent size in 1/48 when you stand a figure alongside. The Triebflügel concept was an interesting one but I have to wonder how practical it would have been to launch, fly and most importantly land this beast.
FINAL THOUGHTS - Amusing Hobby 1:48 Focke-Wulf Triebflügel (48A001)
I'm not heavily into pure 'what-ifs' but I do like models of concept aircraft that never came to life. I also just like the look of the Triebflügel and it featured in the Captain America movie so what's not to like :)
I would encourage Amusing Hobby to switch to grey plastic and ditch the tan colour as it just makes working on seams and surface detail that much harder (maybe it's just my eyes). I'd also encourage them to think a bit more about how real cockpits work and try to leave room for things like cannons !! I know this aircraft was never actually built but we can make some educated assumptions about how things would have (and would not have) been engineered. Other than these little niggles I think they've done a grand job for their first "aircraft" model.
The kit seems to be retailing for around €19.95 (USD $22) which is actually very good value. Many thanks to Amusing Hobby and The Modelling News for supplying the review kit.
Gary Wickham
Thank you to Amusing Hobby for sending this kit to Gary to put together and review. This kit is available from their many distributors worldwide...
Appendix: Instructions