A while ago Amusing Hobby's new 35th scale Rheintochter R-1 Movable Missile Launcher on Panther II Chassis enchanted our Paul Lee - now to bring in the new year/decade etc - Paul brings us his build and paint of this kit in a great story...
Rheintochter R-1 Movable Missile Launcher on Panther II Chassis
From: Amusing Hobby
1/35th scale
Type: Polystyrene, photo-etch, and copper cable, multimedia Kit
Available from Amusing Hobby distributors worldwide
"Luft46" & "What-if" appears to be a polarising subject for some modellers, with its fair share of haters and lovers, although as a subject matter, it does appear to have branched off into two distinct sub-genres. The first leaning more towards sci-fi side with walking robots and fantastical tanks, and then on the other side, we have subjects based on drawing board projects towards the end of the Third Reich.
Amusing Hobby has gone down this second path with their releases, although not always strictly German. This latest release is a combination of two previous kits, the Rheintochter Surface to Air Missile and launcher, and the Panther II tank, now combined giving us a mobile SAM launcher, so not exactly a brand new kit.
A fairly full box upon the first inspection
Sitting atop the Panther II chassis we have already seen from Amusing Hobby, the Rheintochter was a German surface-to-air missile developed by Rheinmetall-Borsig during World War II. The missile was a multi-stage solid fuelled rocket. Developed as part of the Third Reich’s rocketry program the Rheintocher was envisaged as a cheap anti-aircraft rocket to help supplement the Luftwaffe FlaK and Aircraft interceptor units. The name comes from the mythical Rheintöchter (Rhine maidens) of Richard Wagner's opera series Der Ring des Nibelungen.
Note the wooden control surfaces of the rocket fins...
The rocket had four small control surfaces, resembling paddles, in the nose, six fins at the after end of the top stage, and four at the end of the main stage. It stood 6.3 m (20 ft 8 in) tall, with a diameter of 54 cm (1 ft 9 in). The sustainer motor, located ahead of the 136 kg (300 lb) warhead (rather than the now more usual behind), exhausted through six outlets between the first stage fins.
Rheintochter R-1 test showing separation between stages moments after launch
Rheintochter R-1 Specifications:
MATERIALS: Steel, Magnesium; Wooden fins
DIMENSIONS OVERALL: 234 in. long x 118 3/4 in. wide x 234 in. deep, 1650 lb.
FUSELAGE DIAMETER: 21 1/8 in.
FIN SPAN -- BOOSTER: 118 3/4 in.
BOOSTER STAGE: 85 3/8 in.
LOADED WEIGHT: 3850 lb.
DESTRUCTIVE PAYLOAD: 332 lb.
RANGE: 7.5 mi
ALTITUDE: 3.7 mi
SPEED: 680 mph
Solid Fuel Propellant Engine: 165,000 pounds of thrust
ACCELERATION: Mach 1 within first 1,000 feet
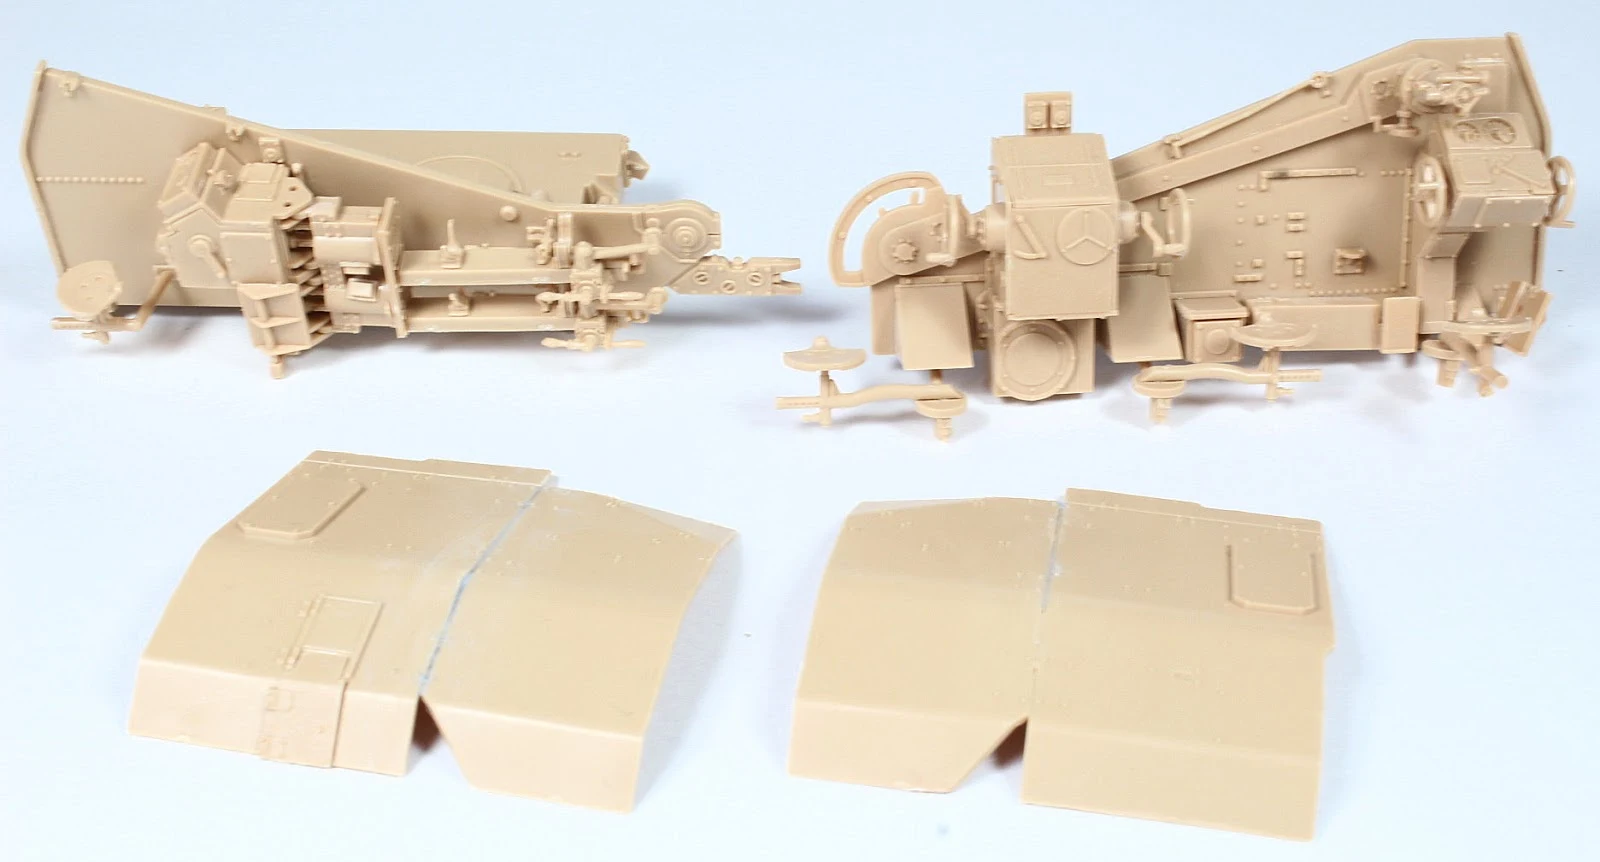
Construction starts with the lower hull and is a fairly straightforward affair, although the first step has a sub-section for the bits that stop the forward suspension arms from going too far up, which should be attached to both sides, but the instructions forget to mention the other side. The suspension arms are moulded to the torsion bars which are threaded into the hull, and uses the natural tension of the plastic to give you a workable suspension. Caps are provided to put over the suspension arms to differentiate inner and outer wheels, however, the cap for the outer wheels were just a little too long so I cut off a bit from each of them.
Sorry for the lense shake - but you get what is meant here.
The instructions ask you to attach the details to the rear plate and upper hull before attaching them, but I attached them to the lower hull first before sticking on the various elements. The kit gives you an option for the heater unit on the rear deck, and photo-etch grills are provided which are always a nice touch. You get one sprue of Amusing’s workable individual links that were provided in their previous Panther II based kits, which required five pieces for every pair of links, which is fine for the spares, but would be a nightmare for an entire run. Like them or not, Amusing give you one piece tracks for the main runs, which can be glued using styrene cement.

The launch platform and missile form the second half of this kit and is obviously their earlier Rheintochter kit. The instructions can be slightly confusing, as the first half uses sprues from their Panther II kit, and obviously are denoted using letters of the alphabet, A, B, C etc, whereas the Rheintochter sprues are denoted as A1, B1, C1 and so on. Separate the sprues and you won’t have any confusion rummaging through the kit box. Construction is fairly straightforward, although quite complex with a lot of small detail parts. The sidewalls of the launcher is attached to a base, and the launch rail sandwiched between, so I glued one sidewall to the base first and got ready for paint.
The missile, apart from the tip is moulded in halves so there will be a lengthy seam to deal with. The large nozzles at the base of the booster rocket come hollowed, although the smaller ones for the rocket itself are moulded solid, so I drilled them out. Prototype Rheintochter’s had unpainted wooden fins, and are a very attractive feature of the missile, but would in-service ones be unpainted? Decisions, decisions.
The kit gives you two schemes, one in the regulation three-tone camouflage with an all-metal missile, and the second with a dark yellow and green splinter scheme on the hull with the launcher in red primer. I absolutely loved the look of the red primer so I rationalized that the vehicle wouldn’t be deployed on the front lines, so that as a paint saving measure due to shortages, minimal camouflage would be applied. Seems reasonable to me.
I started with a black pre-shade of all the panel lines, and sprayed it all with Mig Ammo’s Red Primer colour. I then added a few drops of white to the red primer to lighten it, and then sprayed it mostly on the upper surfaces, and created a few highlights on various elements on the hull.
I painted the tools and spare tracks separately and attached them to the hull along with the wheels. I used Tamiya tape to make a mask for the splinter scheme, and sprayed it with Gunze’s Reseda Green. The tracks were glued into place with styrene cement, so it was easy to create the sag on the upper run. I made a wash from Raw Umber and Black oil paints, and applied a pin wash which really brought out the abundant details on the kit. I further diluted the wash and applied it all over the vehicle with vertical strokes, with some of the heavier pin wash areas providing some streaking.

Time to put the launcher platform together, and this is the weakest area of the kit. The launch rail has two stubs on the side which go into the corresponding holes in the sidewalls of the launch platform. The base has a cog, and the bottom of the launch rail has a toothed arc so it is supposed to operate like the real thing. Except the cog is glued into place so the launch rail cannot be raised or lowered, so I glued it in place in a launch position. It would have been nice to be able to pose the rail in a launch or lowered travel position.
Following the same line of reasoning for the vehicle, plus the fact that the missile is only single-use, I went with the kit’s suggested colour scheme of natural metal and primer, using darker steel colours for the booster rocket sections, and aluminium and primer for the other sections.
The same line of reasoning would apply to the fins as well so natural wood it would be. I originally planned to paint the natural wood myself starting with a wood colour base, and then smudged lighter colours with my thumb, and dry brushed wood grain. I was pretty happy with the effect, except for the fact that the wood looked more 1/1 scale rather than 1/35th scale. Fellow writer and good friend Lukas Kasuba to the rescue, who offered me his HGW wood grain decals, which just needed to be trimmed into shape and are very easy to use. The only issue I had was that they looked a little too clean and uniform, but nothing a simple was couldn’t fix.
With such a large rocket, a massive dust cloud would have been kicked up on launch so I gave the whole model a mist coat of Gunze Dark Earth, and Mig Ammo Washable Dust. I finished off with heavily diluted Abteilung Oil’s Light Mud to show increased dust build up in various areas. With that - the model is finished...
Here it is finished up in a quick walk around - pretty mean looking!
This is one cool looking vehicle. It is such a shame that the rocket cannot be raised and lowered, and while you’re not going to be playing with the thing, the raised launch position is quite tall, so the lowered position would be handy for when you are actually trying to transport it.
Here it is a little closer in for detail comparison...
The platform is also quite difficult to rotate due to all the rocket fins sticking out all over the place. Other than that, this was quite an enjoyable build and I can recommend this kit, except the small parts, would make it not so suitable for beginners and younger modellers.
Paul Lee
Thanks to Amusing Hobby for sending this kit to Paul to build and review.


