Last week we saw Gary Wickham's beginnings of construction on Italeri's new 72nd scale f-35B Lightning II kit. Today he is painting & finishing the kit with masks into something quite unique. See how it all comes together in Pt II of his construction review...
Construction Review: F-35B Lightning II STOVL
From Italeri
Kit No #1425
1/72nd scale
Started: April 2020
Finished: April 2020
For the overall painting scheme, I settled on these two photos of the first F-35B rollout. I was attracted by the mix of white and green primers (not often seen). For parts of the airframe, I could not see I made an "educated guess" :)
As a general rule, it's best to start your painting with the lightest colour. After priming the whole model with Mr Finishing Surfacer 1500 and applied a couple of thin layers of MRP-4 White.
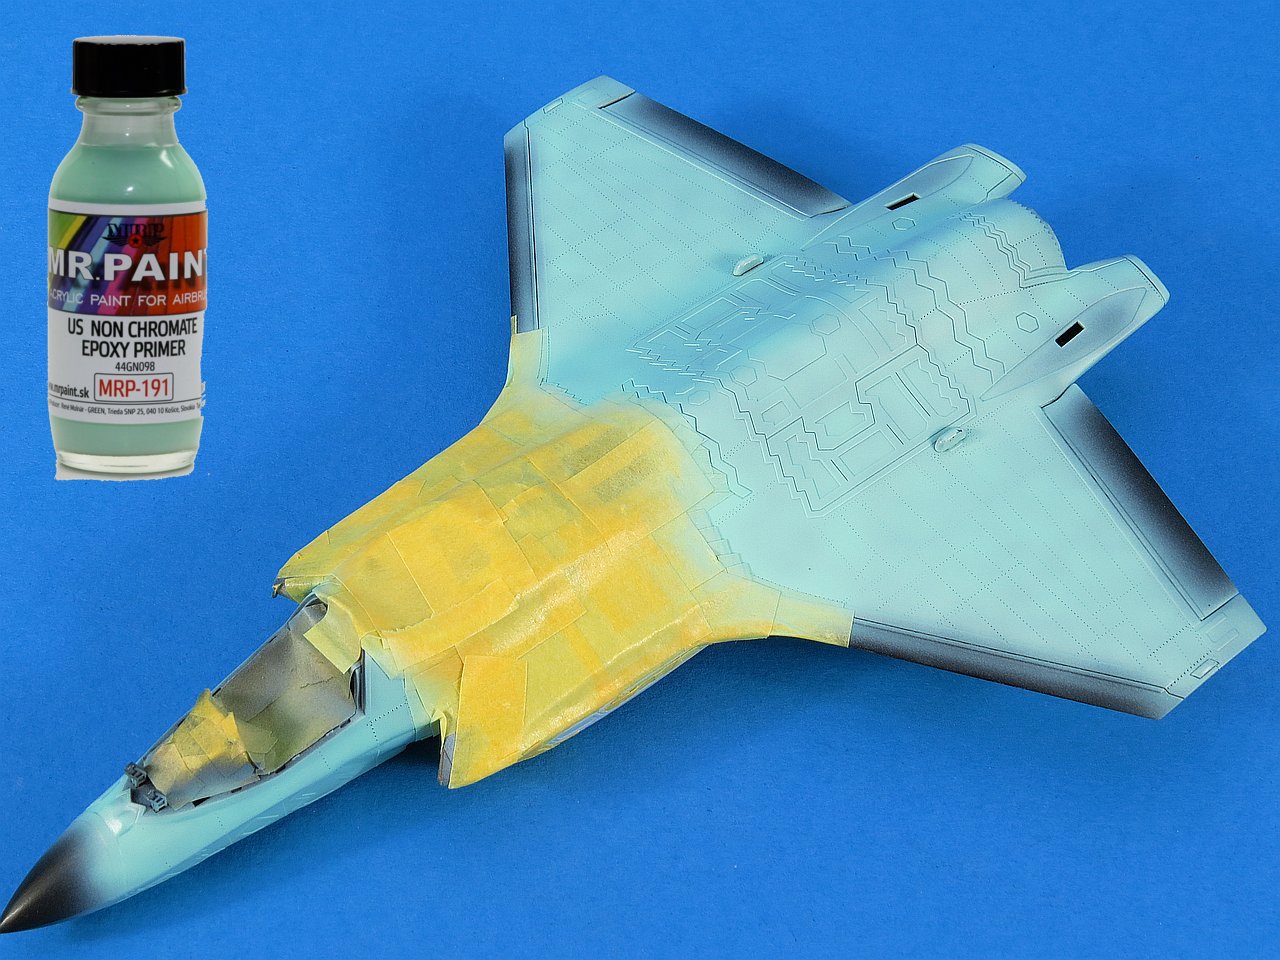
The white was now masked and MRP-191 US NON-CHROMATE EPOXY PRIMER applied over the remainder of the airframe. It's very fortunate that MRP have this colour available as I think it would be fairly tricky to blend.
I was very happy with how the rivet detail showed up under paint (you never really know until then). I very much like the MRP Acrylic Lacquer paints as they are so easy to airbrush and give a perfectly smooth finish. Note that I also left the finish a bit blotchy to try and match the photos of the real thing.
Here is a photo of one of the first Italian F-35B's. There is no white primer on this airframe but it does give a much better idea of the painting of the lower fuselage and vertical fins
Now the fun part began ... masking, masking and yet more masking. When I built my 1/48 Meng F-35A I had the benefit of some pre-cut masks from Galaxy Models, but no such luxury for this 1/72 kit :(
Most of the smaller RAM panels, control surfaces and other assorted panels were painted in Mr Color C-305 Gunship Gray. Note that I did not attempt to mask off all the areas to be painted in one pass. This would have done my head in trying to cut the tape to all those intricate angles. I broke the task up into 2-hour chunks and tackled one section each evening. That way I did not burn out trying to mask the whole thing in one go. After all this hobby is meant to be fun and relaxing !!
One tool that I continue to enjoy finding uses for is the Silhouette cutter. To help make some masks for each of the petals on the exhaust nozzle I created the design in the computer and used the Silhouette cutter to duplicate it exactly. A great way to make your own precision masks.
Of course, hand masking is still the best way to handle most modelling jobs. The Italeri canopy has the detonation cord moulded into the clear plastic. On the real aircraft, this is quite visible as light grey. Being raised on the inside of the canopy meant masking was not hard. Italeri did, however, omit the interior frame of the canopy and so I simply masked this and painted in black. Note this frame is only on the inside of the canopy.
Skipping forward a couple of weeks (each night doing a bit more masking) and I finally completed the task. Much patience was needed but in the end, I wore it down. The bottom of the fuselage certainly was the most effort with many odd and tricky angled edges. Needless to say, I used a lot of Tamiya masking tape!
With the painting now complete I applied a very light wash (Medium Grey) to the rivet and RAM panel details. This was not to create a weathered effect but simply to add some depth to the model surface. Other last-minute painting tasks were also completed like navigation lights.
As I was wrapping up the painting, it occurred to me that one very large advantage of this paint scheme was the lack of decaling. The only decals I ended up applying were the formation lights on the vertical tails and fuselage sides. It also feels a bit odd leaving a model this clean but its right for the subject.
The kit undercarriage is nicely detailed and all I did was to hand paint the included hydraulic lines and apply a light wash to make the raised details pop.
Of course, all those doors had to be painted and then attached to the model. Italeri have provided very good alignment holes, so when you install the doors, they fit snugly and easily. Thank You
Below you will find a selection of photos of the finished model. I used a mirror base to try and capture the detail of both the top and bottom in the same photo.
CONCLUSION - Italeri 1:72 F-35B Lightning II STOVL (1425)
This is a very solid effort by Italeri. The fit of the kit is great, the inclusions such as full interior, tinted canopy, weapons and even a bomb trolley all add up to good value.
For the most part, the detailing and accuracy also seem spot on. I'd be quite happy if they scaled this guy up to 1/48 as the only game in town in that scale right now is KittyHawk.
I mentioned at the start that I have found Italeri kits to be very "hit and miss". Having now built this one I can definitely conclude its a hit.
Gary Wickham
Thank you to Italeri for sending this kit to us to build and review.
If you like Gary's work then please do go to his website www.Scalespot.com for a whole lot more of that...