


From Mikro Mir
Kit No #32002
1/32nd scale
Product Link on the Mikro Mir Website


 This is the first (and definitely not the last) kit from Mikro-Mir I'll be having a good look at. In the box it looks a bit rough but once you get the parts off the sprue and fitted together it starts to shine. It's a classic case of don't judge a book by it's cover (or your preconceptions)
I think its fair to say that we probably won't see another 1/32nd Miles Magister kit in a hurry and you know what, that's ok, because Mikro-Mir have done a darn good job on this one.
Many thanks to Creative Models Australia for the review kit, and I'll be keeping a much closer eye on the Mikro-Mir release schedule in the future.
Gary Wickham


The Subject: Miles Magister Mk.14A
The Miles M.14 Magister is a two-seat monoplane basic trainer aircraft designed and built by the British aircraft manufacturer Miles Aircraft. It was affectionately known as the Maggie and was the only low-wing cantilever monoplane to ever be authorised to perform aerobatics.

The Magister was developed during the 1930s in response to Specification T.40/36, and had been deliberately based on Miles' civilian Hawk Major and Hawk Trainer aircraft.

Entering service barely a year prior to the start of the Second World War, the Magister became a key training aircraft. It was the first monoplane designed specifically as a trainer to be induced by the Royal Air Force (RAF). Amid the war, it was purchased in large numbers, not only for the RAF but also for the Fleet Air Arm (FAA) and various overseas military operators. It was an ideal introduction to the Spitfire and Hurricane for new pilots.

The Kit: Mirko Mir's 1/32nd scale Magister Mk.14A
Mikro-Mir is a Ukrainian based model company that I personally have not come across before. From their website their aim is to specialise in the "production of scale models of rare custom-made military equipment."
A brief look at the current Mikro-Mir catalog indeed shows that they certainly have kitted subjects that no-one else has tackled. I would classify the kits as 'limited run' based on the general availability of the kits and the engineering and tooling quality I have observed when reviewing this Magister kit.
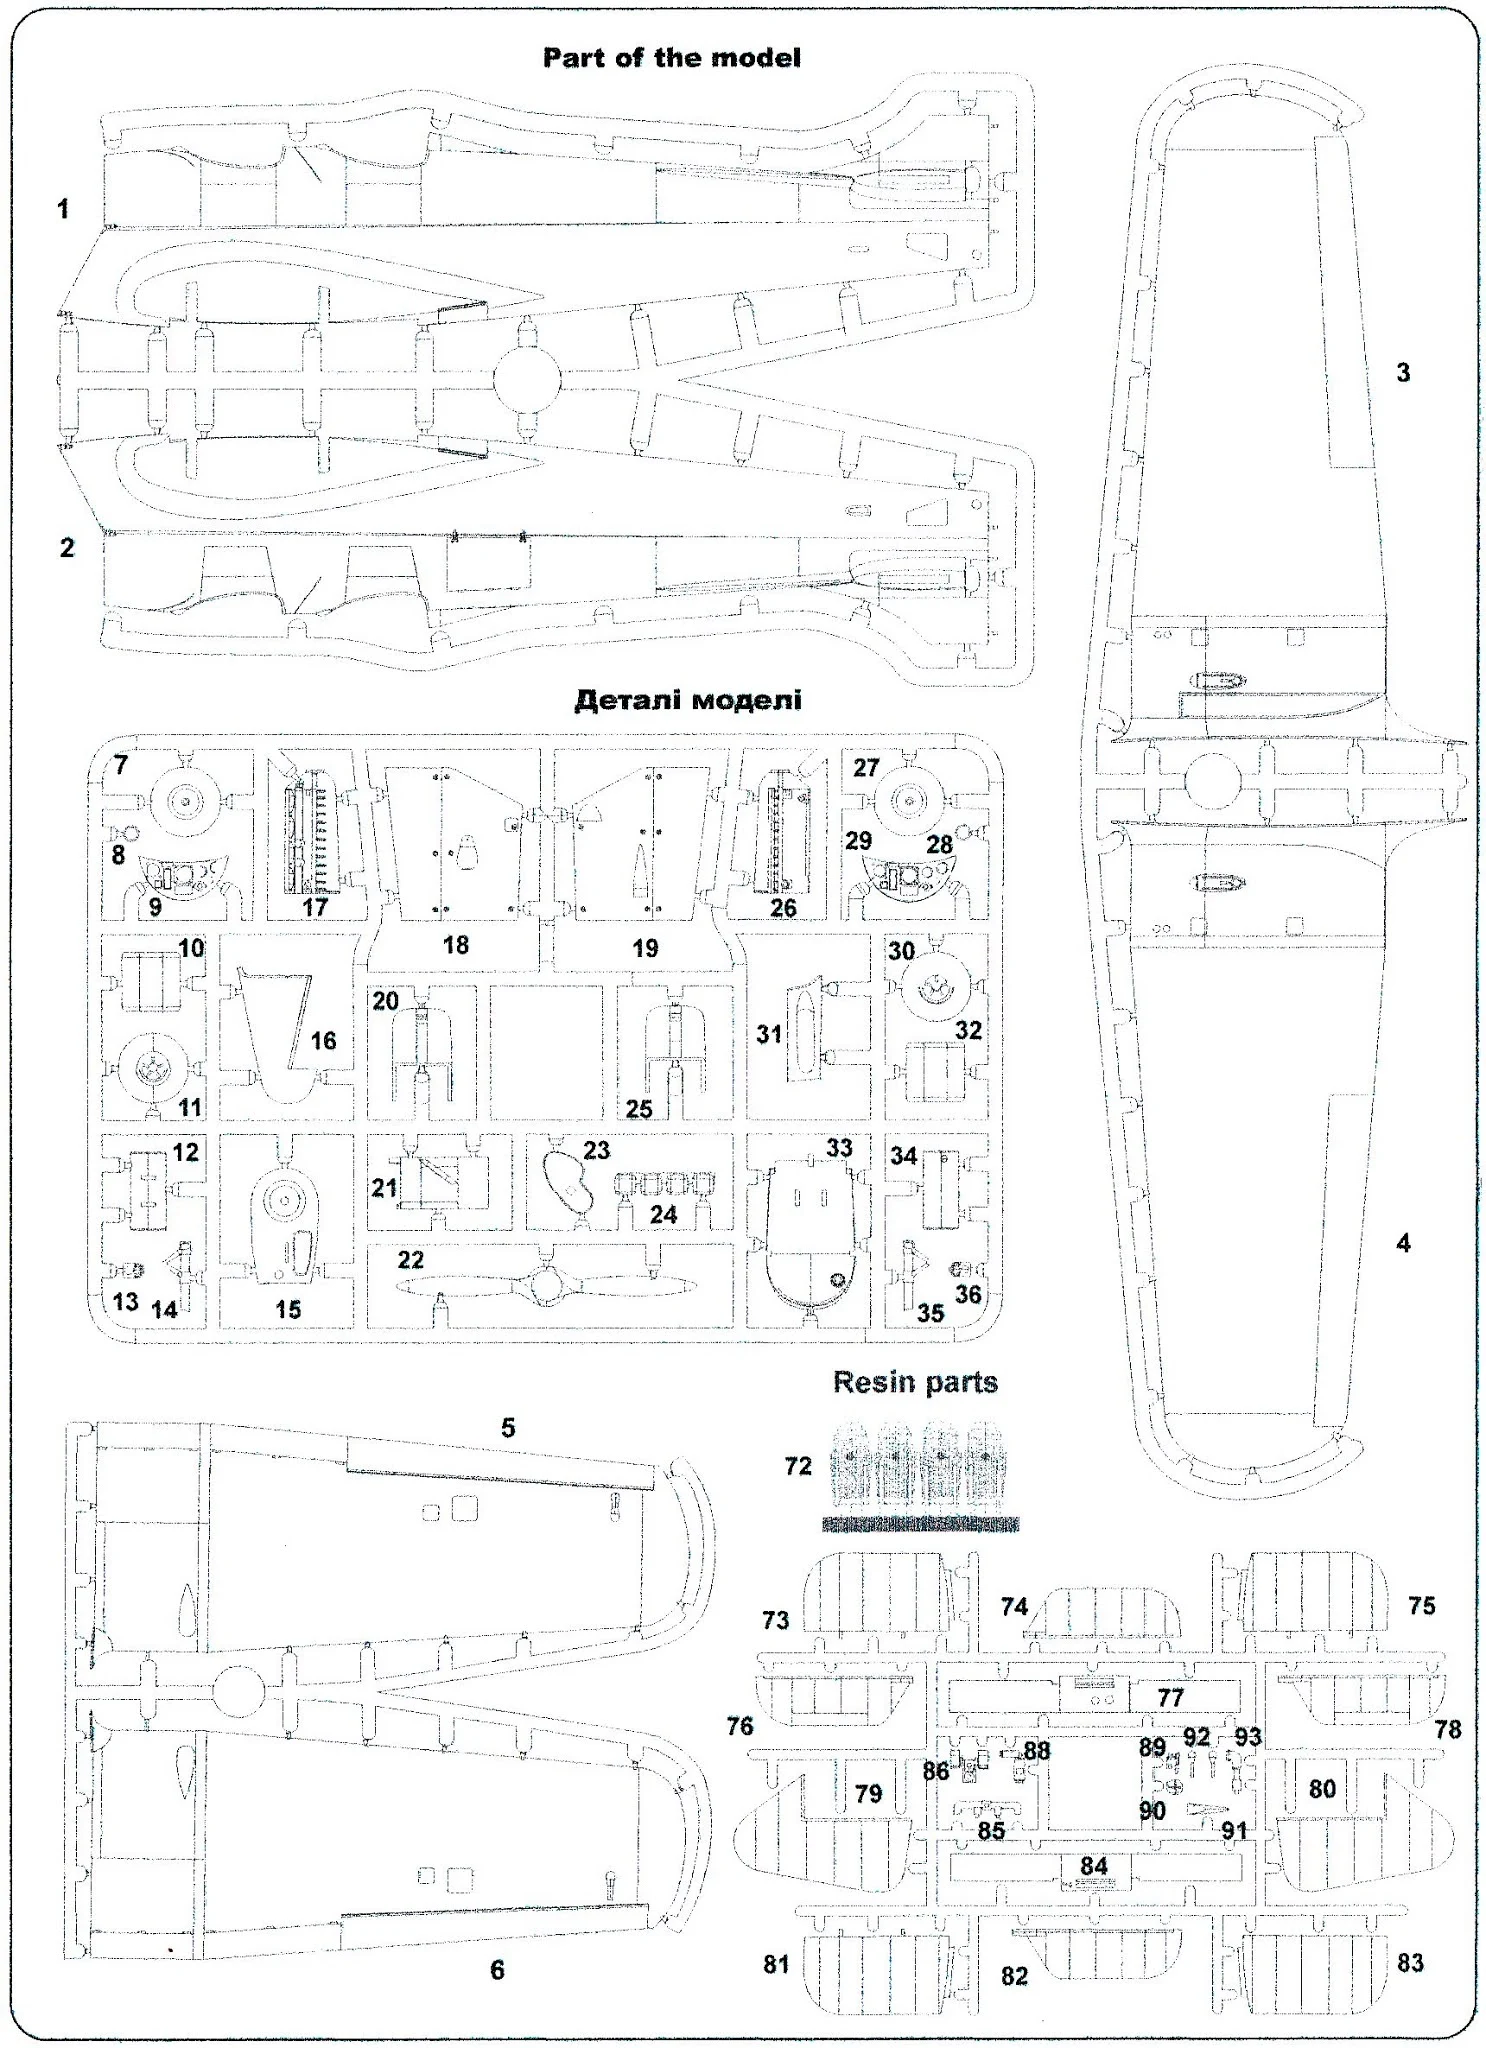
In the box we are provided with the following:
plastic parts: 5 sprues
marking options: 3
decals: Mikro-Mir
PE parts: yes, pre-painted, no
painting mask: yes, vinyl for windshields only
resin parts: yes, cylinders for gipsy major engine


A quick search shows that this is the first injection molded kit in 1/32 of the Miles Magister, so a first for Mikro-Mir.
The retail price for the kit seems to be around the US$70 mark and Mikro-Mir has distributors in many parts of the world, but strangely not the USA. Here in Australia the full range of Mikro-Mir is available via Creative Models Australia who also provided the review kit I looked at.
For a 1/32 scale kit the parts count is quite low. I suppose this is not all that surprising as the Magister itself was, by design, not an overly complicated aircraft. Two things that I noticed when handling the sprues was that the sprue gates are not small and there was minor flash present on pretty much every part. This means extra effort is needed to properly remove parts from the sprue and then clean each one up without damaging or mis-shaping them.

In addition, once I started to cut parts off the sprue, I realised that the identification numbers are NOT molded onto the sprue. You have to instead rely on the sprue layout diagram in the assembly instructions (page 2) to locate each part based on its callout number. None of these 'limited run' traits are the end of the world, but they are not super convenient either.

None of the parts (big or small) have any alignment pins. Some folks will not like this while others, like myself, find this not a bad thing as it allows you to adjust the fit (after glue) very accurately. I found the surface of the larger fuselage and wing parts to have noticeable small blemishes that needed to be gently sanded out.

The molded on interior detail seemed to be well done and the raised parts deep and sharp enough for 1/32nd. It's a bit of a shame that Mikro-Mir did not offer the option to have the crew entry doors open as this looks interesting and provides a better view of the finished cockpit interior.

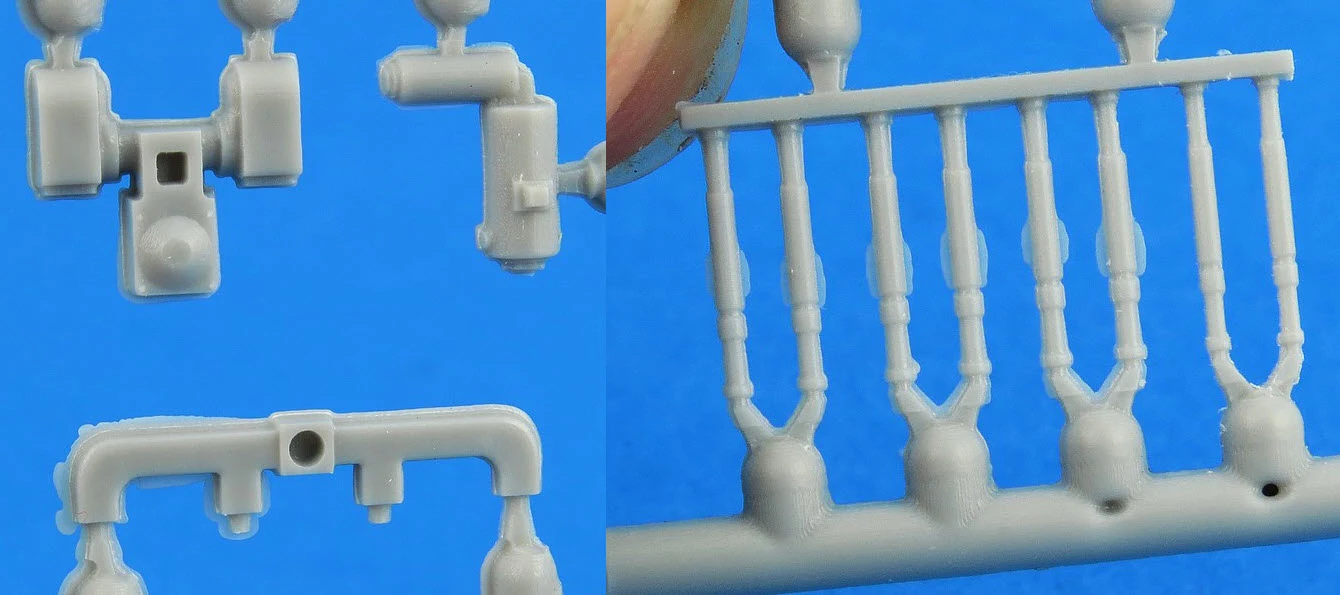
On first glance I completely missed the fact that the engine cylinders are cast in resin. The Gipsy Major engine (as used in the Tiger Moth and many other early war aircraft) had four cylinders and the Mikro-Mir white resin parts are very well cast with the cooling fin detail being far finer than could have been expected with injected plastic.

The control surfaces on the Magister were cloth and Mikro-Mir have done a good job of re-producing the stretched fabric effect. This photo also shows the mould flash I mentioned earlier (caused by mis-aligned and/or poor sealing moulds) as well as multiple sink marks (only on the sprue runners here) which are caused by insufficient plastic and/or early mould removal (when the plastic is still too molten).

A welcome inclusion is a full set of windshield masks for both the inside and outside surfaces. The use of vinyl may not be the best choice here as this material has a tendency of shrink over time (meaning the masks become too small) and the adhesive has a more limited shelf life. Perhaps a better option for Mikro-Mir would have been the use of Kabuki (paper) tape which overcomes these limitations of vinyl.

A small photo-etch brass fret is included which provides all the fine details such as front and back harnesses, alternate instrument panels (these are also provided in plastic), cockpit levers/clamps and detailing for the engine. The use of photo-etch is sensible in that only parts that really need (or benefit) from the use of thin brass have been dealt with.

For the most part the flash found on the kits parts is more of a nuisance than a major problem. Obviously on the smaller parts (such as those for the engine) you need a light touch to be able to remove the flash without damaging the parts themselves. This is even more important where the parts are round as it's so easy to create a flat spot when dealing with the flash. Unfortunately living with flash is part and parcel of building limited run kits.

The Magister is largely composed of wood, its fuselage consisting of a spruce structure topped by a plywood covering, similar materials were used for its three-piece wing and tail unit. The wing centre section has no dihedral and is of constant section with outer sections having dihedral and tapering towards the tip. The Magister is furnished with split flaps as standard; upon entering RAF service, it became the service's first trainer to feature flaps.

As I've mentioned, the Mikro-Mir kit does need some TLC to undertake the clean-up the parts from the sprue. However, once you have this under control and begin the actual assembly, the feel of this kit changes dramatically. I found that the vast majority of parts (once cleaned up) fitted very accurately, simply snapping into place and the kit was a pleasure to build.

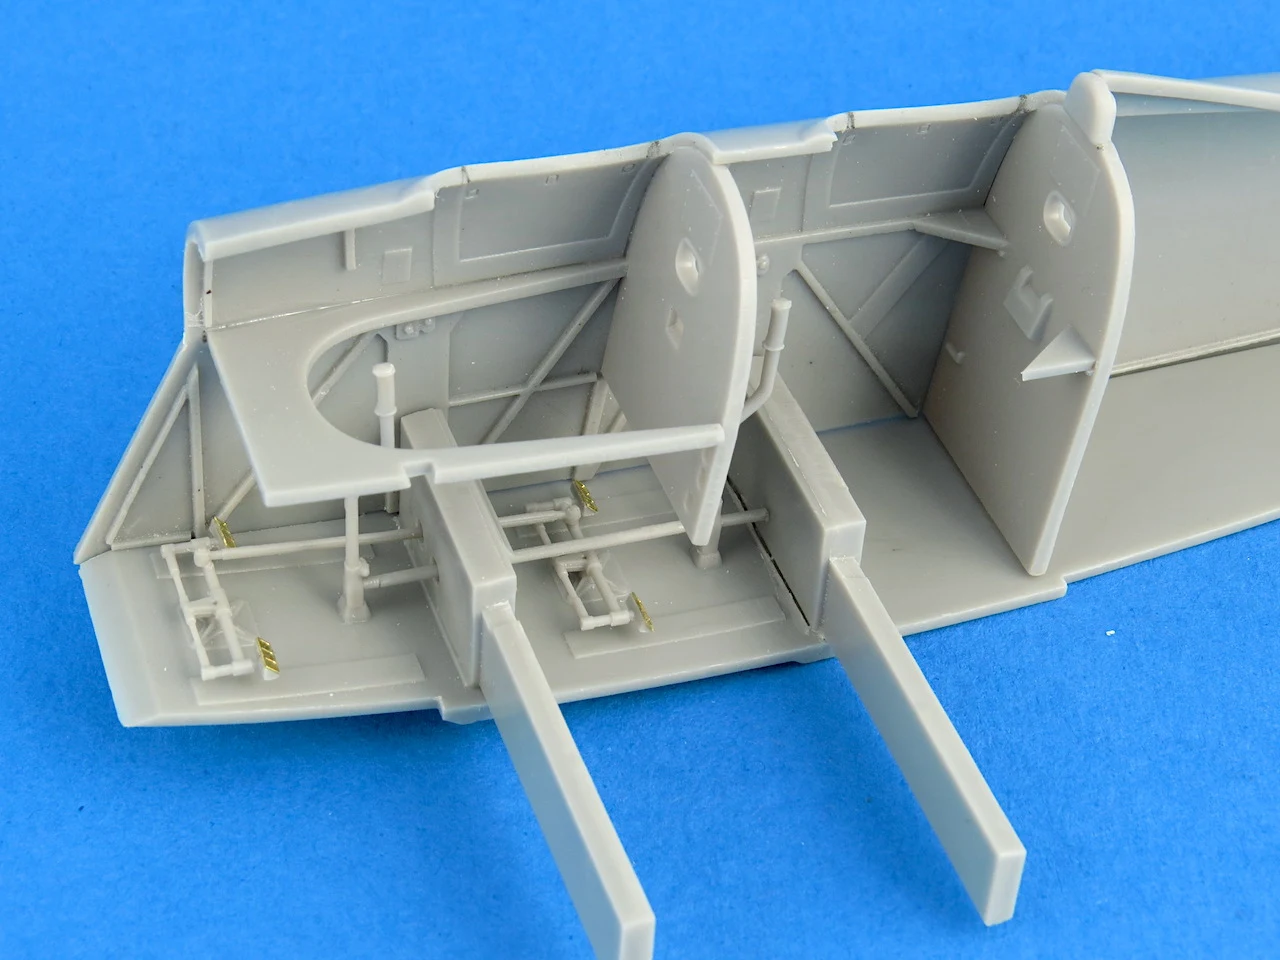
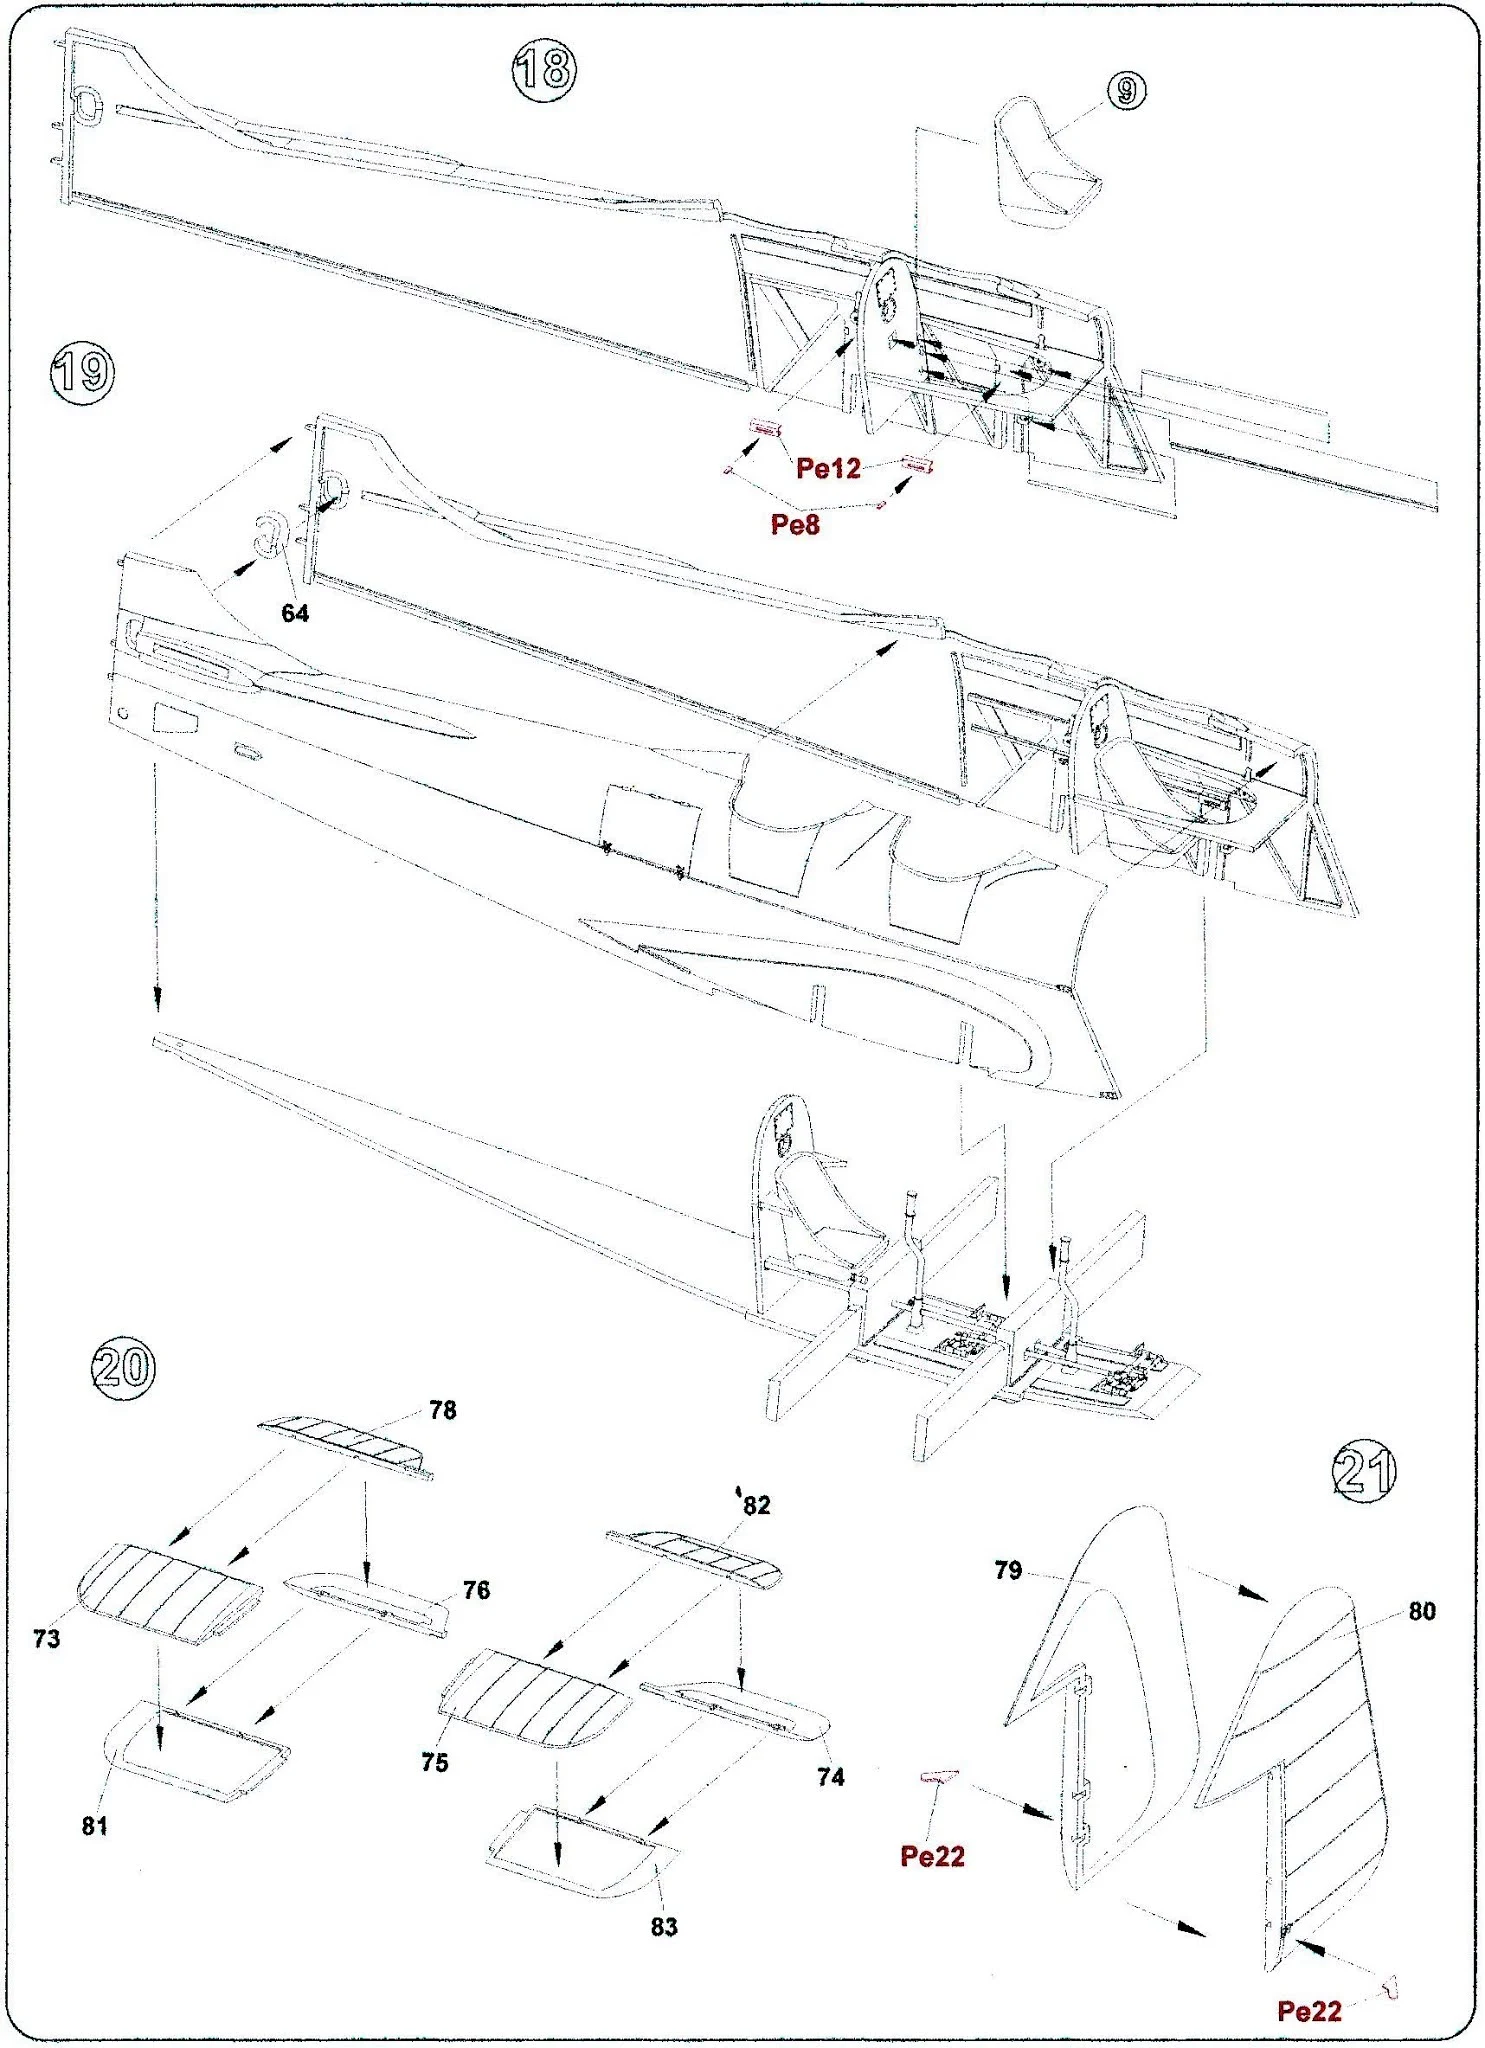
A good example of this are all the fine elements that comprise the two seat cockpit interior. These, without exception, literally dropped into place.

I was equally impressed with the fit of the fuselage halves and the interior bulkheads. I expected some gaps that would need to be dealt with but was to be greeted with a near perfect click fit.

To provide some strength and ensure correct wing alignment, Mikro-Mir have designed the kit with two beefy wing spars. These slide into the assembled wings and as with the rest of the model, no alignment slots are provided so you need to rely entirely on the shallow recessed cutout on the fuselage to achieve the correct position.

Despite careful and repeated dry fitting I could not get the wing to line up cleanly with the fuselage cut-out. I assume that the wing edge is meant to slot into the cutout and then sit flush but the position of the wing spars prevented this from happening on my build.

I will need to figure out how the wing spars will need to be adjusted (ie trimmed) to sort this out.

The wing spars did however deliver on their task of ensuring the correct dihedral of the wings, which is one less thing I need to deal with.

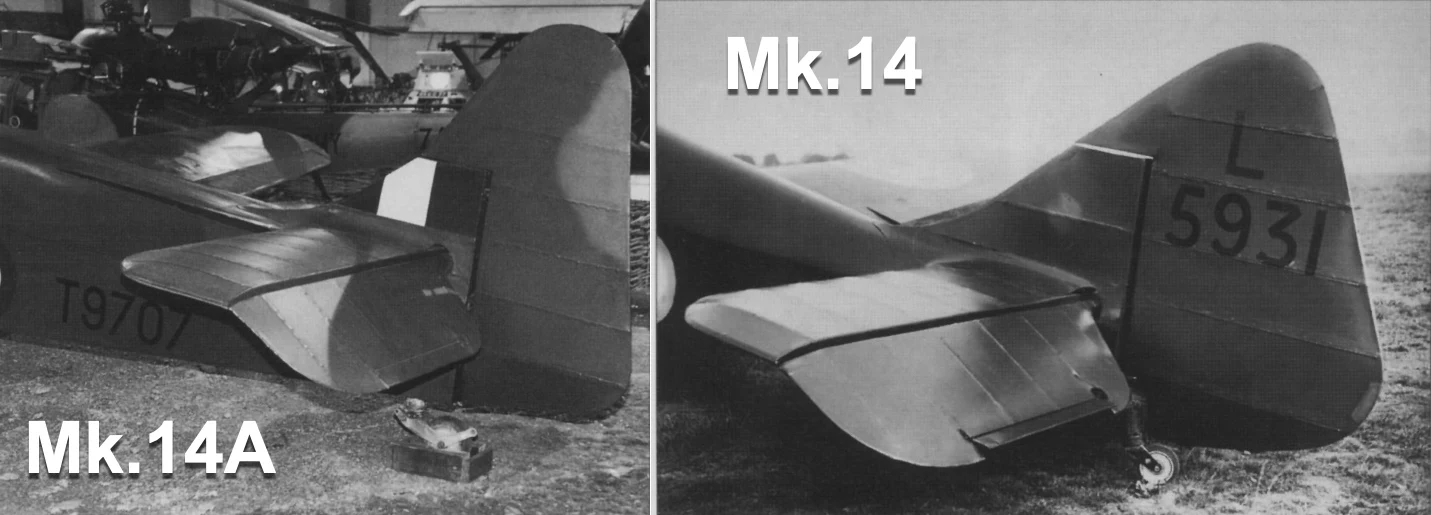
The most visible difference between the Mk.14 and Mk.14A Magister was the redesign of the tail to increase the height by 6 inches and the introduction of anti-spin fairings on the top of the rear fuselage. In mid 1938 an enlarged rudder of narrower chord and higher aspect ratio was also fitted to the Mk.14A. The Mikro-Mir box top refers to the kit as a Mk.I whilst the assembly instructions more accurately refer to this kit as a Mk.14A. In truth, only a Mk.14A can be built out of the box with this kit.

The shape and fit of the empennage parts are all very good. The elevators are designed to be displayed in the relaxed (dropped) position as shown on a parked aircraft. I encountered no alignment or fit issues with any of the parts once they had been cleaned up off the sprue.

The Magister was powered by the ubiquitous 130 hp de Havilland Gipsy Major engine, while the fuel was housed within a pair of tanks in the aircraft's center section. The engine was mounted in the inverted position to improve air cooling with the cylinders on the bottom.

The Mikro-Mir engine consists of no less than 14 major parts, including the four resin cylinders and appropriate photo-etch brass. Extensive clean up of these smaller, delicate parts, was needed prior to final painting and assembly.

Patience with the parts cleanup results in a very credible 1/32nd scale Gipsy Major engine and support frame. Some extra details could easily be added such as electrical cabling and hydraulic piping to really dress this sub-assembly up all the way.

The mounting frames hold the engine securely to the bulkhead in the rear and to the nose and two bladed propeller in the front. It's a shame that none of the engine will be visible unless the modeller takes steps themselves to open the side access panels on the front cowling. Mikro-Mir has not provided this rather obvious option even though they have provided such a nicely detailed engine.

One of the less obvious modifications to the Mk.14A Magister was to replace the original two piece cowling side-panels with a new separate top and two smaller side-panels of slightly different design. This allowed the side panels to be easily removed for engine maintenance and unfortunately Mikro-Mir have not catered for these removable panels but some simple surgery with a razor saw would remedy this omission.

Based on my dry fit testing, I found that the top and side cowling panels are best assembled as one unit and then slid back over the engine. The bottom panels can then be attached and aligned from below. Doing it this way also allows you to attend to any seam work on the main cowlings prior to attaching to the main model.

The fit of the cowling assembly to the main fuselage is very good. A small alignment ridge is built into the bulkhead and this helps ensure the top of the cowling sits just proud of the main fuselage. The only thing I would do extra is thin down the rear of the cowling to better match the sheet metal thickness of the real aircraft cowling.

Placing the lower cowling on last also allows you to fit the exhaust pipe in place on the engine a little further down the track.

The wooden two bladed prop and spinner are molded as one piece by Mikro-Mir. The two parts tended to blend into one another so I used a scriber and razor saw blade to better define the join between them, making painting much easier later on.

The main undercarriage of the Magister Mk.14A was fixed (non retractable) and covered with aerodynamic fairings. I re-used a little trick I learned when building a 1/32 Stuka that allowed the wheels to be installed afterwards which involved cutting a slot in the wheel which allowed it to slide into the fairing and onto the axle. Once installed the slot was is no longer visible. All you need is a good quality razor saw and a guide line along which to cut the slot.

Galaxy Tools have recently released a new set of 0.2mm razor saw blades. At 0.2mm these blades are very thin and so each incorporates a rigid spine support which helps to stop the blade from flexing. Each blades is designed to be fitted to a standard knife handle. Blades are provided with one of two teeth spacing sizes, 0.65mm for the larger blades and 0.4mm for the smaller blades.

The blades are very versatile and for the radial cut on the Magister wheels I used some masking tape to provide a guide line along which to cut. I also found the 0.2mm width to be ideal for separating the panel line along the edge of the ailerons on each wing trailing edge.

By now I knew that Mikro-Mir were not big on providing any form of alignment pins but for the undercarriage I decided that a little more strength was needed than a plain old butt joint could provide. Milliput (epoxy putty) was used to fill the inside cavity of the undercarriage fairing and once dry I drilled and inserted some 0.7mm brass rod to provide alignment and strength pins. Matching holes were drilled into the lower wing surface.

Also from Galaxy Tools, I found their new mini vise to be a helpful third hand for holding the fairing while I marked up and drilled into the Milliput. The vice can be tilted to any angle and its all metal precision construction gives it a comfortable re-assuring weight.

Mikro-Mir provides two options for the main instrument panels, one in plastic the other in photo-etch brass. Decals are provided for the actual instrument faces and I assume you apply these first if you plan to use the PE option. Whilst not provided you could also sandwich a sheet of clear acetate to simulate the instrument glass although a drop of gloss clear would work just as well I expect.

A final over all dry assembly reveals the attractive sleek lines of the Magister nicely. The only real fit problem that I encountered (that was not an easy fix) was the wing to fuselage gap. I fully expect a little time with a sanding stick will fix this but I wanted to call it out in my review all the same.


A quite noticeable feature of the real aircraft was the ripple effect caused by the plywood panels on the wing. It looks a little like stretched cloth and would certainly be an interesting challenge to reproduce on the model. The Mikro-Mir wings are completely flat with no texture at all.

COLOURS & MARKINGS - Mikro-Mir 1:32 Miles Magister (32002)
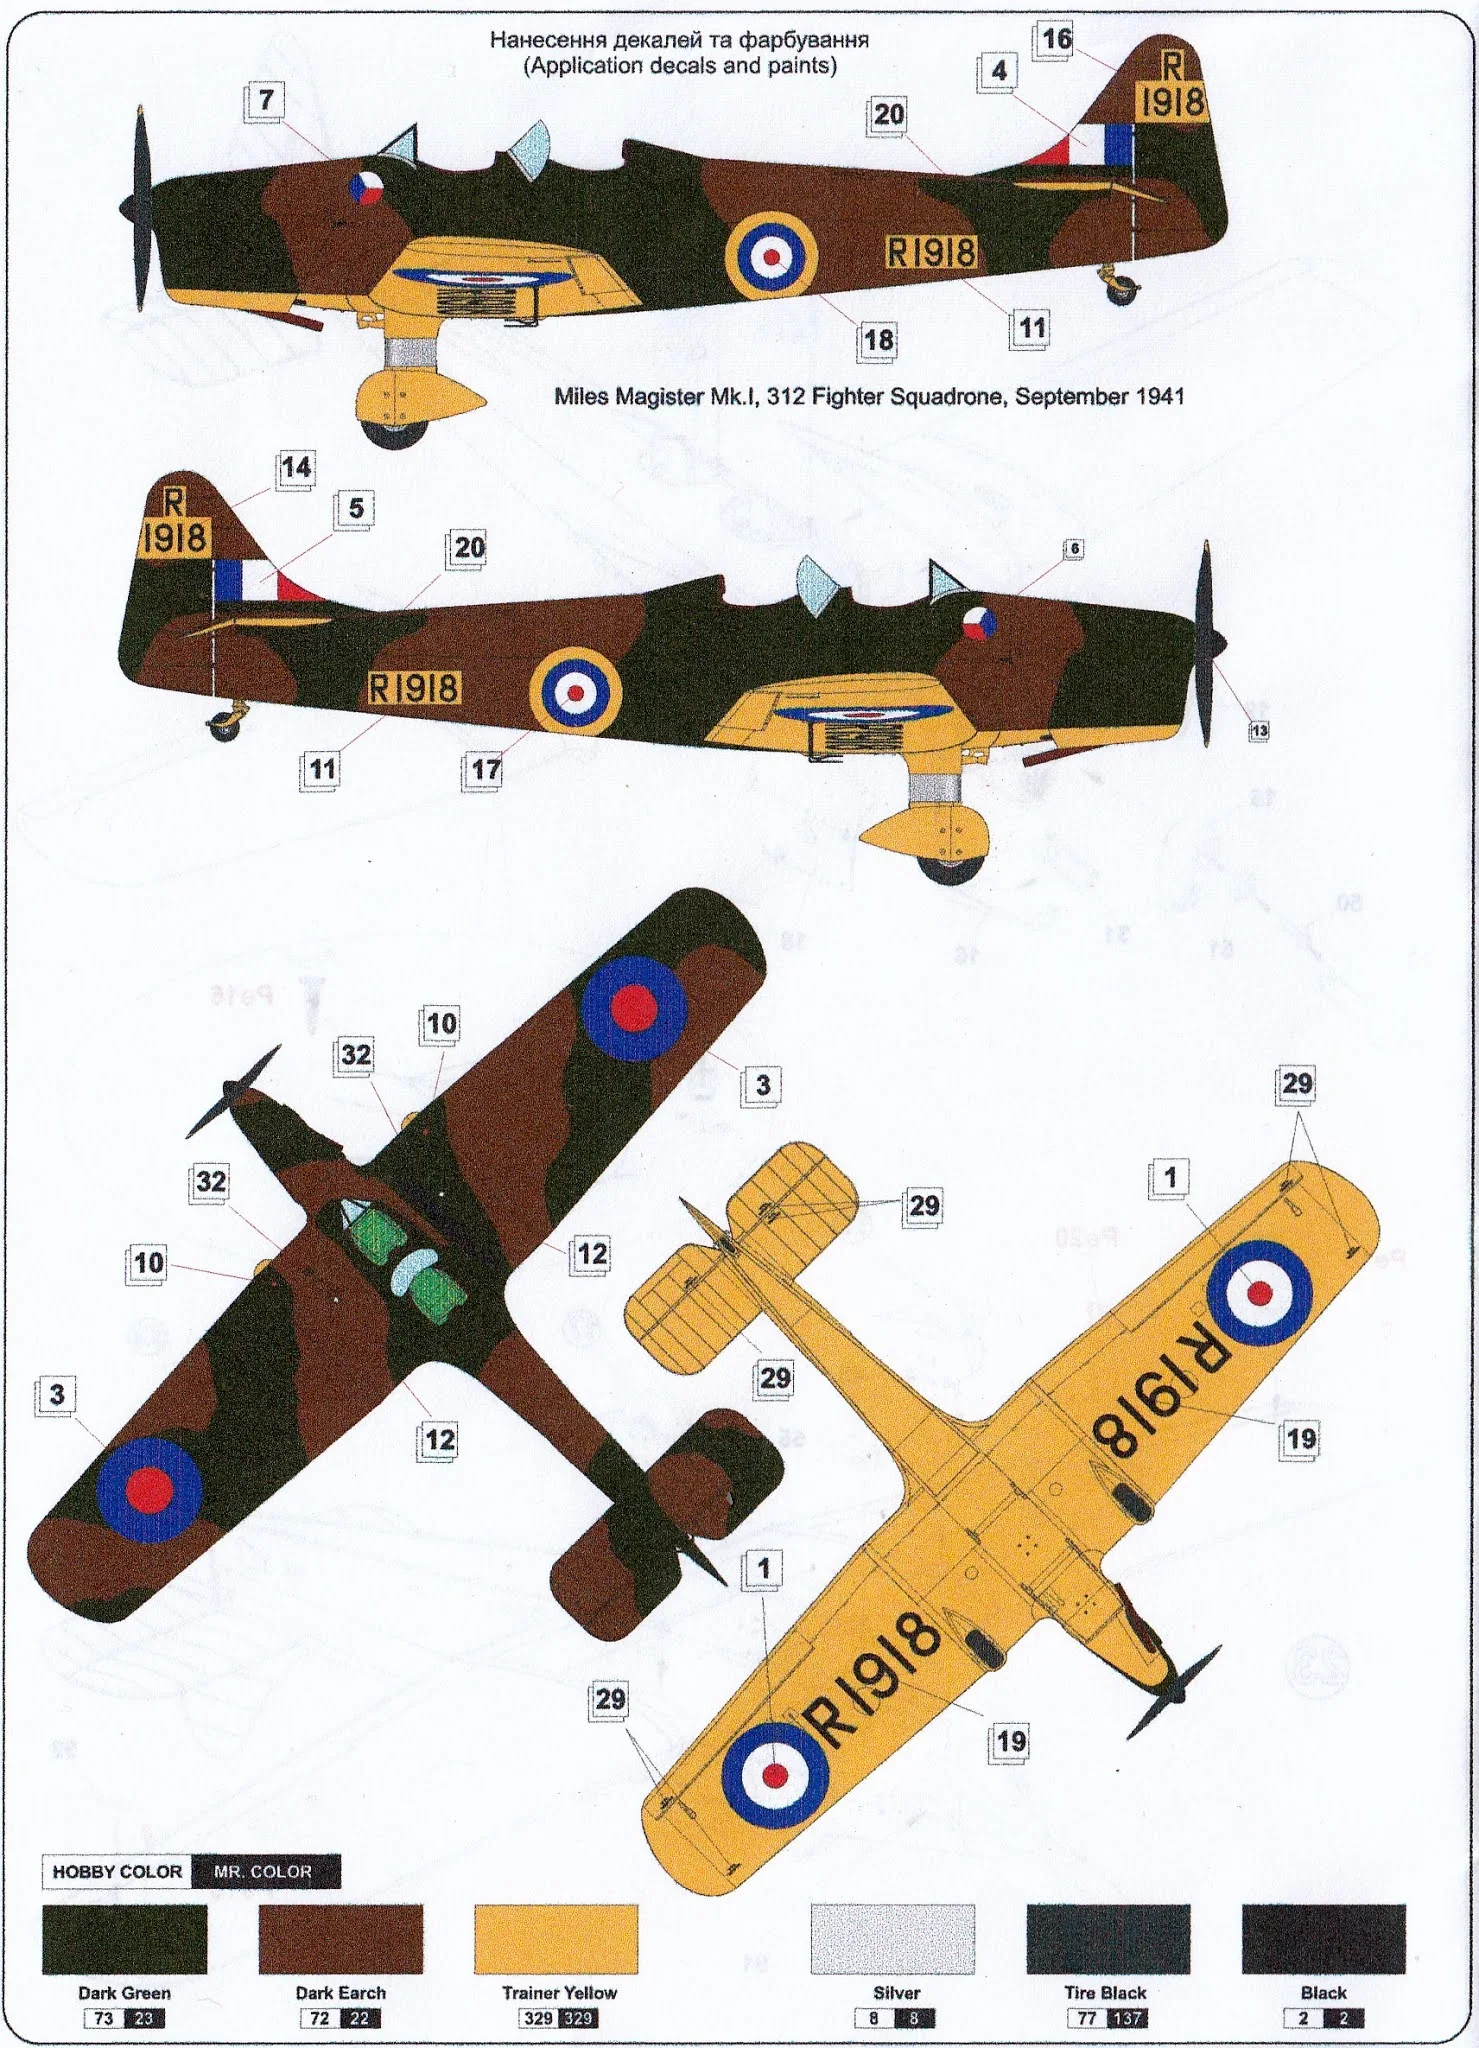
Mikro-Mir provide a healthy choice of three marking schemes in the box. One represents a pre-war all over yellow trainer, whilst the remaining two are representative of war time camouflage schemes. The color callouts are provided using readily available Gunze/Mr Color paints. Whilst no interior colors are called out during the assembly, its a pretty safe bet to use BS238 Aircraft Grey Green which is readily available in most popular model paint ranges.
The first scheme is for N3801 finished in standard hi-viz trainer yellow overall with pre-war type A roundels.

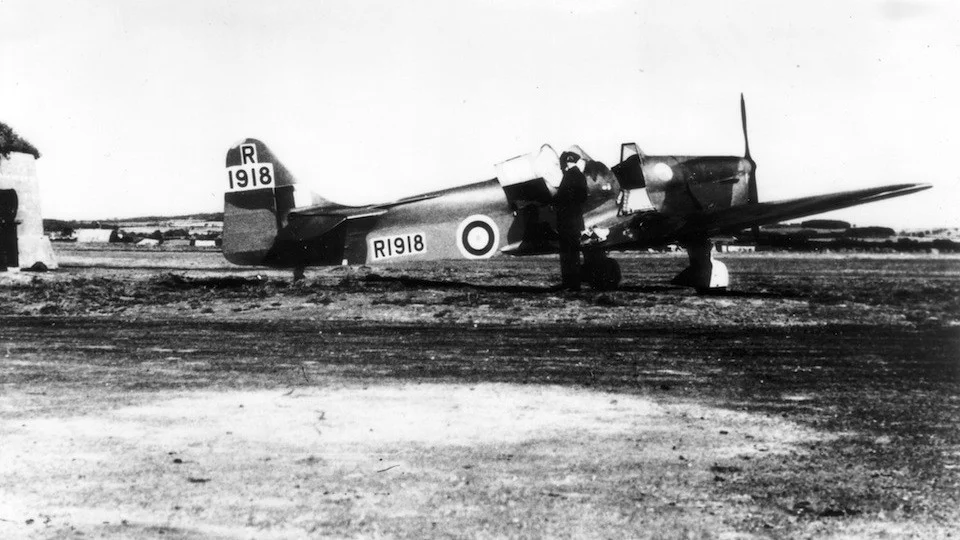
The second scheme is for R1918 during 1941 when it was assigned as a transport aircraft to 312th Czechoslovak Fighter Squadron.

The third and final scheme is for T9883 assigned to 317th Polish Fighter Squadron. This presumably was also a squadron hack used for transportation and general flying. Built by Philips & Powis at Woodley in 1940 for RAF as T9883 and sold as G-AKRT in January 1948. Crashed at Elstree 08.11.53.

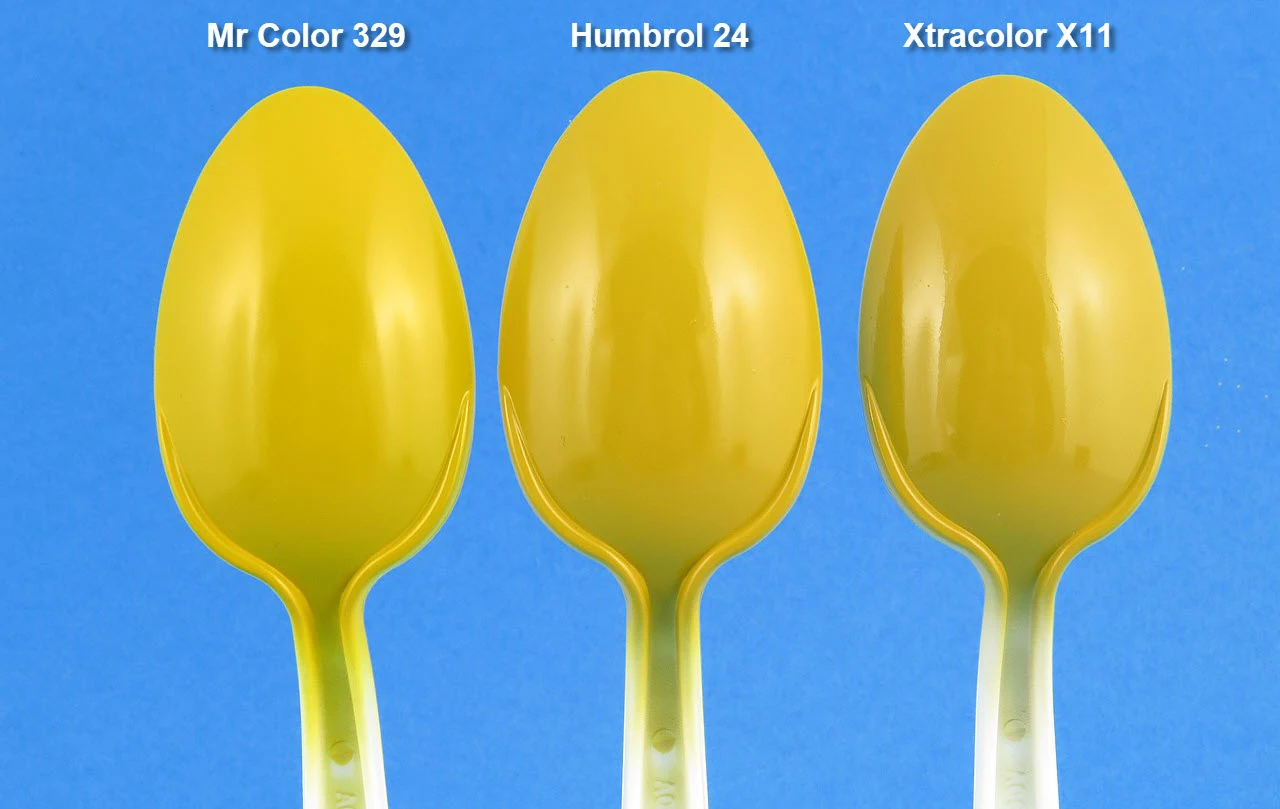
No matter which of these paint schemes you decide on, you will have to deal with finding a good match for RAF Trainer Yellow. I did a test spray of the Mikro-Mir suggested Mr Color 329 (which is actually FS13538 Gloss US Navy Blue Angels) and to my eye it did not seem to have enough orange in it. I happened to have a tin of both Humbrol 24 Trainer Yellow and Xtracolor X11 RAF Trainer Yellow and these look much closer to color photos of the Trainer yellow used by the RAF. Several other paint manufacturers have specific trainer yellows so I would strongly suggest you do your own testing.

The decals in the kit are printed in the Ukraine by Decograph. They have a very matt finish and appear to be very thin (which is good). The colors seem to be faithfully reproduced, especially the roundel colors and the trainer yellow sections to be used on scheme R1918.

OVERALL THOUGHTS - Mikro-Mir 1:32 Miles Magister (32002)
I have to admit to starting this review half expecting this kit to require a lot of effort to polish it into a nice model. That's what we expect from limited run kits but we are more than happy to put in the extra effort because it's a subject we like and have little chance of getting it from any other manufacturer. We are thankful that someone has at least produced an injection molded kit in the first place.

My expectations were spot on as I started to remove parts from the sprue and experienced a lot of flash and some sink holes. Again, par for the course with limited run kits. What I did not expect was how very nicely the freshly cleaned up parts began to fit together (even without alignment pins). This pleasant surprise left a good taste in my mouth and I started to enjoy working on the model rather than it fighting me.

I think its fair to say that we probably won't see another 1/32nd Miles Magister kit in a hurry and you know what, that's ok, because Mikro-Mir have done a darn good job on this one.
Many thanks to Creative Models Australia for the review kit, and I'll be keeping a much closer eye on the Mikro-Mir release schedule in the future.
Gary Wickham
Thanks to Creative Models for sending Gary this sample to use and review. You can get these from the Creative Models Website

Many thanks to Galaxy Model for the tools they sent to Gary. Galaxy Model products can be readily purchased on eBay or foreign (non-Chinese) customers can also buy Galaxy products directly using PayPal. For more details contact Galaxy via email at galaxymodel@outlook.com
You can see more of Gary's Work on his ScaleSpot.com Website & his Facebook page.

Appendix: Instructions


