
.png)
From Eduard Model Accessories
Kit No #82125
1/48th scale
Kit Includes:
Coloured photo-etched parts
Painting masks
Decals for six versions in the box
Price: $60 USD from the Eduard Website
.jpg)
Following on from their excellent new tool Tempest Mk.V, Eduard has now released the Mk.II radial-engined Tempest in 1/48th scale.
As you would imagine Eduard have re-used as much as they can from the original Mk.V sprues. Due to the significant changes between the Mk.V and Mk.II Tempests, this turns out to be a lot fewer sprues than you might first imagine..jpg)
.jpg) Finally, the kit includes a very large decal sheet containing six interesting and colourful marking options covering both RAF and foreign (Pakistan & India) operators.
Finally, the kit includes a very large decal sheet containing six interesting and colourful marking options covering both RAF and foreign (Pakistan & India) operators.
.jpg) Hawker engineers redesigned the Tempest II with a modified Centaurus IV, which incorporated much captured German technology. This resulted in what was probably the cleanest radial engined fighter of the Second World War.
Hawker engineers redesigned the Tempest II with a modified Centaurus IV, which incorporated much captured German technology. This resulted in what was probably the cleanest radial engined fighter of the Second World War..jpg) Orders were raised to 330 for Bristol and 1800 for Hawker, however at the end of the war most of them were cancelled. Hawker managed to finish 402 aircraft, while Bristol completed only 50 aircraft. All production aircraft were fitted with the Centaurus V engine, the short-barrelled Hispano Mk. V cannons, and the standard Mk V tail-unit. All of Bristols aircraft and Hawkers first batch were built as fighters, while the rest of Hawkers production were built as fighter-bombers with strengthened wings. [https://www.hawkertempest.se]
Orders were raised to 330 for Bristol and 1800 for Hawker, however at the end of the war most of them were cancelled. Hawker managed to finish 402 aircraft, while Bristol completed only 50 aircraft. All production aircraft were fitted with the Centaurus V engine, the short-barrelled Hispano Mk. V cannons, and the standard Mk V tail-unit. All of Bristols aircraft and Hawkers first batch were built as fighters, while the rest of Hawkers production were built as fighter-bombers with strengthened wings. [https://www.hawkertempest.se]
COLORS & MARKINGS - Eduard 1:48 Tempest Mk.II Late (82125).jpg)
.jpg)
.jpg)
.jpg)
.jpg)
.jpg) The provided decal sheet is one of the biggest I have ever seen in a 1/48 scale Eduard box. It literally only just fits and the stencils are contained on a second smaller sheet. I assume (as with all Eduard decals since 2019) that these are the "removable carrier film" style which I have not yet used myself but will finally get to try them out on this build. I will almost certainly use a couple of the spare decals on the sheet to conduct some tests of how best to remove the carrier film without damaging the decal themselves.
The provided decal sheet is one of the biggest I have ever seen in a 1/48 scale Eduard box. It literally only just fits and the stencils are contained on a second smaller sheet. I assume (as with all Eduard decals since 2019) that these are the "removable carrier film" style which I have not yet used myself but will finally get to try them out on this build. I will almost certainly use a couple of the spare decals on the sheet to conduct some tests of how best to remove the carrier film without damaging the decal themselves.
.jpg) BUILD - Eduard 1:48 Tempest Mk.II Late (82125)
BUILD - Eduard 1:48 Tempest Mk.II Late (82125)
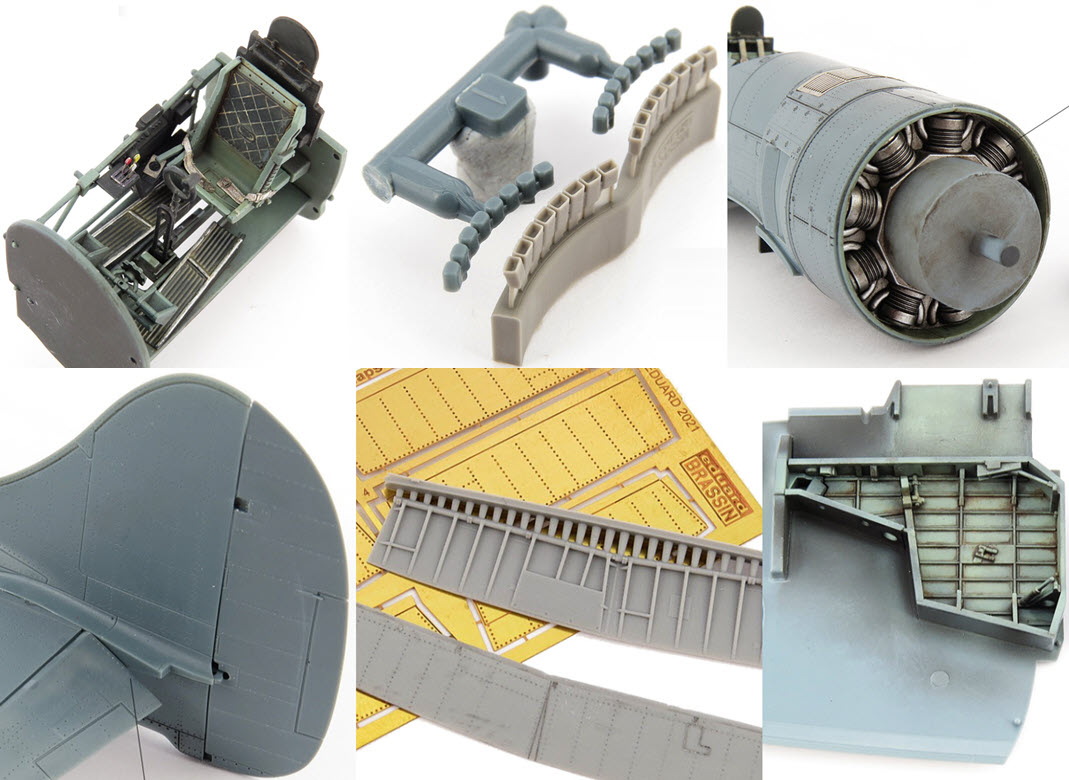
Eduard provides three options for the main instrument panel. All plastic with hand painted raised dials, plastic with some raised dials and decals and lastly (in the ProfiPACK only) a full set of pre-painted photo-etch. I decided to go with the photo-etch option but found that the assembled part was quite flimsy. A simple solution presented itself by instead of part E30 I used the plastic parts (L8,L21 & L22) from option two and sanded off all the raised detail. The PE parts were then easily glued to the plastic..jpg) The plastic parts will be painted Tamiya XF-85 Rubber Black (my favourite "scale black") and then the PE parts attached using Ammo Ultra Glue. I use Ultra Glue for almost all my PE work these days as it is far more forgiving than CA glue and dries quite strongly.
The plastic parts will be painted Tamiya XF-85 Rubber Black (my favourite "scale black") and then the PE parts attached using Ammo Ultra Glue. I use Ultra Glue for almost all my PE work these days as it is far more forgiving than CA glue and dries quite strongly..jpg) The main cockpit parts were primed in black and then a light coat of AK Real Color RC293 RAF Cockpit Grey Green. Various washes were applied in and around the raised details. As I had experience building the Mk.V Tempest previously, I knew that very little of the cockpit interior would be visible on the finished model so no extra scratch built parts were added this time around.
The main cockpit parts were primed in black and then a light coat of AK Real Color RC293 RAF Cockpit Grey Green. Various washes were applied in and around the raised details. As I had experience building the Mk.V Tempest previously, I knew that very little of the cockpit interior would be visible on the finished model so no extra scratch built parts were added this time around..jpg) I'm always interested in new products and had recently came across Mr Hobby Weathering Colors. These appear to be pre-mixed enamel based weathering washes and come in a small range of browns, grays and blacks. I used a selection of these in an around the cockpit. On the seat cushion, I applied some WC04 Sandy Wash, likewise on the foot supports. These products behave a bit like oil washes and can be worked and removed with artists white spirit.
I'm always interested in new products and had recently came across Mr Hobby Weathering Colors. These appear to be pre-mixed enamel based weathering washes and come in a small range of browns, grays and blacks. I used a selection of these in an around the cockpit. On the seat cushion, I applied some WC04 Sandy Wash, likewise on the foot supports. These products behave a bit like oil washes and can be worked and removed with artists white spirit..jpg)
.jpg) The PE fret includes a nice set of pre-painted belts and these looked overly clean so a light wash was also applied, so they better blended in with the rest of the parts. The PE instrument panel looked very realistic once fitted into the cockpit but unfortunately will be virtually invisible once the fuselage is buttoned up.
The PE fret includes a nice set of pre-painted belts and these looked overly clean so a light wash was also applied, so they better blended in with the rest of the parts. The PE instrument panel looked very realistic once fitted into the cockpit but unfortunately will be virtually invisible once the fuselage is buttoned up..jpg) Eduard likes to make a large number of optional upgrades for its kits and the Tempest Mk.II was no exception. These days I am a bit more selective on which options I use as generally speaking the Eduard plastic is often more than good enough. In the case of the exhaust stubs, I decided that Brassin replacement parts would save me a lot of work (drilling out the kit plastic parts) and look heaps better.
Eduard likes to make a large number of optional upgrades for its kits and the Tempest Mk.II was no exception. These days I am a bit more selective on which options I use as generally speaking the Eduard plastic is often more than good enough. In the case of the exhaust stubs, I decided that Brassin replacement parts would save me a lot of work (drilling out the kit plastic parts) and look heaps better..jpg) A before and after comparison of the exhausts highlights the benefits of the brassin parts. These are drop in replacements with no surgery needed. They are also very reasonably priced which also makes the decision to use them easier.
A before and after comparison of the exhausts highlights the benefits of the brassin parts. These are drop in replacements with no surgery needed. They are also very reasonably priced which also makes the decision to use them easier..jpg) With the cockpit complete, it's time to seal up the fuselage. Anyone who has built any of the recent Eduard 1/48 kits will know that the surface detail is very fine and easily damaged. We need to keep this in mind when working on repairing the seam joins. For areas that will require some panel line re-scribing, I like to use CA (Super) Glue mixed with some Talc (or VMS) filler. This helps the CA to act as a superior filler, allowing better sanding and scribing. Where no scribing is needed, perhaps only rivets, I am happy to use Tamiya Basic Grey putty where the seam needs filling. To protect the surrounding surface detail from putty/sanding damage, I apply some sacrificial tape along the seam.
With the cockpit complete, it's time to seal up the fuselage. Anyone who has built any of the recent Eduard 1/48 kits will know that the surface detail is very fine and easily damaged. We need to keep this in mind when working on repairing the seam joins. For areas that will require some panel line re-scribing, I like to use CA (Super) Glue mixed with some Talc (or VMS) filler. This helps the CA to act as a superior filler, allowing better sanding and scribing. Where no scribing is needed, perhaps only rivets, I am happy to use Tamiya Basic Grey putty where the seam needs filling. To protect the surrounding surface detail from putty/sanding damage, I apply some sacrificial tape along the seam..jpg) In the process of sanding the rear fuselage upper & lower seams, it is to be expected that you will lose most of the rivet detail. This is, of course, unavoidable in most cases as the putty and sanding just has to be done to remove the join. It requires us to then re-instate the rivets to best match what was there originally. A good set of rivet wheels will come in handy here and I prefer to use those from Galaxy Models.
In the process of sanding the rear fuselage upper & lower seams, it is to be expected that you will lose most of the rivet detail. This is, of course, unavoidable in most cases as the putty and sanding just has to be done to remove the join. It requires us to then re-instate the rivets to best match what was there originally. A good set of rivet wheels will come in handy here and I prefer to use those from Galaxy Models..jpg)
.jpg) Whilst the provided plastic grill looks quite good, nothing in plastic can match the scale thickness of photo-etch brass or steel. The PE part can be simply glued over the top of the plastic grill or you can cut out the plastic grill as I have done and replace it with the PE part. The part needs to curve slightly to match the fuselage contour and to achieve this you need to roll it gently over a curved surface to minimise the chance of kinking of the PE.
Whilst the provided plastic grill looks quite good, nothing in plastic can match the scale thickness of photo-etch brass or steel. The PE part can be simply glued over the top of the plastic grill or you can cut out the plastic grill as I have done and replace it with the PE part. The part needs to curve slightly to match the fuselage contour and to achieve this you need to roll it gently over a curved surface to minimise the chance of kinking of the PE..jpg) Because of the close fitting engine cowling, very little of the Centaurus V engine can be seen from the front of the model when complete. You could probably get away with just painting it black but almost as easy is a coat of Alclad 101 and a heavy wash to give it some depth.
Because of the close fitting engine cowling, very little of the Centaurus V engine can be seen from the front of the model when complete. You could probably get away with just painting it black but almost as easy is a coat of Alclad 101 and a heavy wash to give it some depth..jpg) The engine cowling ring is a press fit onto the forward fuselage with a gap free result. It's these sorts of details that make building Eduard kits such a delight. Panel lines and rivets have been tidied up by hand using a needle and pin vise.
The engine cowling ring is a press fit onto the forward fuselage with a gap free result. It's these sorts of details that make building Eduard kits such a delight. Panel lines and rivets have been tidied up by hand using a needle and pin vise..jpg) Getting ready to close up the wings, the wheel wells were assembled and received a coat of Grey-Green as per the interior colours. Here I have applied some Mr Weathering grime colours to the left wheel bay whilst the right remains clean. This helps to show how even a light wash can bring more life and depth to your models. You don't need to go super heavy with the weathering to obtain some benefit.
Getting ready to close up the wings, the wheel wells were assembled and received a coat of Grey-Green as per the interior colours. Here I have applied some Mr Weathering grime colours to the left wheel bay whilst the right remains clean. This helps to show how even a light wash can bring more life and depth to your models. You don't need to go super heavy with the weathering to obtain some benefit..jpg) Whilst browsing for extra goodies for this kit, I came across a new 3D printed option for the landing flaps. Having used the full PE set on the Mk.V build I was curious to see what Eduard's home printed parts looked like. The surface detail is well done with rivet and ribbing detail pretty much to scale.
Whilst browsing for extra goodies for this kit, I came across a new 3D printed option for the landing flaps. Having used the full PE set on the Mk.V build I was curious to see what Eduard's home printed parts looked like. The surface detail is well done with rivet and ribbing detail pretty much to scale..jpg) The Tempest employs a "split landing flap" configuration where only the lower half of the wing is extended (or splits away) for landing. Split flaps produce slightly more lift than plain flaps, but like their plain counterparts, they also produce a lot of drag.
The Tempest employs a "split landing flap" configuration where only the lower half of the wing is extended (or splits away) for landing. Split flaps produce slightly more lift than plain flaps, but like their plain counterparts, they also produce a lot of drag..jpg) First step in fitting the new flaps is to remove the closed plastic flaps from the kit wing. There are a number of ways to achieve this, and for this particular kit I chose to repeatedly score along the panel lines (shown in red) with a fresh #11 blade. A razor saw would be less risky but very hard when you get to those corners and inside lines near the fuselage.
First step in fitting the new flaps is to remove the closed plastic flaps from the kit wing. There are a number of ways to achieve this, and for this particular kit I chose to repeatedly score along the panel lines (shown in red) with a fresh #11 blade. A razor saw would be less risky but very hard when you get to those corners and inside lines near the fuselage..jpg) With the moulded in flaps removed, the upper wings can now be glued in place. Learning from my Mk.V build this time, I opened up the rectangular hole for the boarding ladder. This was backed with some plasticard into which the extended ladder will eventually be attached.
With the moulded in flaps removed, the upper wings can now be glued in place. Learning from my Mk.V build this time, I opened up the rectangular hole for the boarding ladder. This was backed with some plasticard into which the extended ladder will eventually be attached..jpg) Next step is to mate the wings to the fuselage. This highlighted a small problem with the upper wings, which no longer matched cleanly to the fuselage wing root. This was because by cutting away the lower flap the upper wing now drooped lower than it should. To correct this, I needed a way to push the upper wing back up to align properly with the fuselage. A couple of temporary shims were made up from plasticard and provided enough support while the glue dried along the join. This proved to be a simple and effective way to address this unforeseen challenge created by the flap removal.
Next step is to mate the wings to the fuselage. This highlighted a small problem with the upper wings, which no longer matched cleanly to the fuselage wing root. This was because by cutting away the lower flap the upper wing now drooped lower than it should. To correct this, I needed a way to push the upper wing back up to align properly with the fuselage. A couple of temporary shims were made up from plasticard and provided enough support while the glue dried along the join. This proved to be a simple and effective way to address this unforeseen challenge created by the flap removal..jpg) When viewed from the top, the result of the shim doing a good (temporary) job can be seen. Here the wing and fuselage are now properly aligned.
When viewed from the top, the result of the shim doing a good (temporary) job can be seen. Here the wing and fuselage are now properly aligned..jpg) If you have built the Eduard Mk.V Tempest kit, you will have likely run into problems with the rear wing to fuselage seam (I know I did). Eduard have re-designed this part in the Mk.II kits and the join is now about 1 cm further to the rear. This is definitely an improvement and I extend my thanks to Eduard for the effort.
If you have built the Eduard Mk.V Tempest kit, you will have likely run into problems with the rear wing to fuselage seam (I know I did). Eduard have re-designed this part in the Mk.II kits and the join is now about 1 cm further to the rear. This is definitely an improvement and I extend my thanks to Eduard for the effort..jpg) With the main parts now solidly joined its time to deal with the lower seam and install the photo-etch interior parts for the landing flaps. It was pretty much unavoidable losing most of the panel line and rivet detail in the seam area and as this was not a natural panel line it must be sanded flush.
With the main parts now solidly joined its time to deal with the lower seam and install the photo-etch interior parts for the landing flaps. It was pretty much unavoidable losing most of the panel line and rivet detail in the seam area and as this was not a natural panel line it must be sanded flush..jpg) Working slowly with my Tamiya Scriber and Galaxy Model rivet wheels, the lost surface detail was reconstructed, and the results checked with a light wash of Tamiya Panel Liner (Black).
Working slowly with my Tamiya Scriber and Galaxy Model rivet wheels, the lost surface detail was reconstructed, and the results checked with a light wash of Tamiya Panel Liner (Black)..jpg) Eduard provides separate control surfaces in the kit (which is nice) but does not cater for attaching them in an off-center position. I always try to model my WW2 aircraft with relaxed elevators and so needed to do some small surgery to the kit parts to droop them as shown here. It's a small detail but one that adds some character to the finished model.
Eduard provides separate control surfaces in the kit (which is nice) but does not cater for attaching them in an off-center position. I always try to model my WW2 aircraft with relaxed elevators and so needed to do some small surgery to the kit parts to droop them as shown here. It's a small detail but one that adds some character to the finished model..jpg)
.jpg)
.jpg)
All new wings and fuselage are provided as well as several upgraded (corrected) parts compared to the earlier Mk.V kit.
Being a ProfiPACK release, this kit comes with a small pre-coloured photo etch fret (covering mostly the cockpit), a pre-cut mask set (for the canopy but also some fuselage markings for one of the included schemes)
.jpg)
The Subject: The Tempest II - late version.
The Tempest Mk II had been intended to be powered by the 2,250hp Sabre Mk IVA in-line liquid-cooled engine. Sir Sydney Camm however felt that the radial engined Tempest Mk II would offer the ultimate in performance for the Typhoon/Tempest line and, as a result, considerable effort was made to improve the efficiency of the 2,210 hp Centaurus air-cooled radial engine..jpg)
.jpg)
COLORS & MARKINGS - Eduard 1:48 Tempest Mk.II Late (82125)
As with most of their ProfiPACK boxings, Eduard include six marking options in this kit. Each of the six represents a post war Tempest II ranging from 1946 to 1951 and includes four RAF aircraft, one Pakistan AF and one Indian AF aircraft. I was immediately drawn to the colourful (and unusual) Pakistani scheme with its desert scheme and white chevrons. As it turned out, I also had a liking for the Indian colours with the orange and black markings contrasting nicely with the overall silver finish.
.jpg)
.jpg)
.jpg)
.jpg)
.jpg)
.jpg)
.jpg)
Eduard provides three options for the main instrument panel. All plastic with hand painted raised dials, plastic with some raised dials and decals and lastly (in the ProfiPACK only) a full set of pre-painted photo-etch. I decided to go with the photo-etch option but found that the assembled part was quite flimsy. A simple solution presented itself by instead of part E30 I used the plastic parts (L8,L21 & L22) from option two and sanded off all the raised detail. The PE parts were then easily glued to the plastic.
.jpg)
.jpg)
.jpg)
.jpg)
.jpg)
.jpg)
.jpg)
.jpg)
.jpg)
.jpg)
.jpg)
.jpg)
.jpg)
.jpg)
.jpg)
.jpg)
.jpg)
.jpg)
.jpg)
.jpg)
.jpg)
.jpg)
.jpg)
.jpg)
.jpg)
With the main assembly complete, I am now up to the painting stage.
.jpg)
Follow this link for part 2 of this build where I take on the colourful Pakistani desert scheme.
Gary Wickham
Check out the Eduard Website for more information on all of their releases...
You can see more of Gary's model making on his website Scalespot.com
