

Landing on the desk in a massive box we have for you today the H.K. Models B-25 in 1/32 to review – This kit is the 95% finished article of the kit you will see in the shops. Only missing the landing gear and proper decals from the box, the
kit itself is the same as you will buy from your favourite vendor. Let’s look inside to
this box to see just what this much talked about and long awaited kit is all
about.
Review:
H-K Models Co. 1/32 B-25J “Glass Nose”
Company: H-K Models Co.
Scale: 1/32
Sprues: 28 grey styrene +clear + P/E sheet –
A total of 514 parts
Dimensions: Wing Span, 643mm; Length:
547.7mm
Price
(Est): US $174.95
Product /
Stock #: 01E01
Product
provided by: H-K Models Co.
I must stress this is the final pre-production kit that is 95% complete so first of all
I can’t make any comment on the box art, packaging or extra decal options. This
kit was supplied to me in a box securely wrapped in bubble wrap with one set of
decals which I will investigate later, Sprue J is missing from this review as
well – it is a small sprue with the landing gear on it – but what there IS to
look at here is a big bunch of sprues in medium grey, some clear parts and some
photo etch I can talk about – here goes..

The plastic:
The medium
grey plastic on offer here is free of flash and of a medium hard variety – akin
to a Hasegawa kit in ease of cutting and shaping. The detail on the kit is very
sharp and progressive. It is said that the fine laser cut rivets are
numbered to be over half a million in
number (I kept on loosing count at the four hundred thousand mark somewhere )
but I can say that there are indeed a lot of rivets that are very fine. They
will look great under some bare metal finishes. In fact the detail is so fine
and so well done that I would be worried about is replicating this effect if
you botched it with glue scarring or filling of seams. It seems progress is
good and bad!

The laser
cut rivets themselves are tiny but only recessed variant and none of the raised
rivets which adorn these bombers skins all over. The debate will rage on with
everyone’s opinions on the forums for a while longer until someone can manage
to do both raise and recessed variants on the same kit. There is no flash on
this kit and on really close inspection against the light there is only one
visible sink mark on the top of the kit
front fuselage.
The only blemish I could find was a small sink mark on the top front left hand quarter
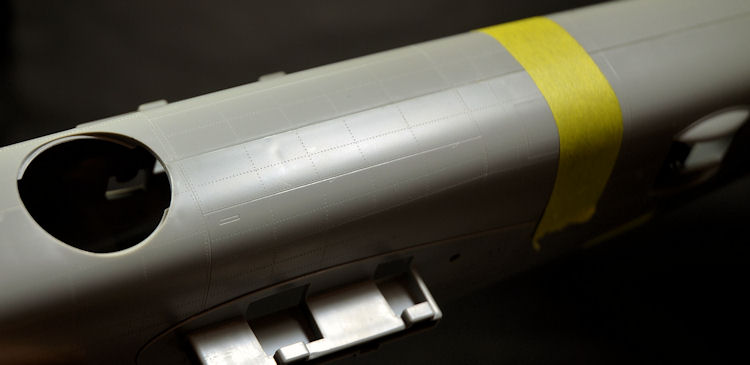
Though no others
visible where the inner structural bracing of things like the wings or flaps
where these often occur. This small blemish is there but unseen to any usual
inspection, so nice work on such a big kit.
The internal ribbing is often a problem on the outside but not on this kit


There are
injection marks but these are in positions where they cannot be seen like the
internal joints in the wings and the inner not-visible fuselage. All in all
little things like the joining of sprues to the kit in places that do not
require a degree in surgery make for a pleasant modelling experience.
Well done on the design of this part of the kit and equally well done on the surface detail which of everything in this kit is just amazing and looks great in 1/32.
Well done on the design of this part of the kit and equally well done on the surface detail which of everything in this kit is just amazing and looks great in 1/32.
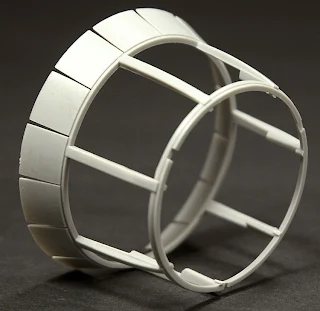
The internal ribbing of the wing and socket to fit onto the fuselage exposed

The Engineering-
...This kit has
some really good innovative features – the wings are easily removable – I have
some this several times on my kit and re-attached them with no visible scratch
marks or fouling of the kit. Whether this works as well with a painted and
finished kit I am not sure but it is a great feature. You can also remove the
tail section and the propellers which are also easily packed away for transport. I
can see this kit with these features being on many modelling tables and events
due to the fact it can easily slip into a box even after completion. Well done
on that feature.
The notches where the kit wing slides on to - a little stiff but i like it that way

This is the notch and socket wing together before it is affixed

The seam of the wing once on is - seamless....

I have glued
together most all of the major sub-assemblies for you to see unpainted “au
natural” so you can see that much of the kit is well thought out and most
things fit very well – some without glue even – there are a few slightly not
straight edges in some of the seams which will need some filler and some care
to make come together neatly.
There is a seam on the inside of the engine nacelle and on some of the engine cowlings that may need some filler but that is to be expected on such a large kit with such a large surface area like the wings to cover.
There is a seam on the inside of the engine nacelle and on some of the engine cowlings that may need some filler but that is to be expected on such a large kit with such a large surface area like the wings to cover.
There is one bit that needs some filler at the nacelle root but most of the seams are pretty good. Care must be taken to secure one part at a time before moving on to the next to minimize potential gaps

While some things fit very easily together
time must be spent to get a good fit on the wings and other large surface areas
as you really do not want to have to go into it half-baked and have to fill
seams and potentially destroy some of the lovely surface work. This is a many
layered kit but not an onion – it isn’t hard build if you go about it all sensibly
and with a selection of glues and clamps at the ready.

The instructions
…Come in a sixteen page booklet are
pretty easy to understand with legible English instructions that point out
different options of the kit and configurations. There are all the usual parts
– sprue map, assembly instructions which start logically in the cockpit and go
through clearly each sub-assembly until everything comes together in the final
construction.

There are
colour call outs in Federal standard colours, hobby colour and Tamiya Acrylics
colour numbers so that covers a few bases there. The kit I have only has one
set of decals of which I will investigate later in the review. All in all this
is a competent and logical plan to follow.
The cockpit floor and the Instrument panel have just the right amount of detail though most will add more -

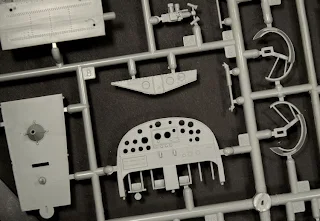

Starting at the cockpit of the Mitchell: The parts for the construction are pretty
much all included in the sprues N, I and M of the kit. The controls and
instrument panel is moulded as a sandwich together type with the holes there
for the instruments. The kit I have has decals for the dials and I am sure
these will be included on the production kit as well – a drop of future or clear glue will make the holes look like dials on
the finished article.


The floor of
the cockpit and the side walls are intricately detailed with all of the panels
required for the J model -

The floor has many details to it as well, and on top of this deck go the two seats of the pilots, these are simple to assemble but have two small circular marks on the rear that need a slight bit of cleaning up – after this they are a good replica of the real thing, down to adjustment knobs on the rear.
The seats constructed

The model seats and a front and rear view of the actual items in the picture below

Some people
have said that the seats are a bit shallow in the bucket at the front of the
lip of the chair - maybe this is true for the front but a lot of seats you see
are from other aircraft or modified - I am happy enough with what is on offer
here because I will just put some made up cushions in each seat anyway - as you can see from the picture above you may need a strip of styrene across the front.
The internal bulkheads are well detailed - more than comparable kits in this scale

Seems to me
that no matter how fine this cockpit and all of the dials are some will like
them and some will crave for aftermarket. This cockpit – and for that matter
most of the interior are far better than most other 1/32 scale kits out there
in detail and accuracy. The throttles and levers on the middle console are tiny
but accurate in detail – lucky for me there are two of the sprues the levers are moulded on!
As a happy accident in injection moulding you have a spare just in case you
lose one to the carpet monster (-ping!) Here is a quick construction


In the cockpit is that there is no escape hatch for the canopy – you will have to scratch build this if you want this detail. It is pretty prominent so I would include this.

The Photo-etched sheet showing the seatbelts

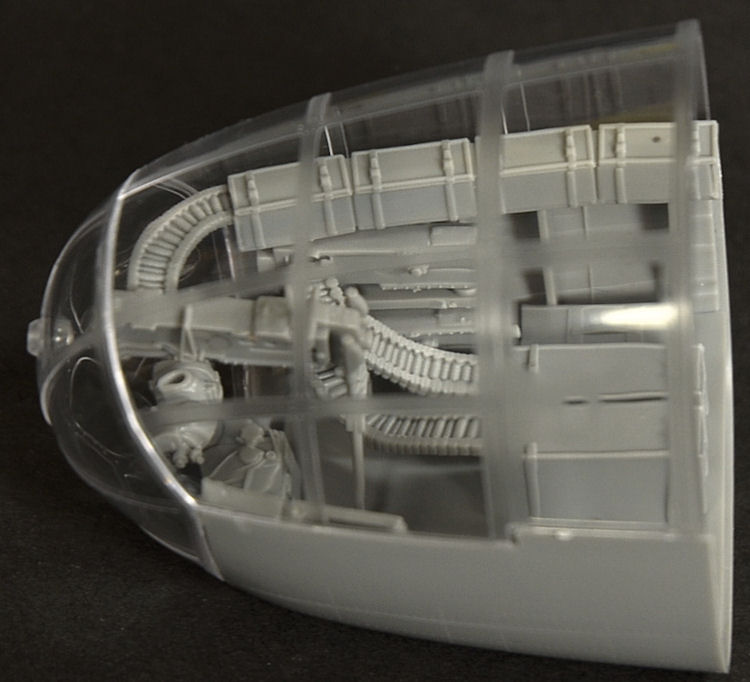
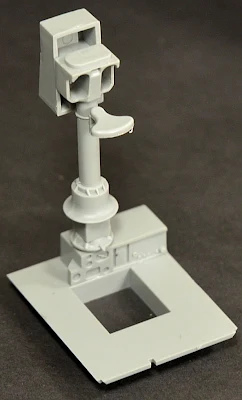
The bombardier’s compartment:
...A real focus for many people of this - the "Glass Nose" kit release, as the other gun nose variant of the “J” model of the Mitchell will be nearly as popular with modellers as this kit – so many would like to know how good this variant’s nose details are. I can say that the equipment and the gun in the nose does not disappoint – the well rendered Norden bombsight and two 30.cal guns and ammunition holders with a massive 50.cal in the nose with a mount and large ammo feed which is a little big but not horribly.
The front glass nose sprue with floor, MGs, ammo boxes, Norden bombsight and bombardier's instruments

 Close ups of the Ammo feeders, ammo boxes and the floor panel with Norden bombsight
Most of the details are there but for the bombardier
foldable riding seat in the nose (attached to the bulkhead) is completely
missing and you will have to scratch build that.
The Norden Bombsight and the Bombardier's seat


The front compartment in pictures showing all of the parts assembled - some which fit without glue..


 The Main wheels are here but i have not a sprue"J" which contains the gear and nose-wheel - the rear wheels are great and look suitably chunky - they are weighted and join together well with not too bad of a seam on them in the centre.

 The engines – These are truly impressive Wright cyclone R-2600 in almost all respects – easy to assemble and very detailed with all exhausts and even plastic representing the front engine brass tubing is all there – better than even the excellent engines in this scale made by Trumpeter which were quite a hit with modellers.

And with the glazing installed (don't forget some weight under the front floor to stop any tail sitting!)


The parts of the engine on the sprue


Close-ups of the powerplant, including push-rod covers, engine wiring and open ended exhausts and spinner.


Close ups of the Piston cases,Push-rods, exhausts and engine frame


The engine shown without the push-rod covers to show the tops of the cylinders - no nasty seams there

Shown here without the engine wiring which is supplied of course with the push rod covers which you will have to secure in mid air almost if you leave out the extra push-rods that are not included in the real thing. - Again this is shown without the push-rod covers, wiring and exhaust to show more of the engine - all of these parts ARE included!


You can see here what I mean a little more clearly - you have an EXTRA set of push-rods in this kit for each row of cylinders - you only need two per engine. This isn't a big problem - you can just leave them out and by removing some notches so the engine fits everything is OK. You will have to join the rear posh rod cover to the rear of each cylinder.

Now you could easily no include them but there is a gap in the space where the 2mm wide space for the two extra push-rods would go – you cannot cut any of the length of the tube the engine sits on so you just have to deal with the gap. Not a big problem but something modellers should be aware of before they pack it all in to their engine nacelles and paint it.


When it comes to the exhausts they are separately moulded and each have hollowed out ends which will look great with some blacked out holes– you will not need any specially hollowed out exhausts form the aftermarket guys here.
They escape through the cowlings which are the next point of investigation here - The B-25's cowlings are the correct shape which is hard to achieve as it has some odd curves in it's shape.

The engine cowlings are very thin and although they have injection circles on the insides they will clean up pretty easily. If you have the cowlings closed you will not even need to fix that, just paint the undercoat colour and you are set.
The engine cowl framing, front nacelle opening and pod mount on what the engine is rooted on - note the cowl flap activators
The engine cowl framing, front nacelle opening and pod mount on what the engine is rooted on - note the cowl flap activators


The thin cowling covers are well riveted here


 The finish here is getting towards the Tamiya region in quality (but not there yet,) definitely better than most Hasegawa large scale offerings if this helps – really a picture or two tell a thousand words so these shots should inform you quite well…

The the wing control surfaces are posable in two positions, down and up (of course) – and these secure into notches in the wings. The surface detail on the metal control parts is excellent but the fabric surfaces is pretty overdone and probably the only thing that someone may pick out about the kit without knowing a lot about the B-25


These may need a sand and a fill to de-emphasize the wrinkled effect

The whole wing assembly laid out
 – the "wrinkly" appearance of the fabric control surfaces would be best fixed by a bit of filling and sanding on these fabric parts. As I mentioned earlier these wings are easily removable from the fuselage – just like the tail….
  The tail of the B-25 is an easy construction where the horizontal and vertical surfaces have movable arts that pretty much just sit in their joints. These are again posable and again the surfaces of the fabric covered bits are overdone while the metal parts are great. Cue more filling and sanding.

Above we have many pictures of the tail unassembled and together showing just what it is made of, the control surfaces are below...


... is very well detailed and as you can see from these pictures pretty much all of the wiring required is there - this kit will detail up very nicely thru some weathering and grime with some scratches and wear and tear -


The real doors below show the inside and outside layers captured here above


The internal bomb bay and racks look good


The steps to securing it all together are quite easy and bring a good result


The armour for the cockpit is included here as well


The turrets are well detailed inside and the gunner’s position looks very good without adding anything extra – but like the rest of this kit it is an after-marketer's dream. Many modellers will just do what it takes to seal it all up and the other half seem to want to make it perfect before it goes together. I can say that this kit’s insides are much better detailed than a comparative model released recently the Revell He-111.
The MG feed belts and MG bodies are well moulded

Some nice detail there

The rear gunner's sheild and large MG ammunition bins look good for internal detail

The Rear MG sprue

The top turret pylon and mount

The top turret frame
 AHA you say! But this kit cost a lot more then the He-111P – well this is the decision you must make yourself, and it depends on your modelling philosophy doesn’t it? Do you want a 100% realistic to the letter or just enough detail or even a mix between these two – I can say that the Revell mentality seems to be “get it all sealed up quickly and make a more affordable kit” while leaving out some internal detail, The Tamiya mentality seems to be - everything exactly right to the letter and costly - whereas the HK Models philosophy seems to fall somewhere between the two - you really do not need any aftermarket if you want to go the middle approach - just some good modelling skills.
 B-25J "Heavenly Body's" tail gunner controls and seat - The gunner sits in a kneeling position with his knees on the pads on either side.


The real top turret section and the HK Pylon here

The top turret Perspex section


The front transparencies are nice and finely detailed 
Side perspex and wing landing lights, wing-tip and landing lights are on this sprue
Front Perspex for the glass nose is quite see thru and the frame detail is well textured with rivets


Some more pictures of the front glass nose to show you the look of the kit

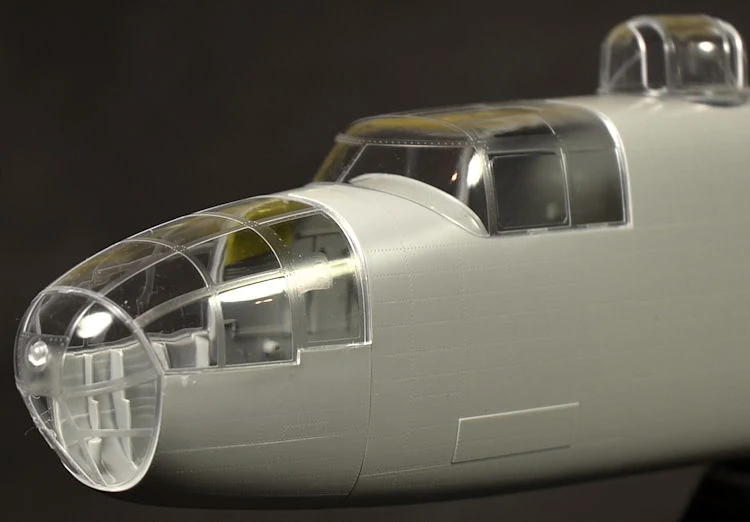


A nice comparison shot of the nose...


Above is the aircraft depicted in the decals supplied - the B-25J "who Cares? II"


There are
also decals supplied for the propellers and the instrument panel along with
some serial numbers.

We will inform you of the new production decals as soon as they surface.
This kit has
been long awaited and I for one am glad it has surfaced – I know there is some history about this aircraft in the modelling communities but there is no place for any
gossip or personalised political views in a review – I am just glad it has
been made and has not disappeared in to the ether – Price has been a talking point - This is a premium kit that many people
will buy only one of, it it up to you if you think this is worth to
you -
It has a few
things that I would look at changing and adding on but overall it is a very nicely engineered
kit with a lot of potential, it is a lovely kit and well done to the creators of it.
Adam Norenberg
Adam Norenberg
Thanks to
the people at H-K Models Co. of who supplied this review kit.
