


Review: Eduard 1/48 Fw190A-7, ProfiPACK edition
Kit No: 8172
Kit type: injection moulded multimedia
Scale:1/48th
Sprues: six including a clear sprue
Available from: Eduard
Direct and Eduard Stockists.
Download instructions: here
The Fw-190a-7 was introduced as an upgrade to the A-6
variant in Luftwaffe service, overshadowed by the A-8 in production numbers it was otherwise just as
important as its numerically superior sibling.
Like the real life aircraft the release of this kit is just as anticipated as the other more numerous brothers in this production series - this Fw-190a-7 kit in the ProfiPACK edition is the last in
the Wurger family (not counting the A-9) to be presented in 1/48th
scale by Eduard. They have included the necessary additions to make the A-7 kit
which we will look at today – I am not wasting your time with history of the aircraft – Let's go straight into the kit shall we?

The lovely looking box art on this kit has adorned my
desktop for a week now so I was pleased to receive it in the post this week.
The box art actually rivals the A-8 boxing of the butcher bird from Eduard that
was my favourite until now – well done on making the kit look aspirational with
great artwork.
The sprues


The box contains six dark tan sprues and one clear
sprue of the clear parts of the kit. Along with two Photoetch sheets and an
instruction booklet there is a neat little package which - from the inspirational
box-art to the internal model kit contents made me happy to be able to
investigate it further. So in I went…


The plastic on offer is dark tan with just a little bit
of flash on the extremities of the wheels which is an easy to remove problem.
The sprues themselves come in packages of two to avoid any scratching or
scuffing of the surface area of the kit. Unfortunately I had a few scratches on
the fuselage, nothing too bad that will not come out with some very smooth
sandpaper to polish the surface.
An example of the tiny laser cut rivets (of which there are many)

Many many tiny laser cut rivets decorate the
fuselage, whose panel lies are sharp and to scale, no trenches here – the panels
on the engine cowlings are very impressive especially, and as there may very
well be on show when this model is finished I am happy to say I like the
surface finish very much indeed.

The instantly recognizable Orange “ProfiPACK”
editions of the Eduard range usually include everything you may need to make a
modern kit, and this kit follows that philosophy to a “T”. Not just plastic but
a few decal choices (4 here), Photo Etch (2 sheets one plan and one coloured),
masks for canopy and wheels and an excellent instruction booklet
You can see there are a few parts for the spares bin here

The Instructions a clear and start with a sprue
breakout sheet showing you what the sprue is long after you cut the letters
off, colour call out which is translated from RLM colours into Aqueous, Mr
color, and Mr Metal shades. The instructions themselves are clear and easy to
follow. They show you where to add the glue, where to insert the extras and at
certain parts to interrupt or make way for an option which comes later on in
the kit.
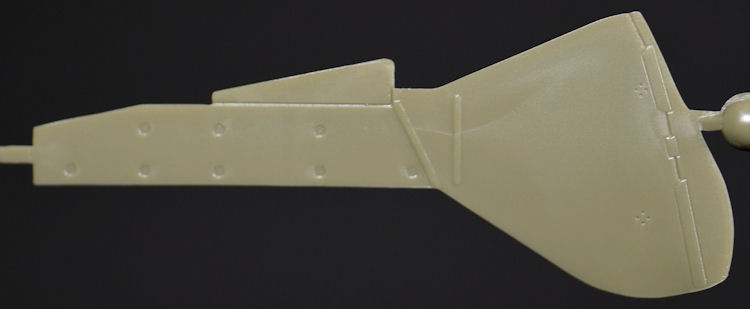
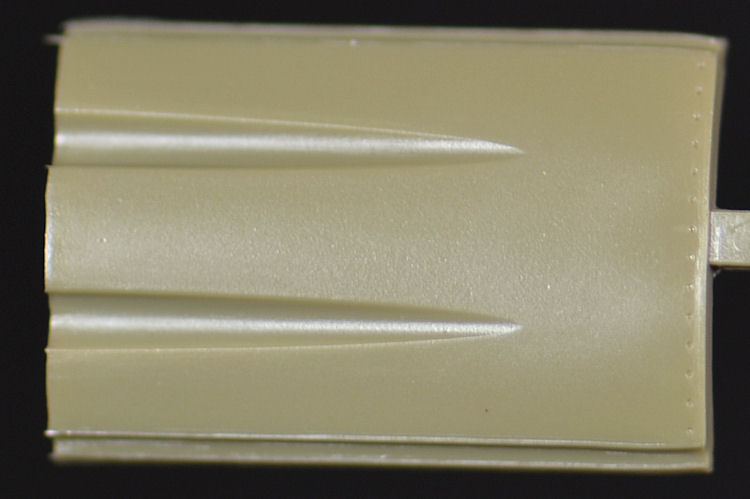
Surface detail of the wings outside and internal is excellent


Over time manufacturers have learnt how to best model
lots of kits and the Fw-190 especially is a different kit to model the first
time you come across it. The inclusion of the undercarriage which is open to
the underside of the engine, the cowling which always bolts on later in one
piece and the bottom part of the wings which glue on to the top of the fuselage
is unorthodox but by far the best way to fix the Wurger together and Eduard follows
that path here. Those familiar with Tamiya and especially Hasegawa kits will
find these easy going and a little bit more detailed ( if not a little bit more
fiddly) These Eduard Fw-190 kits are for a good reason leading the way in the
great compromise between detail and buildabillity in 1/48th.

Construction starts with the cockpit which is full of
Photoetch pre painted parts which are so helpful to modellers and save a great
deal of time if you do use them. The cockpit has the old fashioned side panels
and instrument panel for you as well if you want to go old school on it, but I would
say embrace this technology – you aren’t cheating – the results speak for
themselves, especially in 48th scale where the details look sharp.
It takes a good modeller and a fair bit of time to replicate the excellent
panels offered here. The only problem you have is matching the pre painted
cockpit colour.

The real thing...

If you don’t want to go with the P/E there are decals
for all of the cockpit parts, panels and gauges, the result will still be
great. The rest of the cockpit must match the PE so I can see some people
skipping it. The harness and the side wall placards and several additions like
the manual canopy winding control and the “Danger” panel on the back of the
seat are signatures of the fw190 that cannot be overlooked and are looking
quite realistic in their representation here.
Styrene instrument panels showing nice detail and flat plates for the attaching of P/E if you desire or not


Next in the instructions come the gun bay in which
are included some nicely detailed internal walls with some equally impressive MG131s above ammunition troughs. The only thing these
MG’s could use are slightly hollowed out ends but a bit of careful work will see
yours looking open ended in no time. This is one area I know quite a few
modellers will actually care to add some extra goodies in the shape of brass
barrels. The kit supplied guns though look quite reasonable to me, and if you
are going to close the gun-bay I would stick with them.

The two part tail wheel strut encapsulates the simple
but well detailed tail wheel at the back of the aircraft before this, the
cockpit and gun bay are all applied to the kit before it is all sealed up. This
section sits on top of the bottom half of the wing section.

Before the wing is joined together there are several spar,
stringer parts and undercarriage details that are added to the under-wing
section. This is made into a complete bay before the top parts of the wings can
go together and the fuselage can be added. This is a familiar set up to most
Fw190 builders. The detail however offered by Eduard is a little better than
most kits. Not at all “soft” in realism this undercarriage will be a joy to
behold once assembled, painted and weathered.

Before you can move on to secure the top of the wings
to the undersides you must (if you choose to show them open) detail the gun
bays in the wings which house the MG151 machine guns. The instructions make it
clear how you should detail the bays and the plastic parts on offer are quite
realistic and well moulded (Eduard even give you a small mask for one of the
gun bay areas which Is helpful.) The guns themselves will need hollowed out
ends or replacement brass depending on your tastes(and wallet)

The upper covers of the wheel bays are added (and as
you can see here have some nice details) are added before you can secure the
two halves of the wing.

While on the undercarriage bay area I will say that
the main gear is well replicated with long struts with separate scissor oleos
the instructions clearly show the angle in the instructions that the main
wheels are poised at, this is a feature of this fighter that is easy to get
wrong for the novice Wurger builder.


The tyres, like the tail wheel are not weighted in
appearance but however do come very detailed and with the option of treaded or
smooth tyres. The only thing you are missing here is some lead wire for lines
down the wheels.


With the aircraft ¾ completed the instructions tell
you to add the upper two parts of the instrument panel at this point. This can
be done later on in the build before the gun bay cover is added because next is
the engine construction and I would leave it to the last moment, especially the
addition of the Revi gunsight which always seem to be the first thing to be
damaged in a fighter when applied to early, The gunsight itself is very nice
and includes a clear part to make the gunsight complete.

The ailerons are supplied as positionable surfaces here
and they are well detailed but not overdone.


The control surfaces are mostly positionable, and
pretty well detailed. There isn’t any heavy handed over doing it here with just
right ribbing on the Ailerons and the tail surfaces Some positionable flaps
would be the icing on the cake but not available in this release. There is
however a positionable vertical real stabilizer and the horizontals can be easily
sliced off neatly to be posed with not too much effort.

The air cooled rotary BMW 801 fourteen cylinder engine
is a large part of the kit and for some reason does not have the option to be
shown here all open like the gun bay. The firewall, exhausts, pushrods and cylinders
with their magnetos at the front of the engine cannot be seen behind the
propeller and cooling fan. I am sure the more adventurous modellers will
fabricate their own internal addition to the cowling to make them exposed. This
is the one part of the kit I would include the option for, and a shame that it isn’t
included in this otherwise excellent kit.


The engine itself is complex but not complicated.
Eduard help you out by providing a template for the exhaust positions at the
rear of the engine block. The framing o fthe engine is excellent as well and
thinly moulded. This is really the most intricate and time consuming part of
the kit, the only shame is that you will not see much of your efforts after it
is all closed up.

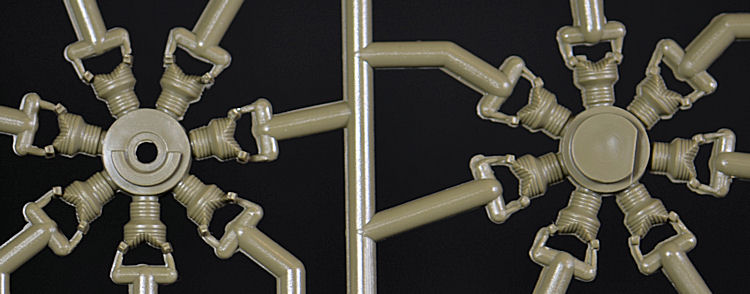
The two propellers at the front of the engine block
close out the business end of the aircraft. They are both a single piece part
which connects to the front spinner plate. Only one of them (the thinner prop)
used in this version – another part for the spares box)


As I mentioned already the cowling all joins together
into one large piece before it secures on to the engine and bottom of the
aircraft. To be honest this isn’t done really well by any company and can be a fiddly
process on every Wurger kit I have made. You must dry fir everything and just
make sure it all goes together without problems and either join it all piece by
piece or all in one then secure it to the rest of the kit. I prefer the second
method as it keeps the cowl universally angled and in a good circular shape. I
am sure others will go the alternate first way I mentioned – their choice. The
engine and the cowling remain the trickiest part of the kit ( and ANY Fw-190
kit – this is no worse than others – at least the surface detail is good here)
but also the rewarding felling of finishing these tricky parts is one to be
savoured.

Ordnance options include a 300 litre drop tank, a
bomb and two W.Gr.21 mortar. Although it is nice to have these they were rarely
used in combat (maybe with exception of the tank) and they are marked not for
use here – more spares! The only thing special to the A-7 and maybe (one can
hope but it probably will not come) covered in a future release would be the
streamlined experimental Doppelreiter 270
litre droptank!


Eduard offer more spares for the box in the open or
closed canopies – only one of the two are used and so you have the slightly
narrower closed canopy and the more open (as it slides back into the open position)
I like I that even these canopies in a smaller scale have both options.

The armoured side windows are included for one
variant “White 20” of Sturmstaffel I are
included – this aircraft was a heavily armoured for-runner of the more famous
A-8/R2 Sturmjäger or Rammjäger variants – this armoured transparency
can be secured by using some thin glue (very) sparingly and running down the
bottom seam in a capillary action. If you are nervous of this method (quite
rightly so) then use clear or wood glue. Deluxe Materials
make some great canopy glue for just this purpose.


Well that is the plastic – Now the rest of the additions.....
There is a very welcome inclusion of canopy and wheel
masks in Eduard's thin masking material which is often hard to capture in this
shot but is very useful in practice – the days of using lots of tape and liquid
masking are gone! This and the other extras in this kit also really speed up
build time – which leads us on to the Photo-etch sheets...

The photo etch in this kit comes in two types – pre-painted
and regular uncoloured. First the coloured sheet which encompasses a finished accurate
representation of all of the cockpit’s surrounds, Split instrument panels, side
consoles, dials, warning signs and very helpfully seat harnesses. All pre
painted and ready to be glued or bent into position. You can see from the real
cockpit reconstruction picture these are accurate and make a kit in 1/48th
look very sharp. I have used the Eduard 1/32 sheet on my large scale Wurger and
they went on easily and gave my kit a more professional look. After I got over
the feeling I was cheating I am a solid advocate of these coloured sets and
love it that they are included here.

The regular P/E sheet contains tiny handles, buckles,
manual canopy release, and delicate rudder pedals which look thin and to scale
in 1/48th. This sheet however is dominated by the "Sturmjägerausrüstung"
additional armour, which is 5mm thick on the original aircraft. It has a thin
profile and all of the rivets in the right spots the appliqué armour had.
The decal sheet is printed by
Eduard and offers four very interesting camo schemes from 1943 to early 1944.
The decals themselves are on two sheets – one with stencils and walk lines for
the aircraft’s wings (made so you do not have to count them to get them equal
thank goodness)

And on the other sheet four different markings of
noted Luftwaffe pilots that flew A-7’s

Swastikas are included in both split and whole
versions as are full national markings for one aircraft. Afore-mentioned
instrument panel in two parts is included as are tactical bands and personal
and grouppe emblems.
The colours are strong, the decals are within their lines
in register and the whites look non transparent. Printed in the Czech Republic
they are thin and carry limited carrier film – just like I like them! Here it
is held against the light to show you.

There are four different options of markings in this
box – some of the most famous pilots from the Luftwaffe are included in the
“kites” that all have the same standard RLM75/76 upper surfaces and RLM76 on
the underside camouflage. We will show you the profiles provided and at least
one picture of the real plane in action during the war.
W.Nr.
430352, 2. /JG 1, Dortmund Airfield, Germany, January, 1944


W.Nr.
340001, flown by Oblt. Waldemar Radener, CO of 7./JG 26, Cambrai-Süd Air Base,
France, May, 1944


W.Nr.
431007, flown by Heinz Bär, CO of II./JG 1, Störmede Air Base, Germany, April,
1944


W.Nr.
642962, flown by Maj. Hans-Günther von Kornatzki, CO of Sturmstaffel 1,
Salzwedel Air Base, Germany, February, 1944


I can say the only thing I would change if I were Eduard
was to make the option of an open cowling. The rest of the kit would only complement
the detail that has gone into the powerplant so it is a mystery that this is
not a centrepiece of the kit like it should be.
This is THE kit for the 48th scale Fw190A
builder and now Eduard has released the machine that fills the gap in the
production series let’s hope they turn their attention to the larger scale
aircraft – this kit is a lot better in detail than the Hasegawa kit in 1/32 – let’s
hope now we are finished the series we can see some “lateral movement” into the
larger scale and up the ante when it comes to detail at an affordable price!
A great kit with lovely detail, colour choices and
options that will build in to great kit – well done Eduard!
Adam Norenberg
