
.JPG)
From the Czech republic come many things of beauty,
supermodels, Beer, lovely scenery and Cesky Krumlov – now Eduard from the Czech Republic bring us their improvement sets for
the B-25 Mitchel in 1/32 scale – we have five sets here for you to look at in our
“Mega” review.
.JPG)
The HK Models B-25 Mitchell kit in 1/32 scale is a large and
really popular kit with modellers it seems – and although the internal detail
is pretty darn nice in plastic the nature of the kit means that most modellers
will get only one shot at making this kit. The size and cost alone make you
want to give it your best shot.
Eduard have answered the
prayers of many owners of the new HK Models B-25 in 1/32 – they have developed
several Photo Etched set for the beast and we have the review of these very
kits – 5 in one in an all up review…-
.JPG)
This is a “Zoom” kit which pretty much takes the guess work
out of building models. I used to think these were a bit of a cheat until i
used them myself on a build. It still takes skill to match them to the other
elements of the kit and these – with some stick back to make them readily adhere
to the plastic eliminate the need of potentially messy superglue – which sometimes
secures unevenly or not at all to the metal.
.JPG)
The other good thing about these “zoom” sets are that to
remove them from the metal parts you simple leave them on the sticky paper
backing and cut them off with a knife. They will not fly off into the mouth of
the carpet monster and be lost forever!

Instructions are provided and they show you how to quickly assemble
this set and what parts to remove. Some pre-textured parts of the kit like
radio boxes and other parts with dials you simply have to sand flat to apply
these pre coloured parts.
The unpainted HK kit and below that the prototype uncoloured P/E set and the real thing
.JPG)
.JPG)


The parts are all pre coloured, and with this aircraft this
will not be a problem – as all of the instrument panels are black. The smart
thing here is the I.P. is a “sandwich” type, where the back with the recessed
dials sticks to the front. The panel on the front is a very dark grey to differentiate
it from the dials and that gives it more of a 3D look – all you need is some
glass simulation with a little white glue or some such.
Not only is the instrument panel included in the pack you
get other parts like throttle quadrant controls and fascias along with all of
the other knobs and switched – these are TINY! All in some great contrasting
colour that I for one would not be able to replicate – I am converted on these
sets.
.JPG)
.JPG)
All in all a great set that helps you save an amazing amount
of time and which looks when finished a great representation of the real thing.
This is also an alternative to getting the full P/E set for the cockpit that we
will look at in it’s own review at the end of this article.
.JPG)
This kit replicates the smaller parts in the Bomb bay of the
B-25. The parts of the kit are pretty good but these are a lot thinner and
scale wise – after some paint will detail this area up pretty well.
.JPG)
The aluminium structure of the bomb bay is replicated here
in thin metal – all of which is a fraction of a millimetre whereas the plastic
is at least a millimetre thick – this will really add to the impression someone
takes away when they see the completed bombay. The ribs of the internal
structure are replaced by the metal in this kit, and the subtle rivets inside
it will detail this up no end.
.JPG)
The large circular shaped internal doors of the bombay are here
in a large metal sheet that is riveted and holed as the doors are in real life.
The rounded front and back frames of the bombay doors are on the set. I was
particularly impressed with the bomb racks which look great as well as the
front bulkhead of the space which is three dimensional and with paint will look
very impressive.
.JPG)
Included also are the bomb improvements, the fuse spinner
for the front and the detail on the back of the bomb are included. A lot of
these parts just come from the sheet and pop in to the segments of the bay.
The HK kit
.JPG)
.JPG)
.JPG)
The Eduard parts in-situ
.JPG)
.JPG)
.JPG)
The real thing..
.bmp)
.jpg)
.bmp)
You can see by the pictures of the completed thing the
difference between them – the bombay is good in styrene – but it is great with
these parts. Yes this set is a bit of work – but when you are finished it could
be a piece of art!
.JPG)
This Photo etched sheet is the much needed coloured
seatbelts for the HK kit. The seatbelts are supplied in the kit in metal form
already – but they are a far cry from what I would like to use in my kit. These
come on one sheet of pre-coloured photo etched metal.
.JPG)
The very basic HK Seatbelts

The buckles are already silver like in real life and the covers are a red colour which I have seen already. The instructions show how easily these can be applied and put into place. The one thing I think could be better on these sheets is that they are only painted on one side so they cannot be twisted unless you paint the other side.


All in all though this is a VAST improvement over the set
offered by HK.

This set has the whole nose pretty much changed to P/E.. The
two sheets here are made of one silver self-adhesive “Zoom” set very similar in
style to the cockpit set we looked at in composition that we looked at earlier
in this review and the other sheet is a brass style sheet we are more used to.

The instructions are a large three page setup with a lot
coming from these sheets from such a small set the most really has been made
from them – they are a credit to Eduard in this respect – the detail which we
will look at is astounding.

First to the silver pre-painted zoom style set. Some of these
are boxes which you can simply fold and leave in-situ while others are the
fascias to put onto the boxes you make from the other sheet. Parts like the bombsight and things like the
heating switches are particularly impressive. A simple set with a lot of scope
for improving the original kit.

The brass coloured P/E set has many really interesting parts
to look at. The whole floor and crawl space of the forward
navigators/bombardier’s compartments are here finely riveted in far better
detail than the kit can give. There is also a seat cushion and headrest out of
P/E which was neglected in the original kit which pleases me a lot.
The rigging for the front nose mounted MG is there in the
tiniest of detail and there are extra parts for the gun including sights and
the metal perforated cooling jacket. You could never hope to replicate these in
plastic injection moulding in any affordable numbers if at all.

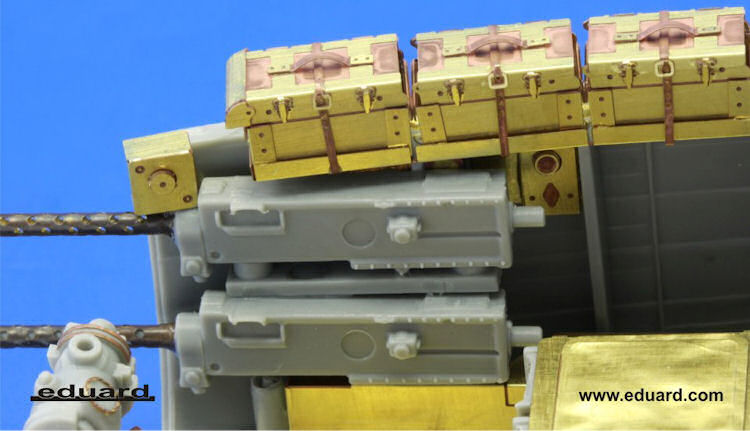


The ammunition boxes for the guns are shown here on the
starboard nose section. A simple construction, they look amazing once completed
and are finished off by the coloured “leather” strap on the accompanying zoom
coloured set.
The exiting nose section wasn’t bad in the original kit –
but this one here really raises the bar and blows the original out of the
water. In such an exposed nose it is one fo the best improvement sets here as
far as “bang for buck” is concerned.

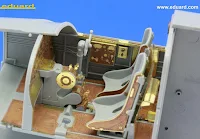
The last of the sets of interior we will look at in this
large combined review is the cockpit set No: 32748 which is made up of two
metal sheets, one of a brass coloured P/E set and the other a self-adhesive “Zoom”
style like the previous set we looked at for the glass nose.

This silver/pre-coloured metal set is the same as we looked
at earlier on in the 32112 B-25J bomber cockpit interior S.A.
1/32 review. The two part sandwich style instrument panel in slightly contrasting
colours is added too here with the centre console plates and throttle and
various other coloured levers yet again. This sheet saves you time and bother
and I won’t go on about the other parts of it as we have covered it here in the
above offering. This silver sheet is I guess for those who want a complete
cockpit and not just the instruments. The added part of the cockpit is the
large brass PE sheet.

This large sheet of brass coloured P/E is again an
impressive thing to have so much pertinent detail packed into such a small
package. From the whole floor which is
shown with the correct and very fine riveting panel lines to the “ANA”
with logo patterned rudder pedals to the sides of the seats which go a great
way to detailing up this aircraft’s cockpit, the sidewalls are again filled in
with correct scale detail again by the boxes on this P/E set.

Eduard has given us the escape hatch missing from the
original kit as well – this was an omission I am very happy to see here as it
is pretty obvious when not in place. The other detail I like a lot is the
detail on the back of the pilot’s seat. Now all we need is an open window for
the cockpit.

.JPG)
.JPG)
.JPG)


.jpg)


Below in this picture series are the HK kit, the Eduard improvements built by Eduard and the real thing to give you an idea of what can be with these kits..
.JPG)


.jpg)

Well that is the interior
parts to improve the B-25 that we have on hand. There are more sets to show you
but that will be a later review. Things like the exterior and cockpit masks are
next and will bring them to you at a later date.
This set will make your already good kit into a great kit.
This was the idea of this B-25 Mitchell kit from the original design, to give
good detail and let others bring the aftermarket to further improve it. These
sets do cost some money – but on a kit like this that many people will only
make once they are a sound investment and very very tempting.
Great work Eduard on a bunch of truly
impressive sets!
