
.JPG)
Amusing Hobby - a modelling company that not many people are familiar with but most are curious about – myself included. I was intrigued by their excellent choices of off-beat German armour – and when their Panzer VII Löwe came out I really wanted not only to get it but to build it. So I thought I would share that with you…

Kit #35A005
Contents:
730 parts
21 sprues Injection moulded plastic +
2 Photo Etched sheets
21 injection moulded part sprues + 1 x Aluminium barrel
Generic Panzer decals + Balkan Crosses
…Part II sees us building the beast - but in this review, we examine what goes in the box and more importantly how it builds….
This is the fifth in the line of products from Amusing Hobby – it follows a diverse pattern of 1/35 scale German armour – first to come out was the NeuBaufahrzeug (Krupp Norwegian Campaign), then the 1/35 Panzerkampfwagen VK3002 (DB), then lately the VK16.02 Leopard experimental “heavy” recon tank - now another of the lesser known Panzers – again a “paper” Panzer – the never released Panzer VII “Löwe” or Lion.
Now let’s get one thing out of the way straight away – this tank was never built. Not even a wooden prototype – it was conceived as a successor to the Tiger II and designed at around the same time as that successful design which saw production 'till the end of WWII – the Lowe however never left the drawing bench. I have a concept blueprint – but nothing else – this review will not be a comparison to those prints but a reckoning on how the kit looks in comparison to other large tank kits of the same time-span and most importantly how the kit goes together.
.jpg)
The Lowe was designed in two flavours – Leichter Löwe - “light” and heavy Schwerer – Löwe – the heavier design topping 90 tonnes and a 105mm L70 gun and massive 120mm frontal armour, using a Daimler-Benz “Schnellboot “ torpedo boat engine and hoping to get to a top speed of 44km per hour – it all sounds like a bit of a pipe dream to me with the actual figures that the King Tiger was doing at the time – and I suppose that with several other factors are why it never got off the drawing board. But this is a review and I am not going to pretend I know exactly what this tank was going to do – that is what Wikipedia is for, look it up. We are here to build ourselves a model! Firstly ill take you through the contents than the plastic

In the box which shows a large Lowe cruising through the streets of Berlin 1945 (6?) with destroyed buildings and some Soviet heavy tanks to boot, we have thirteen bags of kit. There are twenty-one sprues of plastic. Due to a large number of them sealed sensibly in bags, there were not too many scratches or scarring. Eleven of these sprues are set aside in brown plastic just for the tracks.
The large grey slabs of plastic I found to be textured well and free of any really obvious defects. The turret is neatly replicated in a casted surface texture as is the frontal and side armour albeit less pitted than the turret – it looks quite effective to me.
The kit instructions are laid out on a partially coloured paper booklet – the sprue layout and an easy to follow fourteen steps (with some sub-assembly on a few of them) in the building process make me think a little like this will be an ease of construction build like the Tamiya kits rather than super complicated. It is nice to see such a large vehicle still with good detail and so easy to make – this might even be fun!
Markings: There are colour calls in Humbrol, Model Master, GSI Creos and Tamiya colour are included, but the fact that the tank never saw service really makes the colouring guide a little redundant. The good news is you can pick your own scheme!
The decals are very much a simple sheet of numbers in red/white and several Balkan crosses – they look good in colour and nothing is out of register. It will be up to the paint scheme you choose whether or not you use them – but they look to be up for the job.
.JPG)

The plastic on offer - sprue pics and close ups:
With an estimated parts count of 730 and seeing that large parts I soon did the math and 436 parts are just the tracks – meaning that (gears inside his head whirring) there are 294 (odd) parts to the kit proper. This is not a 400 odd part Opus like the kit from Dragon in parts number – but many parts do not make a great model.

Tracks: 6x T1sprues & 5x T2 sprues - The track links and the joints
Quickly whilst we are on the tracks they all have to be glued together in turn – this could be quite a slow process but Amusing Hobby give you an inch long jig to help you line them up correctly. Also lucky for me my girlfriend got involved and glued them all up for me! There are injection pin marks on every track which is a shame but nothing a thin file will not sort out. Everyone has their own preference when modelling tracks on vehicles – but I am happy to tell you I liked the end result – and after some weathering, any pin marks can be disguised if you want to go the quick way around it.
.JPG)
.JPG)

Sprue A -The top of the hull, front and rear armour plates, fenders, upper deck and the track jig.
.JPG)

This upper hull – with not much to go from, has been very nicely replicated and represents a King Tiger hull crossed with an E-75 so a good start. The rear deck fits on snugly with some handy pins that go into slots of the main hull. The rear deck fits well with a slight gap at the rear that can be eliminated with just a little glue whilst the front hull has holes that include on the left-hand side a driver’s port straight from a Panther and a plugged up port on the right. There are two slots for the twin mounted headlights.
.JPG)
.JPG)

.JPG)
Plastic fenders are included – you can use these rather thick versions or go for the also supplied photo etched examples which are very easy to knock up - and would probably look better a little knocked up!

The side and frontal armour have some very nice textures, and I am pleased to say the frontal glacis plate fits millimetre perfect to the front and lower hull. Speaking of which…
The Lower hull -


.JPG)
Sprue B - there are two of these sprues which replicate the steel rimmed road wheels and sprocket and idler wheels along with the lower chassis parts, shackles, lights and exhausts.
.JPG)
These steel wheels look pretty nice and are not like several other brands a paint to clean up a lot of seams. These wheels are nice enough without needing to seek replacements from aftermarket and the whole undersides are easy to assemble. The thing that is a little shame is the sink mark right in the middle of the rear wheels – a bit of superglue and a sanding will fix those pretty easily though.
.JPG)
.JPG)
The whole front headlight assembly is there as well as the exhausts which I would have loved a few different types of if I had my choice – they are hollowed at the end for a start which is nice.
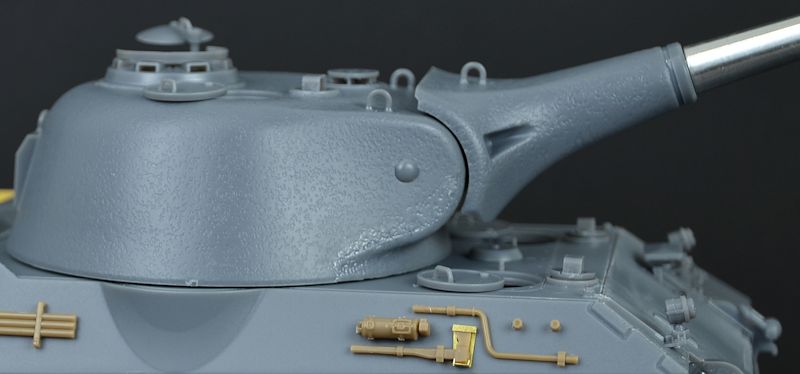
Sprue C - the turret, a Plastic main barrel of the gun and everything that supports the turret.
.JPG)
This is the whole sprue you need to make the turret – smartly moulded in the way that if you did not have this sheet and wanted to do another version then just mould something different for another vehicle. A shame though that nothing else in this line of tanks was ever planned as this is smart moulding by Amusing hobby.
.JPG)
.JPG)
.JPG)

The 105mm Kw.K. L/70 gun barrel is here in plastic and it is an easy fit – both types of muzzle break are included in this version - the more typical panzer version and the perforated bad-ass looking version. The only problem is that the holes on this aren’t drilled out – either you do this yourself, wait for aftermarket or disguise it with a bit of burnt muzzle. The metal barrel replicates the plastic version - there isn't a real difference here as there isn't a seam on the plastic barrel anyway.
.JPG)
.JPG)
The turret has, as I said earlier some excellent texture, the cast steel needs no extra work. The only place that needs work is the “chin” joint but more of that later in the build. Both of the hatches can be posed open or closed – but the lack of any gun past the mounts and no interior at all would suggest you have this either sealed up or with a crewman leaning out. The crew hatches are supplied with holes for the periscopes which are on a clear sprue included of course in the kit. While we are talking about it let’s go non-sequitur and look at the periscopes…
.JPG)
.JPG)
.JPG)
.JPG)
Sprue R Clear Periscopes
.JPG)
There are three large periscopes and seven clear visors for the commander’s cupola. Included on this sprue – standard stuff really…nothing to see here (hehe)
Sprue D – there are three of these sprues that consist of the Inner road wheels, torsion bars and extra suspension parts along with the spare main gun ammo.


Silly boy I forgot to take pictures of these – but I do have pictures of the assembled torsion bars and the road wheels here. The road wheels simply snap together and are locked into place by the end caps while the torsion bars go straight across the hull into the other side of the tank. Making the suspension a flexible thing and when it rides over something there is some noticeable play.
 Though it is pretty stiff it does work. If it doesn't bend enough for you just put a little extra weight into the tank’s hull and it may work better.I am pushing the tank down a little here...

.JPG)
Sprue E – The engine and rear deck doors and details – along with headlight covers, hatches, mudguards front and rear and the fender brackets.

This sprue contains the door that can be opened over the engine – though you get no engine and I wouldn’t want to rip one out of a 1/35 E-boat kit - headlight covers, parts like the front glacis plate portholes and the hatches which have no internal detail.
There are handles and periscope covers but I suppose you don't need any internal detail when there is nothing to see inside. The brackets for the fenders get smaller as they go along the deck of the tank. There are some tiny details – the smallest parts of the kit are here – the hooks for a crane to lift parts of the deck. The mudguards are thin – I would have loved some bendable PE ones though!


.JPG)
.JPG)

Sprue F – The tools
All of the standard tools are included on this sprue to get your tank repaired – a jack and wooden block to rest it on, bolt cutters, shackles, barrel cleaners a shovel and pick axe and cable ends...
.JPG)

I would have liked the cable to put them in, it is like they were forgotten in the last round up of parts – the aerial is missing as well – I would have liked these things to be included. The tools on offer, however, are moulded well without any real imperfections – an adequate collection I would say.
Sprue L - Poly caps for the gun trunnion and front and rear wheels Yes – black these are plastic tubes used to keep the wheels on the front and back turning and the gun elevating and depressing - just don't get them mixed up or your gun could sag…
.JPG)
Photo Etched Parts: Brass replacement fenders & braces + mesh screens for the engines and small winch hook.
.JPG)
.JPG)
While the brass fenders in etched brass go together so well and look so much thinner I wonder why we have the plastic ones still in the kit. They are that much better. Makes you want the other mudguards in metal as well. I understand many people don’t like PE but these are easy to assemble without soldering.
.JPG)
The mesh grates are good to give the depth to the engine grates which really aren’t that deep looking before. A good job these are included to obscure the fact there isn’t anything “below decks”
.JPG)
Construction:
The kit is a joy to build I will confess straight away to you. From the easy to construct suspension and the parts that require little clean up this kit went together in three evening sessions, there were a few things to tell you about it.
A few things of note:
The tracks have no way of adjusting tension as there is only one position for the rear wheels. The tracks themselves can have a few links taken out of them. As they are at 102 links each side they are a little too slack
.JPG)
The plastic gun barrels will not easily slip into the metal barrel – the holes must be hollowed out as they are a semi-circle on the barrel holes while the barrel is round.
.JPG)
.JPG)
The braces for the fenders are in different places on the PE to the plastic fenders – I don't know why and probably no one else does either.
.JPG)
.JPG)
The turret notched that hold it on need to be thinned or loosened so that if you wish to move the turret it isn’t a struggle and potentially a way to crack it. I thinned the underside decks with a sanding stick to help it all turn just that little bit easier.
The chin joint on the turret needs a rough texture applied to it to match the rest of the turret when it is sealed. I used glue and dappled my own texture with the “hot” plastic.
The metal barrel can sometimes droop. (Happens to the best of us I suppose)
All of these aren’t really faults with the kit but more so things a modeller must fix to get the kit just right – I thought I would give you a head’s up!


You would think by the few things I have mentioned about this kit that I didn’t like it. Well, that isn’t true – I found the construction really fun – and as long as I got my “assistant” busy on the tracks I was happy with a really easy build that fit precisely as any other kits around and without fuss. I am building a truck from another company right now and it is far more complicated and no less rewarding for different reasons.
.JPG)
.JPG)

This kit reminds me of the fun I used to have building Tamiya’s white box kits – it is however far more sophisticated and better fitting, as well as having superior detail.
I like the fact you can make this into any scheme you want – from 1942 onwards to the end of the war (or later for fantasists) this is a simple to make a kit that looks great and is a great base for super detailing. This could be as good as you want to make it.
.JPG)
Adam Norenberg
Thanks to Amusing Hobby for this kit to review. you can find distributors of this kit on their website
