AFV Club – known for
a high level of precision in their builds and great accuracy – well we thought
we would put that theory to the test when we review and then build their heavy
softskin, the Büssing-NAG L4500S 4x2
Cargo truck in 1/35th scale…
Büssing-NAG L4500S 4x2
Cargo truck
6 x sprues in tan filled with 240+ parts
1 x sprue of transparencies
7 x vinyl tyres + 4 vinyl poly caps
1 x Photo Etched sheets
Decals of five different versions of this vehicle
Available from AFV Club’s
Distributors
There has been a bit
of a rush on softskin vehicles recently. The penny has dropped with model
companies that they cannot turn out yet another tiger in 35th - the
market is getting very full – or flooded even…so the lesser known vehicles of
WWII are getting a turn, and we as modellers are all the better for it. We
present to you in our review the Büssing-NAG L4500S 4.5-ton heavy truck – is it
a heavyweight contender or a lightweight pretender?
Made by the Germans from 1942, this heavy truck was used for
a very many tasks in the service of the Wehrmacht, Luftwaffe and Kriegsmarine
services along with many other official branches of the armed services. Well
liked for it’s large size and strong powerplant and tough chassis and build –
the L4500S
The kit comes in a lovely double folded white colour printed
plastic box that sees all of the plastic bag wrapped sprues arrive on my desk
safe and sound. No scratches or wear on the seven sprues of tan plastic, the transparency
sheet, the two PE sheets or the vinyl tyres and caps.
The instructions are of white paper, printed on 16 pages A4
in simple monochrome paper in a very clear manner. Although there is more than
a fair share of parts I never got lost in the instructions so great work there.
There is one gaff in that the part B52 – a bottom cross support should go under
the chassis not inside it – you soon notice this when you build the kit – but I
am getting ahead of myself here – anyway good – easy to follow instructions!
While we are on instructions – there are five different
marking choices for this one truck – this offers just a touch on the many choices
you could have this kit adorned in and I like that - you can choose from a
Luftwaffe and four Wehrmacht versions –
in grey and in yellow base colours and camo. The variations are:
1. Luftwaffe
unidentified unit.
2. Heer
- 320th Infantry Division
3. Heer
- 4th Panzer Division, Kursk 1943 in three colour cam scheme.
4. Heer
- 35th Infantry Division
5. Heer
(Afrika Korps) - 21st Panzer Division, North Africa
Colour match ups are catered for in Lifecolor, Hobby Color, Mr.Color,
Humbrol & Revell paints so that pretty much all modellers are aided in their
choices – or those of us who are missing a colour in our preferred brand might
have another without having to cross reference.
The Decal sheet is
provided with both national markings and tactical emblems for all of the trucks
captures in the instructions, however there is no decal for the instruments on
the dash board which would have been a much appreciated addition - more about
the interior later as it is of note on this kit. The decals are in register and
the whites are strong. There is a minimum of carrier film so I am happy!
There are six sprues in tan and these are very much free of
errors in the moulding process. Little is there in the way of extra material in
the way of flash and there are no sink marks that are visible in this kit’s
surface. Indeed the place that really shines is the very fine wood grain detail
on the rear tray – it looks great and will weather up very nicely with some dry
brushing and ageing materials applied.
There is however some very nasty injection holes inside the
cab – and these are the only real fault I can find with the moulding of this
kit. I would like to display my vehicle open or with the door ajar so you can
see inside – this is foiled though by these large circles that are not only
inside the doors but the rear inside wall of the cab. Not good – you can
however – sand them down with an aggressive sanding block or fill them in. But I suppose it is just elbow grease – I shouldn’t
moan too much as some people call it modelling!
There are several small – I would say tiny - parts on this
kit – especially around the engine and undersides – they leave you thinking “surely
this won’t be used” but yes they are – every part pretty much is used and there
is a perfect fit for nearly everything. This is a credit to the engineers of
the kit, I would ask them to cut down on the plethora of extra nodes on this
kit – on some parts like the rear tray there are just too many injection
points. I suppose ill shut up now as the person doing that would have infinitely
more moulding experience than I would!
A look at each sprue with a quick run-down of what’s what
and where…
Sprue A – The woodwork
This whole rear deck section is a real feature of this kit –
a shame most trucks will be filled up with stuff in the back!
You can assemble your truck with the side walls off or on,
down or up and with the wooden bench seats in or out – I like this a lot – the only
thing I would add would be a cargo tarp – but I am sure it will be available
soon or is already somewhere else..
I gave mine some “extra texture” with my Xuron snips – I wanted
to add some drag marks across the wooden rear deck. This is normal with heavy
equipment and the nature of their rough and ready use in the field – I sanded
it down with a sanding block and it looks just right. Especially after some
undercoat – (ill show you that in the painting part II)
Sprue B – the chassis and running gear
This sprue houses the two long chassis parts and all of the
cross-members, of which there are seven, making this a rigid kit. There are not
any bad seams on these which make them effort free to construct. This kit is packed with detail underneath the chassis, brackets, universal links and drive trains all fit together and look like they are meant to be there when the kit is finished.
The long exhaust snakes through the chassis like on the real
thing and you must take care to read and re read the instructions to put it
together correctly.
The leaf springs are nicely moulded with only a minimum of
seam running down the middle of them which came off with a scrape of the hobby
knife and a light coat of thin glue which acts as my cleaning tool as it burns
off any small detail left.
The two air compressor tanks on the chassis do not fit very
well to their brackets (step 1) – you must remove the inside seams of these and
fit them manually – don’t try to fudge it – it won’t work just trim off the tabs and it sits on fine. I
staggered mins a bit to simulate some wear.
The rear diff looks great and the way that it all goes
together really impressed me – I was really highly anticipating greasing this
up with some weathering stuff.
The front fenders are also on this sprue with some running
boards attached – on top of these sit the petrol tank and on the very front is
the large bumper bar - impressive with the “BUSSING-NAG 6ZYL – DIESL” writing
in raised plastic – this would look great detailed up with some “bumps” as
well. Another feature of the kit if handled properly, there are some large
guiding poles on the front to help the driver better gauge the clearance of his
truck.
Sprue C – Cab + interior of the truck
We have already talked about the pin marks on the interior
of the cab – otherwise this sprue houses some great parts - the
thin engine covers are louvered and see through which – although you never
really see them at the angle most people look at them I expect this in a kit
and I am not let down here. You cannot pose the engine open save leaving off a
lower panel on with side. Again it would have been a nice addition but ohh
well.
The instruments are on the dashboard in raised form so a bit
of careful dry-brushing will negate the lack of decals. Careful and smart
thinking in the way the pedals are inserted into the truck through the nicely
detailed corrugated floor is smart thinking. The steering wheel should be left
too last as it can be fiddly with those with big (clumsy) fingers like myself.
The front part of the cab joins onto a roof part and then
the rear of the cab. Inside go the seats and the rest. The nicely contoured
front cab looks very good. And if the engine hood is off completely you can see
the electrical fuse box on the front firewall – a shame you need to remove the
whole hood to see it.
The front grille is good but made better by the photo etched
part that sits behind it and in front of the radiator. There is also a small
rear number plate PE part as well.
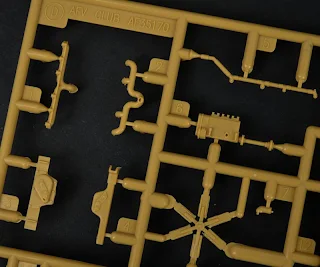
Sprue D the engine.
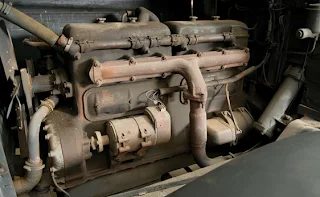
The large engine is a really impressive thing. It would be a
treat if you added a few wires and spark plug leads to it. Again it’s a shame
it isn’t seen with the bonnet as is unless removed partially or totally. This sprue contains the long exhaust which snakes
through the chassis in a very specific order. There wasn’t much – if any flash
the length of this as often occurs.
The exhaust manifolds and fan are impressive as are the fan
belts and the detailed top and bottom end of the engine block.
There are so many small parts which make this engine as
impressive as it is – believe me there is a place for all of them – get your
tweezers out – patience and you will be delivered the completed article which
sits neatly on the chassis.
2x Sprue E’s – the wheels, tool boxes, rear mudguards and minor parts
These sprues pretty much include everything they couldn’t get
onto the others plus the seven road wheels. These are built as units that can
be turned and are steerable. In fact I put a drop of blue into mine to make
them a bit stiffer.
The rear mudguards have some tiny brackets which sit into
holes provided on the arches onto the chassis which make them quite strong.
The tool boxes sit under the rear tray and chassis – the underside
is very busy and there is a lot of scope for detailing this up to look impressive.
There are many other parts here, the brackets for the air
tanks, the headlights and alternate covers, brackets and latches for the tray
on the rear of the truck.
Seven Vinyl Tires (six + a spare) and four vinyl Caps
I am going to convince myself soon that Vinyl tyres are the
way to go – I have heard a technique which involves diluted wood glue and then
some weathering pigments – ill keep you posted in the article if they work or
not. Until then you either love them or hate them – vinyl tires are supplied
with this kit, you get a spare for under the tray as well.
The tread is good and there aren’t any nasty seams that are
a mare to remove, just a little one! There are also Poly caps to help the
wheels keep turning as well.
Transparent Parts
A clear sheet of thin plastic to simulate the windscreen,
textured headlights and the side and rear windows. Pretty standard stuff really….. If you want the windows half up just trim
them. The tires slip straight on and off the wheels which makes weathering and
painting both parts separately quite easy, there is no sag at all they fit
well.
Construction –
There are a few things I have already made you aware of in
the building of this kit – I would say get the chassis and the exhaust laid out
in proper order first or you will stuff it uuuuup!
The leaf suspension and the axles and steering set up really
impressed me and went together very easily. As I mentioned only a little clean
up on the suspension is a bonus.
The chassis fits well and is strong – but make sure it is exactly
straight and you have everything in order and you can’t go wrong.The rear of the chassis is impressive – a shame you won’t
really see it under the tray.
The engine links up with the universal and drive shaft
perfectly – you will have to slightly trim the tabs on the joints for the
universals though – just a little…
The tray sits on the rear snugly – think about painting it
though – as the frame would probably be grey or panzer yellow – and the
undersides of the tray – the wood part will be a natural wood colour I would
think!
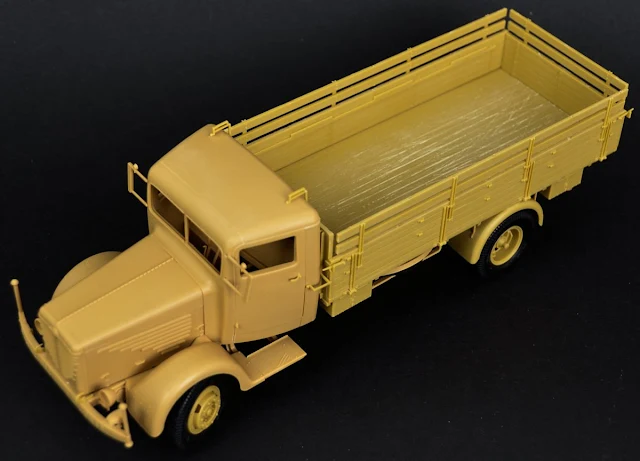
A gallery of the constructed Truck – it sure it BIG! - one thing to take heed of – any gaps in the
doors are because that is only fitted but not glued – as I wanted to paint the
inside before I sealed it up.
I liked this kit – I would love to see a rear canopy for
this as well as a few less injection nodes and I could well do without filling
the injection holes inside the cab – and I thought it was a little bitty at the
start – but once I got past some of the smaller parts it was an easy to build
kit which fit perfectly and leaves you little room to get it wrong. The
instructions are good as are the marking choices. The vehicle is impressive and
imposing and looks a lot beefier than the other German trucks.
All in all a different looking kit (isn’t that what we all
want?) with many different permutations of service and colours that fits well
into most theatres of war. A few nice options make this an impressive kit.
Well done!
Adam Norenberg


.jpg)

.jpg)
.jpg)

.jpg)
.jpg)
.jpg)


.jpg)

.jpg)
.jpg)
.jpg)
.jpg)
.jpg)
.jpg)
.jpg)


.jpg)
.jpg)

.jpg)


.jpg)


.jpg)
.jpg)


.jpg)


.jpg)


.jpg)
.jpg)
.jpg)
.jpg)
.jpg)
.jpg)
.jpg)
.jpg)
.jpg)

