

Well a week ago we had a very large (and we ain't lying) box arrive at our door here - it is one of the pre-production kits of the new HK Models version of the famous B-17 Flying fortress in 1/32 scale – well we have examined it, and instead of just leaving it at that and giving HK our feedback, we have been doing some construction to see how it all goes together - and this is what we think so far..

HK Models B-17 Flying Fortress G - Test Kit
Item Number# 01E04
Scale 1/32nd
Dimensions: Wing Span: 787.9mm - Length: 988mm
Available soon from HK Models Distributors worldwide
Sprues: 33 in light grey – 1 transparent

We were really very lucky to have received one of the test kits of the new B-17 from HK Models – instead of just looking at it and keeping it all to ourselves we thought we would share our initial thoughts with you. I would say though that there are a few things that need to be taken into consideration before I can begin.
Click on any of these images in this review to enlarge them....
The sprue layout...
.jpg)

-Now first thing is first – this is a test kit – not the finished production version – a few things should be taken into account before you rush to any conclusions and post away about this and that that you might have noticed about this kit…
-The box came without decals – not in the retail box and with only rudimentary electronic instructions so we cannot comment on these – also it was pretty hard to read the notes we had, and some sprues were not yet marked in numbers and letters – again a test kit and we may have gone the wrong way on something – if we did so – well that’s life, we will know when we get the release kit..
- The shape of the B-17 is pretty well known but I know no one with a millimetre perfect drawing of one so I will leave the dimensions to someone far more learned than myself - i will point out whatever I think looks wrong though!
- So to sum it up – I dislike “first look” reviews – but I think this is a little more than that, and it is unfair to review something that isn't a final release. When we get the final kit then we can re-examine and call this a review once we add to it the parts we haven't knowledge of yet and what may have been corrected. Until then this is what we see so far.
First up the sprues in total and finer detail of each of them and what we think with initial construction we have made … (notice the sprues are so large that even with a perfectly centred camera dead above them the perspective is warped they are so long!)
The Two Fuselage halves:
.JPG)
The two halves are joined together through a long vertical split divided in half. There is a top section that is separate which will enable some varying model variants if this one sells well.
The size of the fuselage and wings will be daunting to some modellers – be prepared to have to clear your whole workbench – and then some!
we start with one of THE talking points of this kit the external Riveting - There is no raised rivet detail in on this kit – unlike the real thing which is bumpy and lumpy sometimes with rivets and some divots. This will be something sure to disappoint and please most modellers in equal numbers. Scale wise I like the choice that has been made to recess the rivets on this kit for the reason that if you were to see the whole aircraft in real life you would be at a distance that you couldn't really make out the raised rivet detail. Most people will see this kit from a distance to take the whole thing in. The kit is so large you cannot get too close to the because of the sheer size of the wings and fuselage
I would say reserve your judgement until you have seen the kit in the flesh. The rivet detail is very fine in areas and slightly larger holes in others .
The insides of the fuselage parts are ribbed a little like they would be in the real thing - this is not however, an accurate interpretation just an impression of the real bracing. It does however, give you a place to start and most people will not even see the innards of your aircraft unless through the transparencies anyway.

The wing joint inside and out.
.JPG)
.JPG)
.JPG)
The tail section inside and out

.JPG)
While the internal detail here is good enough to pass muster – one thing I am not pleased with but I have to accept (I suppose) are the large injection marks inside these squares of the insides. These cannot be avoided I suppose and it is good that they are inside – it is just a shame to have to fill them if you want to show them off. Either thin plastic sheeting or filling them or a flexible sanding stick will seal these up though.
The inside of the tail section has a handy brace and rods to secure the tail section


The fuselage and wings next to a very small tape measure...

Wings: Long, thick and wide – sounds like another “your mum” joke – but these really are an XXL size and in impressive surface detail. The plastic does not flex and once put together these are very strong and do not dip.
.JPG)
The surface detail on the wings is fine - recessed rivets laser cut, like 'em or not the rivets are here to say - I like the detail and can see it weathering very nicely under a light wash.

The rear of the wings allows for the easy removal and placement of the flying surfaces which pretty much lock in and out without having to open the teeth to secure them. - more on that later when we put it together..


Closer shot of the surface detail


The insides of the wings have the lock in, and out system which enables you to remove them for transport or even storage. We will put these and the flying surfaces in to look at later in the review..

Top of fuselage:
This top fillet slips pretty neatly into the top of the fuselage halves eliminating a nasty seam on the aircraft’s spine. Very much like what Revell did with their He-219, it is a shame there can’t be more of this on models - especially the front wing joints.
.JPG)
Given a bit of manipulation this well detailed and finely riveted section will fit in nicely – you will however, need about 1 mm of filler on the rear joint as there is the slightest of gaps when this is all joined together.
.JPG)
Control Surfaces:
These vertical and horizontal surfaces are as big as many fighters of WWII's wings. Although the control surfaces of the B-17 were fabric there isn't any heavy cloth texture to be seen here like the B-25 kit had – you do get however raised lines (ribs) on each of them
.JPG)
Tail section:
With poseable flying surface this whale of a tail is impressive and although it can be taken on or off I will secure mine once it has been assembled


Bombs:
These are the same as the B-25 sprues – in fact, mine were labelled “HK B-25” so I am not sure if these will be the same. Supplied on each of the five sprues are ten 500kg bombs and the barrels for the guns in the aircraft. Many will go for the more expensive metal barrels on a kit like this and I can see why, but these bombs and barrels are adequate for most modellers I would think.

.JPG)
.JPG)
We are missing some flash suppressors on the barrels of the guns - but not all aircraft carried them. Again I am not 100% sure that these are the ones you will get as this sprue comes from the B-25 kit. Note that the attachments ont he bombs are between the tails, they should be in line with one - kinda like a "+" symbol instead of an "X."

Internal structure of the bomb bay and Bendix chin turret:
.JPG)
This sprue contains the bulkhead doors between the cockpit and the bombay and then into the rear near the radio operator, belly turret and side gunners. Included is the floor section of the nose and the cover for the Bendix chin turret. The square panel holes to load the .50cal ammo are included on the front of the chin turret as well as the covers to protect and close up the gun troughs made of zippered up canvas.
.JPG)

Here you can see the turret and how it attaches to the nose - a slight twist and it is locked in.


.JPG)
The bulkhead walls are well detailed for places that 99% of modellers will not display. It is a shame they are closed as I would like them to have doors to open or close. The large holes on the bulkheads are for the stand which HK are devising.
.JPG)
Details of the ball and top turret including the compressed air for the ball gunner. You can see here there is also parts for the chin turret and even the nose - the nature of these sprues is very spread out.

Cockpit and internal structure:.JPG)
As well as housing the large tail wheel and strut this sprue holds the front bulkhead that leads from the cockpit to the navigator and bomb aimer’s stations as well. This is the rear wall of the nose section and is ready for some pretty nice super detail work and wire looms..JPG)

The instrument panel is a two part affair – and although we do not have decals to show you we assume that these fit like the ones on the B-25 – sandwiched layers that the decals sit between and you put a drop of future in to make the glass.
.JPG)
The side walls are very well detailed and although most will add more wires this is a pretty good start. A super-detailer would never leave this part!

These large structures help keep the fuselage mounted to the wings and add a lot of strength to the plastic frame.
.JPG)
Tail wheels are weighted and the large strut to accompany them will do the job – though some will go for metal legs I am sure. Wait till you see the thickness of the main gear…

.JPG)
Here the rear wheel is all in position - Like the main gear when in position as it is very strong.

Bombay, tail bracing and others:
.JPG)
This sprue has a multitude of different parts from all around the aircraft but mostly there are parts from the bombay, the open doors, bomb racks but there are also .50 Cal ammo boxes, a bulkhead from the rear as well as turret parts and notably the tail “plugs” for the want of a better word.
Shown here is the internal bulkhead the bomb rack and the pillar for the top turret


Bomb bay doors are well represented here and although the internal detail is not as deep as I would have hoped they are a good representation of the real thing. There is as well, the dreaded injection marks in them, and this is one area you WILL have to sand down or fill with thin plasticard. There are also some sink marks on the outside as well which will need filling
.JPG)

The inside of the crew door on the port front is here as well – this is the little door near the nose of the aircraft that the front office crew used - it has texture on the inside which is very nice for those wanting to show it all opened up.


Nose section & Cheyenne turret:
.JPG)
The nose consists of two vertically split parts which you must take some care to get together without losing fine surface detail, and in a place where a lot of critics will look at your model. The two side ports for the machine guns are staggered correctly, the port more forward whilst the starboard is in the middle of the nose section. The navigator’s instruments sit on the port wall. Again there are ejector marks you will need to disguise if you want anyone to peer inside.
.JPG)
.JPG)
This sprue has the .50Cals and other little details like the pedals of the pilot and fire extinguisher, rear of the pilots seats and then surprisingly many parts of the tail of the aircraft as well. Talk about spreading the parts around on the sprues...The guns may be changed we are not 100% sure yet.


The top turret frame from the portion just aft of the cockpit is included – there are many slightly different configurations of this turret – check your references to see if the frame matches your bird.


.JPG)
Here is the tail a little more put together showing how it looks.


Vertical tail surfaces, ammo belts and bomb racks:

Here you have the ammo chutes for the .50 cals and the two halves of the vertical stabiliser’s moving section as well as the insides of the bomb-racks.

.JPG)
The fabric and dope covered tail rubber is here with extra detail on it. These go together really well and the good thing is that the seam on this whale of a tail is well hidden inside the vertical tail receptacle, even when turned. Here is the rear end altogether.

Engines, props main wheels x 4

These four sprues contain your four plastic variants of the four 1,200-horsepower Wright R-1820-97 engines – these are replicated just to the front row of pistons and although hard to see here there are the finest of lines criss-crossing them. This detail is so small this with a little silver over black paint hardly any weathering will need to be done – very nice indeed.
.JPG)
The large tyres are slightly weighted on the bottoms which are good for a heavily laden bomber and the wheels all look very nice. No doubt some company will provide replacement wheels after they buy a heap of resin!

The next thing that no doubt which will be replaced are the prop blades – There are a few I have found on reference pictures but the ones here on Sentimental Journey – a “G” model still flying in the US – shows that these blades are a little “fat” towards the middle of the blade, the difference is very close to my eyes. They can be squared up without too much work – hopefully avoiding you the cost of replacing all four blades.


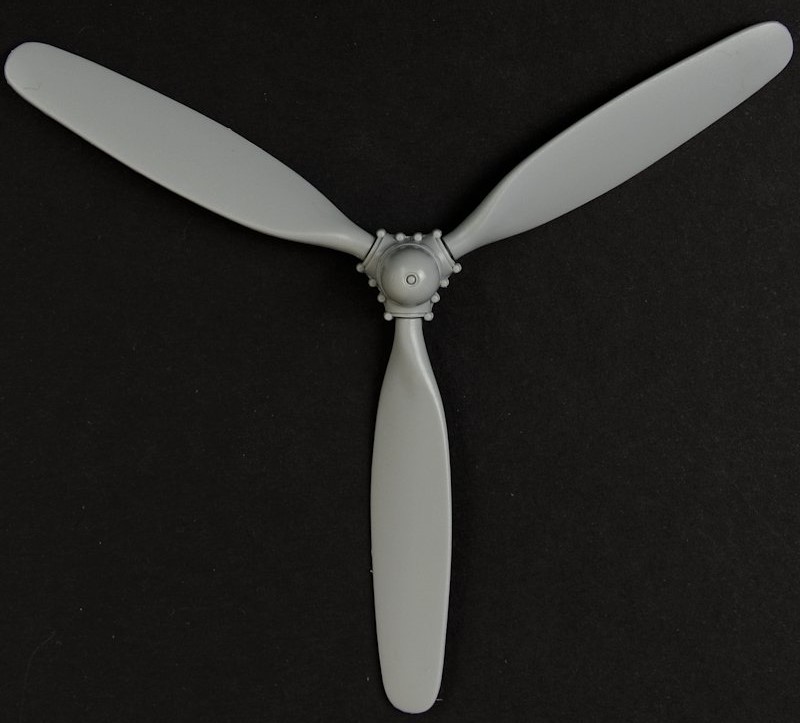
.JPG)
.JPG)
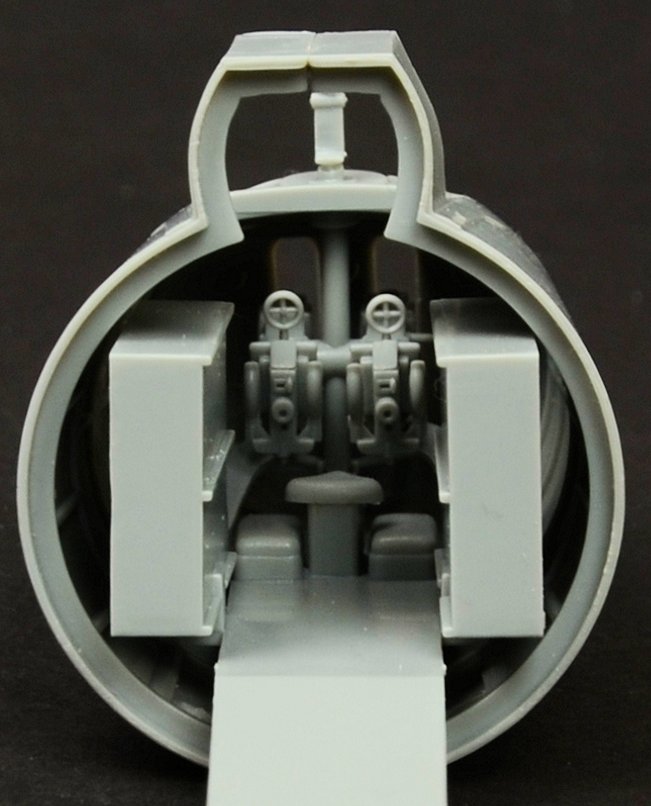
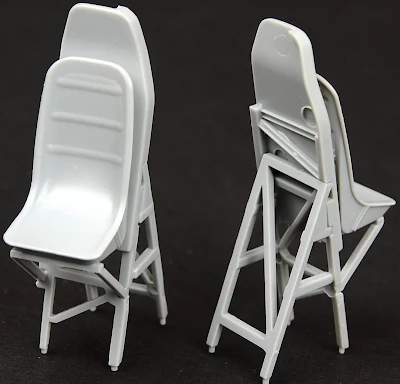
This sprue also contains many oxygen bottles, .50 Cal parts and handles plus their sights, parts of the supercharger, steering column and crew seats
.JPG)
The seats make up into a decent replica - maybe a bit thick on the legs but not once they are painted and weathered - no doubt many companies will make up some photo etch soon enough!


This sprue houses the large main gear struts and the cables which come attached to it, the inside of the main wheel wells and the cowlings amongst other parts of the wing innards.

.JPG)


.JPG)
This sprue also houses the alternative cowling which is trimmed around the supercharger as well as the internal wing landing light, air ports and other internal parts front he firewall of the gear bay.


.JPG)
.JPG)

The wheel wells are a very smartly engineered section, these go together like a dream and although they could do with some more wiring they look good enough on their own.Here are the wheel wells all together in steps – showing how well it all fits – including the gear in there as well.


. 


These are very clear – which is not typical for a test kit as often you get obscured copies of the windows – the rear single gunner’s Perspex and the chin glazing especially is very thin and clear. The several parts that make up most of the Bendix belly turret are included here in clear as well.
A stand???

Believe it or not, this kit comes with a stand! It is made to support the weight of the bomber and hooks into the bomb bay in holes you can either plug up or leave open to receive this apparatus – I can see merit it in! There is talk as well of a backdrop included in the kit that you can lay your kit next to give the impression of a kit flying through the clouds – this is still in development and more on it when the full kit arrives. The version we have WILL be changed to another type I am told. The aim will be to portray this aircraft as in flight.

Ok now on with what out of the way this is what we think about this kit so far…
Firstly the size – this model isn't for the faint of heart or the short of glue. You will need a few sanding sticks there for the long seams that run up and down the aircraft. The flying surfaces of the tails in themselves are as large as a WWII Luftwaffe fighter of this scale. It must have been daunting (and pretty hard to miss) trying to shoot these down in combat.You can see in these pics compared to the HK B-25 how big this is - it is a whole new game.
.JPG)
.JPG)
It took me a little while but you do get used to the size – the fact that several of the parts can be constructed separately are a bonus – we will look at these in detail later. Get used to not having much room left in the place you are working in though!

The kit that we received came in some fifteen “normal” sprues and several extra sprues that encased the flying surfaces of the aircraft, fuselage, wings etc. Some of these sprues are the largest I have ever handled. The fuselage itself – without the nose cone section and the Cheyenne tail was 23 inches or 58 centimetres long. It is even longer with the nose section and tail secured and the wings are nearly as wide.
The plastic reminded me very much of the earlier B-25 Mitchell kit that HK made. There are said to be over 800,000 rivets in this kit – although I gave up counting at about 650,000 I am pretty sure they are all there.
All safely bagged up individually some did not have sprue letters and numbers as like we said this is a test kit. The box art has just been released - we showed you that earlier – The box also shows one of the aircraft that will be featured on the decals – a good choice – “Milk Wagon” - there is an excellent reference here for this plane – this site on the 447th bomb group is where a few of the pictures came from


- The spread out nature of the parts to make things - I had a fair bit of difficulty with the need to hunt around a few sprues when constructing one section – something like the turrets for example. There should be enough room on each sprue to better lay out and assist the construction of this kit. With this kit’s instructions in only nucleus of form like we have them this made it pretty hard to navigate my way around the trees – what I did was arrange the sprues next to me in alphabetical order – that helped a lot.
- The holes on the inside of the flying surfaces need to be sanded – there are some tight gaps and it is a shame the marks are there but that is injection moulding and these need to be fixed.


- The wheels fit together easily – however you will spend a lot of time making the tread not look so bad after they are together, as it always seems to sit proud of the rest of the tread and you almost loose some of the pattern, just like the B-25 wheels did – keep sanding I suppose is the answer.

- Talking of sanding - I had to readjust my sanding technique – sometimes resting the kit on my shoulder to sand the seams on the wings!! There was a long seam on the front wing which you really need some superglue and some of the very useful thin sanding sticks – Flexi-i-file are the ones I use – in four gradients it made the job a hell of a lot easier when trying to keep surface detail. The god thing is a lot of B-17’s were a bit beaten up around these wing faces from ladder access and things resting against them. There really are only some small horizontal lines and some rivets to replicate anyway in these spots.


Some more pictures of the engines in position and the wing seams after a good deal of cleaning up


I would shave liked to have seen all of the internal doors and the external rear doors being able to be opened. This kit is too expensive for me to go cutting the outside door, though I would have a go at the interior doors.
To sum up – I have told you what I have found difficult so far – here are the things I was impressed with…
-I like the surface detail – though many may not like it (some not at all). The riveting looks right to us here on a consensus around the office that scale wise – you will have to see it from a distance on your bench to encompass the whole kit.

Some will say they are happy to have raised rivets as they can always be sanded off. Myself I don't mind the fact that they are not sitting proud of the surface because I grew up sanding off Revell’s rivets on their early large scale aircraft and never again do I want to waste that time. Careful weathering will make these look correct in scale to me. I know though that not all will be happy with this and some maybe even spitting chips about it – well each to their own… But right now this is likely to be the only injection moulded kit of this type in this scale.
An example of raised rivets clear to see up close (left) - how being far enough away to see the whole airframe doesn't really allow raised detail to be worked out on the right.


-Ease of construction. Apart from some very long seams which take a lot of care and some time carefully sanding afterwards – this model is only 625 parts in total. I was amazed by this as it looks to be a lot more detailed than that. The engines are a prime example - easy to make and sure to be easy to detail. This kit reminded me of how easily a big new tool Revell kit fits together - but with nicer detail. Not a massive amount of effort and with paint and weathering these will look very nice.


- Not only in the look and feel of the plastic but the very handy feature of being able to remove the wings and tail unit is again used here. I suppose there has never been more of a useful feature on any other model has this. The ability to transport the model from place to place will be a great selling feature – especially for modellers who get kicked out of the house to model elsewhere and people travelling to shows. I will say that if it was to stay static I would include some glue into the wings. They hold but you will see seams if the kit moves around too much. There is nothing like a perfect seam and on this aircraft with such a large wing it will not be 99% perfect unless you superglue it. Indeed you will need to jockey the wing a bit to make it fit as it is rather a tight fit. I trimmed the tabs slightly to make it slip in there…

Above is the wing joint - below is the seam without glue.


-the smart way HK have assembled the inside to fit snugly and give strength to the wings and tail, the poseable control surfaces are all a great bonus for this kit. Hell - we are just getting these things on fighters in this scale in the last few years!
We thought we would make up the internal skeleton - complete with wing attachments - this is a little kit in itself and is just yelling to have more detail added to it


Now in detail from back to front of the internal airframe with internal parts affixed to the fuselage - this is at 90% constructed with ammo belts and just some wires to add:
The tail - notice the axillary power unit and posable flying surfaces..


The mid -section including the turrets, I am missing the ammo belts here and a few wires but 99% is in-situ


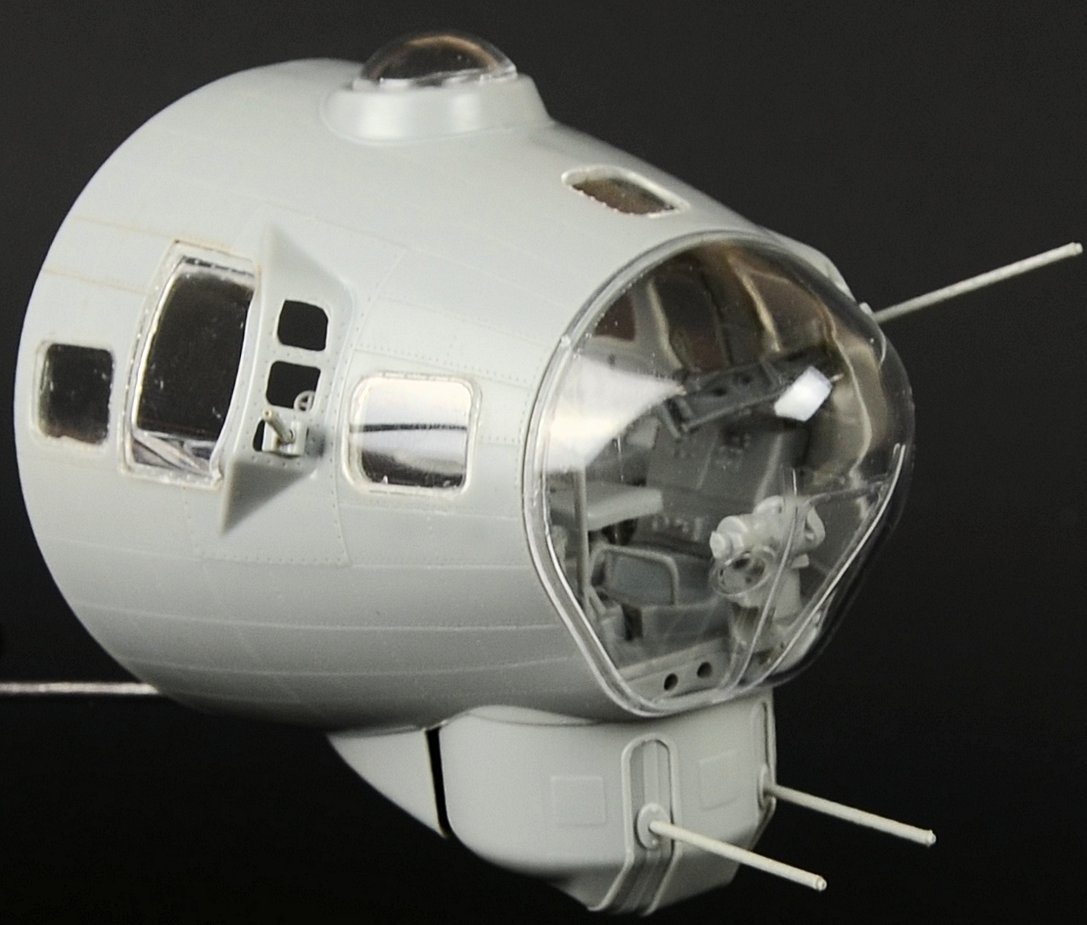
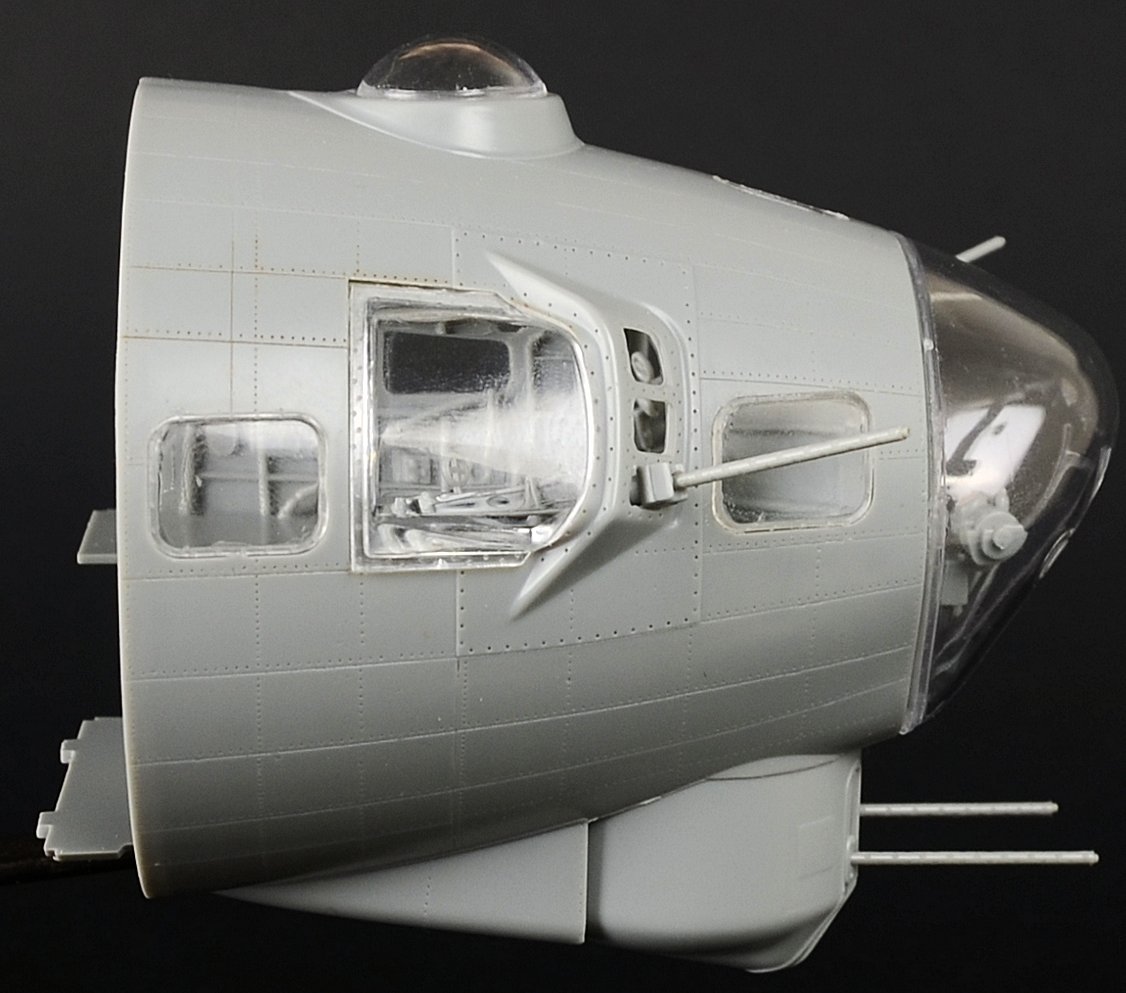
The nose section. We have it all together here - just missing a few bits from final construction.

The top turret without "perspex"


The cockpit in various stages of completion


.JPG)
.JPG)
.JPG)


The outside of the nose-cone - again missing antennae but 99% there


-The potential for super detailing is the last thing I would like to mention – only the filling of the internal ejection marks will hold you up in making this kit into something of a showpiece – by adding wires and extra detail as many have done it in smaller kits of this aircraft and now it is the big boys turn to show what you have all been hoping for so long. A super detailed B-17 in 1/32 scale.
"Look at everything we have in store"

This is not a Tamiya quality kit – but it is more refined in detail than a Hasegawa kit – It falls I think somewhere in the middle as those two - not bad. Though so far I feel it is not as sharp as their B-25 but it is as good as if not a fair bit better than any Revell Heinkel type of kit and on a much bigger size - and hey this is still the pre-production kit so I am going to stop talking now.
We hope that our look at this kit has helped you see what is coming our way soon.We eagerly await the official release sometime in the next month or so.
Adam Norenberg
Addendum:
So you know I have been in touch with HK models today and they say they have removed most of the injection pin marks and tweaked the shape of blades a little as well as the gap of the rear top fuselage fillet.
Available very soon from HK Models Distributors worldwide Thanks to them for the chance to build the kit to show you what to expect.
