


Andrew Perren has already given us an In-box review of the kit, and today his build of Kittyhawk's new "Huey" has literally taken off. See how he has handled his kit, also the parts that he has added to further enhance the model in his build guide...


UH-1D/H "Huey"
From: Kittyhawk Models
1/48th scale
Kit Number# KH80154
Pt I: In-Box ReviewPt III: Build Guide & painting internals
Pt IV: Painting, Decals & Finished Gallery

Today: Part 2. Construction Guide by Andrew Perren.
With the inbox part of the review out of the way, the urge to start this kit straight away was too much to ignore. The bench was cleaned up and the references gathered and the plans began to take shape. Rather than build one of the kit decal options I decided to make this one up as a UH-1D/H as operated by 9 Squadron RAAF out of Vung Tau and Nui Dat in the Phuoc Toy province of South Vietnam in support of the 1st Australian Task Force. 9 Squadron operated a total of 16 aircraft which were delivered in 1968.
The introduction of the longer bodied UH-1D/H Huey increased the troop lift capacity over the previously used UH-1B and gave the Army commanders the half company uplift they demanded. 9 Squadron returned to Australia in late 1971 having served with distinction.

Mostly due to just sheer lack of numbers of aircraft available the Australians employed the Huey in a different manner to the US Army. This is observed in the standard fit of the aircraft as seen in period photos as well as the in-theatre modifications which bore out the unique gunship variant given the nickname & callsign “Bushranger” by the Aussies. 9 Squadron slicks operated under the callsign “Albatross” as a reflection of the squadron crest.
The need to maximise use of the aircraft was such that even after modifications were made to allow for the carriage of the weapons kits as a “Bushranger”, those weapons could be removed quite quickly and the aircraft operated as a slick if required.

Kittyhawk has gone to a lot of trouble to reproduce as faithfully as possible the many interior components of a Huey. You as the modeller will have to decide quite early on what options you will take and what you will leave out. The Kittyhawk parts also provide a great base from which to detail up should that be your thing. I’ll try and point out some of the modifications I’ve made along the way to get what I want out of this kit.
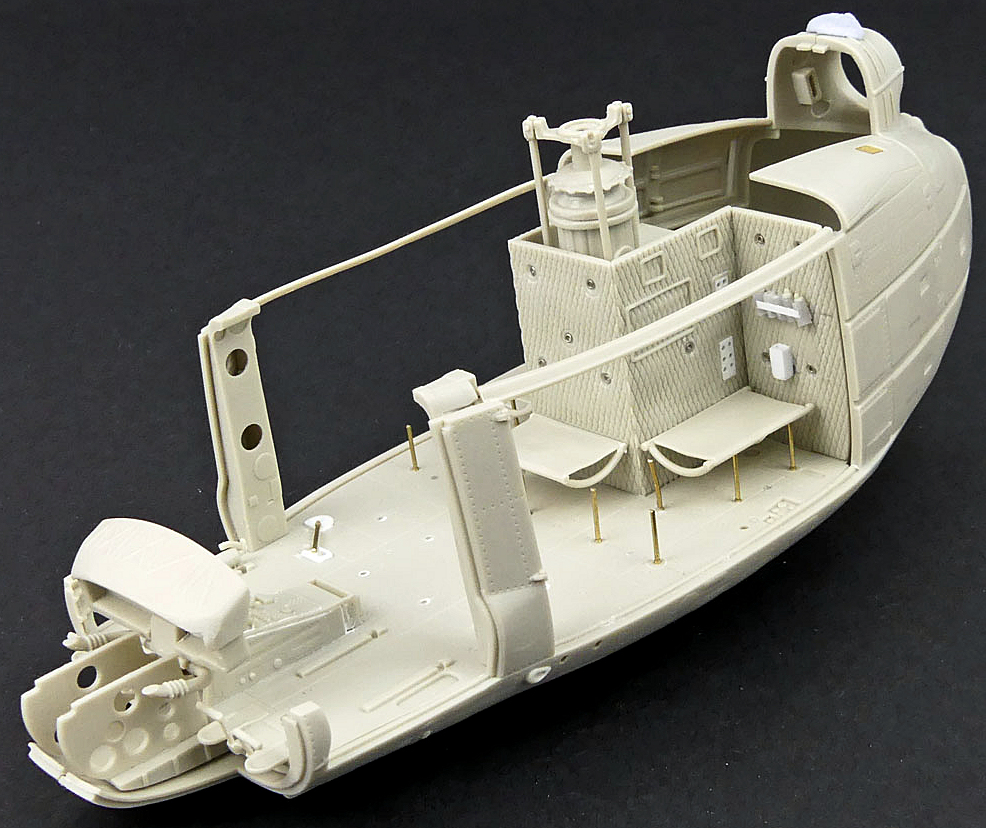
The interior main cabin structure is supplied in a quite logical breakdown. The back walls and the ceiling parts having a nice quilted effect for the soundproofing.

There are options for the main cabin seating arrangements, I chose not to install the front pair of seats which go behind the pilot’s seats and face backwards. I filled the 8 mounting holes in the floor.

I added some extra details to the walls including tie down rings and the smoke grenade racks which seem to be an Aussie specific thing. You will also notice that I have replaced the seat supports for the main troop seats with brass rod. This is mainly due to Kittyhawk getting this part wrong. They have moulded the seats with not enough supports. The have 3 where there should be 5 across the front. The gunner’s seats are also incorrect. I filled the incorrect holes and added new supports where I thought they should be based on pictures.

The centre console for the pilots has some well thought out pieces including the horn shaped ducts for the ventilation system in the nose avionics/radio bay.

Up until now, I had encountered no real hassles with this build, that euphoria was about to take a small dent when it came time to add the base plate for the main rotor transmission. It is clearly marked on the instructions that the part sits on two mounting lugs which give it the correct height and orientation. However, the parts do not actually have the mounting lugs so the location is up to you to guess. This could be a big deal affecting the look of the finished product as it will determine the sit of the main rotor assembly. I guessed the height and glued mine in. (now that I am further on with the build I think it is still 1-2mm too low)

Each fuselage half has some assemblies to add for the main pillars and the cargo hook structure. I also elected to close the engine bays on this build so I added the main doors to each side now to get a good joint rather than take my chances later when I had no access to the inside.

The engine deck complete with the T53 turbine is represented nicely. I built mine up to make sure the structure was strong and in case anything can be seen through the engine shroud mesh screens.


The undersides of the main fuselage halves with the cargo hook and oil cooler bays installed.


The underside details show what Kitthawk can do and looks to be a good representation of the real thing.

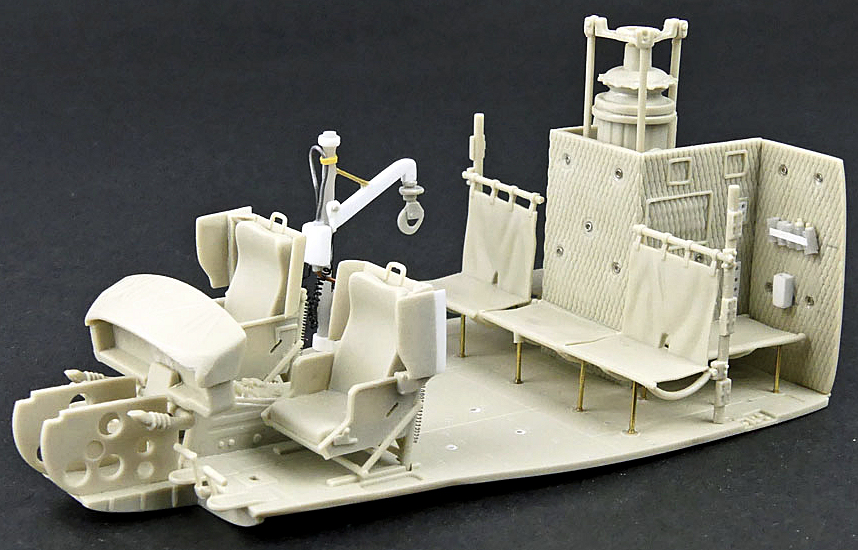
RAAF operated slicks almost always seemed to have the rescue hoist fitted. The kit does not include parts for this so I scratch built a hoist from the spares box ready to fit inside. You can see the floor mounting point in some of the pics above.

Dry fitting the main troop seats showed me that everything would sit nicely how I wanted it to.

The seat parts are still separate to allow for painting.

The pilot seats are a pretty good representation of the armoured seats used in Vietnam. There is a small issue in that the side armour panels are fully forward. I tried to modify mine to be slid partially backwards and I added a small piece of styrene to replace what I had cut away. Not 100% but it will do.

There are also prominent spring details on the rear of the seats which are moulded as a solid piece. I removed that piece and replaced with some fine wire wound into a spring.

The central overhead panel for the pilots is devoid of detail so some of it was added from scratch.

A dry run for all the interior components so far.

The instrument panel and coaming are nicely done and fit well. I removed some plastic from the outermost corners of the coaming as I was concerned it may foul the windscreen fit.
The ceiling is now added to the exterior roof section into positive mounting points. It may look odd now but it all fits together with the other interior components. You may notice that I added some interior lights and the wire grab handles seen on the Aussie aircraft and yes, they are different shapes. The starboard one angles up – I assume so that it doesn’t foul the swing of the rescue hoist arm. I also added some blanking plates to the front edge either side of where the overhead panel sits so you don’t see straight in there from the front. I left out the intercom box recesses in the roof as I struggled to get definitive locations from pics and I had to draw the line somewhere.

Don’t forget to pre-drill any holes for the antennae fit you intend to use on the roof. Pay careful attention to your references here as the instructions are no help. The kit has an early teardrop shaped DF loop aerial to fit onto the roof. It appeared to be removed in service and replaced by a rectangular shaped plate. I went this way on mine with some plastic card.

I added the upper engine doors to the intake fairing so I could play with the fit. The etch brass screens fit nicely with some minor fettling.

And the intake fairing fits really well onto the roof section.

The main cabin sliding doors feature detail on both sides. Good news, the circular divots that you see on the interior are not ejector pins marks and are meant to be there.

The pilot’s doors are both separate and can be posed open or closed. I chose to have one of each and the port side door needs to have the hinge mounting tab removed. (red arrow). Please be ultra-careful when cleaning up these parts there is some flash between the fine window frames that needs to be removed. I tried hard but still broke these pieces no matter how careful I was.

There are inserts for the insides of the doors, these need some trimming to sit right. The instructions show two etch brass boxes to fold up and add to the door panel, they seem to be specific to the German version only using external references so I left those out.

A dry fit of the fuselage halves around the interior structure gave me confidence that all would go well.

The separate upper nose and radio compartment door are a reasonably good fit. You can see I used some filler to remove the mounting locations for the un-used nose pitot and FM whisker antenna.

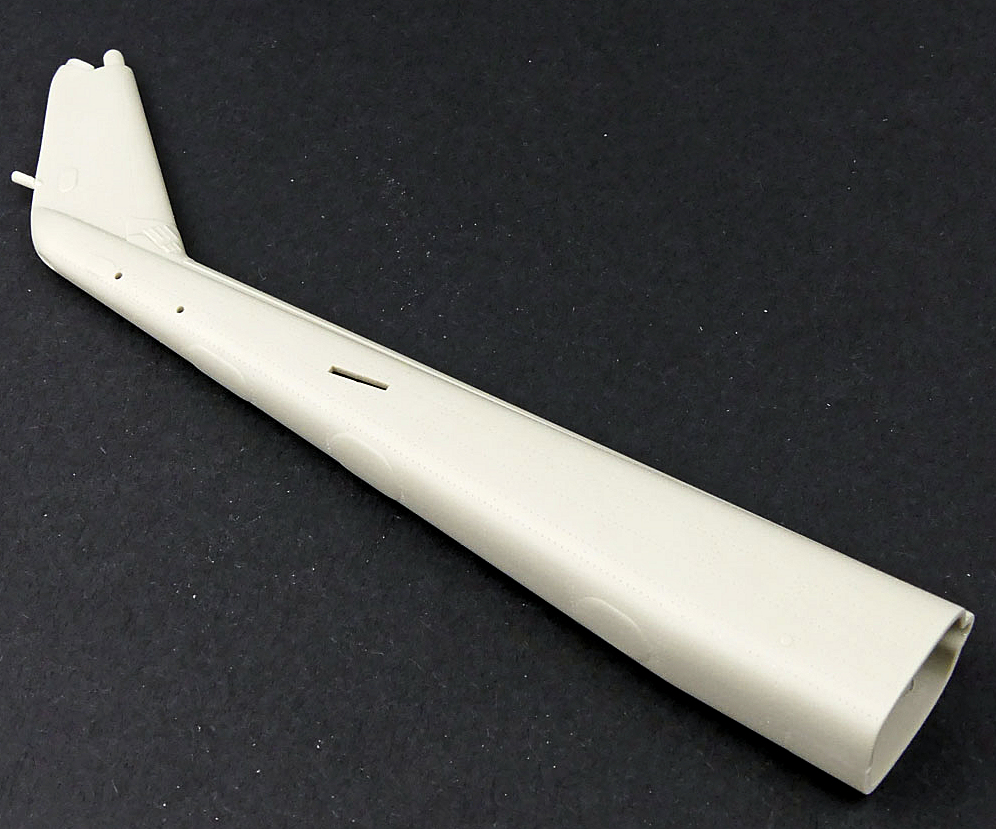
The tail-boom is separate and is a simple left and right half so no issues with that. The shape looks spot on to my eyes as well.
The skids are a multi-part affair with separate cross tubes – be careful to use the correct parts for front and back as the mounting points have different spacings (they are both labelled A26)

There is also a strange triangular cut out on the bottom of both skids just forward of the front cross tube. No-one knows why but I just glued in some half round styrene and sanded to shape when dry.

I’m getting close to squirting some paint on the interior but I’ll leave that for the next instalment.
See you soon.
Andrew Perren
Thanks to Kittyhawk for sending this Huey to Andy to build and review- The build is "inbound" as Andy already has the helicopter nearly at painting stage. Super Detailed build to follow in the next week or so. Stay tuned...
