


B-17 E/F Flying Fortress Build Guide: The Cockpit
from Hong Kong Models
1/32nd scale
Model Number# HK01E05
The kit features 44 sprues
A resin casting ammo tracks
Photo-Etch parts on two sheets
Three markings on two decal sheets
Large format instructions included.
3.2kg weight - 989mm wide and 709mm long!
Price:¥31,920/ USD $281.95/ €266.15 from Hobbylink Japan
In-boxed: HK Models 32nd scale B-17E/F


 When these were finished I put them aside and started on the front of the cabin that serves as the door way/bulkhead between the pilot's cabin and the Bombardier's post. Once I got it on the workbench and only thing I did I came up with my cabling solution.


 Stay tuned for the next part of this build when I will tackle the rest of the interior from the Pilot's compartment rearwards in this massive build.
Lukas Kasuba

1/32nd scale
Model Number# HK01E05
The kit features 44 sprues
A resin casting ammo tracks
Photo-Etch parts on two sheets
Three markings on two decal sheets
Large format instructions included.
3.2kg weight - 989mm wide and 709mm long!
Price:¥31,920/ USD $281.95/ €266.15 from Hobbylink Japan
In-boxed: HK Models 32nd scale B-17E/F


Today: HK Models 32nd scale B-17E/F Build Guide: The Cockpit.
Here we are. My first part of B-17build, it is the one I originally only intended to do strictly OOB (well with the interior I almost did that) however, rather quickly, I converted it into a little more of a detailed build.
Speaking of building the "guts" of this beast you can compare it to 4-5 standard single fighter interiors worth of work, and this was the driving force behind keeping it simple this time. I have learnt my lesson earlier last year when I built MiniArt's SU-122 with full interior. After closing it up over all of that detail with only pictures to ever see my good work again.

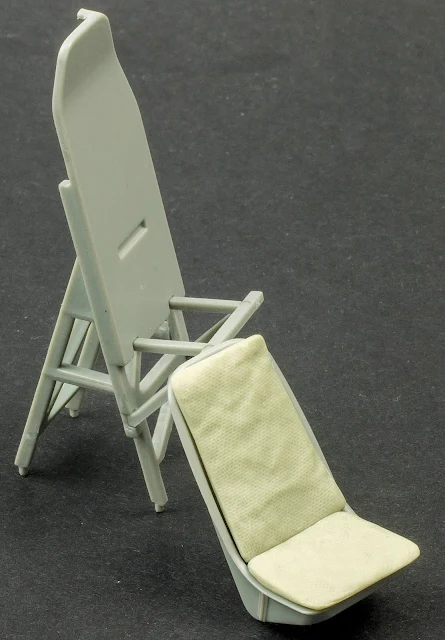
At first, I started with nose sections but got distracted with main half of fuselage(hard to miss as they are about 70cm each) and big sections that divide the interior into different sections. After this, it was straight to “traditional” way of building interior - pilots compartment, radio operator section, bomb bay, waist gunners section and rear gunner. As I mentioned above I get easily distracted and instead of doing production line with all parts I did pilots office first and started the build with the pilot and co-pilot's seats.

Main work here with these seats was to remove ejector pins marks

They receive resin cushions from HGW #132534 which are designed for this kit. The set contains 1/32 textured cushions which add a lot to the detail level of the interior.

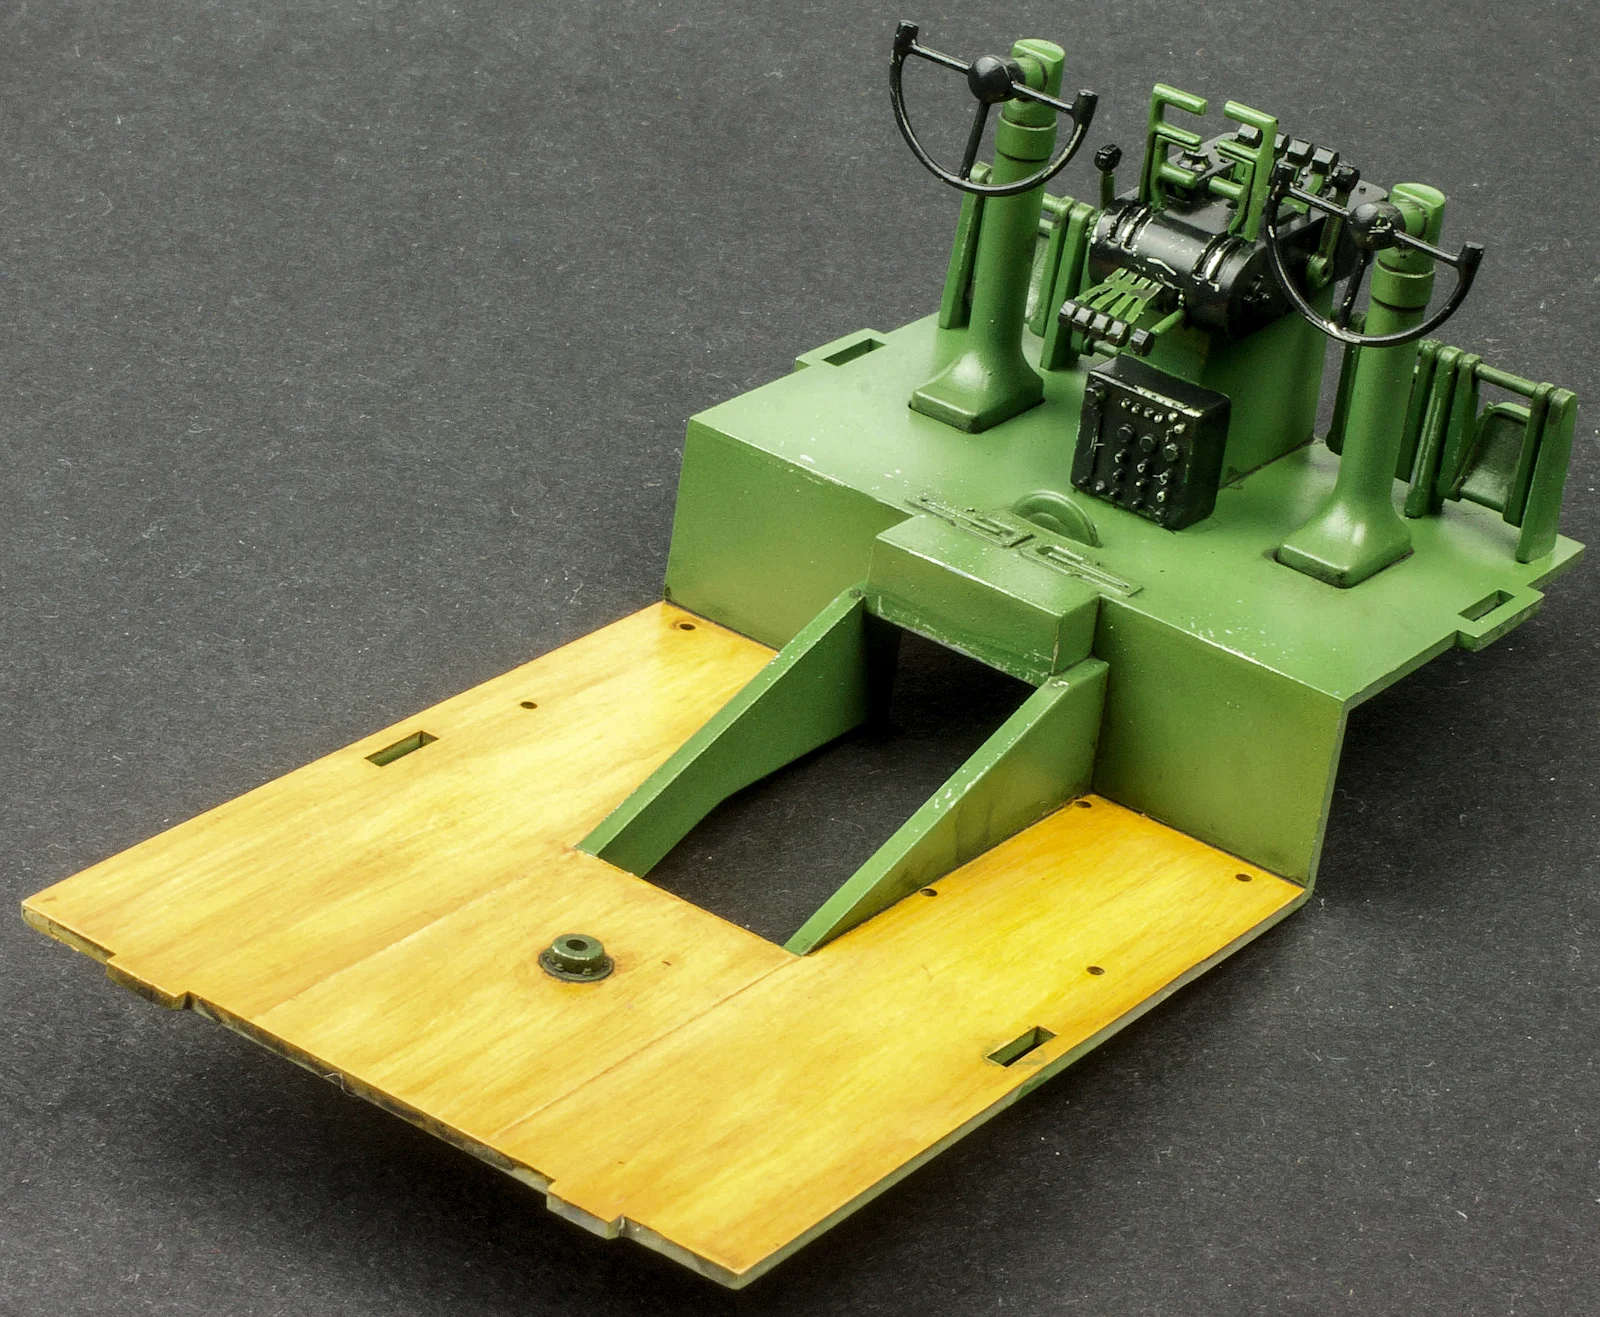
After seats were assembled I carried on with cabin floor and controls. I painted wooden floor separately using oils over radome colour (GunzeC318) base shaded with mix of radome with brown colour


After the floor dried I masked wooden part and finished the rest of interior using the recommended paint ratios for interior green.

The wooden texture on the floor is achieved with a darker oil colour than the light floor colour brushed over it unevenly.

The controls were scratched up using a simple silver, while the throttle and warning lights of the cockpit were touched up also.

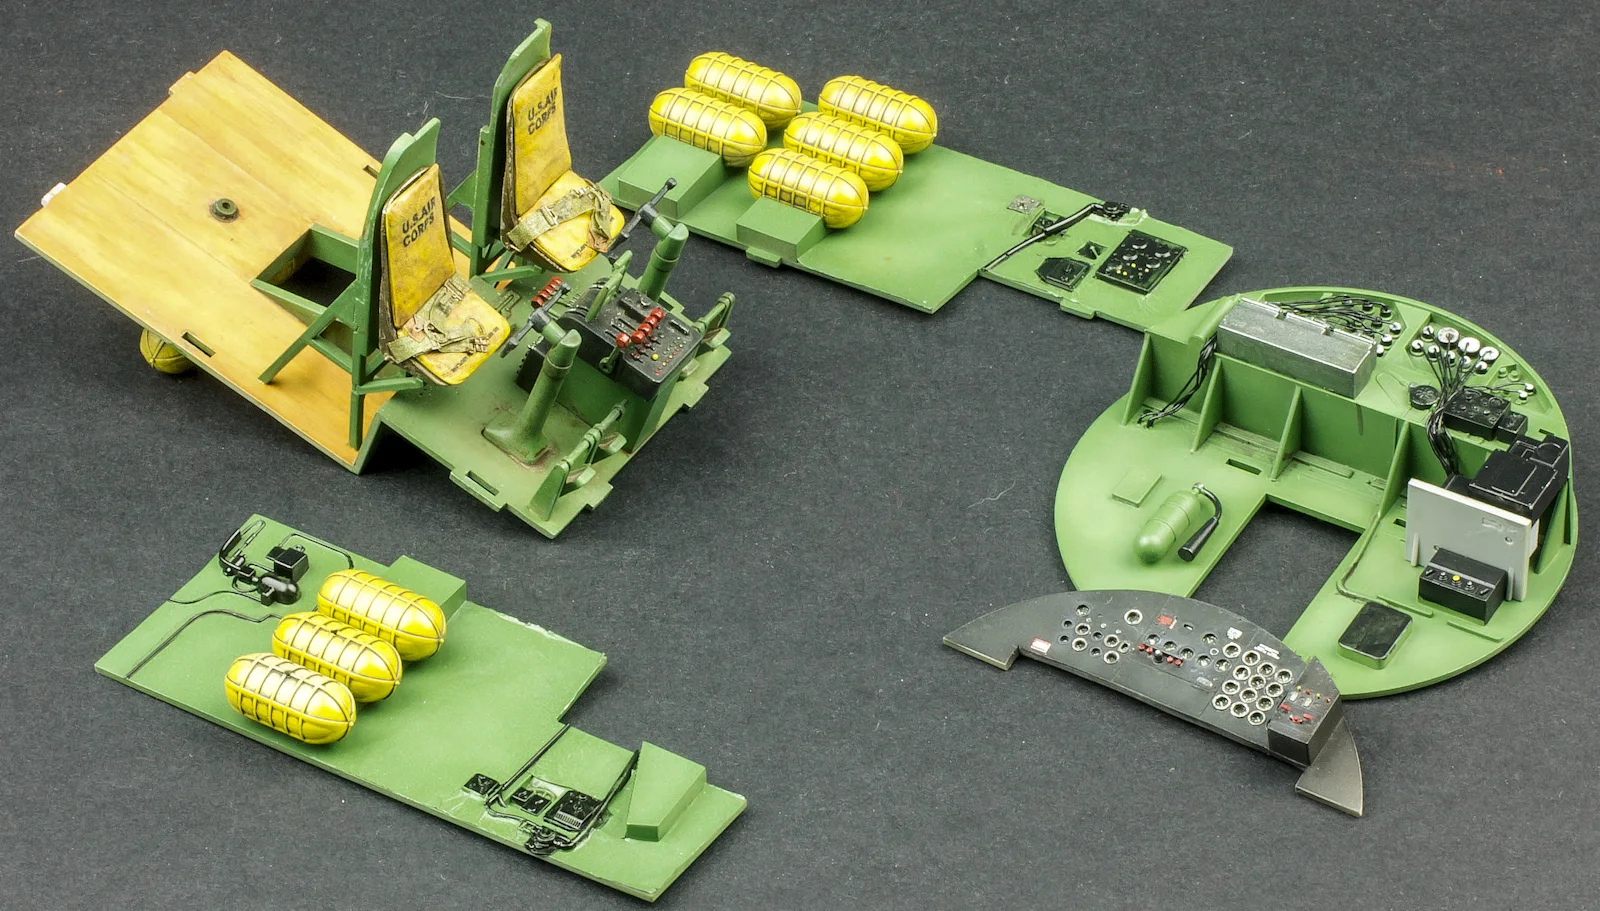
Same paint colours and technique was applied to seats, then they, in turn, were added to the floor

I weathered the seats just like the rest of the cockpit with dark brown wash, then I followed it up by installing fabric seat belts as a replacement for PE parts offered with a kit.

Weathering these seats and chipping the metal parts make them look a whole lot more "lived in"

I like working with theses seat belts slightly better and they came as a set with previously mentioned cushions for main seats.

I was fighting myself very hard and eventually resisted to purchase any AM for the interior (if you don’t count HGW as interior :). Instead, I used leftovers from HGW WWI bezels set and pumped up a dash board with them plus some extra handles from Eduard’s PE I had in spare parts. At the end, I added a few extra decals with some warning signs from Airscale’s cockpit placard sheet - leftover from my Spitfire build.

The Instrument panel got slightly redesigned, as I didn’t like the comparison with the real thing in pictures that I have found.
 I created a gap with my cut but with all that space underneath dashboard when installed it seems closer (well, to me at least) to reality - my eyes trick me here for sure.


After some gentle paint of the finer details, and with the depth of the dials and HGW details found I loved the result.

Having said that, you could super detail the entire interior as there is a huge range of aftermarket for this kit of the B-17 in 32nd that varies from photo-etch all the way to resin.
As I was building the floor and was waiting for oil paint on the floor to dry I prepared the side consoles of the cabin for painting. I created wrinkled texture using aluminium foil - idea that I proudly stole from Gary Wickham, and still not sure If I like what I achieved

Successive washes brought out the detail a little more


On the subject f how I do my weathering. The majority of my weathering follows similar order - gloss-cote over the painted parts and first pin wash. Here I found a new friend to replace my old dark wash from an AK set of panel liners. I seal this with Tamiya matt-cote. Then I follow with flooding surface with a very thinned mix of white spirit, oil paint and drop of Uschi’s Dry blitz to help with drying. I usually do this procedure twice each time with different tones of oil paints. When It dries I seal it with matt cote again and dry brush the details to make them stand out. It gets to look like this


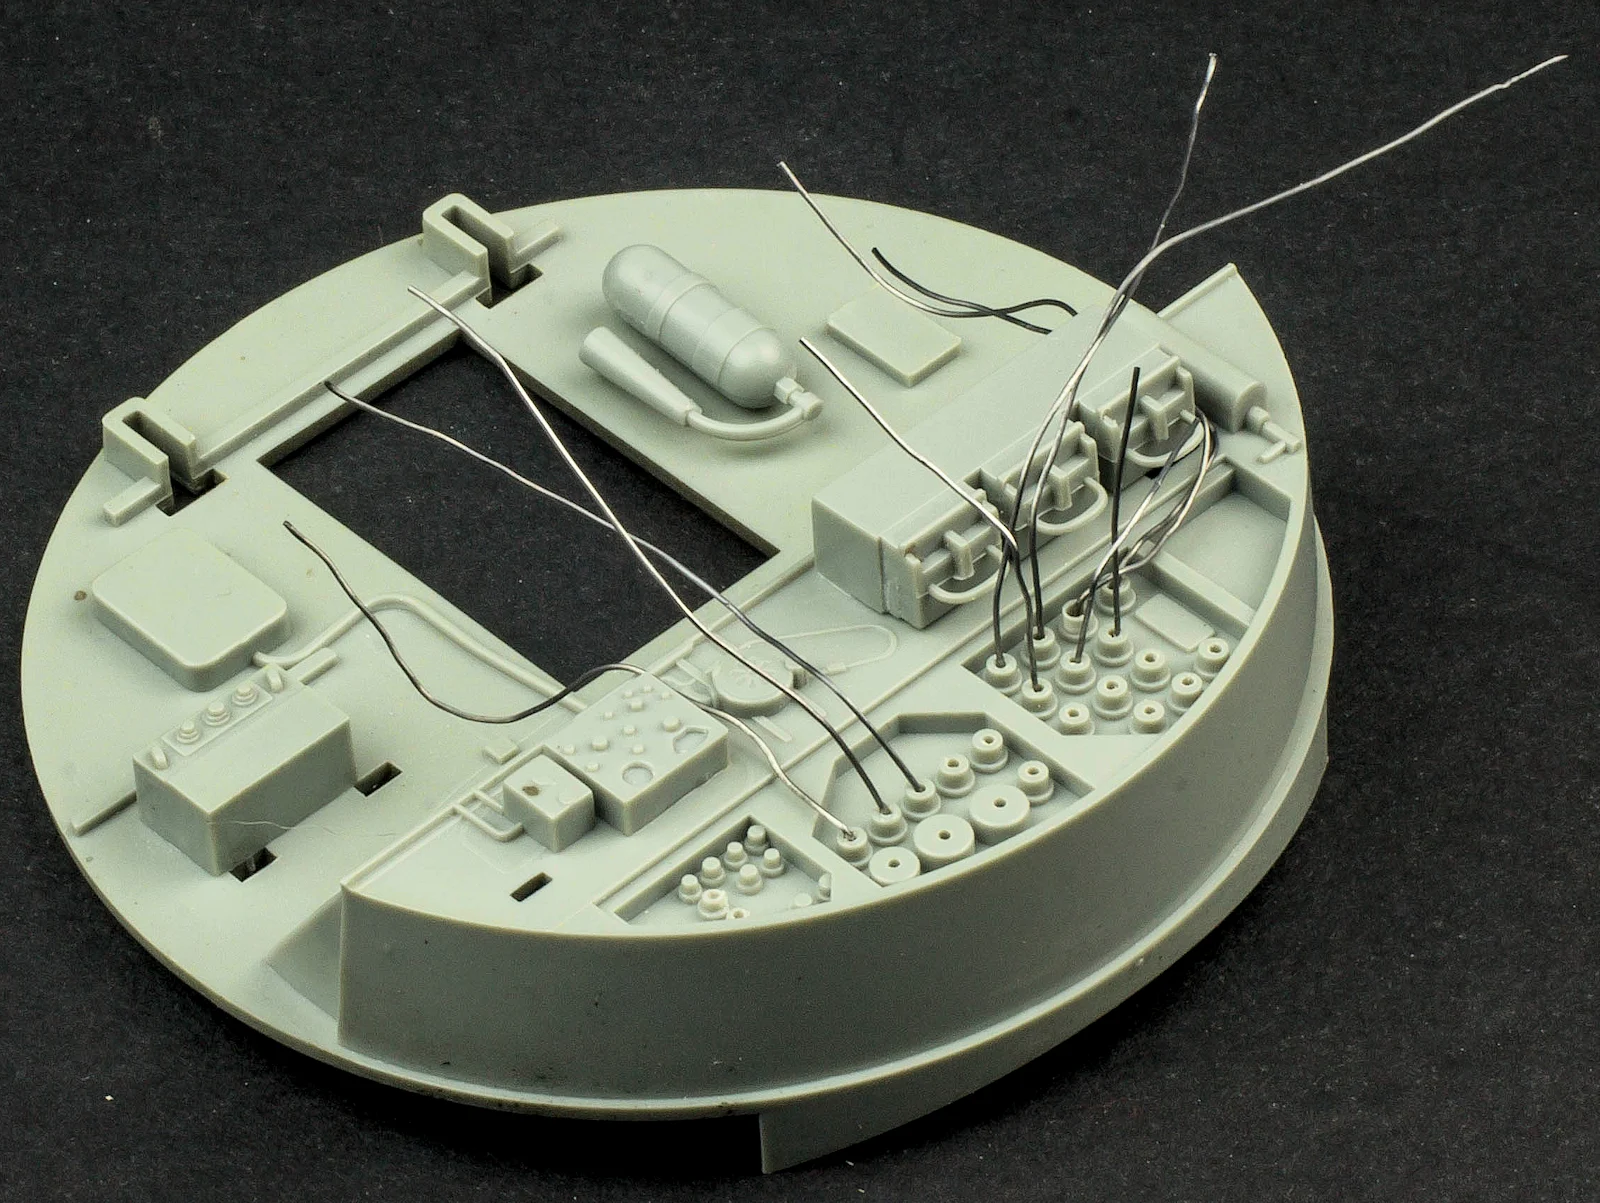
By connecting wire to the back of the instrument panel connected them this way that I liked to add more depth into nose compartment

It was important was for me to stay away from blocking future nose assemblies (mainly of the navigator’s office) and once the cable was managed in a realistic way I was happy with the result.

I painted it in the same way as floor and walls so I could have it ready for weathering. you can see my steps of the procedure below...First a highlighted base coat.
 Then I painted the interior details
 The last details and some weathering is then added, It looks very nice pretty much with only some small additions.


All parts for main flight deck placed together ready to be assembled. They sit on top of the wing lug, and with all of this in place and ready to seal away, this part of the build is in the bag!


Lukas Kasuba
Thanks to HK Models for sending this kit to us to review and build.
