


Maker: Meng Model
Item No.#: WWT-003
Product Link on the Meng Models Website
Price: USD$ 6.41/ GBP 4.48/ EUR 5.15/ AUD 7.94 from HobbyEasy


Andy Moore's build article of the Tiger I & the M4 Sherman in the same sries
Now, I guess I should state, that I don’t actually play the game that these kits have been derived from, so for the purists out there I am sorry if I am not paying homage to the game. I have heard nothing but good things about it…so I really should get around to having a go one of these days. My philosophy with this WWT, or Egg tanks if want of a better term, has always been to not take them too seriously. I certainly am not suggesting they shouldn’t be painted and weathered with care, but I feel, given the distorted proportions and cartoon-like nature of the model, the paintwork should follow suit.
I guess the most obvious cartoon-like interpretation on this model is to paint Tiger stripes on it…and that was the direction I was initially going to take. I did, however, seem to have missed the boat with this, as I have seen a few in this style popping up on the internet, so a change of plan was required.
So, the plan was now to make my King Tiger, a white (Alpine) Tiger, but to try and tie it back to some type of credibility with a semi-plausible German camouflage scheme.
Step by step guide: This is how I went about painting my World War Toons King Tiger.
As with most of my builds, I begin by priming the kit in an Alclad white Primer. I have kept the tow cables and some of the smaller parts off for the painting process.

A very quick and basic pre-shade is applied now. I focus on a downward motion to help add to the streaky look in the finished paintwork.

I wanted to build up a basic ambush scheme on the body of the tank. Tamiya Red-Brown is applied.

Using rolled up Blu Tack as a mask, a mix of Ammo Olivgrun and Yellow is applied. The yellow helped to lighten the colour and brighten it up. Given the cartoonish nature that I was looking for, I felt the straight Olivgrun was too dull.

More Blu Tack masks and the Dunkelgelb from Ammo is set in place. Horizontal surfaces are lightened by mixing the base colour with German Sand Beige.
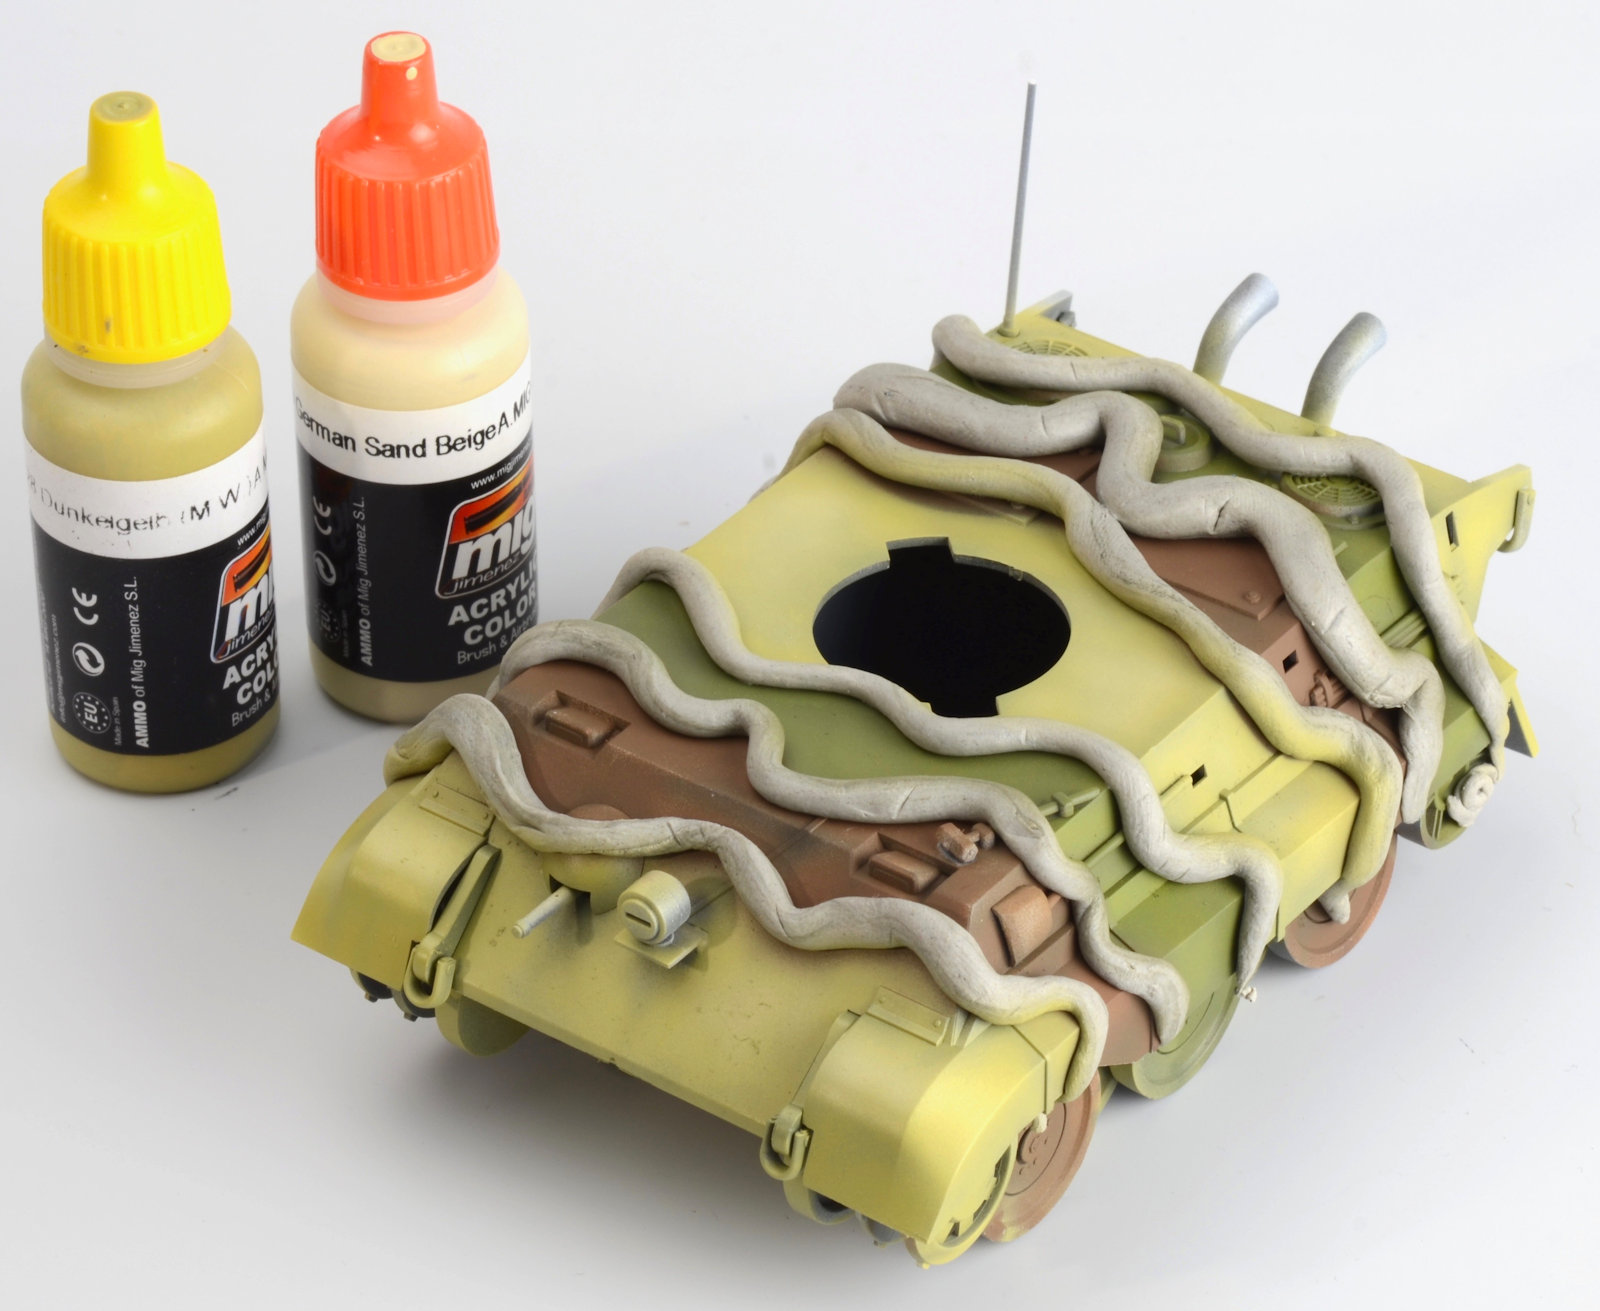
With the masks removed, I felt the Red Brown I have applied earlier was a little bland, and recoloured these sections using Rotbraun from AMMO.

Using Panzer Putty, I now apply a mask to help me lay a ‘whitewash’ section down. My KT was going to a white tiger, so I figured the whitewash would be a good bridge between the camouflage scheme and the markings of the animal.
I used the Panzer putty as it tends to give a sharper edge than the Blu Tack (generally), but I have to confess I don’t overly like this product.

With the white down and the masks removed, I now added the spots in the ambush scheme by carefully spraying a thinned Dunkelgelb.

On to the Turret now, and this is where the white tiger will come alive…. hopefully…
The piece is sprayed in a black undercoat, and a tiger stripe mask I cut myself is applied, ready for spraying.

With the mask in place, AV 70344 is applied. It is a Vallejo, Panzer Aces colour designed for the German Winter tank crew uniforms. I used this colour because it has more of a bone tinge to it, and wouldn’t be so stark on the finished model.
Masks removed, and the stripes appear… And yes, I am fully aware that it looks very much like a zebra!

With the top and bottom sections now together, the scheme is starting to make sense. A thinned mix of XF64 and XF69 are now applied as a post shade. This helps highlight some of the detail and add some contouring to the model. It also starts to add the grimy, used look I like to see on my models.

Gun Metal pigment is now polished onto the model using a cotton bud. The machine gun barrel, tools and the wheels are all treated.

Now using a mix of Rust toned pigments and gunmetal, the exhaust pipes are rusted up.

Some light chipping is added by dabbing the Ammo colour, ‘Dark Tracks’ on in certain places with a sponge. Masking off sections like I have in this picture will help you achieve an interesting and realistic effect with this technique.

Note the fine chipping on the front fender. Very simple to achieve with very little effort. It is all about practice.
Decals are also applied at this stage. I added some aftermarket numbers to the turret also.

A light misting of Washable Dust is now sprayed to the lower edges of the model and scrubbed away using a water-soaked brush to tone it back.

Conclusion
So, after a bit of a stop/start run with this one, here she is. My White Tiger II in a large walk around...


These little WWT kits are very simple to build and are a lot of fun. It is an interesting line of kits because I would imagine the appeal would be quite broad. I would think they would capture the beginner market, as well as the players. familiar with the game. Then there is the more serious modeller looking for something to let their guard down with and just have a bit of fun with.
A close up of some of the details of the Alpine Tiger...


At the end of the day, you can take these kits as seriously as you want, or just let your imagination run wild. It’s up to you. No rules, just a bit of fun, and a leave pass to come up with something that no one else has done.
Clayton Ockerby
Thanks to MENG for sending us this kit to make up for you all, Check out their kits on their Website

Also, see the game that inspired these model s World War Toons - the free to play game...
See more of Clayton’s work at his website “Workbench Hobbies” or join him on his Facebook page