

Andy Moore has already taken a look at the JPG Productions 1/12th scale "Probot" Imperial Probe Droid) in an earlier article here on TMN. Here today he gets to building and painting the 'droid with a great result - see how he did it in his build article...

Build Guide: Imperial Probe Droid
Manufacturer - JPG Productions
Scale - 1/12th
Original Master Model - Nicholas Sagan
Type - Resin Casting
Price - £45 available from Tirydium Models
Manufacturer - JPG Productions
Scale - 1/12th
Original Master Model - Nicholas Sagan
Type - Resin Casting
Price - £45 available from Tirydium Models

The Probe Droid seems to be one of those Star Wars subjects that crop up time and again on forums when modellers discuss the kits they'd like to see released. It was great news then, when JPG announced that their next droid release would be the Viper Probot that first hit the screens in 1980 in The Empire Strikes Back. The inbox review showed the resin garage kit was a solid representation of the original but, like JPG's previous Chopper and Gonk releases, was in need of a little refinement here and there.

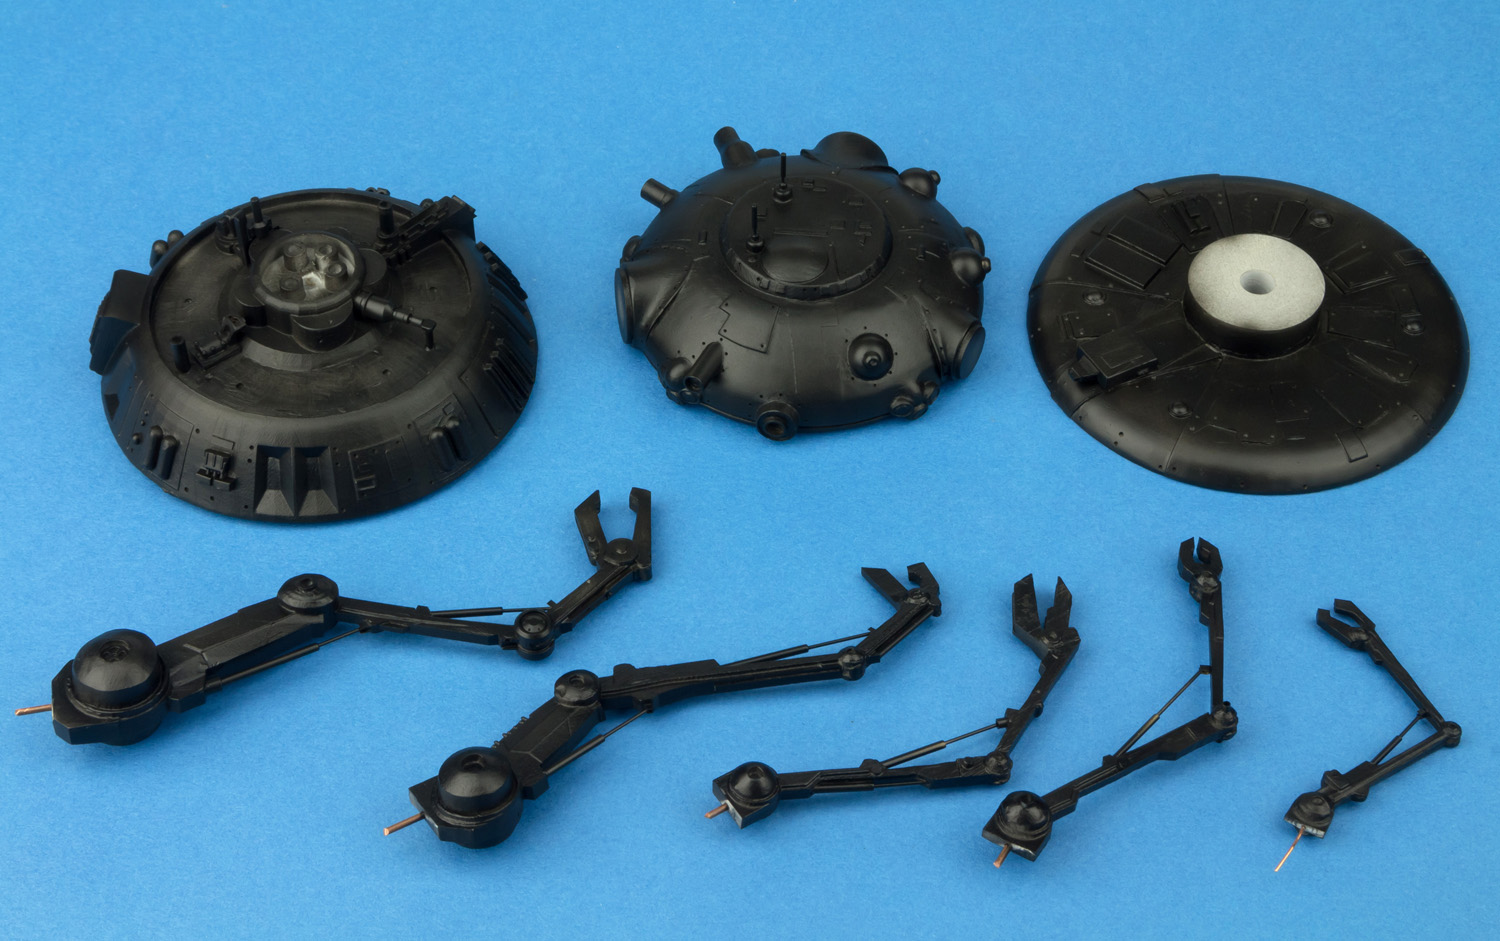
One of the main areas that needed a little extra attention was the manipulator arms. These all had quite heavy mould lines that needed cleaning up, and some of the smaller details were a little messy and would need some refining. The parts that needed the most work were the actuators. Not only were they quite misshapen, but they also hindered access for cleaning up the seam lines on the main arm sections.

Rather than spend time trying to clean up the actuators, I decided it would be simpler to cut them away and place them with metal tubing. This would not only give a cleaner and more in-scale look, but would also add a little more structural rigidity to the arms. The replacement actuators were very simple elements made up from two sizes of metal tube, with the thicker of the two being secured into a hole drilled into the existing mounting block on the upper arm.

The thinner tube was then slid into the open end of the thicker tube, with it's opposite end concealed by a very simple U shaped bracket made from scrap brass cut from the frame of an old photo etch sheet. A few other small details were added to the arms using small pieces of styrene and a few assorted parts form the spares box. I wasn't following any strict reference for this detailing. It was simply a way of adding a little more sharpness to the finished arms.

Although the arms did have nominal mounting points on the underside of the main body, the fit and alignment wasn't great. I decided it would be better to remove the mounting points altogether and drill holes in the base of the body. Short lengths of copper wire were added to the tops of the arms which could then be inserted into the holes in the body. Not only did this make fitting the arms much easier, but would also allow me to rotate the arms to any angle I chose. It would also make painting easier, as the arms could be finished separately and added right at the end.

With the arms finished I turned my attention to the main head. As part of this build, I'll be using the lighting kit produced by Tirydium Models which includes a red LED that comes pre-wired to a battery box. The lighting kit comes with very comprehensive fitting instructions, but as it's all pre-wired you won't need to do any soldering and the modifications to the model are minimal. The first step is to drill out the sensor were the LED will be fitted with a 3mm drill bit.

The LED can then be inserted into the hole from the inside of the head. Don't secure the LED at this stage, as you'll also need to drill holes in the base of the head and the upper half of the body through which the wiring will run to the battery box which is housed in the main body cavity.

The LED will definitely bring some extra life and realism to the finished model. Later in the build, before the LED was permanently installed and the head closed up, I lightly sanded the end of the LED to give a more diffuse light. [pic 09] With the lighting sorted, I turned my attention to the other sensors on the head. The three largest sensor domes are provided as separate parts using acrylic half-beads and these look very realistic once in place. The smaller sensors are cast in place though, and many of them are a little misshapen. I decided it would be better to remove these altogether and replace them with something similar to the larger sensor domes. I initially bought some red pearl finish half beads to replace the sensors, but later at the end of the build I substituted these for 3mm clear red resin lenses.

The area on the head that required the most work were the ball-like sensors on the upper edge, which can be seen on the Sideshow 1/6 model in the photo below. In the JPG kit these are represented as flattened domes with extended prongs and look very different to the originals. I decided that, since these are very prominent features of the probe droid, it would be worth rebuilding them from scratch.

For the replacement sensors I picked up some 8mm plastic beads which would form the main dome, and some 3mm beads which would form the smaller second section of the sensor. [pic 12] After carefully slicing away the kit sensors, I drilled out depressions in the head into which the plastic beads would sit. Some of the small fastener holes that cover the head were lost during this stage, and needed to be re-drilled later on. In fact, many of these holes were filled and re-drilled as some were unequally spaced while others were slightly oversized.

The 8mm beads were then glued in place in the depressions with the hole through the bead facing the front. Those holes could then be drilled out to accept the smaller 3mm beads, and these were added, again with their holes facing forward. Later, after painting, the sensors were finished by adding tiny 1.5mm clear resin lenses to the front of the 3mm beads.

Moving on to the lower body, the small rim that spaces the two halves apart was trimmed away and replaced by a disc of 2mm styrene. The magnets that are supplied with the lighting kit were fixed in place with epoxy putty. These allow the upper body to be removed to gain access to the battery box and switch for the LED.

Like the arms, the lower body received some additional detailing using various odds and ends. Again, I didn't worry too much about matching details to the original prop. It was more about sharpening up the existing details and adding an extra level of interest to the finished model.

That finished off the detailing work and the parts were ready for painting. At this stage I left the different sections separate, as that would make the painting process much easier. It would also allow me to leave the LED out until the painting was complete, removing the need to mask off the light.

The painting stage itself is pretty straight forward as the Probe Droid is almost entirely black, with only a few small details to pick out in other shades. To start the process, I primed all the parts with a satin black lacquer from Mr Color. [pic 18] For the main base coat I didn't want to go with a pure black, as it would look much too dark and hide most of the detailing. Instead, I mixed up a very dark grey using Tamiya and Gunze colours and all the parts were given a solid coat of this shade.
The rest of the painting was done by brush, and was simply a case of picking out some of the details in different shades. Some of this was based on reference images and some was purely artistic licence. To finish it off I added some chipping to the edge of some of the panels with silver and some light weathering with a dirty brown enamel wash.

The very last step was to install the LED and add the various sensor lenses. The large black lenses are the ones included in the kit and, although completely opaque, do a very good job of simulating the tinted glass domes on the prop. The smaller red lenses and the tiny clear ones on the ball sensors are resin lenses from Little-Cars and are available from modellingtools.co.uk. The small cluster sensors are 1.5mm copper coloured half beads which can be obtained from craft stores or similar outlets.


All that remained now was to put the sections together, pin the legs in place and mount the finished Probe Droid on the supplied base. The base had previously been painted satin black, the rocks picked out in grey and the groundwork finished with a snow effect paste from Wilder. I replaced the acrylic support rod included in the kit with an aluminium one for extra strength, as the completed model is quite heavy.

I have to admit, I was a little underwhelmed by the model when I first received it, as it looked a little rough in some areas, and I wasn't sure just what the finished build would turn out like. It's surprising what a little clean up and some extra detailing can do though, and I think that the finished model turned out pretty well in the end. It's definitely a model that benefits from a little TLC, but the basic kit is sound and will provide you with a very striking model to add to your Star Wars collection.


 The addition of the lighting kit from Tirydium Models really bring the kit to life, and is definitely worth picking up if you're ordering the kit. As long as you don't mind putting in a little work, JPG's Probot gets a definite recommendation.
The kit poised over its base and lit up...


...and in close up.


Andy Moore

Btw here are three of Andy's 'droids from Jpg Productions - the Gonk, the Imperial Probe Droid & Chopper

Thanks to JPG Productions for the Probe 'Droid kit...

...and Tirydium Models for sending both the Probe Droid and the lighting kit to Andy to review - and to build for you all.

...and Tirydium Models for sending both the Probe Droid and the lighting kit to Andy to review - and to build for you all.

Btw here are three of Andy's 'droids from Jpg Productions - the Gonk, the Imperial Probe Droid & Chopper
