

..Or maybe One trouser leg at ta time – you get to a point in a build you just want to seal it all up and finish it into a great looking build - but there are things you need to do first - especially on a kit like this with LOTS of internal detail. In the last section was all about getting lots of
decals on seats and lots of paint into the interior – but this part is all about
getting your underclothes on before your trousers and jacket.

Scale: 1/24
Material: Styrene
Sprues: 13
No. of parts: 390
Decals for two RML Routemasters
Skill Level: 5
Revell model kits are available from all good toy and
model retailers. For further information visit www.revell.eu
...What I mean is that the kit has a really nifty internal
structure which I have to hand it to the guys at Revell of Germany pretty
amazing – and daunting! You seal up both levels and paint inside them and then
and only then can you put on the outside layer “shell” – and hope it all fits –
hence the trepidation that creeps in. You are kind of building two models in
one, I think though that the end result will be more than worth any nervousness
you encounter on the journey. Let’s crack on..

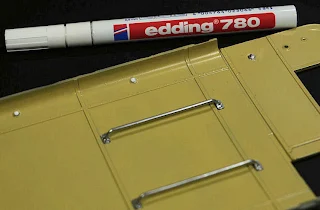
 The inside walls were constructed with the help of
numerous clamps like these ones I got below from Shesto (they seem to have the
market on things like this tied down) Anyway I used a lot of super glue from
here on in because the painted surfaces do not adhere very well with normal
model plastic adhesive. This was good and bad, as superglue can crack, but it
is fast drying and seals up many gaps – it is the best for this application
though.
The inside walls were constructed with the help of
numerous clamps like these ones I got below from Shesto (they seem to have the
market on things like this tied down) Anyway I used a lot of super glue from
here on in because the painted surfaces do not adhere very well with normal
model plastic adhesive. This was good and bad, as superglue can crack, but it
is fast drying and seals up many gaps – it is the best for this application
though.
Before installing all of your painted seats make sure
any excess is off the bottoms so they get a clear grip to the floor. A few of
mine had some excess material and to get a really firm hold I just used a rough
sanding stick to get it to hold fast!
This is what you are left with upstairs and
downstairs after your seats go in. A few tips for you:
- Organize
and place either side the seats before gluing them in there
- Dry
fit them first – the old adage measure twice – cut once - springs to mind for all
of those wannabe carpenters out there.
- It
cannot hurt to pack the glue into any holes left like where the seats plumb
into the sidewalls – but after you do sand/cut the walls flush so you avoid fit
problems with the outside “skin” later.


The inside walls of the stairwells come next and I am
still living in wonder of how it is all going to come together from here. I did
need a fair amount of superglue on the painted surfaces and lots of clamps to
get it all sitting right. One thing I will say which again is probably common knowledge
to everyone but me is to cut just a little off every socket which fits into
something else with this kit – it stops you from trying to jam anything into a
space which is too tight with paint of glue. The fit is good but what you add may
make it too good!


The next part I attempted on this model was to
weather up the floor. There is a good chance for some decent again on this
aircraft with all of the nooks and crannies provided and especially the floor
which would really cop it in an English winter cries out for some dirt. I
used a simple wash of MIG Productions
Dark wash to get into all of those lovely cracks and crevices of the kit that
simply hold it like dark brown gold. All of the stairs, under the seats and any
area that would accumulate mud and dirt were given a treatment. I like the end
result after a bit of cleaning up – New “ish”.


Now the bottom colours were in place I got the upper
colour of the interior ready – for this I chose the cream coloured Humbrol 71 “Oak”
this wasn’t too yellow and not too white – just in the middle and very much
like the colour of the bus in the London Transport museum. On the instructions
it calls for some grey between the red and cream, well I have seen enough
busses with just the read and cream colours to make this just that. The old
fashioned lights inside which suit the older models look great when shaded with
just a little white – they look just like white light bulbs.


The rest of the internals just rests agains the the
waist high side walls for each floor and so all I had to do was give the
internal walls a coat of Humbrol 71 Oak again and then the trusty old silver paint
pen made the insides of the windows silver enough for me.


The problem I now had was the internal adverts on the
bus roof for the “ground floor” – I was stumped as the kit give you no advertisements
to use internally and even though most people wouldn’t look I would – so I got
creative….
I found my trusty copy of a magazine “Model Collector”
and found some old adverts in a feature inside, some on corgi toys, a James Bond
Astin Martin advertisement and some dinky toys with some others that looked the
right size.

 After cutting out a heap of them I found the right sized suitable new “decals” and wet them with water, then applied some watered down wood glue to the rear of them – and they applied into the cracks of the ground floor roof brilliantly! I was very proud of myself to have worked this out because otherwise I would have just stalled for even longer trying to think of a commercial solution.

The adverts places on the inside roof of the lower half of the cabin are below - once they dry they are not see through like the one above which is still wet - they looked great once dry - and the great thing is if you get creative you can do this yourself and have something YOU want to include on YOUR bus.


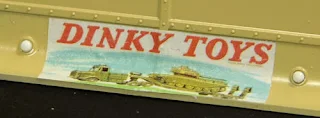


 After cutting out a heap of them I found the right sized suitable new “decals” and wet them with water, then applied some watered down wood glue to the rear of them – and they applied into the cracks of the ground floor roof brilliantly! I was very proud of myself to have worked this out because otherwise I would have just stalled for even longer trying to think of a commercial solution.
The adverts places on the inside roof of the lower half of the cabin are below - once they dry they are not see through like the one above which is still wet - they looked great once dry - and the great thing is if you get creative you can do this yourself and have something YOU want to include on YOUR bus.


- You will notice when you make your Routemaster that
the poles attached to the chairs on the inside don’t quite touch the roof – a bit
of a schoolboy error there – but you
never see it when the kit is finished.

Next comes the roof of the first floor as I started
to tie it all together. Using again my clamps from Shesto and lots of super
glue to seal it all in there the first level went on. (You really cannot have
enough of these large jawed but gentle clamps)

How can this model – which looks like a porcupine
right now with all of these clamps attached – be transformed into a shiny Routemaster
smooth with unique advertisements and maybe – just maybe – a street scene to go
in behind it? Well stay tuned the updates are coming thick and fast towards the
end of this buses scheduled route!

Till next time..
Adam
Norenberg
Revell model kits are available from all good toy and
model retailers. For further information visit www.revell.eu
