

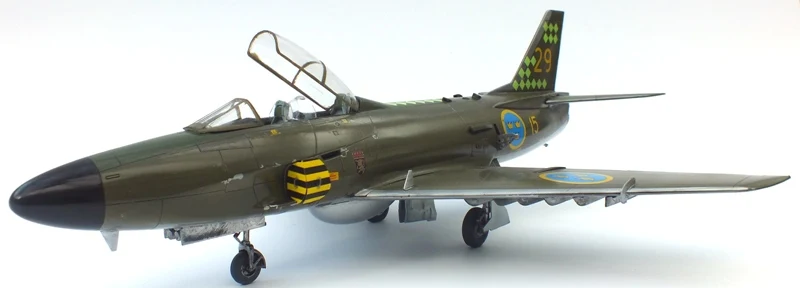
Now with the finish line in sight Eth brings us the final part of his build of the Saab Lansen in 1/48th from Tarangus - this time finishing and adding the excellent looking Photo Etch to turn humble beginnings into a little head turner - read on to see how it came out...
 Kit Maker: Tarangus
Scale: 1/48th
Kit no: TA4801
Sprues: 5
Parts: 80 grey
+ clear Parts
Material: Injection
moulded plastic + PE Parts in the Maestro Add-on kits
SAAB A32 Lansen A Build Pt. IISAAB A32 Lansen A Build Pt. III
SAAB A32 Lansen A Build Pt. IV
SAAB A32 Lansen A Build Pt. V
...With the decals in place and the Klear left to dry it was
time for the application of the wash. Pro-Modellers Dark Wash was lathed all
over the model and left to dry for an hour. This was is an excellent product
that works very easily and the excess can be removed using a dampened cotton
bud. Always make sure when removing the wash to do so in the direction of the
airflow.

It is not easy to see the effects of the wash in the
photographs as it is a subtle effect on a green painted model. However it does
help to highlight the panel lines and that really is what this process is all
about

Once you are satisfied with the removal of the excess wash
it is time to apply the last varnish, in this case Humbrol Matt Varnish. While
this was drying it was time to do the final assemble, undercarriage, wing
fences and the air brakes. The air brakes were the first to be assembled and
you can see how fiddly they are to assemble. When the airbrakes were in place i
had to reattach both of the rear flying surfaces as the location pin is so
fragile i managed to knock them both off. This was an easy fix using two
lengths of brass rod and some super glue. Holes were drilled in the correct
position and then short lengths of brass rod were inserted into the holes on the
flying surfaces and then these were attached to the fuselage, job done.

It would be fair to say they look harder to assemble than
they actually are and went together quite easy, the same could not be said for
the boarding ladder/platform. The boarding ladder is in the final photo etch
set i was given to use on this model and i have to say it defeated me. The
instructions are vague, to say the least. The actual ladder is easy enough to
assemble but the platform that is attached to it is a complete nightmare and
the instructions add to this. However also in this photo etch set were a couple
of pre-painted FOD guards and these worked a lot better, mainly because there
is only one bend and two handles to attach. I love uncomplicated photo etch!

There was one slight issue with the left hand side FOD. As
with the cockpit photo etch, when i started to bend the photo etch the screen
printed part started to come loose. Having had this issue in the cockpit i
stopped as soon as i saw the screen printing lifting. So the left hand side FOD
is not fully formed but the right hand side is.

With that out of the way it was time to attach the air
brakes. They were brush painted with Humbrol Metal Coat and LifeColor Dark
Green (LC-UA001).

The photo etch instructions are a bit vague on the location
of the air brakes when they are open however a quick search on Google found a
couple of photos that were a great help. There was one last item to attach and
that was the canopy. It is a two part canopy and i choose to display mine with
it open.
Conclusions
Let’s get one thing of the way at the beginning here this
kit is overpriced for what it is. With the inclusion of the photo etch sets,
two of which, the interior and the exterior sets, really do need to be used in
conjunction with this kit to get over the short comings. That would make the
kit in the region of £100 and even for a limited run kit that is a lot of
money, without the photo etch sets the price is roughly £60-70. Again that is a
lot of money and with the fit issues and the detail issues you need to think
carefully before committing to buy this kit.
However, there is a lot i like about this kit and i am glad
i had the chance to build it. Mostly the fit of the parts was on a par with
other limited run kits i have built and most, but not all, of the issues i came
across are similar to what you would face with other limited run kits. The
decals were some of the thinnest i have ever used, easily on a par with
Cartograf and they reacted well to the Micro Scale setting solutions.


The photo etch sets, leaving aside the peeling screen
printing, were excellent. The plain photo etch sets were also very good and
certainly added a level of detail that the Tarangus kit did not supply. An
example of this is on the inner face of the main gear doors. In the kit these
are just plain plastic parts, but the exterior photo etch set provides two
highly detailed panels to compensate for this. My main complaint about the
photo etch concerns the peeling screen printing and the instructions for the
assembly of the boarding ladder, otherwise the photo etch was excellent.

 Overall i would give this kit a 6/10 for the base kit and
8/10 for the photo etch.
Overall i would give this kit a 6/10 for the base kit and
8/10 for the photo etch.
And that was all she wrote.
Ethelian Glendawr
I would like to thank Tarangus for the kit, Maestro Models for the photo etch and Adam and Osprey for the chance to build this kit.
Ethelian Glendawr
I would like to thank Tarangus for the kit, Maestro Models for the photo etch and Adam and Osprey for the chance to build this kit.