

A few weeks ago, we presented you with a review of the
latest kit of AvantGarde Model Kits,the Fouga Magister in 1/48th scale. We found it to be a lovely kit, with a lot internal details, so we
were curious on how it would build. Corentin, the newest member of our “Belgian
Connection” came into action!

Fouga CM.170 Magister
Avantguarde Models
1/48th scale
Kit No: 88004
Kit type: injection moulded multimedia
Sprues: 6 styrene + 2 clear + 28 white metal parts + 46 Photo etch parts
Part Count: 285 plastic parts
Product Link.
Kit No: 88004
Kit type: injection moulded multimedia
Sprues: 6 styrene + 2 clear + 28 white metal parts + 46 Photo etch parts
Part Count: 285 plastic parts
Product Link.
In-box review of this kit on TMN


The Fouga Magister is a tiny aircraft and so is its cockpit.
The Fouga doesn’t have any ejection seats; in case of an inflight emergency,
the pilot had to fly on its back after which the canopies were jettisoned and
he and his back-seater dropped out of the aircraft...
The kit cockpit is
very nice indeed ...

... but even so,
Corentin added quite a lot of detail to it, especially all the wiring to the
instument panels.

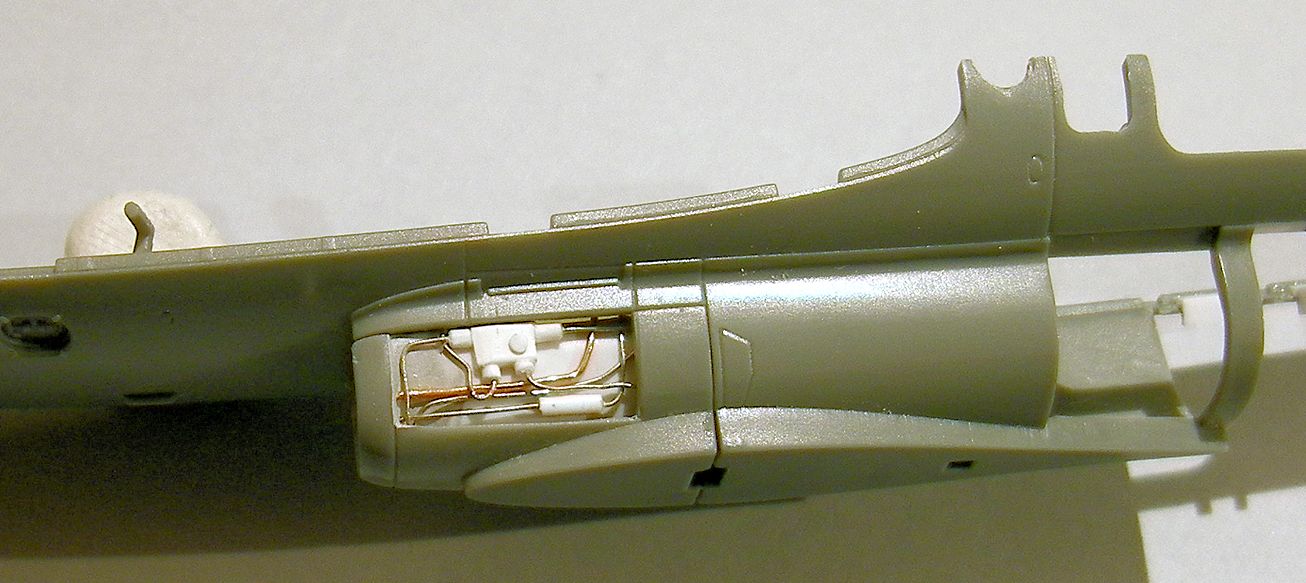
The kit comes with all internal structure and engines. And
even though they are very nice for such tiny little things, they received some
extra wiring.

AMK offers the possibility to build the structure of the
little jet and has provided open panels to do this according to the actual
maintenance panels. So, Corentin added detail to these parts as well.

As it turned out, and having some reference material close
by, it became clear quite a bit of detail could be added. But even when doing
this, the fit of the kit is very impressive.


The area above the jet air intake isn’t provided in the kit,
so this part was cut and the details scratched. It isn’t a very complex thing
to do, but it sure ads a lot of interest to this area.
With all the extra
detailling done, the parts got a layer of primer to make painting them
afterwards a little easier.

The cockpit of the aircraft is painted black, which makes it
not easy to see all the details. Some careful dry-brushing helps though.

With the cockpit,
internal parts and engine painted, Corentin got ready to assemble the larger
parts of the kit.

The nose wheel of the fouga is placed on a metal frame in
front of the cockpit. It’s quite a simple aircraft, actually. The cockpit wall
got some wiring before this part of the kit got constructed.

All the exposed wiring does
have a very nice effect of some realism indeed..

Constructing the kit went very straightforward. It confirmed
what we thought: this is a very good fitting kit. The fuselage-wing joint was
very good as well, as was the tail-section.

Before we continue this build, I have to own up to
something. In the initial review, I mentioned that the V-tail has quite a lot
of prominent raised rivets on it. All of the aircraft I saw didn’t have those
rivets, so that’s what I wrote. After the review went online, Sio of AMK Models
contacted me explaining that some of the initial Fougas that were build,
actually have rivets on the V-tail. So, there you have it: the kit is accurate
on this part too. So, when you build a particular Fouga, check you references
to see if it needs the rivets or not.
Here’s a picture Sio
sent me: Thanks for putting me straight, Sio!

With the construction done, it was time to get the kit ready
for painting. First, Corentin cleaned it thoroughly with a paintbrush and soapy water.

In the 1970’s six Belgian Fouga’s formed a display team
called “Red Devils”. They were painted bright red all over, with the Belgian
red-yellow-black colours on the V-tail and underside of the wings. This
colourful livery inspired Corentin; fortunately, AMK provided the decals for it
in the box.

After a layer of red, the wings and V-tails were masked for
the other colours. Once this was dry, the landing gear bays were masked and
painted.

Some gloss varnish prepared the kit for the decals. These
turned out to be flawless. And easy to use. The kit really started to take
shape now and Corentin was ready to unmask the canopy and panels.

With the decals in place, a light wash made done. The
aircraft of the “Red Devils” were kept quite clean, so this was done rather subtle.


The sub-assemblies, like the landing gear and engine were
painted and weathered too.

Because the model was to be in a little diorama; some stands and racks were scratched from sprue - and they were quite effective at little to no cost..


Time to unmask
everything and glue the details to it... looking good!

The seats and canopy
are ready to be placed into position.

The kit is looking very convincing when finished and the
open panels look very much in proportion to the rest of the kit.

For the base, a brick-road was selected. On some Belgian
bases of the 1970’s those were used, so this gave the scene just that little
extra realism. To liven it up, some beaten up yellow marks were applied.

And then AMK’s Fouga Magister was done. And what a great kit
it turned out to be. There is a lot of work involved because of all the
internal structure that needs to be built, but it is worth all the effort that
you put into it.

So this kit builds as well as it looks. Fit is fantastic, it
is well detailed, but as with so many kits, you can always add details. This
really is a kit that can be recommended. At the moment this kit is without any doubt
the best Fouga Magister available in any scale. The result speaks for itself!


We can’t wait to see what AMK has planned for us next. We
have learned that the brand is preparing a Mig 31 and even an F-14 Tomcat in
this scale and if these two kits will be of the same quality as this Fouga,
well than those will be simply spectacular! With those two planned releases,
they tackle some very impressive aircraft. So far, with the Fouga, Delphin and
Kfir, AMK picked rather small aircraft, so it will be interesting to see how
those two will go.

We like to thank AMK Models and Au 16e Escadron in Brussels
for providing us with a sample of this Fouga Magister.

And thanks to Sio for correcting me with regards to the
V-tail rivets!
Kit: Corentin
Haubruge
Photos: Corentin
Haubruge and Guillaume Friart
Text: Nicolas Deboeck
Thanks to AMK
Models for this kit and to Au 16 Escadron model shop in Brussels.

