


Construction Guide: Sukhoi Su-35 "Flanker-E"
From: Kittyhawk
1/48th scale
Product Number# KH80142
Product Link on the Kittyhawk Site
Price: £49.49 on the E-Models Website

Kittyhawk's 48th scale Su-35 "Flanker E" Build Guide Pt. II - Masking & Painting
Today: Kittyhawk's 48th scale Su-35 "Flanker E" Build Guide Pt. III - Finishing
So when we last left the Flanker it was painted and decaled, the basis of the work had been done, and now the kit is at the hardest part in a way - finishing it all off.
Now let’s get on with final assembly and adding the weapons. First off, the jet nozzles

Whilst the kit parts are quite nicely detailed, they do not depict the drooped nozzles that a Flanker parked on the ground shows

Enter AMUR Reaver with their set of drooped nozzles that will allow you to model a jet in this configuration.

I bought mine straight from the website with no problems, and they arrived about 3 weeks later. Each nozzle is made up of four parts with some very nice detail, and they are made specifically for the Kittyhawk kit
I initially painted the exterior surfaces of mine Floquil Silver, then masked off the rings that will remain silver before spraying the parts with Alclad Jet Exhaust.

I then really just experimented applying different shades of Alclad paints such as Pale Burnt Metal, Hotmetal Sepia, Hotmetal Violet and some Tamiya Clear Blue in a random pattern to achieve the below result. Interior surfaces were painted Gunze Off White.


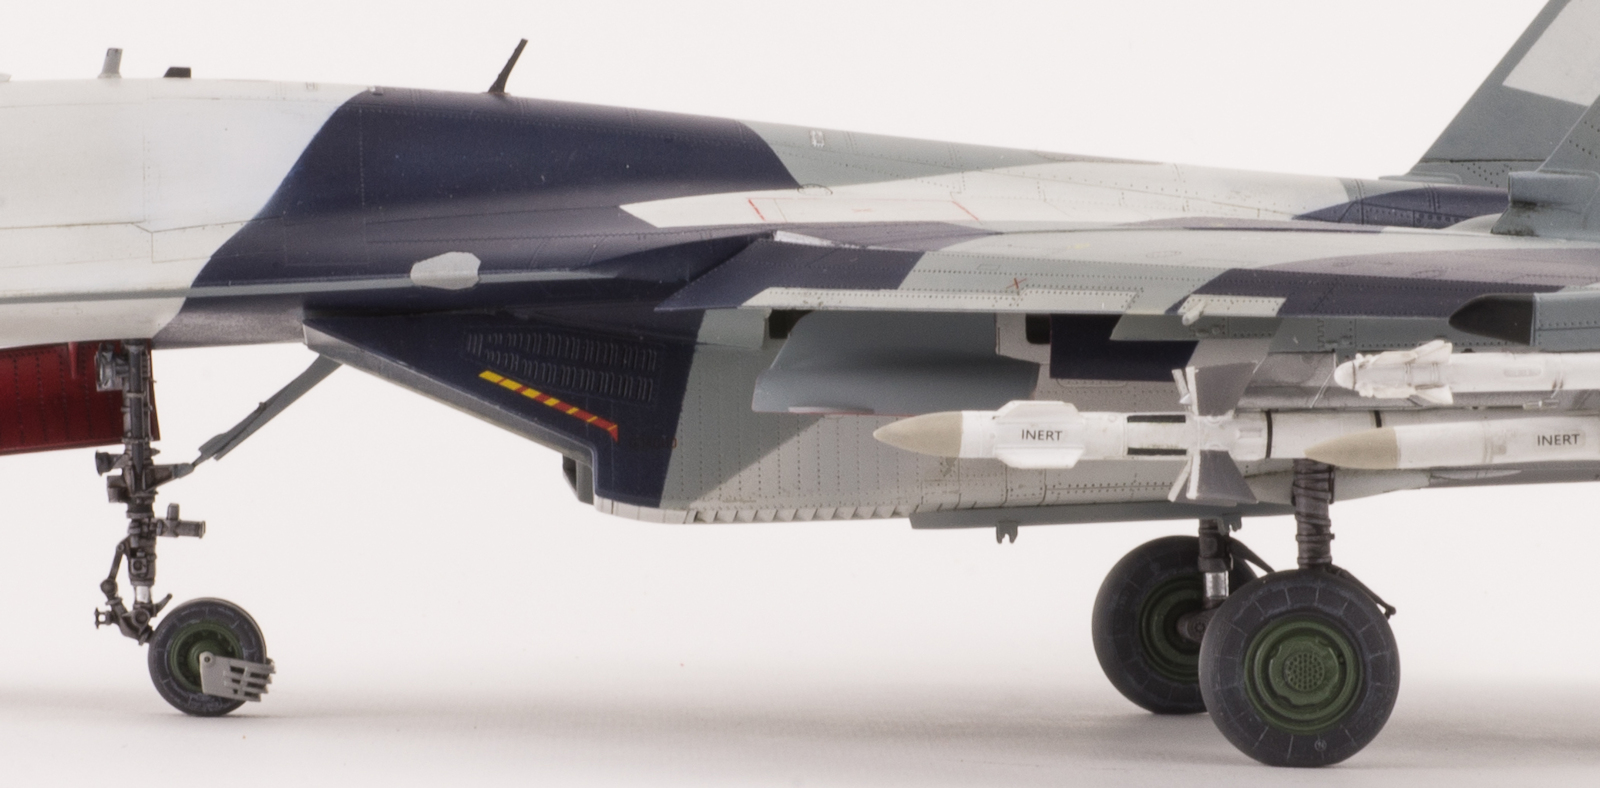
Next up, I decided to tackle the undercarriage and wheels. The wheels themselves are moulded with a fair bit of detail, such as makers marks and reinforcing ribs on the sidewalls. PE hubs add to the fidelity of detail.
I made a small axle out of plastic rod so that I could sand flat spots evenly on both tyres. Ensure you have the wheels correctly orientated if you do this as the locating holes are D shaped, so it’s not a simple matter of just rotating your flats spots to be on the bottom when later fitting them to the kit axles.

Once I had cleaned up the seams, the tyres were painted with Vallejo dark rubber whilst the tread area was done in Vallejo Light Rubber. Flory Light Grey wash was then added to the sidewalls to bring out the detail before the hubs were painted in Xtracolour RLM Green 83

I thought about adding brake lines but chose not to, due to wanting to get the article out as soon as possible, however, I think they would look fantastic with added lines of fine wire.
I finished off the undercarriage using a wash mixed from Tamiya brown and a 50:50 mix of water and future. This is a really quick way to add a wash. Spencer Pollard shows the technique here.
At this point, I struck a problem trying to add the main gear to the model. Adding the lower braces parts C40 &C41 to the legs when called out in the instructions meant I could not get the main legs into position. I would recommend gluing these parts into place in the bays first, THEN adding the main legs. This should see you being able to fit the gear with no problem.

The nose gear slots into place nicely with no problems encountered
Comparing the attitude of the sitting model to the real jet, it perhaps is a little too nose down - maybe I am looking at it too long?


It was whilst studying photos of the jet I realised KH had missed the inclusion of a scoop on the underside of the jet (here on the left-hand side on the picture below) KH has provided it as part E58 but have not shown its placement in the instructions.

Speaking of instructions, KH illustrates the canopy heater tubes parts E89 &E90 that look a little more detailed than what’s provided in the kit.
The choice you get in weapons is mind boggling with every type of modern Russian weapon and its associated pylon seeming to be supplied. I went with a load of air to air missiles shown being carried by the subject jet in a few photos. It’s worth, mentioning KH have moulded different spaced locating pins on each wing pylon so you cannot possibly mix them up

One of my New Year Modelling Resolutions, (yes, I’ve made some already) is to spend more time on kit ordnance. I’m afraid I did my usual job here of treating them like afterthoughts and not spending the time on them they deserved.

It just remained to affix the various antenna, and That, they say, is That!


So, what did I think about the kit?
What I didn't like
* Cannot make an “In service” Flanker S from the box.
* I really wish they would source a different type of styrene.
* No drooped jet nozzles supplied, although KH has remedied this by releasing another boxing with the required parts included, I would hope they also provide the parts to those people that have bought the earlier boxing.
* Still faults in the instruction booklet with parts either not shown, or incorrectly numbered, some part locations are still illustrated vaguely.
* Small parts still have flash and ejector pins evident.
What I did like
* It’s a kit of a modern jet that’s not an F-16!!
* The weapons provided, and the addition of the accompanying decal sheet
* Kittyhawk has moulded a lot of detail into the parts, just check out those tires and hubs
* Fit is good with intelligent engineering,
* Separate control surfaces
* Smart use of photo-etched parts for belts, hubs, intake mesh and sway braces on pylons
* The decal sheet for the jet is quite comprehensive with all stencilling, and even the di-electric panels being provided.
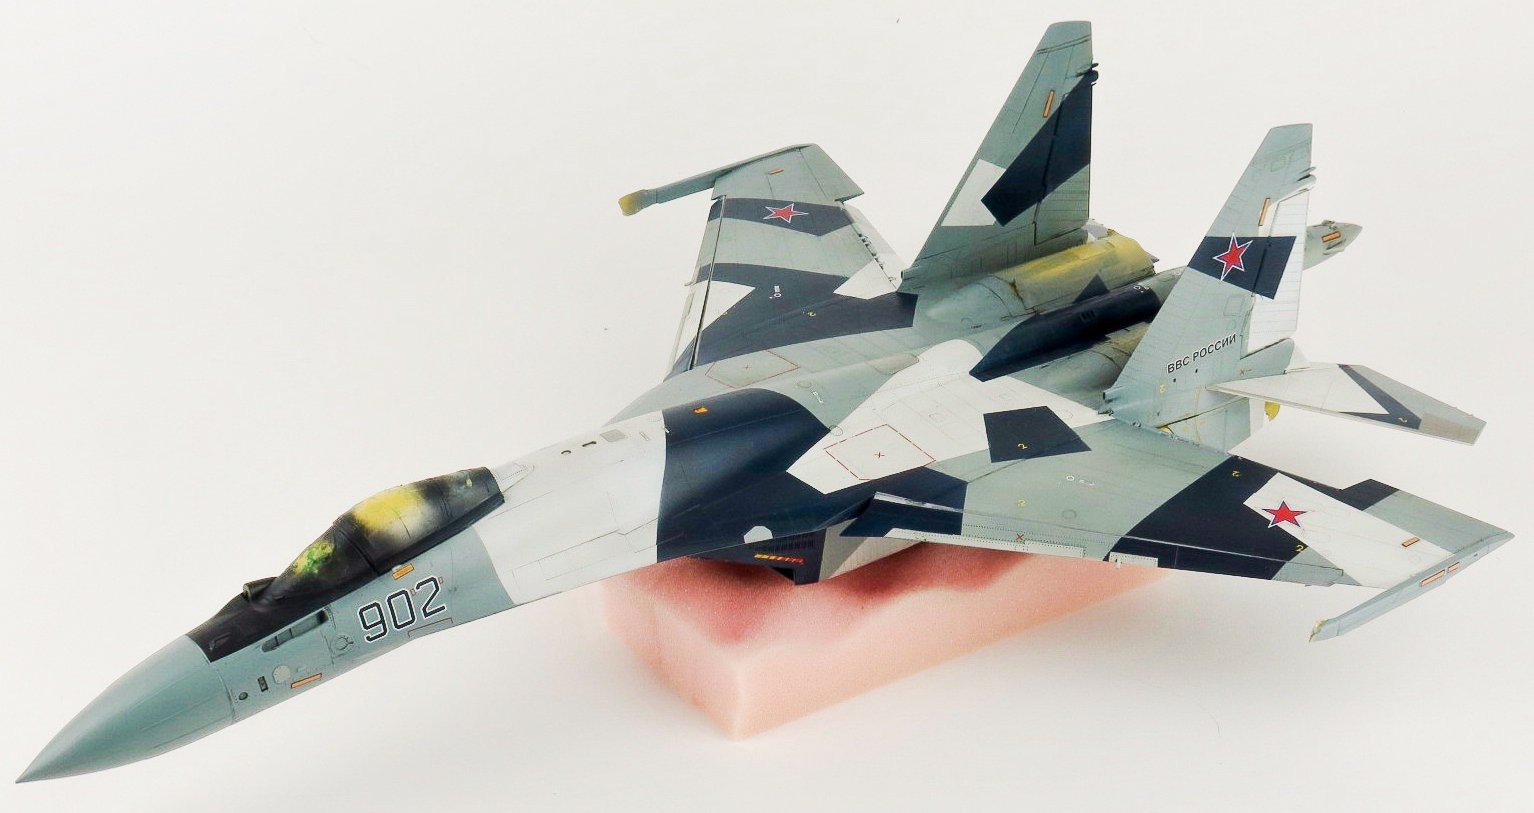
A walkaround of the finished Flanker in "wideshot"


Overall, I enjoyed building the model. The fit is pretty good throughout with no major problems encountered. The small amount of filler I used was probably down to me not ensuring the wing roots were step free. I believe this model shows Kittyhawk is slowly improving with each new release.
The jet in closer detail...


Bruce Anders
Thank you to Kittyhawk Models for sending Bruce the kit to review and build. This kit, and it's brother the Chinese variant of the Flanker E is now available from Kittyhawk's Distributors Worldwide
