WHAT? You're showing the build review of a TRACTOR? WHAT? Ohh yes we did! (since when have we done anything by the book?) Andy Moore has completed the kit of Hasegawa's 1/35th scale Yanmar YT5113A Tractor - he promises that this will pique your interest - and we agree after seeing his build. See how he made this so well in his step-by-step build review...
Build Review: Yanmar YT5113A Tractor
From: Hasegawa
Kit Number: WM05 (66005)
1/35th scale
Kit Includes: Clear parts, chrome-plated parts, parts for one figure
Price - ¥2560 • US $24.50 • £18.50 • €21.50 from Hobbylink Japan
For those of you that have been following this story Andy has already given us his excellent in-boxed review of this kit late last year...
In-Boxed: 1/35th scale Yanmar YT5113A Tractor from Hasegawa
Wellies pulled on tight, straw stalk set at a jaunty angle in the mouth, Wurzels on the stereo; let the farming commence!
The constructions gets underway with the transmission and gearbox. The detail here is lovely and the parts clip together perfectly. While this isn't strictly a snap-fit kit, and is designed to be glued, many of the assemblies are reminiscent of Bandai's snap-together Star Wars kits, and the kit's engineering is on a similar level to what Bandai produce. Must be a Japanese thing, and it's a trait that makes this kit a breeze to put together, despite some quite complex assembly steps along the way.
For the most part, I built the kit straight from the box, but here and there I added a little extra detail. One of those areas was the attachment point for the three-part linkage on the back of the gearbox. I drilled out the holes for the linkage arms which is a simple mod but adds some nice refinement to the rear of the tractor.
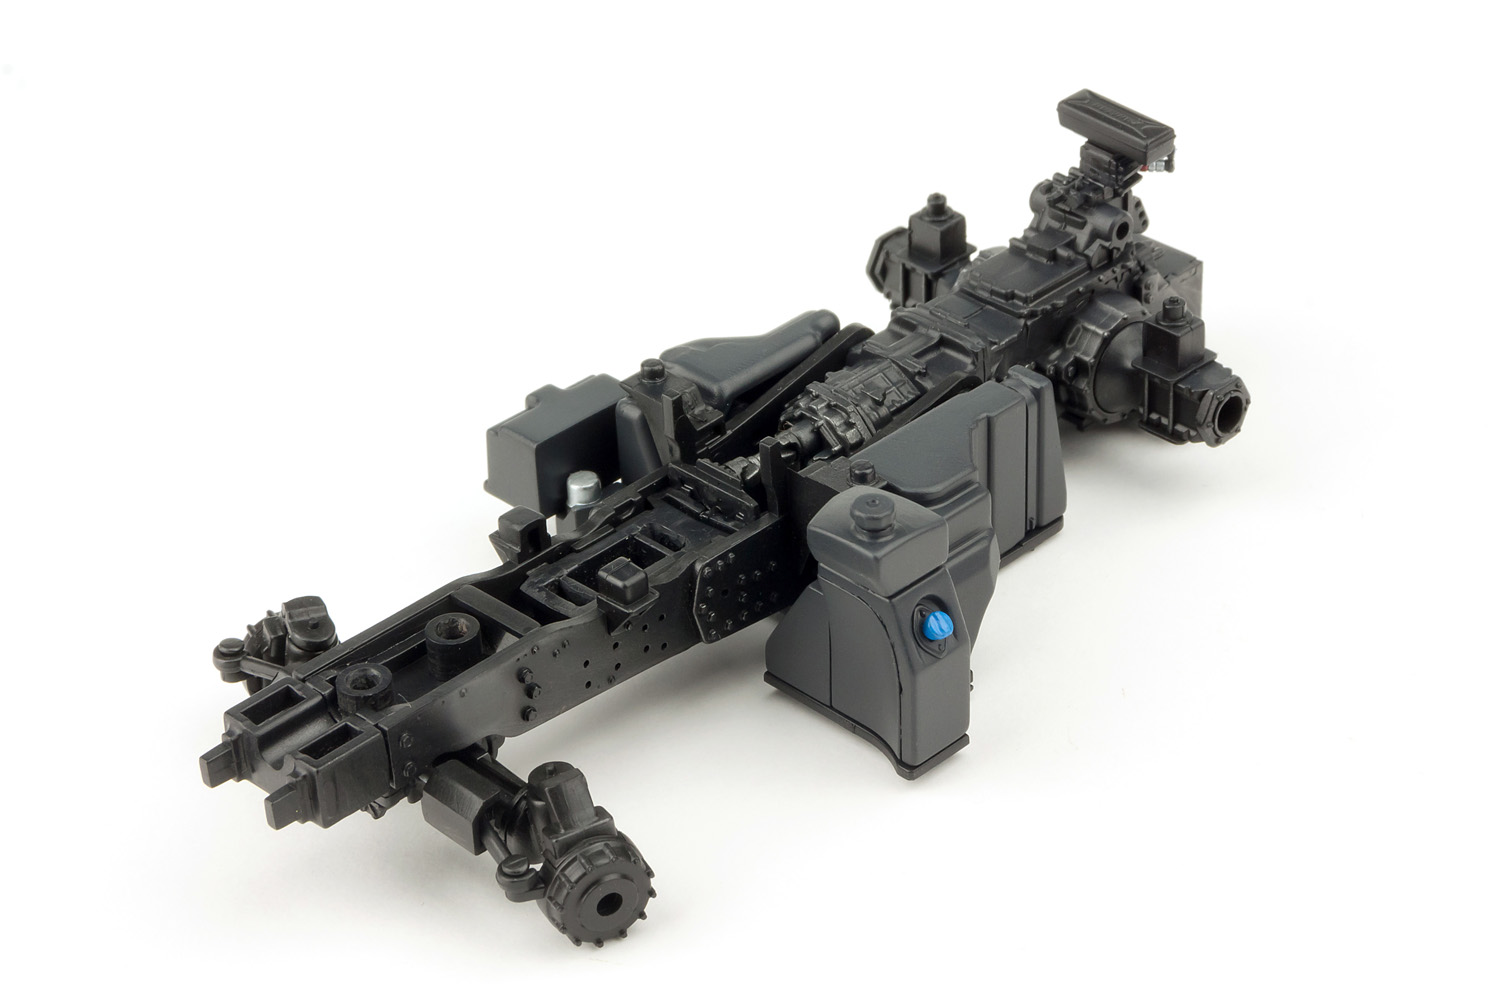
The main chassis is the next assembly to go together and, again, this has very positive connection points, resulting in a strong and sturdy construction. Another area in which this kit is similar to Bandai's Star Wars models is the fact that the parts are moulded in appropriate colours for each section of the vehicle such as the black used here for the chassis and gearbox. While the kit is designed to be painted, it would be entirely possible for younger modellers to build this without paint and end up with a very respectable model.
The chunky front axle has working steering as long as you're careful with the application of glue. The wheels hubs (front and rear) contain poly-caps, which makes fitting the wheels at the end very easy.
The chassis is finished off with the fuel tanks that clip into place via a floor plate that sits below the main chassis rails. Although the colours of all these parts are simply listed as black (albeit in various combinations of matt, satin and gloss), I wanted to add a little variation to the finished unit. The chassis parts were painted in a satin black, lightened very slightly with a drop of grey. To contrast, the tanks were finished in a dark grey. While it's still a pretty drab and monotone finish, the varying tones liven it up a little, and the blue cap on the AdBlue tank adds a splash of colour.

As well as the working steering, the front axle can pivot, again as long as you're careful when cementing the parts. As well as making it possible to pose the model on uneven ground on a diorama, it also guarantees that all four wheels will sit squarely on the ground if the model is left free-standing. While the range of movement isn't vast, it's probably fairly accurate to the real thing.
The components of the three-point linkage are probably the most fiddly aspect of the build. While the parts fit well, getting all the arms and struts lined up requires a bit of patience. While the linkage isn't workable, you do have some options as to how it's positioned by clipping the vertical struts into the different mounting holes on the arms. The linkage was painted up in the same lightened black tone as the chassis, then the various silver elements picked out, and a little wear and tear added with a graphite pencil.

Next, we move up to the nose of the tractor and, while there isn't an actual engine as such, the real thing being entirely covered by panels and grills, you do get a basic block to which the front grill and headlights attach. The grill parts on the front and sides of the block are very nicely reproduced, and benefit from a light dry-brush after painting to bring out the fine detail better. The lights are formed from chromed parts to which clear lenses are added, and the results look very realistic. The three-pointed Yanmar emblem also comes as a chrome element and, although I'm not usually that keen on chromed parts in kits, Hasegawa has done these well and, crucially, have placed the sprue gates in such a way as to not leave visible scars when removed.

The cover panels are the next part to add to the nose, and these required painting first. Since I needed to mix up the colour for the nose panels, I decided to prepare and paint all the other body panels at the same time, to avoid the need to re-mix the paint colour later on. That only consisted of the roof and rear mudguards anyway, so it didn't take long to get everything ready. The colour Yanmar use for this tractor is a rich candy red metallic, and Hasegawa recommends a mix of Gunze Aqueous H3 Red and H9 Gold for this. I didn't have either of these paints, so used my own mix consisting of Mr Colour 07 Red with a little Alclad Pale Gold added to get the metallic effect. Since these lacquer paints will adhere very well to plastic, I sprayed them directly on to the red styrene without bothering with a primer or undercoat, having first masked off any areas where additional parts are added later.

With the red panels in place on the nose and the decals added, the build was really starting to take shape, albeit looking way too clean for any self-respecting tractor, something that I'll be rectifying soon. The mesh grill on the top bonnet panel was enhanced with a dark red/brown wash mixed from thinned acrylic paint.

As I said above, nice as the build was looking at this stage, it clearly wasn't dirty enough (at least for me). With the engine removed (it was only loosely clipped into place at this point), I set to work muddying up the chassis. I used a couple of AMMO Mud and Splash washes for this, namely Dry Steppe (A.MIG-1751) and Loose Ground (A.MIG-1752), and these were mixed together to get a light mud shade that would contrast well with the black chassis. To start the weathering process, I thinned the mud wash and applied it in loose vertical streaks along the chassis sides as well as blending it over the horizontal areas like the tops of the fuel tanks. Once that was dry, I used a thicker, undiluted mud mix and flicked this using a stiff brush over the lower areas of the chassis. When all the washes were dry, I blended the effects together with a misting of Tamiya Flat Earth.

The bottom of the chassis got the same treatment, but with a much heavier application of the thicker mud mix. Different mix ratios of the two mud washes were used to create some tonal variety across the chassis.
The engine didn't escape the weathering treatment either. The sides of the nose were also given a misting with the Dark Earth acrylic used on the chassis. It seems a shame to mar that beautiful candy red, but it has to be done; tractors should be muddy.
I could now properly attach the nose to the chassis and add the exhaust pipe, which had been painted separately. With all this in place, the final weathering was a process of blending the different sections together using the same washes as before, stippled and flicked on, until the whole effect looked harmonious.
I turned my attention to the wheels now, and these need to be finished in a metallic gold, which I personally think is a little flamboyant for a tractor. Luckily they're going to get somewhat dirtier by the end. I used Alclad Pale Gold again for the main wheels, while the hubs were painted in satin black. The separate hubs are a neat idea, as they can be painted black, and the bolt heads picked out in silver, then glued into place from the back of the wheel to leave a perfect finish with minimum effort.

The chunky tyres where pushed onto the wheels, then weathered using a combination of the AMMO washes and various earth-toned pigments. Another over-spray of Tamiya Flat Earth helped blend everything together. When adding the wheels to the tyres, push the wheels into place form the back of the tyres, not the front, as the ribs that run around the outer edge of the wheels can scuff and mark the hard rubber tyres. I cut down the ribs on my wheels but they still left some noticeable marks on the back of the tyres. Better there than on the front though, where they would be far more visible.

All that remained now was the cab, although this is actually the most detailed part of the build. The main cab interior is essentially a single-part moulding to which the seat and various controls are added. The orange, blue and white levers you see on the side consoles are only represented as small stalks in the kit (about the only noticeable simplification I've found), so these were extended slightly using short lengths of styrene rod. The instrument panel and steering wheel are very well detailed and are best painted as separate parts to avoid a lot of fiddly masking. The decals for the various screens, controls and labels finish the cab off perfectly, and really add to the realism of the finished build.

Of course, the cab would look wrong if it was spotlessly clean when the outside of the tractor is filthy, so this too got some dusty weathering with pigments and enamel washes. The outer edges of the cab moulding form the rear wheel arches, so these areas were weathered in the same manner as the chassis. You may notice the shaft for the steering wheel has changed here. I managed to snap off the kit part, so had to replace it with a length of aluminium tube.

Modern tractors are designed with maximum visibility in mind, so most of the cab exterior is formed from glass panels. Luckily then, the clear parts in the kit are excellent. The black borders to the glazing are supplied in decal form but I decided the finish would be better if the borders were masked and sprayed. For the most part, this is just a case of following the moulded demarcation line around the edges of the panels, although for the complex shape around the centre of the windscreen I used the decal as a guide, tracing the shape onto masking tape.
Since the glazing would also need some weathering to blend in with the rest of the build, I decided to mask off the ark of the wipers before misting the front and rear screens with Flat Earth. I made the mistake of underestimating the sweep of the wipers and in reality, the ark of both the front and back wipers should extend further than they do here. Annoying, but not much I could do about it once the weathering was added.
With the glazing weathered up, the front and rear screens were attached to the cab along with the frames for the doors. The rear mudguards were also added at this stage, and these clip very neatly to the door frames and only require a tiny drop of cement to hold them in place.
The roof simply drops into place on the completed cab and is finished off with the cluster of spotlights. These are really nice details, with the moulded LED lights clearly visible behind the clear lenses.
The final parts to finish off the build are the two large glass doors. These feature an inner frame that I thought might be tricky to install. As it turned out this was a very simple step, with the ends of the frame being held in place by the hinges and handles on the outside of the door. As with the rest of the kit, the engineering here was exacting, with the parts lining up perfectly.
All that remained was to weather and install the doors, which simply clip to the side frames and remain fully poseable on the finished model. A very easy step to finish off what's been a really enjoyable build.
So, if you haven't already spotted it, I'm a huge fan of this release. The quality of the kit is up to the high standards you'd expect from Hasegawa, with a near perfect fit of parts and great levels of detail throughout the kit. I'm also glad they chose to produce the kit in 1/35 scale as I think that's the perfect size for a vehicle like this, and it'll fit in nicely with any collection of modern AFVs, despite not being a military vehicle itself.
A walk around of the completed kit
I'm hoping that Hasegawa will continue to expand their agricultural range, along with the associated construction machinery range, and maybe move away from purely Japanese subjects and give us some international brands; a 1/35 Massey Ferguson would be fantastic.
...and a little more in detail...
A scale model tractor may not be that high on the wish lists of many modellers, but give this one a go. I think you might be surprised how much you enjoy the build.
Highly recommended.
Andy Moore