Today we give you the second part of Gary Wickham's ICM's new 72nd scale MiG-25 MiG-25RBT Foxbat B build. And with this part he is fully concerned with the painting, weathering and displaying the base on a cool blurred "moving" background. See how he brings it to life in the second part of the build.
Construction Review Pt.I: Mikoyan MiG-25RBT Foxbat B
From ICM
Kit # 72172
Scale: 1:72nd
Started: Feb 2019
Finished: April 2019
The desired effect...now, how was it acheived?
A base coat of Tamiya X-18 Semi-Gloss Black is applied thinned with Tamiya's own Lacquer thinner. Once dry I set to work laying down the natural metal finish that is present on the rear fuselage due to proximity to the massive engines. A primary coat of Alclad Stainless Steel is followed by selective masking and application of Pale Burnt Metal and Exhaust Manifold colours.
There are plenty of reference photos of this area of the MiG-25 out there on the internet and I did my best to match the subtle colour changes on the NMF bought about by heat effect over a prolonged period.
In addition to the NMF, I also painted and masked off the multitude of dielectric panels over the tail and nose of the big MiG.
I used a couple of different colours for the dielectric panels as these seem to fade over time. This tends to be most noticeable on the port vertical tail panels.
With the second round of masking complete, the main colour is now applied. MR Paint produces a specific paint that is for the MiG-25/31, MRP-189 Traffic Grey. Light, random coats of the acrylic lacquer were mottled over the black primer and slowly built up to provide a complete, but not uniform cover. I then used a lighter grey (MRP-186 Light Grey) to provide some extra variation to the finish. The trick here is to not make it consistent. Don't stick to the panel lines or panel centres, instead mix it up. The last step in this phase was to use some XF-55 Deck Tan to pick out selected spots to give a base for some grime further down the track. It looks overdone here but once we blend it in and apply subsequent washes it will all but disappear.

The last area that needed masking is the anti-glare panel. Although probably not needed, I took my new Infini Model cutting mats out for a spin to help me with some of the curves to be masked. These are great tools as they have engraved channels on the mat that you use to guide your blade to cut the tape to shape. Simple but effective. Once masked I applied some hairspray to allow for some minimal chipping of the black.
I still felt that the surface of the model looked too uniform with little visual contrast. I wanted to break up that ocean of grey and decided to try out another new tool for the first time. I like the truly random effect that can be obtained from salt masking but do not like the mess involved, so when I came across the Artool FX Texture mask set I placed an order.
You basically hold the mask over the model surface and spray through it with alternate colours (in my case I used both darker and lighter greys). In places I was a bit heavy-handed and in other, I did not keep the mask moving enough but overall I like the effect.
To tone down the overdone areas I loaded the brush with the original Traffic Grey and over-sprayed the whole model to blend all the other parts back together (but not entirely).
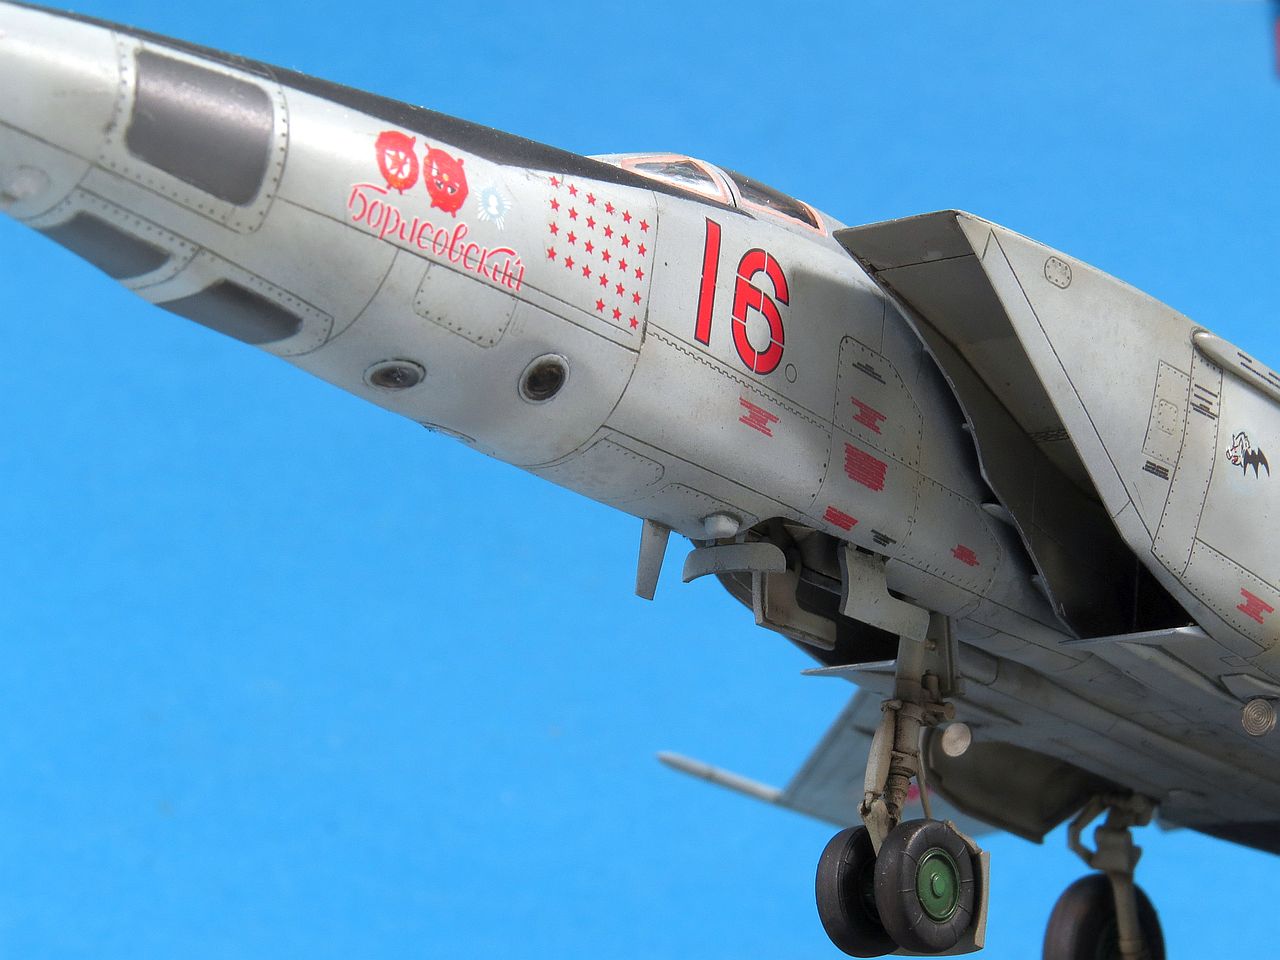
With the main painting complete an overall clear gloss coat of Tamiya X-22 thinned with Mr Color Levelling Thinners is applied. ICM provides a choice of four marking options and I had decided on Red 16 in Soviet service circa 2001.
I found the ICM decals to be thin but initially very uncooperative. They took a very long time to release from the backing paper and once you applied them to the model surface they would grip and refuse to move around into position. I was using Micro-sol Setting solution (as I always do) and even this did not coax them to behave. In frustration, I tried using more water which seemed to help a little and then I applied a couple of drops of mild washing detergent (Morning Fresh) to the water and onto the model surface and finally the decals seemed happier.
Luckily there were not that many main marking decals but I still had to face that dedicated stencil sheet!! By the time I got to the stencils I had refined my application process to use more detergent (to minimise surface tension) and kept the water warm. This seemed like the optimal formula for the ICM decals to come to heel.
I was able to apply enough stencils to be happy with (not all of them). The decals settled well enough into the recessed panel lines and rivets so I was happy. A final gloss coat and I was ready for weathering to commence.
The first step after decaling is the panel line wash. For this model I wanted a wash colour that was not too dark and that had a bit of blue in it to pick up the same colour in the primary paint. Mig PLW 1613 Blue Grey seemed like the perfect option. These pre-mixed enamel panel line washes are my favourite these days. They are just too convenient and provide plenty of colours so that you can always find the right one.
The wash takes about two hours to dry enough to allow you to remove it without thinners. I use a paper napkin (or tissue) for the main areas turning to cotton buds for those hard to get at areas. Wipe the excess off the surface slowly and try and go across the direction of the panel line.
I needed to reapply a couple of times in some areas where the panel lines were not deep enough to hold the first pass.
For the NMF areas I chose a darker wash (MiG-1617 Blue Black) as I believe the metal panels benefit from the higher contrast the darker wash provides.
It’s not really until this step that you know for sure how your decals performed (did they settle down properly) and just how well you have prepared your panel lines and rivets. A well done panel wash really makes the model come to life in my opinion.
A coat of flat clear was now applied and then the detail parts like antennae and undercarriage fitted. One last thing I needed to deal with for the MiG-25 was the very distinctive pink 'canopy sealant' putty. Luckily on the real aircraft, this is very roughly applied and so it would match my limited hand painting skills in 1:72 :) MR Paint came to rescue once again with their new acrylic range designed for hand painting. Two coats of MRP-A024 RUSSIAN COCKPIT SEALANT was applied by brush around the canopy and windshield framing.
To add one last dimension to the surface weathering I applied a very restrained spot application of Oil washes. For this, I once again selected the Mig Oilbrusher Starship Filth and heavily thinned it to make a glaze which was applied to areas where grime may accumulate. The interior of the exhaust got a heavier application in keeping with the abuse these parts encounter.
Despite initially fighting the decals I think in the end I learned how to get the best out them. A couple of things worth mentioning is that I over-sprayed the stencils with some Traffic Grey (the primary colour) to tone them down as initially they were too prominent. Also, note in this photo the extended landing lights on the lower fuselage just behind the nose wheel. These are scratch-built as ICM only gives your clear parts to display them closed (i.e. retracted).
I was generally happy with the result obtained on the NMF areas at the rear of the model. A combination of paint shades, panel line and finally oil washes give a convincing representation of this part of the real MiG.
To close out the build here are a selection of photos of the finished model mounted on its display base. The base is pre-printed by Coastal Kits and is one of their 'motion blur' range which I really like.
FINAL THOUGHTS - ICM's 1:72 MiG-25RBT Foxbat B (72172)
For some time I had been vaguely aware that ICM were producing new aircraft kits, but nothing they had produced seemed to make it onto my build list. That changed when I got hold of this lovely little MiG as I felt 1:72 was the perfect scale for the Foxbat. To be honest, I was half expecting a dimensionally accurate limited run kit which was challenging to build. To my pleasant surprise, nothing could be further from the truth.
ICM has come of age, having employed just about every modern technique available to injection moulded plastic manufacturers to make a kit that is not only accurate but is cleverly engineered to be a pleasure to build. In truth, the only phase of the build I stumbled on was the decaling. The kit decals just did not behave the same way I was used to and once I adapted my approach things went smoothly.
I have no hesitation at all in recommending this kit and am now looking far more closely at the upcoming aircraft release schedule from ICM.
Gary Wickham
Thanks Also to Mr Paint for their excellent range used on this kit.