


From Eduard Model Accessories
1/48th scale
Kit No #82122
Plastic Injection moulded kit
Six decal options from Cartograf
Photo-Etched parts
Painting mask included
Product Link on the Eduard Website

Previously in this series:
-Build Guide Pt III - Painting and making the markings of the kit.


You can order this kit from the Eduard Store Directly - Thanks to Eduard for sending these to Calum to build.


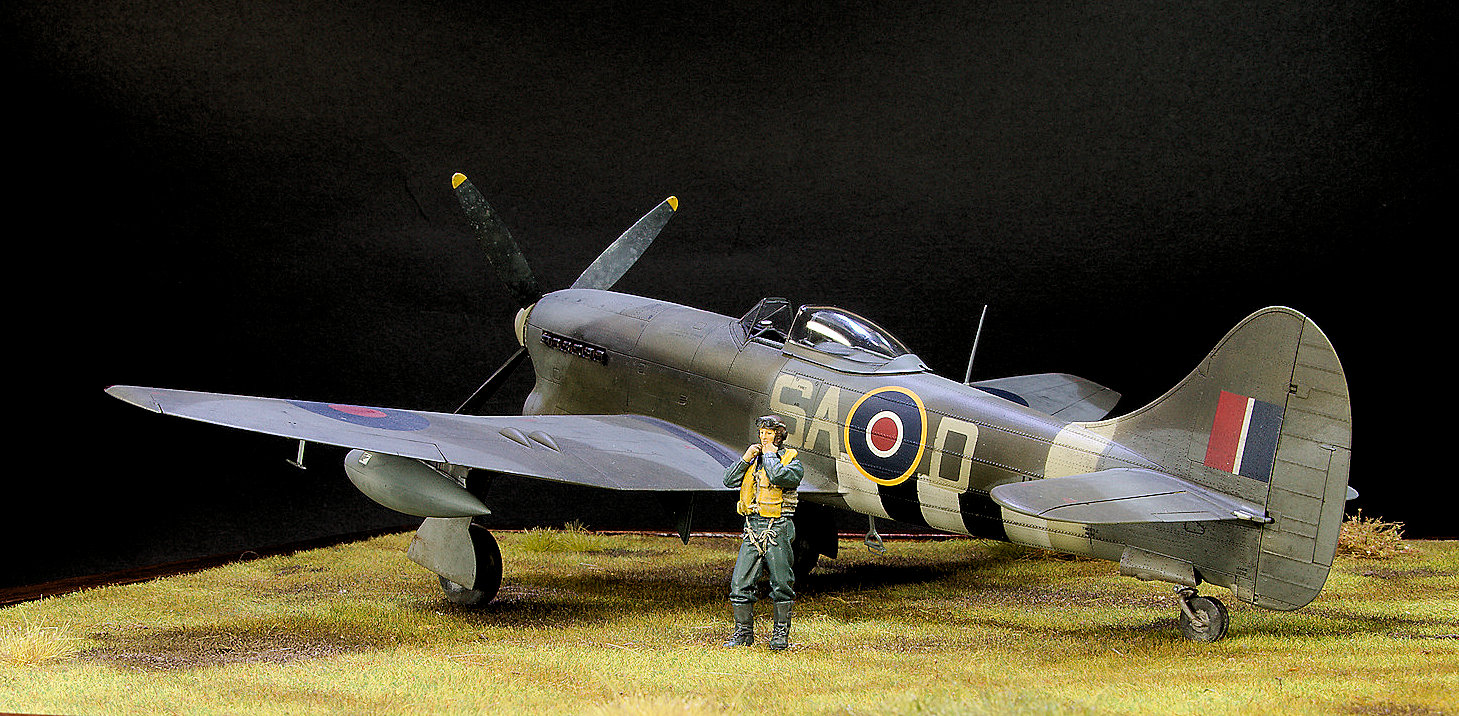
The aircraft I am depicting was one of the early ones which has the larger five spoke Typhoon wheels as opposed to the later, smaller four spoke Tempest Wheels. Eduard supply wheel sizes in the kit but a quick look through my aftermarket box reveals a set of Barracuda Typhoon wheels.
Comparison of these against the large Eduard kit wheels revels a slight (1mm) difference in diameter so now I want to know whose right. Google tells me the Typhoon wheels are 34 by 11 inch (834 by 280 mm) which is about 17.4 mm in diameter. The Eduard wheels are around 18.1mm whereas barracudas are pretty much spot on 17.4mm so I guess I’ll use those.

Whilst in the aftermarket box I also found this guy. His the "RAF WWI Mid/Late War Fighter Pilot" No #BR48270 in 1/48th Scale. I figure he will be perfect to go with this build.

A quick coat of Mr Colour super gloss, decanted and sprayed through my airbrush gives a good gloss coat prior to decaling.

The decals went down well using Micro sol and Micro set. I use a cheap wax pot to keep the water hot / warm when decaling. I have fitted a switch to turn the pot off when it gets too hot as it doesn’t have a thermostat.


After another sealing coat I then applied flat coat of Gaianotes Flat prior to some more weathering. I used coloured pencils, some pigments and the Tamiya Weathering sets to add some tonal variation.

All that was required was to add the final small parts. Extreme care needs to be taken cleaning up the clear pylons as they are quite easy to break (I broke mine) . Furthermore, when unmasking the canopy I noticed I’d somehow managed to crack the canopy. Thanks to Eduard for sending replacements.

Taking more care this time I painted the canopy and applied the final parts.
I also replaced the kit spinner with a Barracuda resin part. Care has to be taken to clean up the back of the spinner back plate to get it to fit nicely to the aircraft. Barracuda Exhausts also replaced the kit parts.
In conclusion it is a very well detailed kit that builds well. At first I wasn’t convinced much of the detail would remain after painting, but I’m happy to report I was wrong. The detail is still there, even on parts of my build where I probably over did the finishing.
As a result of the detail Eduard have achieved some parts are quite delicate and care needs to be taken when removing them from the sprue and or cleaning them up.
Additionally the decision they made to get the sharp trailing edges of the wing results in there being a bit of work on the underside cleaning up join lines and restoring a bit detail. None of this is particularly difficult however.


Calum Gibson
You can order this kit from the Eduard Store Directly - Thanks to Eduard for sending these to Calum to build.

Thanks also to Barracuda Studios for sending all of their products to be used on this kit
