Sunday, July 7

Construction review: 1/35th scale Russian Lanchester Armoured Car 'Russian Service' from Copper State Models

Copper State Models is making another version of their Lanchester kit in 35th sale - this varaint is the "Russian Service" version with the 37mm Hotchkiss gun. Andy has already built the British WWI version, but now, see how this Russian Service kit builds up and what has changed in his construction review...


Construction review: Lanchester Armoured Car 'Russian Service'
Manufacturer – Copper State Models
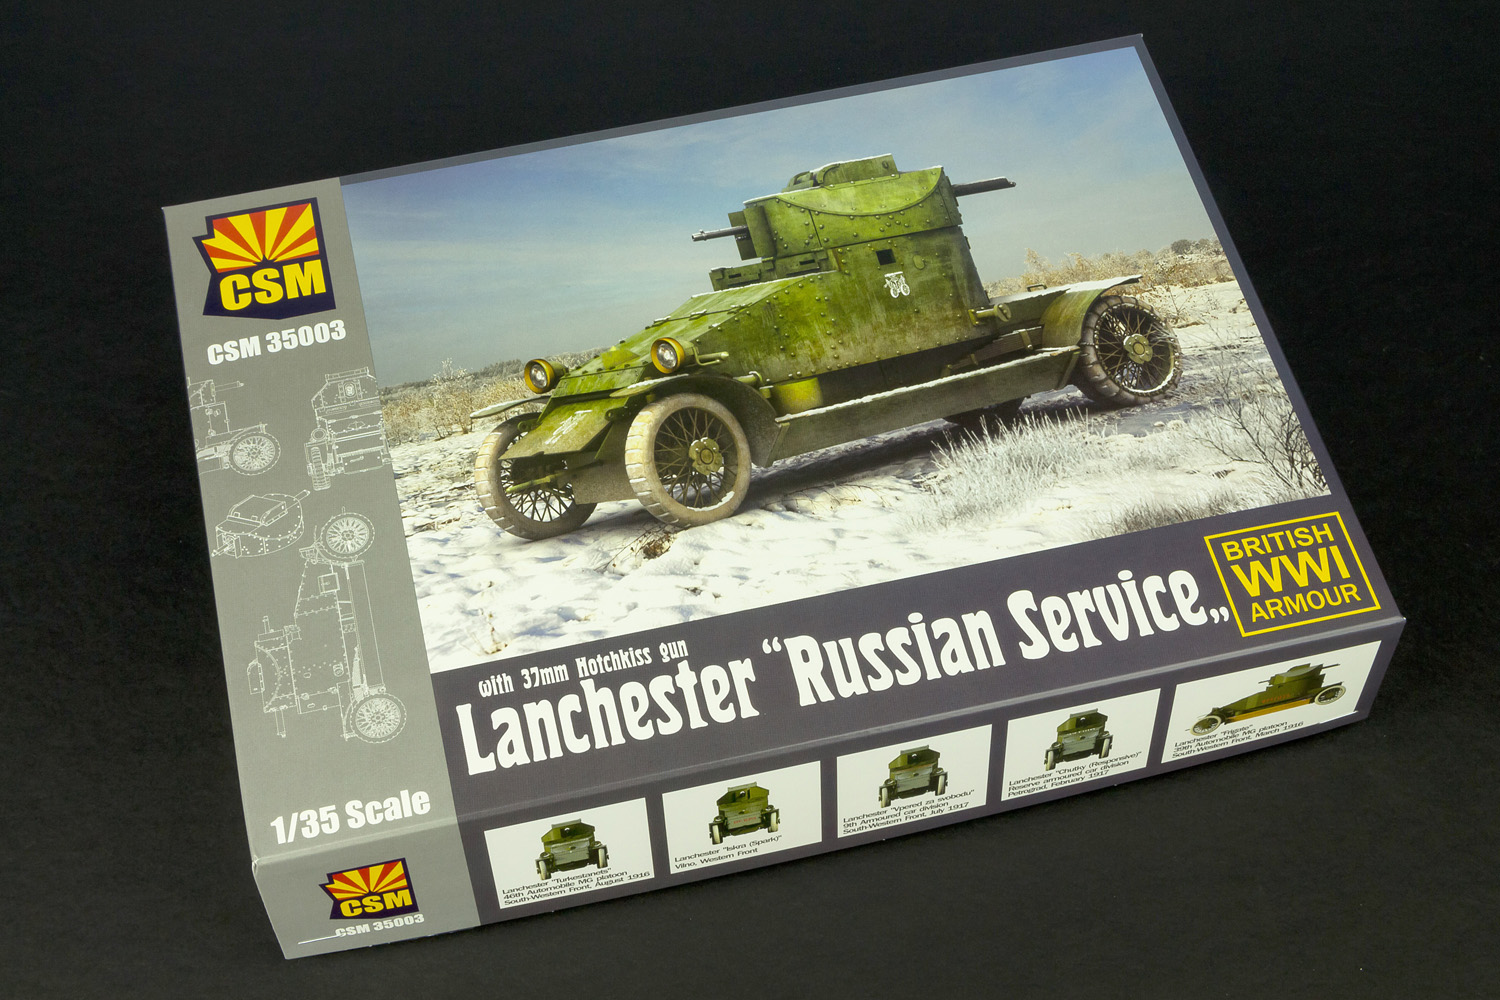
Kit Number – CSM 35003
Scale - 1/35th scale
Available on pre-order from the Copper State Models Website Link
Around a year ago, we built the Lanchester Armoured Car from Copper State Models here on TMN which, at the time, was the company's first foray into armour modelling, being better known as a producer of WWI aircraft kits.

The kit turned out pretty nice!
After that initial release, CSM promised there would be more to come, and now the next model in their armour range is due to hit hobby store shelves very soon, in the form of the Russian service version of the Lanchester. The original release was one of my top kits from last year, so let's see just what's changed in the new version.
This newly updated release of the Lanchester represents the modified versions of the armoured car that were used in Russia during the Civil War. These vehicles were adapted locally to improve their effectiveness by fitting a 37mm Hotchkiss gun to the turret, with the original Vickers machine gun moved to the turret's rear hatch.
In service with the Imperial Russian Army, the Lanchesters were assigned a wide range of duties, including direct infantry support, engaging field fortifications, and acting as fixed gun emplacements. In addition to the changes to the armament, the Russian Lanchesters also had the rear stowage boxes removed and new fenders added, giving the rear of the vehicle a very different look to the original.

The Kit
The kit comes packaged, like the original release, in one of CSM's sturdy corrugated boxes, covered by a conventional lid featuring lovely artwork of a snow-covered Lanchester in the Russian winter. Inside you'll find 10 sprues in a mid-grey styrene, along with the instruction manual and a small decal sheet. No photo etch is included with the kit, although CSM does sell a separate PE detail set for those who wish to use it.
Most of the parts here are the same as the previous release, but I'll quickly run through the sprues all the same, before getting onto the build.

Sprue A
The first sprue holds the main parts for the chassis, bodywork, and turret. For this version, some of these parts won't be required. The first release of the Lanchester had very clean and crisp mouldings, and nothing has changed here. The detailing is excellent, and very little clean-up is required on the parts.

Sprue B
Here we've got the main chassis rails, and parts for the axles and suspension.. Again, this sprue is the same as the original release, and similarly, some of the parts won't be needed for this build.

Sprue C (x2)
All three of these sprues are labelled as 'C', which can be a little confusing, but it's easy to tell which parts are which, so shouldn't lead to any problems. I was very impressed with the finesse with which CSM had moulded the delicate spokes of the wheels when I built the previous Lanchester, and I'm still as impressed now.

Sprue E
Now we come on to the new stuff for this release – the Russian specific parts. What you see here is a test sprue and, as such, isn't in the same styrene as the other sprues. The final release will feature the same plastic across all the parts. Here we've got parts for the revised rear end of the vehicle, the new turret roof and accompanying parts for the cupola, and the 37mm Hotchkiss gun. The moulding here is just as good as the original parts.

Sprue 10
The final sprue is another new one, and came as a bit of a surprise. The original version of the Lanchester had one shortcoming in that it didn't include any clear parts for the headlights. That's now been changed with this release by the inclusion of this small sprue holding the light lenses. It's a very welcome addition and, hopefully, the earlier kit will be updated to include these parts too.

Instructions and Decals
CSM instruction manuals are always very well presented, printed on thick card stock with partial colour build-steps and full-colour paint guide on the inside rear pages. The text inside is in both Russian and English. I'm not sure if the Russian text on the cover is a stylistic choice, or if there'll be an English version too. Like the new sprue E, the manual is a pre-release version, so some aspects of it may change before the kit is released.
For the most part, the assembly sequence is the same as the previous Lanchester, with the exception of the new sections for the Russian version. In a few cases though, the main assembly steps have been revised to make the build a little more straight forward, and in some areas, zoomed-in views have been added to make parts positioning more clear. It's very nice to see a manufacturer continually improving the user experience in this way. 37 steps cover the build, using very clear 3D illustrations.
The decal sheet is small but very well printed. Not surprising given that it's produced by Cartograf. I'm not expecting any issues when it comes to applying these.

Marking Options
You get a total of six markings with the kit, although they differ only in the placement of decals for unit insignia and vehicle names. The colour of all six vehicles is shown as green, with a footnote explaining that information on the exact shade is limited, and listing British Khaki or Moss Green as likely finishes.

The Build
Okay, let's get straight into the build, which kicks off with the front suspension. Here, there's been a small change to the assembly sequence compared to the previous release. When I built that first Lanchester, the instructions had you fit the front springs, together with the axle mounts to each chassis rail. At the time I mentioned that adding the mounts was quite tricky without having the axle in place first, and I left those parts off until the front axle was fitted. CSM has now altered the build order to reflect that issue, and only show the springs being fitted in step 1. The mounts are then fitted later on, once the axle is in place.
The floor plate is covered in the next step. This requires three ribs adding on the upper side, after which the floor is turned over and the transmission and exhaust can be attached. Like my previous build, I replaced the tip of the exhaust with a short length of brass tube. In truth, this is probably pointless as the end of the pipe is almost invisible on the finished build.
The side rails can now be attached to the floor plate to finish the main chassis assembly. Switching back to the front end, the axle can now be built up and installed on the ends of the springs. Now those mounts that I mentioned above can be added, which is a much simpler process with the axle in place.
The front axle is then finished off with the steering linkage. These parts are quite delicate, so a steady hand is required, but is otherwise fairly straightforward. Using fast drying cement like Tamiya Extra Thin Quick Setting will also be helpful.
We now move on to the main bodywork and, since each side comes as a complete section, it's a very fast step. There's a bar for the headlights which passes through the front of each body panel, and this needs to be added after the first side panel is in place. You won't be able to install it after both sides are fitted, so don't forget to add it.
The rear of the Lanchester features a wooden deck section, and for this version, the part needs to be shortened. The section that requires trimming is shown in the instructions, and it's simply a matter of cutting the surplus section off with either a razor saw (for preference) or a hobby knife (with care).
With the cut-down deck added, the build starts to come together very quickly. The single-piece side panels on the main body really speed up construction, without compromising the detail level. It also means you don't have to worry about getting parts aligned correctly.
The bonnet and roof plates complete the main body assembly, and these both drop into place very neatly on the side panels. Even loosely fitted, as here, the panels are virtually gap-free. Once a little cement is applied, they close up perfectly and don't require any filler.
The driver's visor is one of the new components in this kit, featuring some additional detailing compared to the previous version. It's also slightly thinner, and looks perfectly in-scale for armour plate. You can pose the visor open if you wish, although there's no interior to see. I believe CSM are intending to release a resin interior set in the future.
The rear suspension arrangement looks quite complex, but actually goes together very easily. You can see here how buried away the exhaust pipe is, making the copper tube replacement rather redundant. It's even harder to see once the rear panel is on, which closes off the view from the back.
This version of the Lanchester features a boxed-over rear deck, and the parts for this come on the new sprue. The points where the sides of the box section join to the chassis required a little filler and some careful sanding but, otherwise, the fit was excellent.
The rear deck is finished off with the new fenders. These can be a little fiddly to attach, due to the need to hook the mounting brackets under the lower edge of the chassis rails, whilst hooking the top of the fenders over the brackets on the rear panel. Take your time and it's simple enough though.
The front fenders are the same as the first release and, as with that build, I'm going to leave them off for the initial painting stages so I can access the areas behind them more easily. These can be replaced with brass options from the separately available photo-etch set, but personally, I think the styrene parts are more than adequate as they are.
The headlights were the last parts to add to the main body. I drilled a hole in the back of the light casings to take a short length of copper wire, the opposite end of the wire going into a corresponding hole in the side of the body. The lights, of course, now come with the addition of clear lenses, but I won't add those until the painting is finished.
Moving to the turret now, and this uses the same construction method as the first release. The side panels feature extended 'fingers' that slide over lugs on the back of the front and rear panels. These can be slotted together over the turret base and secured with a drop of cement on the inside, leaving a flawless finish on the exterior of the turret.
The Russian Lanchester features a new turret roof, which incorporates a small cupola, made up from a top and two side panels. This was the only area of the kit that required any additional work, although it was very minor. The side panels each feature a slot into which the ends of the top plate are inserted, but the slots were a little too narrow for the top panel to fit.
It was a simple matter to resolve though, by lightly filing the ends of the top until they slid cleanly into the slots on the end panels.
The instructions tell you to add the Vickers and Hotchkiss guns while building up the turret. I preferred to leave mine separate for painting, as it's very easy to add them later through the open base of the turret ring.
Moving back to the body, and the unditching boards were given a woodgrain texture with a coarse sanding stick and a wire brush. These will be left off the model for painting, then slotted into place at the end.
The last things to do on the build are the wheels. These are very simple four-part assemblies, with the main wheel split into inner and outer halves, the outer one incorporating the tyre. The only other parts to add are the tiny air valve (the little dot next to the hub in the photo), and the wheel hub. The Russian version doesn't have the two spare wheels fitted, but they're included in the box, so you can choose to fit them if you wish.
...And that wraps up what's been a very quick build. In fact, the kit was put together in less than 48 hours. As well as being fast, it's also been a lot of fun to build, aided by the clever design that makes assembly very straight forward. While the model isn't dramatically different from the previous Lanchester release, the modifications for the Russian version do give it a unique look, and the two versions should look great displayed side-by-side. I'll be doing just than once the painting and weathering is finished.

The second part of this article here on TMN is at this link

In the meantime, I'll leave you with some shots of the built-up model.


Andy Moore
This new kit of the Lanchester is available directly from  Copper State Models as well as their distributors worldwide.Thanks to them for sending this kit to Andy to review & build.