

Build Review: Ju-88С-6b, WWII German Night Fighter
From ICM
1/48th scale
Kit No #48239
Injection moulded plastic kit
Two types of radar parts are included (FuG 212 / FuG 220)
4 types of decals included

This new kit from ICM is a re-tooling with additional parts to transform it into a night fighter of the Luftwaffe. The original kit some of you may be familiar with is from 2015 "vintage", with several of the Ju-88 family already kitted by ICM, this is one that many modellers will be anticipating. Alister has taken it on in his first build here on TMN...
A quick rundown of the Ju-88C family for those of you who need a catch-up...
The Ju 88C was originally intended as a fighter-bomber and heavy fighter by adding fixed, forward-firing guns to the nose while retaining some bomb carrying ability of the A-series bomber. The C-series had a solid metal nose, typically housing one 20 mm MG FF cannon and three 7.92 mm (.312 in) MG 17 machine guns. The aircraft retained the ventral Bola gondola under the crew compartment through individual units sometimes removed this to reduce weight and drag to enhance performance. The Ju-88C was later used as a night fighter, and this became its main role.
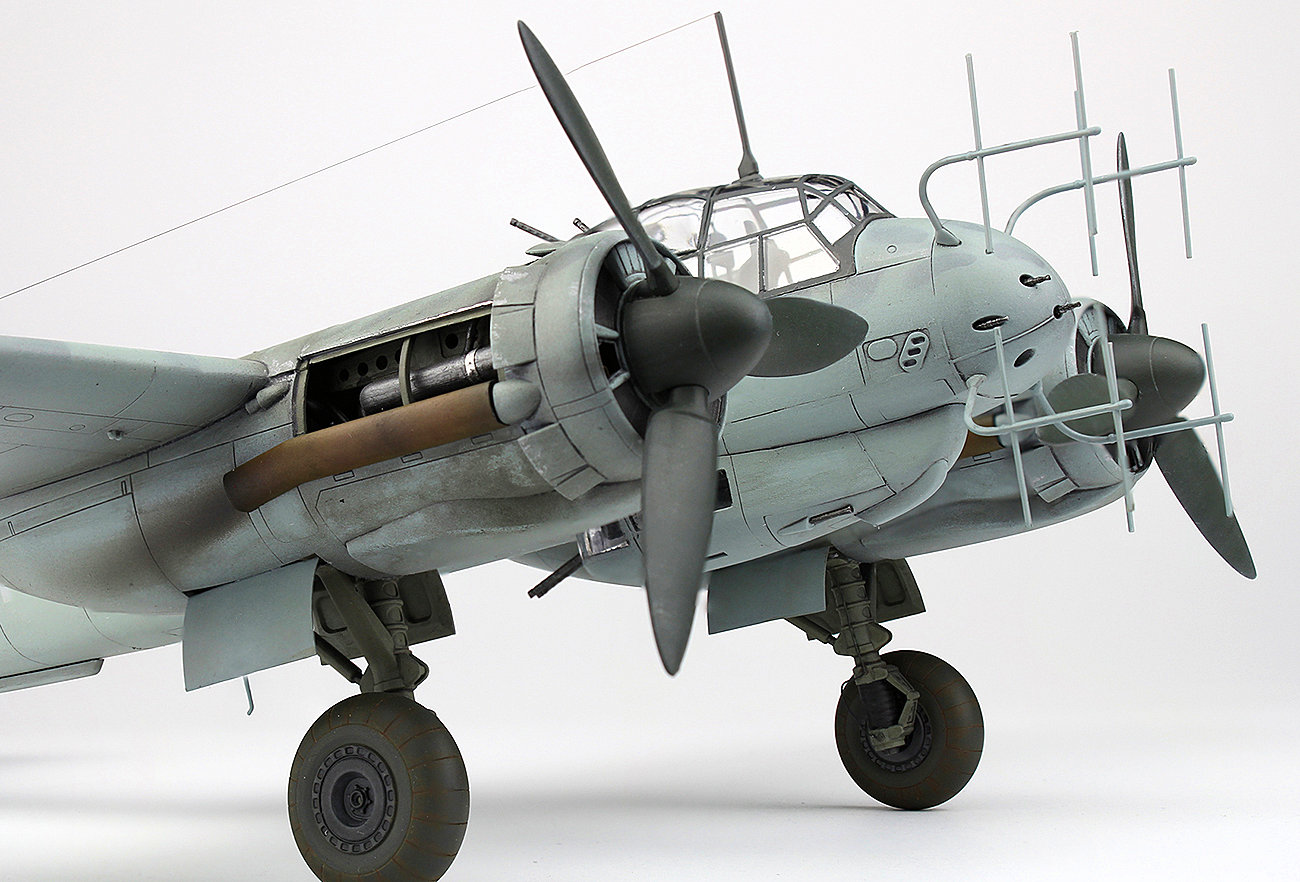
The Matratze 32-dipole antenna for the Lichtenstein UHF radar on a Ju-88C-6b

The first version of the Ju 88C was the C-1 with 20 aircraft converted from A-1 airframes. Some of them entered service in the Zerstörerstaffel of KG 30 which became part of II./NJG 1 in July 1940. The C-1 was followed by the C-2 of which 20 aircraft were converted from A-5 airframes with enlarged wingspan. The C-4 became the first production version with 60 produced and 60 converted from A-5 airframes.

The C-6 variant, of which 900 aircraft were produced, was based on the A-4 airframe with more powerful engines and stronger defensive armament (single- or dual-mount belt-fed 7.92 mm MG 81 or 13 mm MG 131 instead of drum-fed MG 15 machine guns).

The C-6 as night fighter was typically equipped with FuG 202 Lichtenstein BC low-UHF band airborne intercept radar, using the complex 32-dipole Matratze antennas. The first four C-6 night fighters were tested in early 1942 by NJG 2. The trials were successful and the aircraft was ordered into production. In October 1943, many C-6s were upgraded with new radar systems. The first new radar equipment was the FuG 212 Lichtenstein C-1. After the UHF-band Lichtenstein radars had been compromised to the Allies in the late spring of 1943, the next development in German AI radar was the VHF-band FuG 220 Lichtenstein SN-2, discarding the 32-dipole Matratze antennae for the much larger eight-dipole Hirschgeweih (stag's antlers) aerials, required for the longer wavelength SN-2 system.

Many Ju-88C's had their Bola gondolas modified to hold up to two forward-firing 20 mm cannons. Several C-6 night fighters were equipped with two "Schräge-Musik" upward-firing 20mm cannons in trial fittings, and from mid-1943 onward, there was an official field modification kit available for this arrangement.
This new kit from ICM:
The " Ju 88С-6b, WWII German Night Fighter" is in 1/48th scale with new decals and a new sprue for the radar array. We have some CAD images of the kit showing you the overall shape.

This kit from ICM details the JU-88C-6 version of the night fighter, and will be the subject of this build article. This boxing of the ICM JU-88 was released in 2018 and contains new and updated parts needed to build a Ju-88 C-6b night fighter. The kit is packed into a very nicely presented and strong cardboard box with a glossy cover, and all parts are bundled into that box tightly in a single plastic bag. This is fine, as there is little or no room for movement inside the bag once it is packed, and I found no parts damaged or scratched in the box. The clear canopy sprue (and the extra clear sprue for the C-6) are all bagged separately for further protection. These clear parts all looked very much perfection in terms of quality and clarity.
The manual is very nicely presented in colour on glossy paper, but I am surprised that no painting instructions are provided in the manual for the upper and lower surfaces for the mottle camo paint schemes provided in the box. The decals look to be of excellent quality from first impressions. The kit decals do not include the tail swastika as is the norm for several kit producers today. There are decals supplied for four different aircraft. A quick look over the parts tree shows recessed panel lines are nicely done, and I think to reflect well for the scale of the model. This kit is to be built (mostly) out of the box, so what you see is what you get for those interested in adding this kit to their collection. I will scratch build some parts of the build, but I will detail those in due course. After a night reading the manual and browsing the internet for photos of the aircraft, I finally cracked on with the kit, starting firstly with the radio operator seat. This has an ejector pin hole inside the curved area of the bucket seat and needed rectifying. I decided I would struggle with filling and sanding this inside the bucket of the seat, so I cut a piece of my trusty aluminium tape to match the shape of the seat base, and used this as an extra tape panel to cover the pin mark. Next, I scratch built a seatbelt harness from some masking tape. It's all very tiny at this point, but the effect will be worth it, since the JU-88 has a large canopy to look into the cockpit through. After the belts were attached to the seat, the remaining parts could be built, and it was placed in line to get a coat of black primer. Moving on to the first step of the manual, the sides of the fuselage were removed from the sprue tree, and the inside walls of the cockpit could start to be built up. The details that have been included are very nice, though lacking in detail perhaps for the throttles and levers on the left wall for the pilot to operate. This is something modellers could always scratch build if interested. Once the side walls were built and dry, I loaded the airbrush with some Vallejo black primer, and applied a coat of this across the interior.
Once this was dry, I have applied over this the standard Luftwaffe interior RLM66 colour (black grey, Vallejo 71055), I mixed in a few drops of Vallejo dark gull grey to lighten the shade a little. For the radio boxes on the rear wall, I used a liquid latex mask to cover the black primer on these before spraying the RLM66 colour. After this was done, I then removed these masks and the radios are still black and ready for the fine details. I brush painted these details as needed (not much required, they are mostly black anyway) and applied some light grey Tamiya panel liner to give them a bit of fading. The various dials on these got a drop of Micro Krystal Klear to simulate the glass dials. There is very little in the way of switches and dials in the cockpit needing painting. When happy with the painting being completed, I applied an Alclad Aqua Gloss varnish to all the parts, and now applied the cockpit decals supplied for the side panels and main instrument panel. These were applied with Microset and Microsol to tighten them down onto the raised details on the plastic. Once dry (overnight) these were sprayed again with a light coat of the gloss varnish, and the dials on the main instrument panel also got the treatment of the Krystal Klear to simulate the glass dials. The cockpit was now ready for some weathering with Tamiya black panel liner black, and also some diluted Starship Grime from the AK oil brusher set. After application, these are blended and thinned with some hardware store white spirits and a paintbrush. Once blended and dry, I applied Vallejo Mecha matt varnish.
The next step involves building the base floor of the cockpit, including the gondola hanging underneath the fuselage. It is fitted with guns on this night fighter version. The gondola was built and painted also in RLM66, some masking of the windows was done with liquid latex. While I waited to paint to arrive for my floorboards in the cockpit, I assembled and glued all the flying surfaces. I could then move onto the main landing gear subassemblies. These are very comprehensive, and I took my time with them. It took me almost an hour to build the first one, but I got the second one down to thirty minutes. I fitted scratch-built brake lines made from electrical wire to each of them, and then sprayed the gear in black primer before painting them in RLM02, and with minor details brush painted. A small amount of dirt and grime was done to give them a bit more life.

The floor of the cockpit could be put off no longer, so I decided to have a crack at painting some form of wood texture onto approximately half of the surface area. I found that finding photos of this aircraft type to be quite difficult online, and I am not blessed with a large library of aviation books. In a couple of photos online, I did find wooden areas on the floor, and some wooden handles used on levers in the cockpit. For the wood floor I used a technique I found on YouTube, presented in a tutorial on the "Scale-a-thon" channel. It starts with a flat white base (white primer in my case), then some texture is added to the white (I used a water-based oil stain weathering fluid), and some brown watercolour pencil was also used. These were used to give the floor panels a look of a wood texture pattern when worked with a wet paintbrush (water). This wood pattern it creates is then painted clear yellow, before getting a final paint coat of clear orange. I’ve used Tamiya acrylics in this case. Finally, I added a thin wash of Tamiya brown panel liner over top, then all sealed in with a gloss varnish from an artist brand spray can. The result is just what I was hoping for and will do the job nicely. After the wood sections were masked, the rest of the floor got the RLM66 treatment, and the leather cushion on the floor was hand-painted in Vallejo 72710 Leather Brown. The control column was painted, seat mechanisms assembled and painted, and the finish line for the interior is coming into sight. Lastly, the pilot seat seatbelt was scratch built and painted in leather, and the entire cockpit scene could now be assembled. I really enjoyed building this cockpit up, the instructions were at times a little difficult to follow, but I couldn’t fault the fit once I figured out how things were meant to fit together.

With the tail wheel already painted, the fuselage halves could now be joined together. This process wasn’t as simple as the cockpit had fitted together in the week prior. I found the plastic required quite a bit of flexing in order to line up perfectly, and unfortunately in my building supplies, I’ve neglected to own any sort of clamps that could have saved me personally holding it in place while I set the joins. I joined the two fuselage halves together, let the glue set overnight, and then the following day added the cockpit section in from underneath. This lower section I glued with super glue. I am using the super glue not only for the strength of the join, but also as a filler, that I can sand back once it dries. Note to self, buy some clamps. The following day again, the flying surfaces were all attached, I could start working on filling gaps, smoothing out the joins, and leading edges of the wings and elevators. A little bit of rescribing of some panel line detail was also done and work could begin on the engines.

The kit is supplied with two full engines, so I set about detailing and painting my ever first model aero engine (all for the benefit of you, the reader!). Parts were removed from the sprue and tidied up before I built what I could and sprayed all the parts in black primer.

The engine block was left in black primer and a light highlight layer of RLM66 Black Grey was applied over the block. Given the engine will only be partially visible when completed, I didn’t worry too much about the filling gaps of the engine block that were not going to be visible. The rest of the engine pieces were painted as per the instructions in the manual, assembled together, and then the whole thing was dirtied up with some Oil Brusher Starship Filth from Ammo by MIG, and a few touches of Tamiya panel line washes. The engine exhausts were a bit of an educated experiment. Starting with Vallejo burnt iron (pointless, I can’t see it now), I then applied a mix of Vallejo Rust and Hull Red to give the exhausts a rusted metal look. After this, I used Tamiya brown and black panel line washes, and I rubbed in some artist pastel to complete the look I was going for. It’s all a bit of a moot point again, the exhaust is mostly going to be covered by some flame suppressor pipes, but it was a good excuse to practice some rusted metal (I will need this for the flame suppressor pipes at the end). The engine was fully assembled finally to the engine firewall and was left completed to the point you can see in the photos here.

Engine one done, I proceeded to build the second engine, but this one is just left with a coat of black primer, as it will be completed covered by the engine cowling. The engine cowls themselves were now built and sprayed with their internal colour of RLM02. The engines could now be fitted to the wings, and I will admit I struggled a bit with the fitting and filling in this area.

The flaps and ailerons were fitted, and after a little sanding of where the flaps meet the fuselage, the fit was excellent, to the point I considered not needing to glue them in. After attaching the nose, it was back to the task of masking in preparation for painting.
The landing gear was masked with a combination of cardboard strips and tape, and I also masked the canopy framing. Unfortunately, not having a canopy mask on hand, I’ve had to mask this canopy by cutting small strips of tape, window by window. As you might imagine this took quite some time, approximately 5 hours, and 90 tiny and unique strips of tape were required for each frame edge. But once done, the canopy was mounted to the fuselage with a very small amount of Tamiya thin glue so I could remove it again later after the painting and varnishing.

The aluminium tape you can see in the photo below is areas I felt I needed to fill out a little. The direction finder on the fuselage sits a bit low, and I had been a bit heavy-handed on sanding the engine cowl joins. So I've used this to raise the level of surface a little.

The entire model was painted in Vallejo black primer.

I found some details of this particular aircraft online that suggested this aircraft had a dark coloured canopy frame so I for my first step of painting I did this in grey. After painting the canopy, this was then fully masked off and the upper surfaces to have the mottle were applied in a layer of grey RLM75. I then applied lots of little blue tac dots around the place! A couple hundred in total.
There are no painting instructions for the exact location of these, and I imagine it was a fairly unique scheme aircraft by aircraft from the factories (or painted at the front line for these earlier C6 models?), so I just spread them around and tried to give the model an even coverage of spots. Once I had the look I wanted with the blue tac, I went over the upper surface of the aircraft with the RLM76 Light Blue. After removing the blue tac dots, I must admit this wasn’t the look I was wanting. A friend put me onto information for a similar scheme C6 that looked like I wanted, so I masked off the fuselage, and sprayed the wings and elevators again in grey, applied another set of larger blue-tac dots, before respraying the RLM76 light blue. This was more the look I was after. These aircraft often had multiple types of patterns and squiggles applied to them, so to this end, anything goes with Luftwaffe camo! After removing the second round of blue-tac spots, I then attended to them by hand with the airbrush to tidy up a few of the spots that hadn’t worked so well, and to fade and blend the top surfaces.

Once this was done, I airbrushed a very thin mix of Tamiya Smoke with the airbrush to some of the panels and all the panel lines. A few highlights and touch-ups here and there and the model was now ready for a coat of Vallejo Mecha gloss varnish.

Once this had dried overnight, I then applied the decals, of which there are only very few, around 20 in total. The historically correct swastika was applied from my decal spares. The decal applied to the upper wings is as suggested by the extra information I found for this particular aircraft online.

After the decals had set overnight, I gave them a clean up with water on a paper towel to clear up the remnants of the microsol and microset applications. Then I gave the model another coat of the gloss varnish to seal in the decals.

After this had dried for overnight and the following day, I now mixed up a dark grey oil paint wash that I would apply across the whole model, made from Windsor & Newton oil paint, and some white spirits thinner. I applied this to the whole model and left it outside for about two hours before wiping off the excess with paper towels. Another day later, after allowing the summer heat in my garage to dry things a little, I now mixed up some more paint to apply the engine exhaust stains. This colour started with Vallejo Tyre Black, a little Vallejo Hull Red, and then a drop or two of Vallejo Black to darken it up. Now I had a nice dirty dark brown colour, and this was thinned about 30% paint and 70% thinner/flow improver mix. I sprayed the engine exhaust stains first. Following this, I have applied the same mix lightly all around the engine cowls, panel lines in the engine area, and along the top of the wings, from the engine to the trailing edge, to simulate the dirt, grime, heat, fluids and smoke that could have come from the engines, and stuck to the surfaces as it passed by. I applied this mix heavier at the front end of the engine cowl, particularly making it heavier on all the removable engine covers. I also applied a little of this mix to the flaps, ailerons and elevator joins.
After it was visually dry, I have now approached the engine cowls with some further work. I’ve taken a cotton bud (you might call it a cotton swab) and dipped one end in a 50/50 mix of simple green and water. The brown mix I’ve sprayed on the engine cowls is now worked with a blotting method to give this a blotchy finish to simulate the fact these panels often had dirty hands on them, and engine oils and greases and so on. The wet end of the cotton bud would loosen and smear the thin coat of paint, and the dry end would flatten and dry the result. Just one cotton bud dipped once was used for the process of both engines. A little goes a long way and I wanted a subtle effect.
The propeller parts were all painted in the traditional black-green colour with my usual black primer before that. I applied some Light Grey Tamiya panel liner to the propeller parts and wiped this off in the direction of movement/ airflow with a light amount of white spirits (I did not apply a varnish beforehand). Main landing gear wheels are in two parts, these were glued together, sanded smooth at the join, and the tyre tread rescribed. After primer again, I painted the centres in RLM66. After masking those off with some Vallejo liquid latex, I sprayed the tyres Vallejo tyre black, and then added some homemade brown oil paint wash and pastel dust to give them a bit of a dirty look.
Next up the exhaust flame suppressor pipes were painted to look like a rusted metal colour. This was a custom mix of colours similar to the engine exhausts earlier in the build, with Orange Rust and Hull Red from Vallejo mostly featuring in the mix. A bit of black here and there, and I brushed on a little pastel dust at the end as well. They have remained off the model until all the varnishing layers have been done as I was happy with the look without any further influences.
The final coat of Vallejo Mecha Matt varnish was now applied over the whole model with the finish line getting close. The canopy masks were removed, and overspray on the glass areas cleaned off. The pilot gunsight was modified from the part supplied in the kit as the gunsight itself was moulded grey plastic. I cut this off and added a new gunsight glass from a tiny piece of thick clear tape folded over on itself, and cut to size. I then glued this to the gunsight housing and glued the whole gunsight assembly to the main instrument panel. Various small parts now started being added to the model, such as the guns being added into their openings in the nose area. The landing light glass was added, and the guns for the radar/radio operator added to the rear part of the canopy. The two-piece canopy was then be glued to the fuselage, the fit of this is very nice. The aerial mast was added.

The final two steps of the process were to paint and attach the radar antennae and the radio aerial wire. The radar antennae were always going to be at risk during a build process, so these were left until very last. They proved a difficult proposition, and I managed to break one of them in the process of trying to tidy up the sprue tree connections. I might investigate the option of a set of photo-etch aerials to replace these in the future. The aerial wires I made from stretched sprue and attached with superglue. I use the heat from a soldering iron to tighten these up. After a final look over and a few touch-ups, I could call the model complete.

I would like to think ICM and The Modelling News for the opportunity to build this kit. I congratulate ICM on a great kit that built up very well, and that I really enjoyed building. I spent just under 99 hours on the kit, with around 10 hours correcting my own errors included.
A walk around the finished model at a distance...


A little closer in details showing you the details of the kit...


I’m so pleased with the result and it has built up to be a highlight of my collection.
Alister Curnow
