


Andy Moore continues on with the build of the AC-40-137A Soviet Firetruck in 35th scale from ICM. Today he follows on from the chassis and running gear on to the cabin and internal details. See how he gets the most out of the kit in the penultimate part of his build...


Pt III: Build review: AC-40-137A Soviet Firetruck
Manufacturer: ICM
Kit Number: #35519
1/35th scale
Price: £35.99 From Model Hobbies UK (it is hard to find not boxed as the Chernobyl #2 kit)
Product Link on the ICM Website

Previous parts of this story:
Pt I In-Boxed: 1/35th scale AC-40-137A Soviet Firetruck from ICM Models
Pt II: Build review: 1/35th scale AC-40-137A Soviet Firetruck from ICM Models
Today's article:
Pt III Build review: 1/35th scale AC-40-137A Soviet Firetruck from ICM Models
After completing the chassis and wheels in part 1 of the build of ICM's new AC-40 Firetruck, we'll continue today by moving on to the cab. This starts out with a floor panel that incorporates the front fenders, to which is added the firewall and a half-height divider between the front and rear compartments. The floor area is then finished off with the foot pedals and gear stick. The detail here is fairly basic but perfectly adequate given what will be seen on the finished build.

The seats are made up from nicely detailed frame parts which are mounted to the seat and back cushions. As is often the case with vehicle kits, the seat pads looked a little square and angular, so I gave them all a heavy sanding around the edges and corners to give them a more natural, used look.

The upper cab is formed from two single-part side panels that incorporate both the front and rear cab doors and the sides of the bonnet. The inner side of the cab panels are fitted with door liners to create the correct thickness for the doors, and the liners are finished off with the latch handles and window winders. Those parts are very small and delicate, so take care when removing them from the sprue and attaching them as there are no extras provided. I found it easier to clean up any mould lines on the handles after they were attached, rather than trying to hold the tiny parts between my fingers to do the work.

The instruction calls out the regular Russian interior green for the cab, and here I used Gunze C351 Zinc Chromate Green which seemed like a reasonable match. Once the base coat was on, I mixed up a dirty brown colour and sprayed some shading around the floor and door liners, then followed this with an oil wash to bring out the details. Lastly, the door handles and foot pedals were picked out in appropriate colours. It's pointless going crazy with weathering or detail painting, as little can be seen of the interior once the cab is closed up.

The seat frames were sprayed with the same interior green as the cab, then the cushions were painted with a patchy, faded brown leather colour, followed by a light dry-brushing to bring out texture I'd added earlier.

The dashboard is the last section to build up before the cab can be assembled. The dash needs to be attached to the windscreen frame, and the fit here is a little vague with the instructions not being much help either. There's a mounting point on the frame, but this seemed to make the dash sit too high, and I'm still not entirely sure I got it mounted correctly. Having said that, the cab did subsequently go together with no problems so the dash positioning probably isn't critical. The decals for the dials were very well printed and, like all the other decals, went down easily with no issues.

If you do want to step up the detail in this area, there's a very nice set of 3-D printed dial and placard decals available from Quinta Studios (set QD35001).

With the interior painted, the cab panels were built up on the floor plate, and the fit here was pretty much perfect. The only areas to watch are the joints between the sides of the windscreen frame and the tops of the front doors. There are no alignment pins to keep these parts flush so it's best to use clamps or tape until the glue has set. Due to the way ICM have engineered the kit, the cab needs to be attached to the chassis before the bonnet and front grill are added, so these parts were kept separate for now, as was the roof panel. I also decided to leave the glazing out until the main painting was finished.

As the cab needs to be in place on the chassis before the rear bodywork can be added, I decided to get it painted and decaled while it was still separate. The window apertures were masked off, and the roof, bonnet and grill were temporarily attached, held in place with tape on the undersides. The main colour is, of course, red, but the doors and bonnet stripes are white and it's easier to spray these first. The first step was to lay down a primer coat, in this case, Alclad White Microfiller, and this was followed by Gunze C107 Character White, sprayed over the areas that would remain white.

With the doors and bonnet stripes masked off, it was time to break out the red paint. Gunze AVC-07 Red was used to lay down the main base colour, then a little Tamiya X-6 Orange was added to the red to spray some highlights over the centre of the larger panels. Shading was then added around panel lines and in less exposed corners, this time by adding a little XF-9 Hull Red into the base colour.

With the masking removed, the decals were added, which again went down flawlessly. The glazing had its framing masked and sprayed (rubber black for the windscreen and aluminium for the quarter lights on the doors) and then installed using PVA to avoid damaging the clear parts. I decided to replace the windows in the rear doors with pieces of clear plastic sheet so I could pose them partly wound down. The clear parts for the indicators and roof lights were brush painted with Tamiya Clear Orange before installation. At this stage, I'd also given the panel lines and raised details a pin wash with a dark brown oil paint.

At this point, I decided to fit the floor plate for the rear body, as it would still be possible to fit the cab with the rear floor in place. It was here that I noticed an error in the instructions that would no doubt have spoilt my day latter on had I not checked ahead. The rear floor is shown being fitted in step 86 in the instruction, but a couple of pages later, in step 97, you're told to fit an extended exhaust pipe, part of which runs between the top of the chassis and the underside of the rear floor. It would be impossible to fit the exhaust had the rear floor already been installed. Not a problem so long as you know ahead of time. Just make sure to add the pipe before the floor.

With the floor plate and exhaust sorted, I went ahead and permanently fixed the cab in place. This needs to be installed by sliding the cab along the chassis rails from behind the engine block, as the engine is too wide for the cab to be dropped directly down over it. This is the reason the front grill and bonnet need to be kept separate until the cab is attached. Despite sounding like a slightly cumbersome construction step, the cab actually attaches very easily, the inside edges of the engine compartment sliding easily under the block until the whole assembly clicks into place.

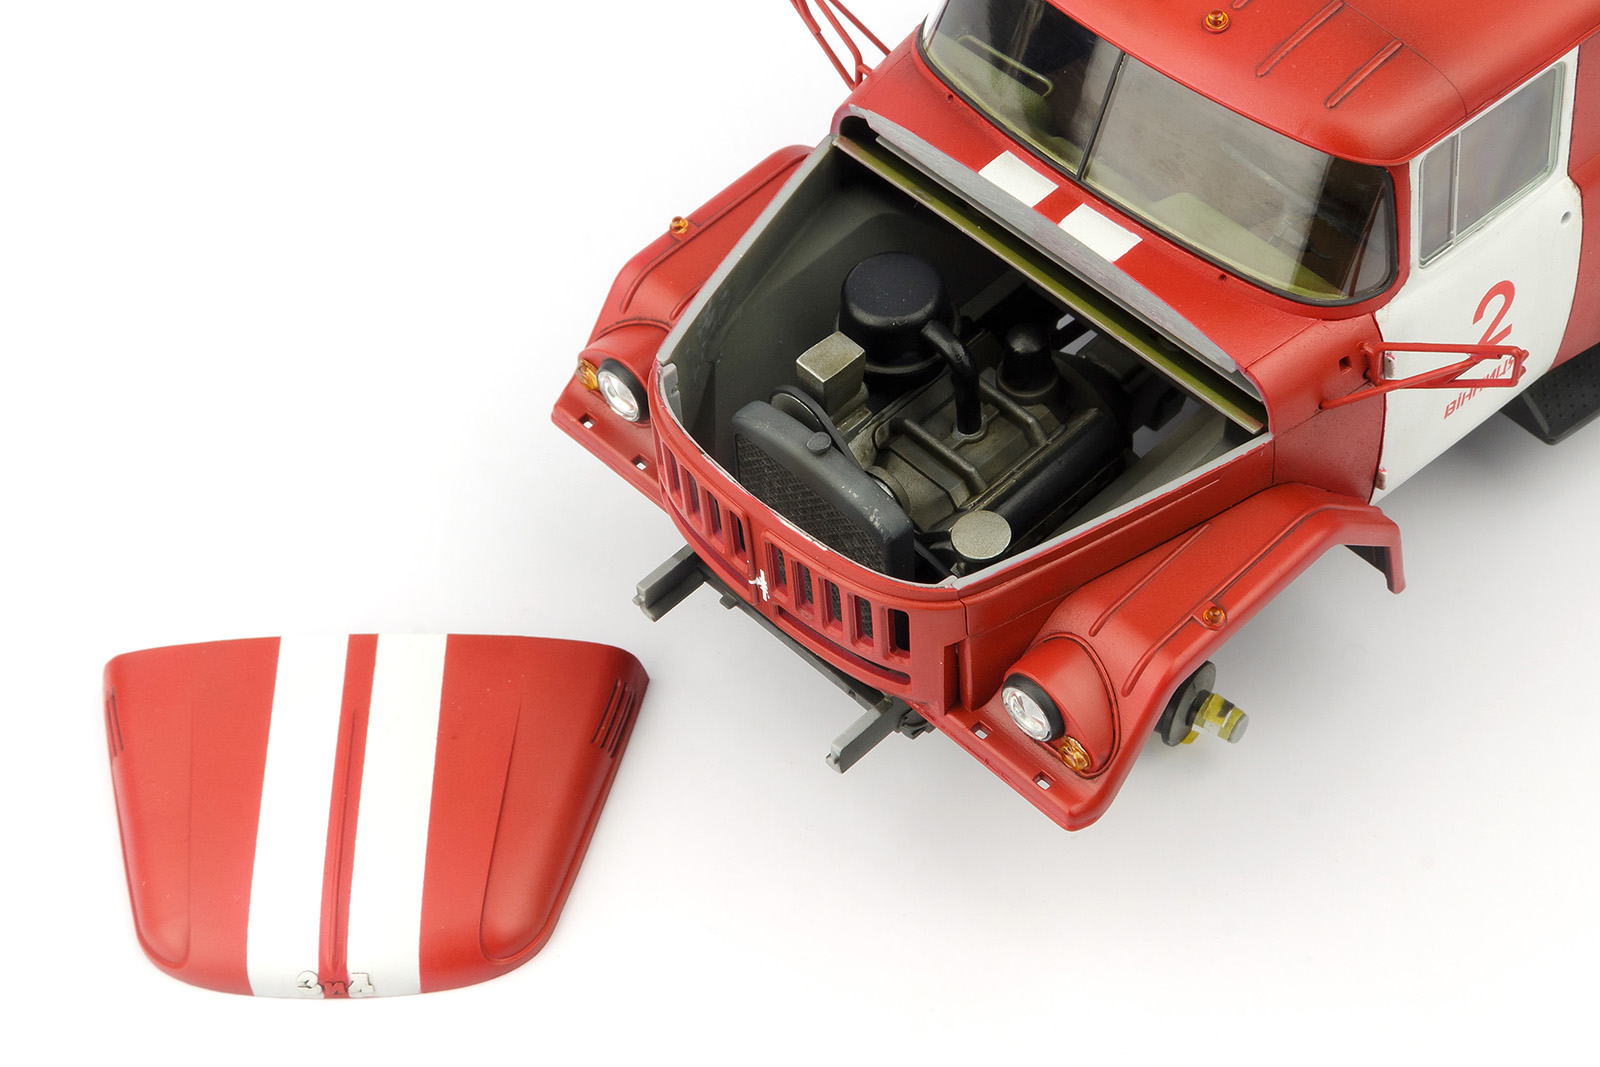
Once in place, the front grill and bonnet can be added. The fit here was very good, so no worries about having to fill any gaps and any associated risk of damaging the paintwork. If you wish, the bonnet can be left loosely attached so it can be removed to view the engine compartment, although I chose to glue mine position.

We finish the construction and painting of this kit in the last part of the article at this link on TMN

Andy Moore
Thanks to ICM for sending this kit to Andy to Review and next up to build. You can see more about their models on the ICM Website
