

Today Gary Wickham examines ICM's two 48th scale boxings of the Ryan Q-2A and Q-2C Firebee kits in a dual build article. He checks the fit & the accuracy of both kits before he paints & weathers them very nicely. See what he thought about the kits in his review...
 Build Review: KDA-1 (Q-2A) Firebee with trailer & BQM-34A (Q-2C) Firebee with trailer

From ICM In 1948, the Pilotless Aircraft Branch of the USAF issued a requirement for a jet-powered aerial target with a high subsonic speed, for use in ground-to-air and air-to-air gunnery. The designation Q-2 was assigned to the project, and in August 1948, Ryan has announced the winner of the design competition. The first powered flight of an XQ-2 occurred in early 1951, and in the same year, the drone was ordered into mass production as the Q-2A Firebee. Similar versions were also ordered by the U.S. Navy and U.S. Army as KDA-1 and XM21, respectively.
The Q-2A/KDA-1 Firebee was a target drone powered by a Continental J69-T-19 turbojet. When ground-launched, the drone was boosted into the air by an Aerojet General X102F solid-fueled rocket booster. The Navy's KDA-1 and Army's XM21 were powered by a Fairchild J44-R-20 engine, and could be recognized by the distinctive intake centre body. The Firebee could be recovered by a two-stage (brake/descent) parachute system, which was automatically deployed when the drone was hit, or when vital components like engine or remote control equipment failed. Of course, the parachute descent could also be initiated manually by radio command.
 In the late 1950s, the USAF awarded Ryan a contract for a substantially improved "second generation" Firebee, the Model 124, originally with the designation Q-2C. The initial prototype performed its first flight in late 1958 and went into production in 1960. In 1963, it was redesignated the BQM-34A. The BQM-34A emerged as the Firebee as it is recognized today, with a bigger airframe, longer wings, and in particular a "chin"-type inlet under a pointed nose, in contrast to the circular intake of the first-generation Firebees. It was powered by a Continental J69-T-29A turbojet, a copy of the improved Turbomeca Gourdon derivative of the Marbore, with 1,700 pounds (770 kg) thrust. The Navy also adopted the BQM-34A, while the Army obtained a ground-launched version designated MQM-34D, with longer wings and a heavier RATO booster.
 In the mid-1950s some B-26Bs were modified as drone director aircraft. All guns were removed and special drone mount points were added to the wings to enable special pylons to be added. The aircraft was intended to test new air-to-air missiles by providing a target drone for live-fire tests. Additionally, the aircraft was used in support of combat crew training by providing aerial targets for pilot proficiency training. The Ryan Q-2A Firebee was the standard drone carried on the DB-26B. These director aircraft began service in the late 1950s and continued through the 1960s before being replaced by more modern aircraft capable of carrying larger drones.
 KIT OVERVIEW - ICM 1:48 Ryan Q-2A/C Firebee (48400/48401)
Continuing their steady stream of entirely new tooled kits, ICM has recently released a pair of Firebee drones in 1:48. The initial two boxings (48400 & 48401) of the KDA-1 (Q-2A) and BQM-34A (Q-2C) are provided as standalone kits with the inclusion of a ground trolley in each.
 If you have followed historically the way ICM releases its new kits, there is almost always a good reason that they pick any given subject. ICM routinely use coordinated releases of new aircraft and then matching crew figures all the time. It's a clever approach and very well planned out. In the case of the new Firebee's my first assumption was that these drones were somehow related to a previous ICM release or something they planned for the future.
It was therefore no real surprise that after 30 seconds of searching I found that the early Firebee's were used in conjunction with a modified B-26 Invader, the DB-26. Bingo, ICM already had in their catalogue the whole A/B-26 Invader family in 1:48 and so the Firebee was a natural fit. In fact, scalemates.com already have a part number and boxart listed for a future ICM DB-26 Invader kit.
 As you would expect these models are super simple and each one comes on a single (small) sprue. For these standalone boxings, an additional sprue is included for the ground trolley. The main sprues in each case also contain an underwing pylon which will no doubt be used when the DB-26 kit comes out. If you don't want to wait you can certainly attach your Firebee's to a A/B-26 Invader you already have (even the Monogram/Revell kit).
 QUICK BUILD - ICM 1:48 Ryan Q-2A/C Firebee (48400/48401)
I normally fail miserably if I try to build more than one model at once, but in this case, I was confident that I could stay on track given how simple and similar these two kits are. Indeed it only took me about two hours to get both Firebee's cut out and cleaned up, ready for glue. Having no cockpit also helps greatly to speed up the build as we modellers love to spend endless hours detailing cockpit interiors.
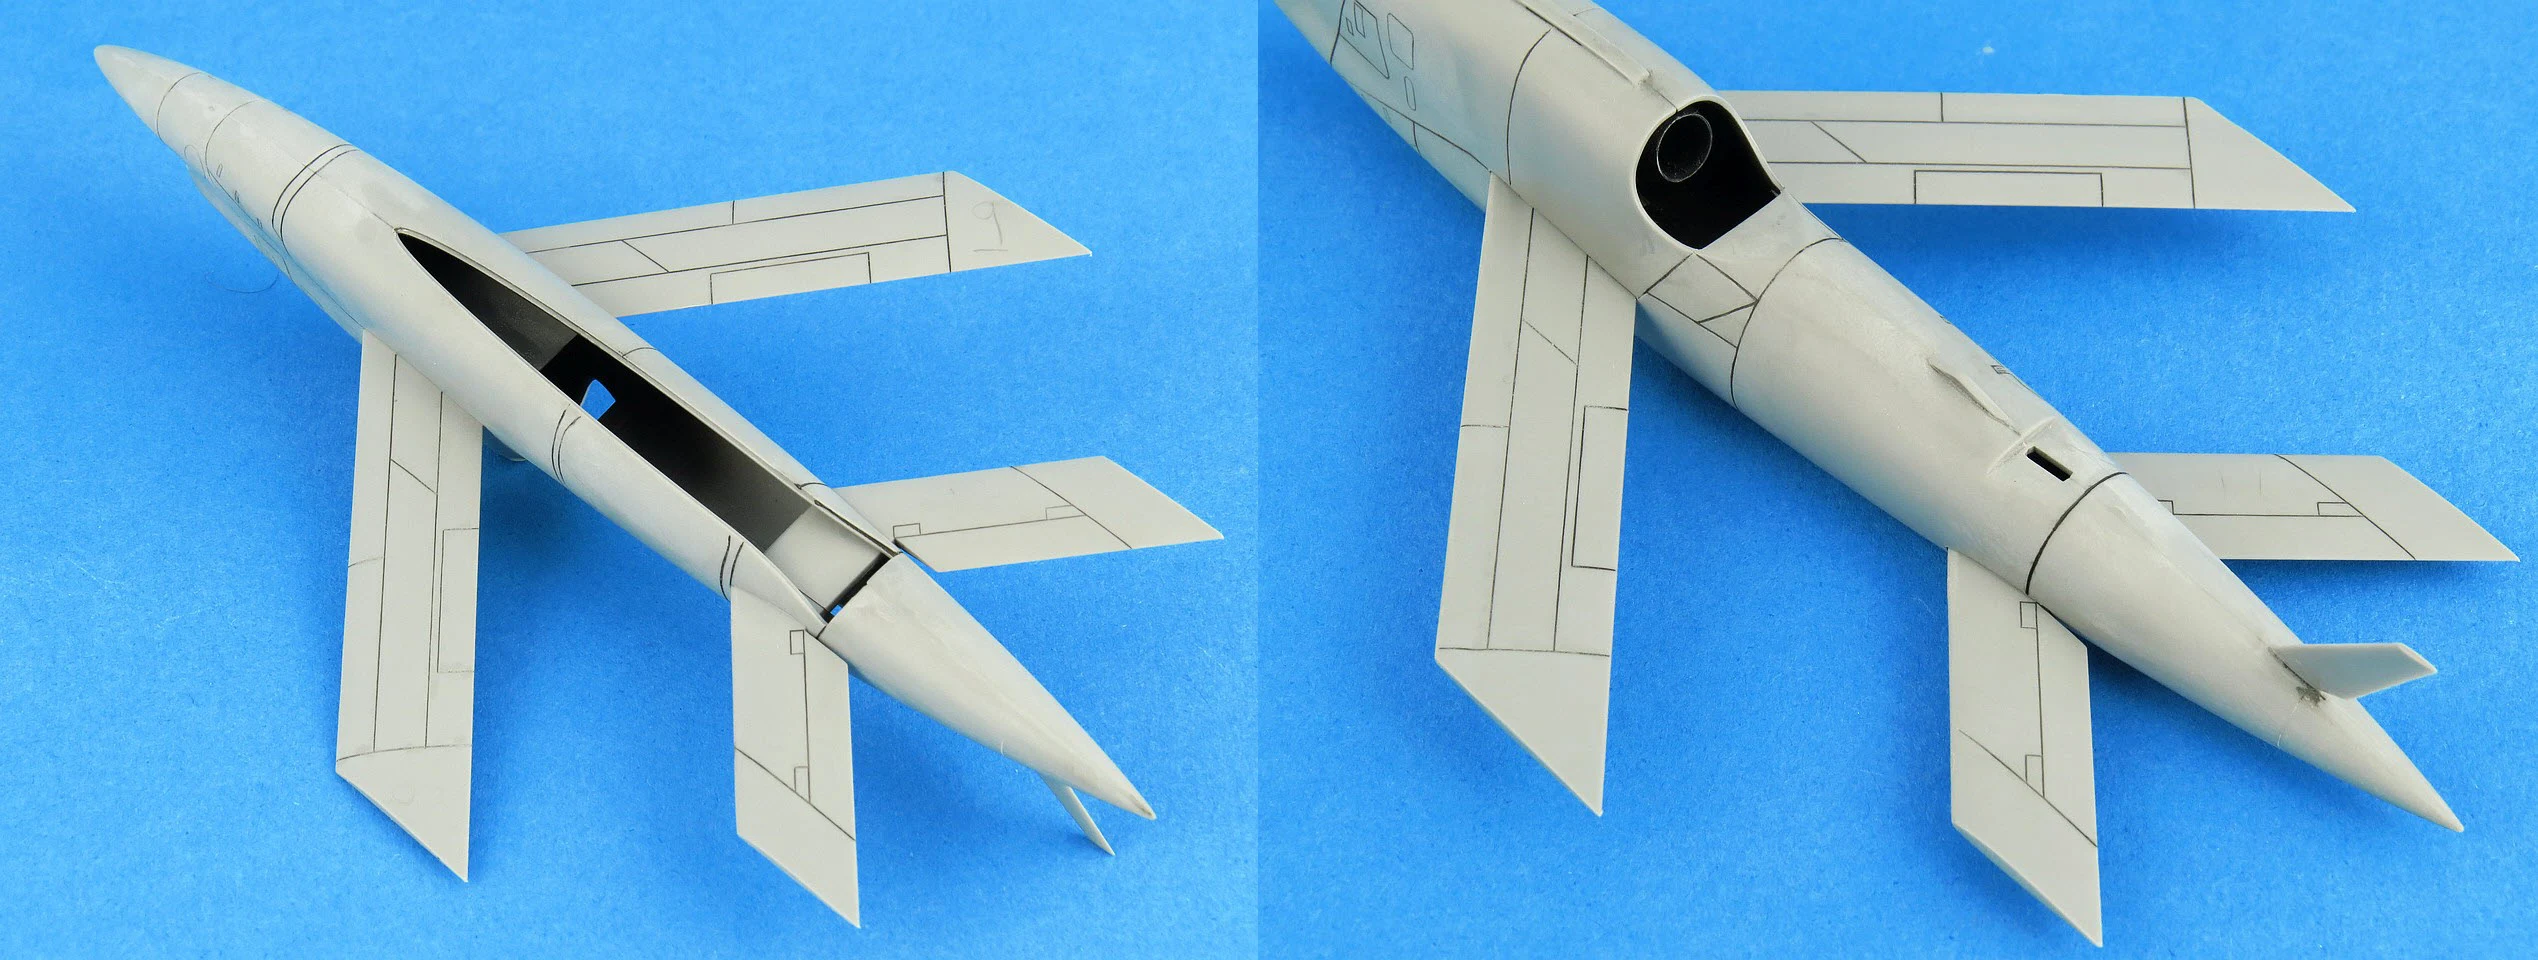
 Construction of the Q-2A was straightforward with generally the same very good fit that we have come to expect from ICM new tools. You may want to consider painting the interior of the fuselage in black as on both kits you can see a fair bit of the inside through the lower exhaust opening. I'd also suggest you glue the interlocking wings and tail halves into the fuselage prior to installing the fuselage top spine. This simple alteration to the ICM assembly sequence allows you access to the wing joins inside the fuselage to more readily apply glue and tweak the join/alignment. If you've already closed the fuselage top before sliding the wings in place you lose this option having instead to apply glue along the exterior seams.
 The fuselage spine and vertical tail are glued in place and the only masking needed was to protect the engine exhaust and interior opening. I used some Tamiya tape to roughly mask the opening and turned to Blu-Tak to finish the job around the edges. To check the panel lines I applied a light wash using Tamiya Black Panel Liner.
 The only filler I found necessary was in the roof of the intake. As I had little to no room for sanding I turned to Milliput which afforded me the benefit of being able to smooth the putty before it dried using a dampened cotton bud.
 With the Q-2A squared away I switched over to its larger brother, the Q-2C. This particular photo not only affords us a good overall view of the drone itself but also of the ground trolley.
 The construction of the Q-2C was basically the same as the earlier kit. Again I painted the interior of the fuselage in black before closing it up. The wings and tail used the same interlocking method and I was able to apply the liquid glue on a brush through the open fuselage spine. The very delicate ventral fin broke off a couple of times and in the end, I left it off until the very end of construction and sanding at which time it was reattached using liquid glue prior to painting.
 Masking was quick with only the exhaust and intake openings to deal with (yah no canopy!!). For the intake, I have used dampened paper towel which is inserted into the hole using some tweezers and adjusted to the right shape. With some practice, you can use this basic technique to quickly (and cheaply) mask the interior of even the most tricky openings.
 The final assembly needed was the ground trolley, which to be honest took more time than the drone itself. I decided to replace several of the plastic support rods with brass as these looked quite flimsy (and I broke one when cleaning it up).
 More often these days I find myself using a primer coat on my models. For this project, I turned once again to my favourite Mr Hobby Finishing Surfacer 1500. This time I did not reach for the grey or black bottle but instead decided to try out the Pink primer. I have read that using pink when painting with red (or yellow/orange) colour coats results in a deeper/richer result.
 I now needed to decide on a marking scheme for each of the Firebee's. ICM provides a generous set of options for both the Q-2A and the Q-2C models. Whilst I was attracted to the sharkmouth schemes in the end I decided on the Navy prototype scheme for the Q-2A and a US Air Force scheme for the Q-2C.
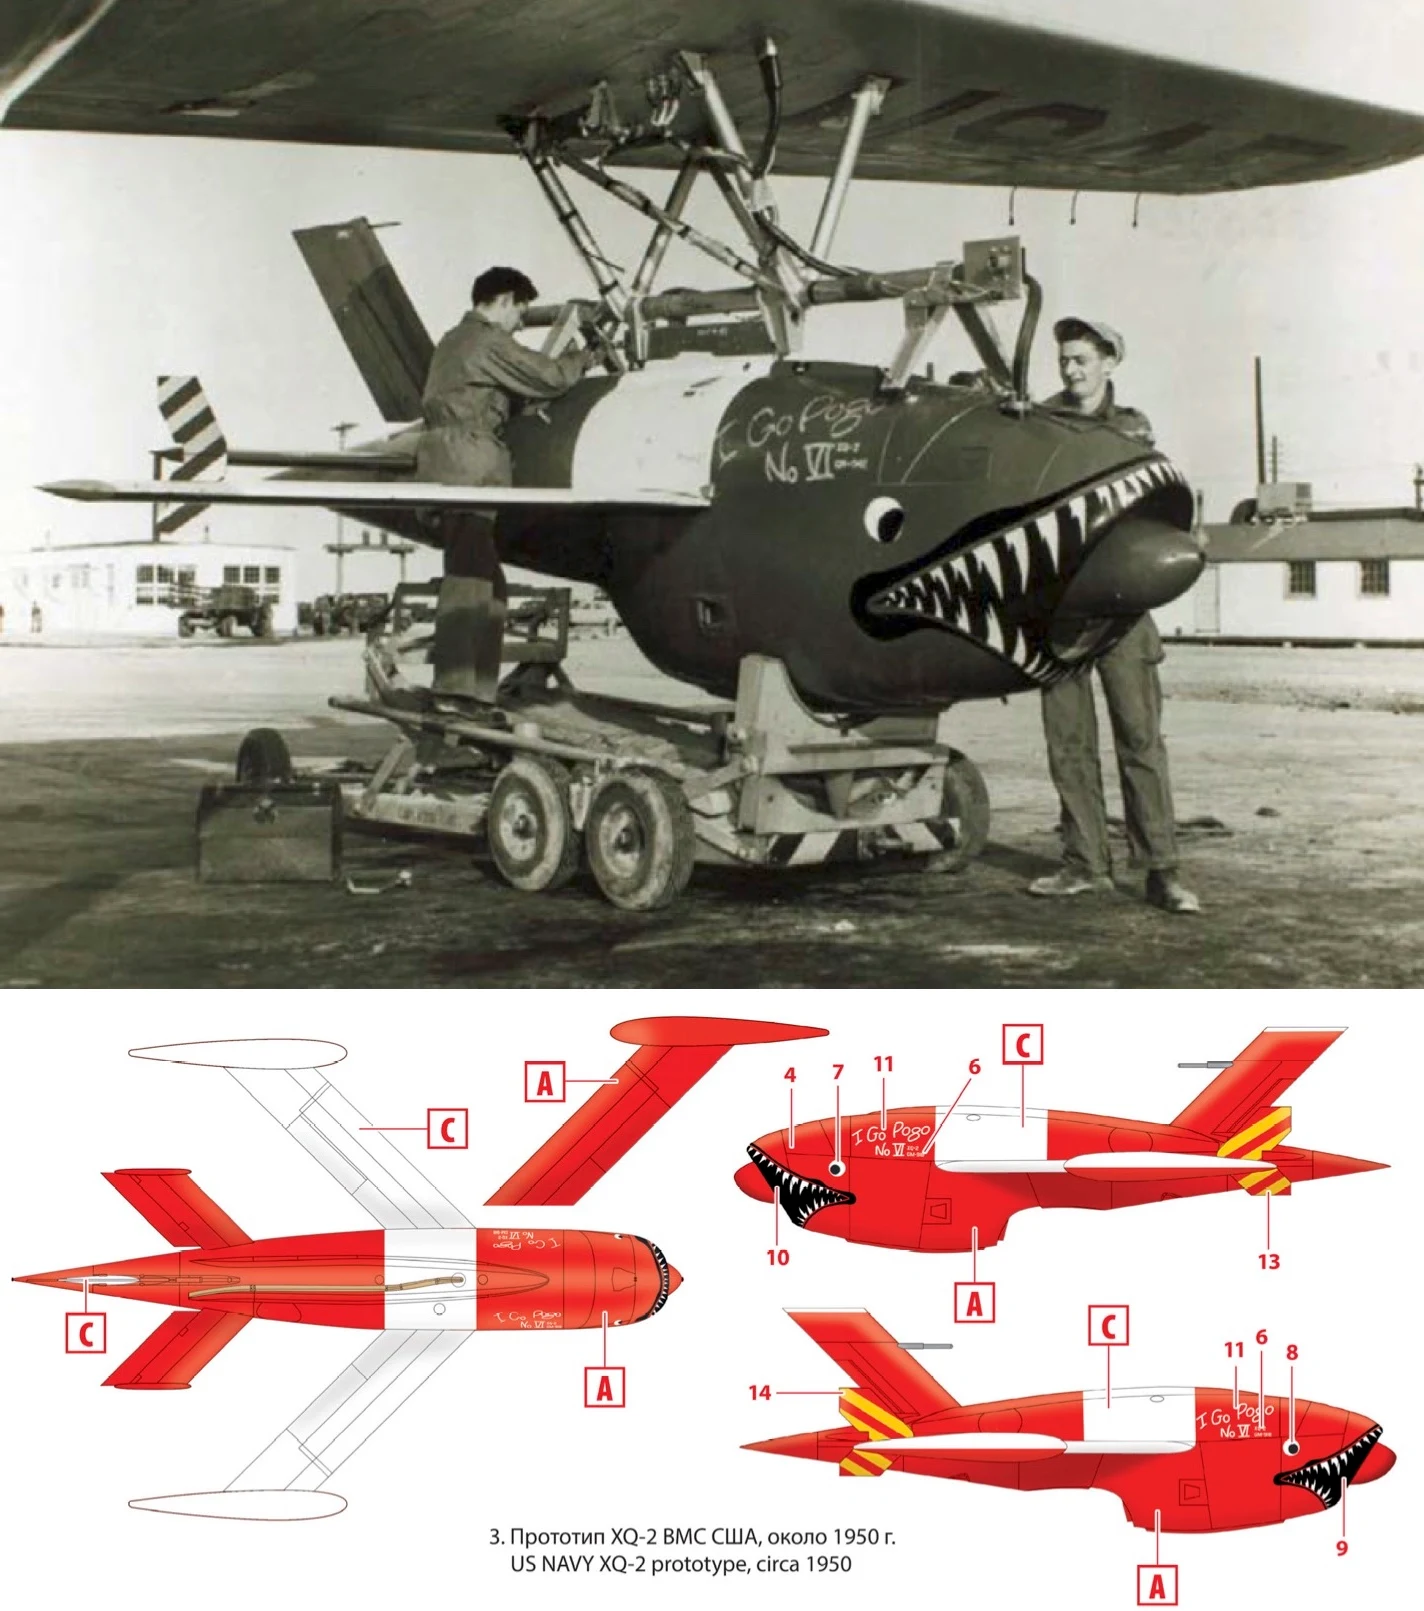
 For the KDA-1 markings, I settled on the Navy prototype option. The handwritten note "I Go Pogo" on the nose of the Firebee presumably refers to the cartoon character Pogo, who was a reluctant "candidate" for President (although he never campaigned) in 1952 and 1956. The phrase "I Go Pogo", originally a parody of Dwight D. Eisenhower's iconic campaign slogan "I Like Ike", appeared on giveaway promotional lapel pins featuring Pogo.
 The first order of business was to lay down the white stripe across the fuselage and on top of the wings. I've pretty much switched to using lacquer based paints these days and so applied several thin coats of Mr Color GX1 Cool White thinned with Mr Color Leveling Thinners.

 The ICM colour callouts for both Firebee kits suggest Tamiya X7 Red, however after I did some test spraying I felt that it needed a more orange tint to better match the colour photos of the Q-2A I could find. I dug into my paint drawers for some possible candidates and was much happier with the MRP 299 Insignia Red. The MRP paint range are acrylic lacquers pre-thinned for airbrushing which cover very well even for troublesome colours like red and yellow. With the Pink primer the end result was a warm red with a hint of orange.
 The decaling was applied directly over the semi-gloss finish of the MRP paint. Normally I would apply a gloss coat prior to decaling but in this case, felt the surface was nice and smooth already. The ICM decals are quite thin and I quickly learned to treat them carefully when moving them from the backing paper to the model surface. They do not seem to like decal setting solutions (like Micro Set) which are designed to break the surface tension allowing you to move the decal around into place more easily. I had more than one decal fold over on itself which I then had to try and sort out. In the end, I stopped using the setting solution and instead used some plain warm water with a couple of drops of Morning Fresh dishwashing liquid. This worked far better to break the surface tension and the ICM decals responding accordingly when I poked and prodded them, although care is still warranted.
 I applied a final semi-gloss clear coat to seal the decals followed by a light panel line wash using my new favourite, the enamel-based Tamiya Panel Liners (in this case Grey and Dark Grey).
 The kit decals are well printed with no obvious registration issues. They are quite nice and need a light touch when handling. Be careful when using setting solutions as I found that plain water with a couple of drops of Morning Fresh dishwashing liquid gave the best results of all.
 FINAL THOUGHTS - ICM 1:48 Ryan Q-2A/C Firebee (48400/48401)
This is yet another welcome new release from ICM, who are continuing to deliver a healthy number of brand new toolings in 2021. These initial boxings of the Firebee drones are designed for the modeller who wants to display them as standalone models, on their ground trolleys. They will make the perfect addition to your dioramas and will fit in nicely next to a 1:48 Invader or Hercules.
 Like all new ICM toolings, the fit and engineering is first class. I find the ICM plastic easy to work with (not too hard, not too soft), the assembly instructions are clear/logical and the colour/marking options plentiful.
So whether you have been hanging out for some 1:48 Firebee's to add to your collection or just looking for an easy build, I have no hesitation in recommending these kits to modellers of all skills levels.
Gary Wickham
Kit No's 48400/48401
1/48th scale
1/48th scale


Continuing their steady stream of entirely new tooled kits, ICM has recently released a pair of Firebee drones in 1:48. The initial two boxings (48400 & 48401) of the KDA-1 (Q-2A) and BQM-34A (Q-2C) are provided as standalone kits with the inclusion of a ground trolley in each.

It was therefore no real surprise that after 30 seconds of searching I found that the early Firebee's were used in conjunction with a modified B-26 Invader, the DB-26. Bingo, ICM already had in their catalogue the whole A/B-26 Invader family in 1:48 and so the Firebee was a natural fit. In fact, scalemates.com already have a part number and boxart listed for a future ICM DB-26 Invader kit.


I normally fail miserably if I try to build more than one model at once, but in this case, I was confident that I could stay on track given how simple and similar these two kits are. Indeed it only took me about two hours to get both Firebee's cut out and cleaned up, ready for glue. Having no cockpit also helps greatly to speed up the build as we modellers love to spend endless hours detailing cockpit interiors.


When dry (a couple of hours) I carefully masked the white edges in preparation for the red.


I kept the weathering intentionally light as despite these drones being re-used I found no photos that showed significant wear and tear.
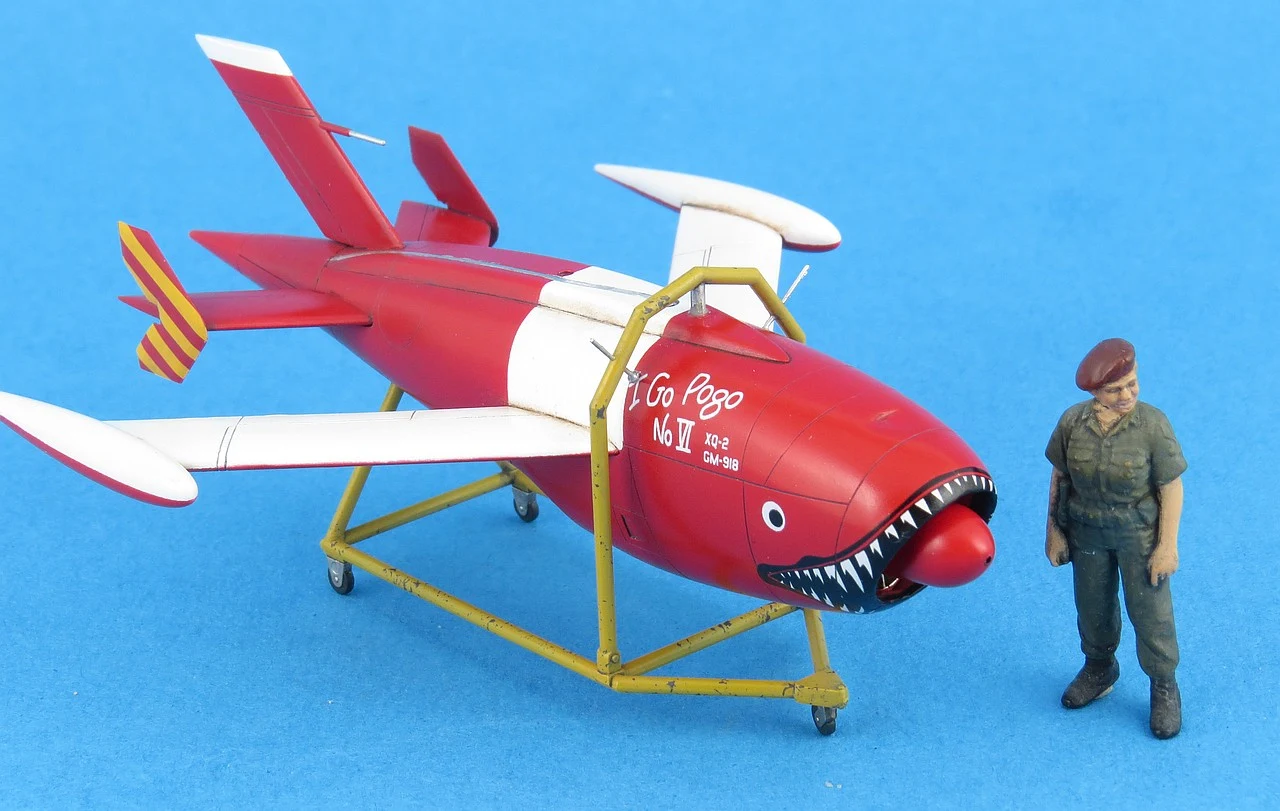
 To provide a sense of scale I posed one of my existing 1/48 ground crew figures next to the Firebee. While it's not a huge model, it's certainly not tiny either.
 The "second generation" Firebee, the BQM-34A, originally with the designation Q-2C is noticeably larger than the original Q-2A. The lines of the Q-2C are more streamlined and look more like a modern jet fighter, minus the cockpit. The Firebee series of drones are designed with no internal undercarriage and so rely on a support trolley for ground handling. Once launched (either from the ground or a buddy aircraft) the Firebee flys its mission and then deploys a parachute. Once safely back on earth it is recovered and returned to the base to be prepared for the next launch.
 ICM again recommends the use of Tamiya X7 Red for the body colour but this time I had to disagree. All of the photos of the BQM-34A I found showed the finish to be far more orange than pure red. Once again I turned to MRP for a better match in the form of MRP-2. Labelled (incorrectly?) as Insignia Red this colour is more like to be high visibility International Orange commonly found on US Navy Training and Coast Guard aircraft. The black and yellow sections were masked and sprayed despite ICM providing decals for this purpose.
 As before the decals were applied directly onto the semi-gloss MRP paint. Having learnt now the best method to treat the ICM decals I had a much easier time with applying and positioning. Tamiya panel line wash was again used to give some depth to the surface detail.
 The completed BQM-34A (Q-2C) with ground trolley makes a nice model in its own right. I look forward to seeing models out there with these drones fitted under the wings of Invaders and Hercules as that would make an eye-catching display.


 A final "group" shot showing the 1st and 2nd generation Firebee's. These really are a quick, easy and most importantly, enjoyable little build. I for one didn't know much at all about these early UAV's when I cracked the box but as always I enjoyed learning as I proceeded through the build.
 COLOURS & MARKINGS - ICM 1:48 Ryan Q-2A/C Firebee (48400/48401)
ICM are typically generous with the number of markings provided in the box. For the Q-2A we get three (3) schemes including one US Air Force and two US Navy. For the Q-2C we have four (4) options including three US Navy and one US Air Force. I suspect that not many aftermarket decal manufacturers will jump on this kit so you may need to make do with the ICM options or make your own.
 Thankfully each of the schemes are provided in the instructions with full colour on glossy A4 pages. The colour callouts are provided using ICM, Tamiya and Revell paint, however, you can always substitute your own paints as I have done.


ICM are typically generous with the number of markings provided in the box. For the Q-2A we get three (3) schemes including one US Air Force and two US Navy. For the Q-2C we have four (4) options including three US Navy and one US Air Force. I suspect that not many aftermarket decal manufacturers will jump on this kit so you may need to make do with the ICM options or make your own.
The Ryan Q-2A choices

Q-2AC Firebee markings


This is yet another welcome new release from ICM, who are continuing to deliver a healthy number of brand new toolings in 2021. These initial boxings of the Firebee drones are designed for the modeller who wants to display them as standalone models, on their ground trolleys. They will make the perfect addition to your dioramas and will fit in nicely next to a 1:48 Invader or Hercules.

So whether you have been hanging out for some 1:48 Firebee's to add to your collection or just looking for an easy build, I have no hesitation in recommending these kits to modellers of all skills levels.
Gary Wickham
Many thanks to ICM plastic model kits for supplying the kit for Gary to review.


