Adam O'Brien's build of Hong Kong Models 48th scale Avro Lancaster B Mk.1 continues here on TMN. See the kit painted, beaten up and weathered just enough to transform the plastic into something very much like a "Lanc" in Pt.III of his build guide...
 Build review Pt III: Avro Lancaster B Mk.1
From Hong Kong Models
1/48th scaleKit No# 01F005
Approximately 360 parts
Photo-etch parts included
Completed size: 648 (total width) x 443 (total length)
Cartograf decals included for two marking choices
Poster of the boxart is included
Price: ¥11,000 ($105 USD/ 75 GBP/ 86 Euro)
Product Link on the HLJ Website
Product Link on the HK Models Website
Part III – Painting The Airframe
First up, I painted the wing internals, flaps and landing gear bays, with interior green and nato black respectively. The wing flap internals were then highlighted with a simple pin-wash of dark brown oils, diluted with artist white spirit. The flap itself was then re-attached with a small amount of white glue, to allow it to be painted and weathered along with the rest of the wing. The landing gear bay was given a pin wash with a lighter dirt brown colour to highlight the excellent detail.
The entire airframe was then masked where required – a considerable job, given the amount of glazing on the Lancaster. An overall coat of Tamiya LP-11 Silver was then airbrushed over the entire airframe in two light coats. This would act as the primer and base for later chipping.
The next series of wing photos will show my basic aircraft painting order. Once the silver base was allowed a few days to harden, I applied two very finely misted coats of hairspray.
I do not normally apply any pre-shading to my aircraft models, preferring to post shade instead. Given the sheer size, and large surfaces of this model, I opted for a simple pre-shade of all panel and rivet lines. To achieve this, I broke out my seldom-used Iwata CM-C. This is an amazing airbrush that allows very fine control, and very subtle line-work.
Over a series of hour-long sessions, I was able to cover the entire airframe with an extremely thinned coat of Tamiya Nato Black. I added maybe 20% retarder to the mixture as well to allow longer drying times.
For all the underside surfaces, once the pre-shade was complete, I misted on, 2 to 3 very fine coats of nato black, being careful to allow the pre-shade to show through.
The upper surface camouflage was first pencilled on over the pre-shading. The first colour applied was earth-brown. The colour I use is a mixture (shown in the photo) developed for a previous RAF model. Both the brown and green colours used are deliberately mixed lighter than the actual shades, I do this as I will be applying several weathering effects later that will visibly darken these shades.
My green mix was then airbrushed on – again in very light misted passes. The airbrush used for the camouflage was an Iwata HP-CH. Note on the photo that I have left the roundel area unpainted, again to allow the pre-shading through.

At this point, I started chipping the model. Working on small areas at a time, I moistened the surface of the model and started the hairspray chipping process. My technique is quite simple – moisten the model, allow the water to penetrate the surface paintwork - say 5 minutes? – then start the actual chipping process with a toothpick. I think the secret to a believable result is to not overdo it – better to have less (and smaller) chipping, than a model that looks like it’s in a junkyard – there is a fine line. I’ll show a series of closer photos below.
Once I had the camo colours on the airframe and the basic chipping complete, I gave the entire model a wet coat of VMS Varnish HD – Satin. At this point, I put the model away for about a week to allow the paint to properly harden for the rigours of oil washes and weathering later.

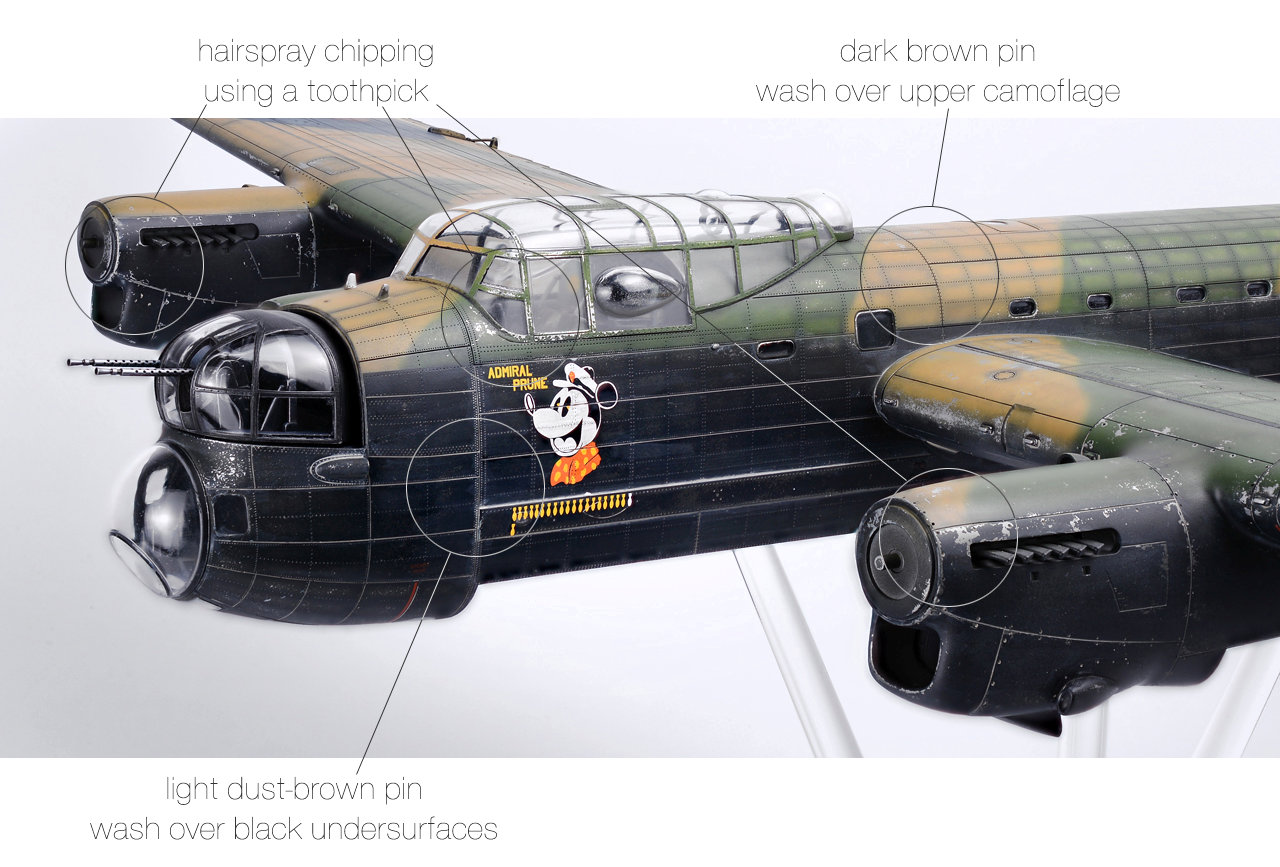
A close-up of the nose of the aircraft illustrating chipping and wash colours/locations.
A view of the rear of the fuselage highlighting the light dust coloured wash over the black base. Note that I continued the wash over the roundel and markings.
A view topside of the wings and mid-fuselage. The pre-shading shows through the lighter camo colours and does a lot of the work highlighting rivel lines. I have only run a pin wash through the topside camo colours at this point. My final part will deal with differentiating panels using filters, and the all-important exhaust staining.
Note the pre-shading showing through on the black undersides. I had to be very careful with the paint thickness while covering these areas, as with black, it would be easy to completely cover the pre-shading.
A couple of overall views of the model at this point.
My final part will look at finishing the undercarriage, bomb bay and props, along with some further weathering including some substantial exhaust staining at this link…
Adam O'Brien
Appendix: The instruction booklet