

.jpg)
From ICM
1:72nd scale
Model #72140
82 parts
24.1cm long, 15.8cm wingspan when completed
A special "Ghost" digital decal is included
Price: $34.45 USD from Hobbylink Japan
Product link on the ICM website
 The subject - the "Ghost of Kyiv" & his MiG-29
Product link on the ICM website

ICM is bringing us a kit portraying one of the myths of the war over Ukraine. The "Ghost of Kyiv" was a story from the start of the Russian Invasion in March, with the tale of a brave Ukrainian MiG-29 pilot who shot down gained worldwide fame after shooting down 5 or 10 - depending on your source - Russian aircraft on the first day of the invasion. “People call him the Ghost of Kyiv. And rightly so,” the Ukrainian government had said at the time.
.jpg)
Footage of the MiG-29 shooting down Russian aircraft spread around the internet like wildfire, and although later on it was said the footage that was created in flight simulator DCS was not real, it was said it was created to pay homage to this now legendary pilot's skill and nerves.
.jpg)
Reports have come in today that the "Ghost", after shooting down as many as 40 Russian aircraft, was identified as Major Stepan Tarabalka, a 29-year-old father of one. A UK newspaper also said that the Tarabalka, whilst flying a MiG-29, was shot down on March 13 while battling an “overwhelming” number of enemy forces. His final tally of enemy aircraft is rumoured to be around 40 enemy aircraft & helicopters.
.jpg)
Although the facts about the pilot & his exploits are under scrutiny and we will never be sure of many of them, we are sure that the legend has inspired many Ukrainians and citizens of the world alike.
The kit: 1/72nd scale MiG-29 "Ghost of Kyiv" kit
Early on during the war in Ukraine (and it is a war, not a 'peace-keeping operation') a legend was spawned, 'The Ghost of Kyiv' and it was due to the amount of Russian aircraft 'The Ghost' allegedly shot down before the pilot ejected or was killed. Whether it was true or not or whether he flew a MiG-29 or Su-27 doesn't really matter because the important thing is that legends like this give people hope when their back is against the wall during conflicts.
.jpg)
Footage of the MiG-29 shooting down Russian aircraft spread around the internet like wildfire, and although later on it was said the footage that was created in flight simulator DCS was not real, it was said it was created to pay homage to this now legendary pilot's skill and nerves.
.jpg)
Reports have come in today that the "Ghost", after shooting down as many as 40 Russian aircraft, was identified as Major Stepan Tarabalka, a 29-year-old father of one. A UK newspaper also said that the Tarabalka, whilst flying a MiG-29, was shot down on March 13 while battling an “overwhelming” number of enemy forces. His final tally of enemy aircraft is rumoured to be around 40 enemy aircraft & helicopters.
.jpg)
Although the facts about the pilot & his exploits are under scrutiny and we will never be sure of many of them, we are sure that the legend has inspired many Ukrainians and citizens of the world alike.
The kit: 1/72nd scale MiG-29 "Ghost of Kyiv" kit
Early on during the war in Ukraine (and it is a war, not a 'peace-keeping operation') a legend was spawned, 'The Ghost of Kyiv' and it was due to the amount of Russian aircraft 'The Ghost' allegedly shot down before the pilot ejected or was killed. Whether it was true or not or whether he flew a MiG-29 or Su-27 doesn't really matter because the important thing is that legends like this give people hope when their back is against the wall during conflicts.
With that ICM re-boxed their 1/72 MiG-29 in 2022 complete with a new decal sheet. The kit itself is one of their earlier models released in 2008 and to be fair it shows as ICM have improved their moulding quality a LOT since then.

The "Ghost" scheme...


On the smaller sheet are a variety of I.D. numbers plus stencils;

Looking at the parts on the sprues and moulding quality is OK, but there is some flash present;

The aftermarket improvements I will be using for this kit.

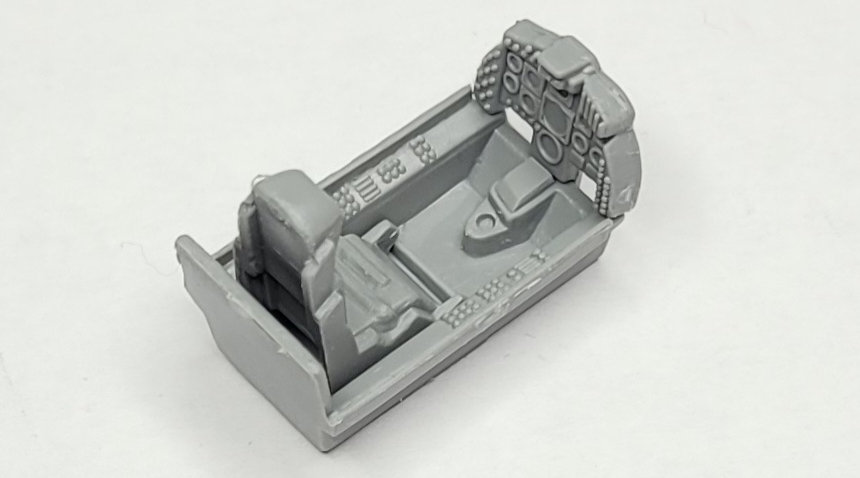
Starting then with the cockpit and this is a very simple construction comprising the tub, an instrument panel and ejection seat. I tried to add the etched parts for the Italeri MiG-29 due to the claim it fits this one....nope! In fact the only part that fits is the floor plus the ejection seat harness and that's it so scratch that idea.

I assembled the Quickboost seat to see how it fitted the cockpit but unfortunately it is substantially taller than the kit item and as a consequence the canopy wouldn't fit in place so scratch that idea (#2);


In the end I carved off the moulded on seat harness and used the one from the etch set so that it wasn't a total waste;

The instrument panel didn't fit either, so more etched bits for the spares box. With the cockpit in place, I glued lead weight into the nose before sticking the fuselage halves together;


The nose joints require some TLC


On the starboard upper fuselage near the cockpit there is a sink mark that needed filling too;

After all that the airframe was virtually built;

The new intake covers

The leading edge inlets needed populating...
The difference between them is pretty stark - The kit part is on the left (like you needed to be told that), the Reskit (RSU72-0192) exhaust is on the right.

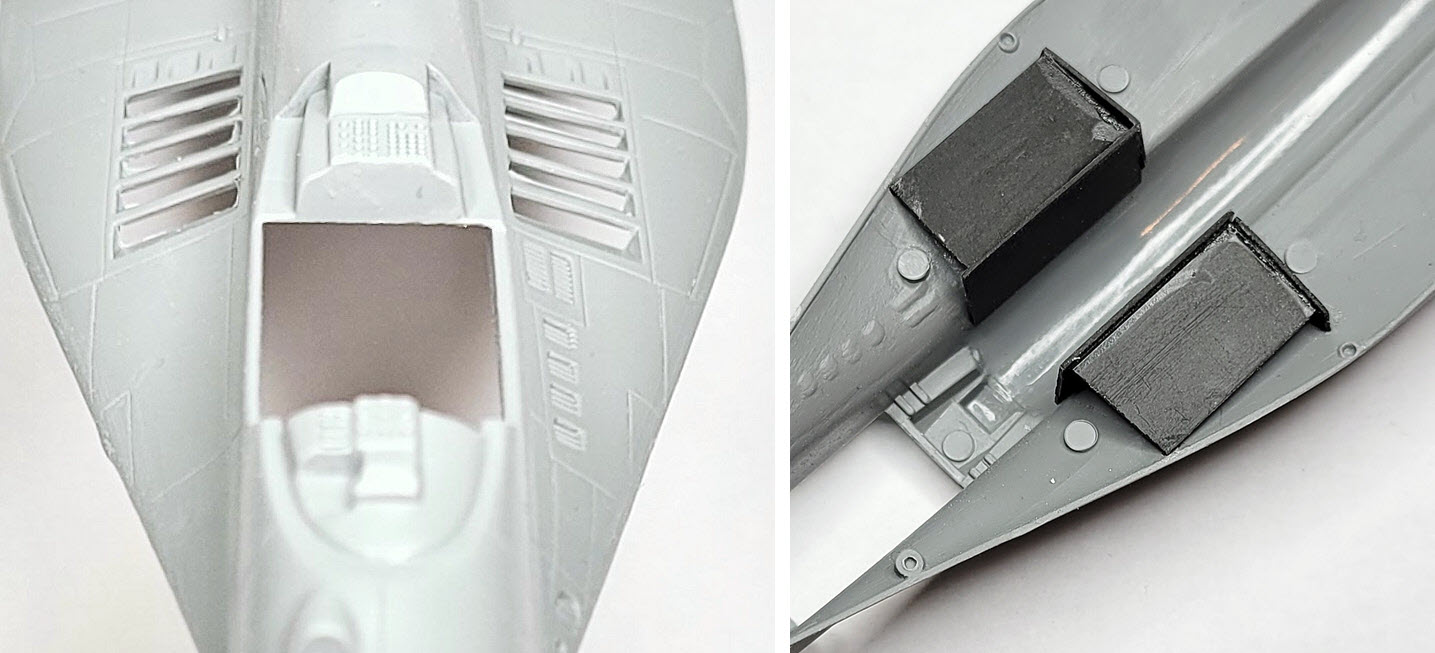
To start, you have to remove the lower exhaust panel on the kit right up to the first panel line;

The insides of the fuselage needs thinning down to accept the engines; a huge improvement!


Once done the pylons were glued to the wings;

As the undercarriage bays were more or less the same colour as the undersides I glued these into place and the build was done apart from a few little bits. The wheels look a little wonky as they were only held in place with Blu-tak for photography purposes.
.jpg)
.jpg)
.jpg)
.JPG)
.JPG)
.JPG)
.JPG)
.JPG)
In conclusion it may not be the best MiG-29 available in 1/72 and it requires a fair bit of work to bring it up to current standards, however the important thing to remember is that with purchasing this kit you are making a small but vital contribution to the Ukrainian economy when they really need it.
Considering that the country is fighting Russian aggression and all that entails such as power outages, it is remarkable that ANY of the Ukrainian model manufacturers are able to produce anything, let alone bring out new kits. Pretty amazing really and a huge testament to the Ukrainian people.
Andy King
Thanks to ICM for sending this kit to us to build & review, you can find out about ICM's other releases on the ICM plastic model kits website

Instruction manual


