

There is once again a large scale battle on to win the night
skies over Germany – Large in scale meaning the 1/32nd market. Our
two contestants - the Zoukei Mura He-219 in the blue corner – with a high price
tag but high detail to accompany that – and in the red corner the He 219 from
Revell, boasting nearly as much detail but a much easier to swallow price tag.
Who wins the battle?? Well we have the Revell kit here to examine today – we will see if it kit can match it with the best in our
review…
.JPG)
Scale: 1:32nd
No. of parts: 261
Light grey and clear plastic transparencies.
Length: 524 mm / Wingspan: 578 mm
Marking Choices: 4 choices of ex Luftwaffe machines.
RRP: £49.95
Revell model kits
are available from all good toy and model retailers. For further information
visit www.revell.eu
There are two new kits of the He 219 in 1/32nd
scale on the market this year - one is the high-tech – high price point version
of the early He 219 A-0 “Uhu” from Japanese brand Zoukei-Mura and the other is
the later He219 A-7/A-5/A-2 from Revell. We think that both will have their own market
– but today we focus on the offering from Revell.
Revell has a theory of model making that is put to the test
with this kit. They have been forging ahead in a “slow but steady wins the race” way –
releasing a few large scale kits a year that are increasing in detail and ease
of construction but are including just enough detail to keep most modellers
happy. This method satisfies a lot of people but in particular it keeps the aftermarket guys in raptures – there always being one or two areas that people invariably want to improve on or detail further. I believe personally pretty
strongly in this ethic myself as I would prefer not to have too many parts of
the aircraft open whilst keeping kits detailed but simple to make. If I want
detail I would probably use aftermarket anyway – the amount of research and
detail most of these companies put in make this a better choice for me. But
enough of what my preferences are - Let’s look at what is in the box
.JPG)
The large blue box has striking box art that captures this
sleek but sinister looking aircraft very well. The Uhu is spiting fire whilst a heavy bomber
goes down in “discreet” flames behind – this is a step in the right direction -
too many boxes of kits recently have been sanitised and this box looks great.
The other thing about this box is it is a top opening box – no one maybe except
the greenies like the side opening boxes so two ticks even before we look at
the kit!

When we look at the instructions they are the regular Revell
comic book looking fare we are used to but rather better thought out this time
– Seventy eight phases of construction are a little easier to follow this time
and it doesn’t look like everything is jammed into a few pages like they have
been previously. There aren’t many traps here to fall into as long as you
follow instructions.

Even on these smaller parts there is not much flash to speak of..

On opening up the large kit we were surprised at the slim
and lengthy lines of the kit – this was indeed a creature designed to be used
at altitude – the long fuselage sprues are fifty two centimetres long whilst
the slim wingspan comes in at nearly 60cm. The plastic on offer is a light grey
with a slight duck egg tint we have been familiar with the other large scale
Revell German kits. The twelve sprues are free from any visible sink marks to
my eye. There is some extra flash at the rear of the wings where the plastic is
very thin - but that is an instant fix with your hobby knife. A good job on the
injection process.
An overview of the grey plastic sprues - click images to make them larger..


Although I have high praise for the way the surface is textured there are still some surface problems – there are some two separate mould lines going with the direction of the airflow on the starboard wing. The top and the bottom wing are affected – and I am baffled as to the source of this as there are no rib/s below the surface on the inside of the wing it to make it happen. Puzzling! It needs a quick sand and a re-scribe to fix or you could ignore it altogether, the only thing is once you know about it it’s hard to not look for it.
.JPG)
.JPG)
There is also a bumpy surface around the working surfaces of the tail – though this and the wing irregularities are minor they must be mentioned. I have found with most models though to sand or cut connecting pins shorter and to sand joints to fit before you glue them. Measure twice cut once as carpenters say!
The lovely rivets and access panels are not too deep - lovely detail is shown on this kit


Apart from these irregularities I am really impressed with the surface detail of this
kit. All of the panel lines and access ports are only very recessed slightly
right around the kit – they are very fine indeed and not too overstated –
especially once undercoat and paint goes on to the model. The plastic is easy
to cut and work and we found the sprue connections to be in sensible places.
There are several features of this kit which make it clear that Revell had
thought hard while tooling it.
An example of forethought here is the top dorsal and
underside ventral panels which sit in the middle of the fuselage and runs
nearly the length of the aircraft – they fit over the fuselage like a saddle
and secure right on the aircraft panel lines like in real life – goodbye to the
arduous centre fuselage seam sanding and later re-scribing of the surface to
get a decent looking result.


The bottom gun pods are a separate part as well preventing nasty seam fixes - well thought out

The other thoughtful part of the engineering I liked was the
use of the strengthening wing spars that I think Tamiya pioneered – this enables
the wings to be strongly anchored onto the fuselage at the right angle – very
important for a kit with such a long wingspan.


 With three variants being able to be depicted – from the
A-2, A-5 and the latter A-7 Variant we have many features that can be
included or not depending on your choice. I would stick to one colour scheme
you like and follow the instructions carefully as there are several aircraft
specific choices you will have to make in the options of this kit. The choices
really start to make a difference around step sixteen at which you have to
choose how many guns you put in the under-fuselage pod. You must choose
carefully and use the thoughtfully included blanking plates if you wish to use
the upwards firing "Schrage
Music" cannon.
With three variants being able to be depicted – from the
A-2, A-5 and the latter A-7 Variant we have many features that can be
included or not depending on your choice. I would stick to one colour scheme
you like and follow the instructions carefully as there are several aircraft
specific choices you will have to make in the options of this kit. The choices
really start to make a difference around step sixteen at which you have to
choose how many guns you put in the under-fuselage pod. You must choose
carefully and use the thoughtfully included blanking plates if you wish to use
the upwards firing "Schrage
Music" cannon. 

The front cockpit is very thoughtfully made – it houses a
detailed little instrument panel which once painted simply needs the supplied
decals fitted to it. The side panels sit inside two bulkheads which house the
cockpit tub perfectly as you can see below left. The cockpit tub can be detailed up to look very realistic with some care and ingenuity in the addition of scratchbuilt throttles.


The only addition I would make would be some aftermarket seat belts and pedals as these are pretty thick/soft in detail and this would be
the only thing about the kit I would change if I were moulding it.
.JPG)
The large radio and electronics suite in the rear facing seat are very well detailed and will come up really well under some paint and chipping. The equipment for both types of FuG 220 Lichtenstein SN-2 radar are included as well as the viewer for the Naxos radar equipment which sits on top of the panel and it is at this step in the build where special concern must be taken to make the right choice. The instructions are clearer here than in previous incarnations and they tell you pretty well at step eighty in the build to make the choice.Shown below is the complicated set up for the Neptun radar array on the nose, the instructions guide you through pretty well.

.JPG) The former big hitter in the He 219 stakes was the Tamiya
1/48th scale kit – It had an integrated metal cast front nose wheel bay which kept this
tricycle undercarriage bird from being a “tail sitter” this was a great idea
but left a lot of stress on the otherwise thin metal gear in the nose. Revell
have again thought straight and shown you in the instructions to add 25 grams
to the front nacelles in each engine and 70 grams to the section just behind
the cockpit. This keeps the weight off the very front and spread the strain
well for those who will use the supplied plastic undercarriage. This may negate
the need for metal undercarriage as well.
The former big hitter in the He 219 stakes was the Tamiya
1/48th scale kit – It had an integrated metal cast front nose wheel bay which kept this
tricycle undercarriage bird from being a “tail sitter” this was a great idea
but left a lot of stress on the otherwise thin metal gear in the nose. Revell
have again thought straight and shown you in the instructions to add 25 grams
to the front nacelles in each engine and 70 grams to the section just behind
the cockpit. This keeps the weight off the very front and spread the strain
well for those who will use the supplied plastic undercarriage. This may negate
the need for metal undercarriage as well.
Instead of buying some weights I used 3x 2 Pence coins
and a 1 Pence coin – it beats the hell out of paying for weights – this was the
25G for the engine nacelles – and you can just x3 it to make the weights for the nose
section. Cheap and readily available if you don't have any readily available sinkers or lead weights!


The undercarriage itself looks great and comes in two parts
to each strut - whilst they are well made and look very much like the real ones to my eye some may as a matter of habit with such a large aircraft - opt for metal landing gear.

 The Wheel bays are very well detailed and although they do not have all of the
wires and cable as shown on examples like the restored NASM aircraft In America
they should be quite adequate for most modellers. There are two injection marks inside the engine nacelle bays and a large seam that needs to be filled before this is painted. This wont be seen sitting normally but it certainly will under close inspection.
The Wheel bays are very well detailed and although they do not have all of the
wires and cable as shown on examples like the restored NASM aircraft In America
they should be quite adequate for most modellers. There are two injection marks inside the engine nacelle bays and a large seam that needs to be filled before this is painted. This wont be seen sitting normally but it certainly will under close inspection.
Gear doors are detailed inside and out


The Tyres are fat and plain in tread like the real thing –
with the brake lines supplied on the wheel hubs. The landing gear fits around
the wheels which is a pain if you want to pre paint them – you could trim down
the stalk the wheels rotate on and cheat them in there if you like though.


There aren’t any engines on this kit – well none that you can see anyway. The cowlings will have to be buttoned up unless you want to source an aftermarket engine and cowlings. The cowls I would have liked to have posed open – as this gives this the ‘219 a more menacing look. The nacelles themselves are nicely panelled and go together on the kit not too badly. I have assembled two of them already and the fit is great


Whilst the exhausts are not too detailed and certainly not hollowed out this doest matter as they are surrounded by flame dampeners so this would have just been detail wasted anyway.


The posable tail surfaces are here for you to see on the sprue – they do
move freely and the fit is fairly tight but you must really follow the instructions
carefully to make sure that you don't put a step wrong. You don't want
something that fits to fit on the wrong side.


The tail surfaces secure “on the tail” - if you know what I mean,
they need to be assembled on the kit and not before it as they clap around their
pivot points. I used Tamiya or Mr Cement thin glue to make this bond AFTER I clasped
them around the tabs which let them pivot on the kit. They are not at all
flimsy and do not flap around in the breeze like some I have encountered. Posable
surfaces are a great addition and add depth and versatility to the kit,
modellers on the whole will really appreciate them.


Transparencies:
The kit has two sprues of clear parts which depict the three
types of canopies needed to depict the aircraft in the box. The canopies can be positioned opened or
closed to suit your tastes and how comfortable you are with your completed
cockpit modelling.

A canopy is depicted housing the NAXOS radar bump and
included is the clear NAXOS tail radar part as well. The parts are thin and
very transparent and luckily for Revell the shape of the canopies negates any
need for a centre seam down the cockpit bubble. One part which is interesting on
this clear sheet is the side wall moulded in plastic so you can colour it
whilst showing the clear switches.


Decals:
There are four choices depicted in the decals - Several of
the He 219s were captured in north Western Europe by the allies and photographed
extensively I mainly for their novelty value I suspect – some research has gone
into the decal choices here – a small sheet of decals represent five “Uhus”.
.JPG)
The decals are similar to others released by Revell –
printed by Cartograf in Italy these decals have some pedigree – I have used
them myself and know the satin finish of these decals gives way to a marking
that settles down into the kit very well and leaves little to no signs that it
is a decal at all. With the rising popularity in using masks it is a good thing
Revell go to the market leaders in quality to print their decals.

Included here are all the markings you need except for
swastikas – being a German based company and it being illegal there I can
understand why but sourcing them is always something I wish I hadn't needed to
do. There are the red dotted walkway strips which may or may not be included on
your kite (our choice as the proof for or against is inconclusive) as well as
tiny access panel markings.
As mentioned before there are several small decals for the
instrument panels which look great once applied and save the need for Photo
etched metal. The decals have a small amount of carrier film on them but my
experience with these decals is it disappears under micro-set/sol combination.
The colours are strong and the white is not at all opaque – this looks like an
efficient and well set out sheet.

Marking Choices:

.JPG)
Captured by the American in Denmark in 1945 this Uhu had the
lighter colour schemes predominating with these birds - all over RLM 75
“Lichtblau” with the upper surfaces RLM 76 Grauviolett – the squiggled with the
underside colour over the top of that. Captured by the British this aircraft
formerly known as “D5-CL” codes wore the
RAF roundel after the war whilst being evaluated by the British.
- Heinkel He 219A-2
of 1./NJG 1 Westland/Sylt, Germany, April 1945
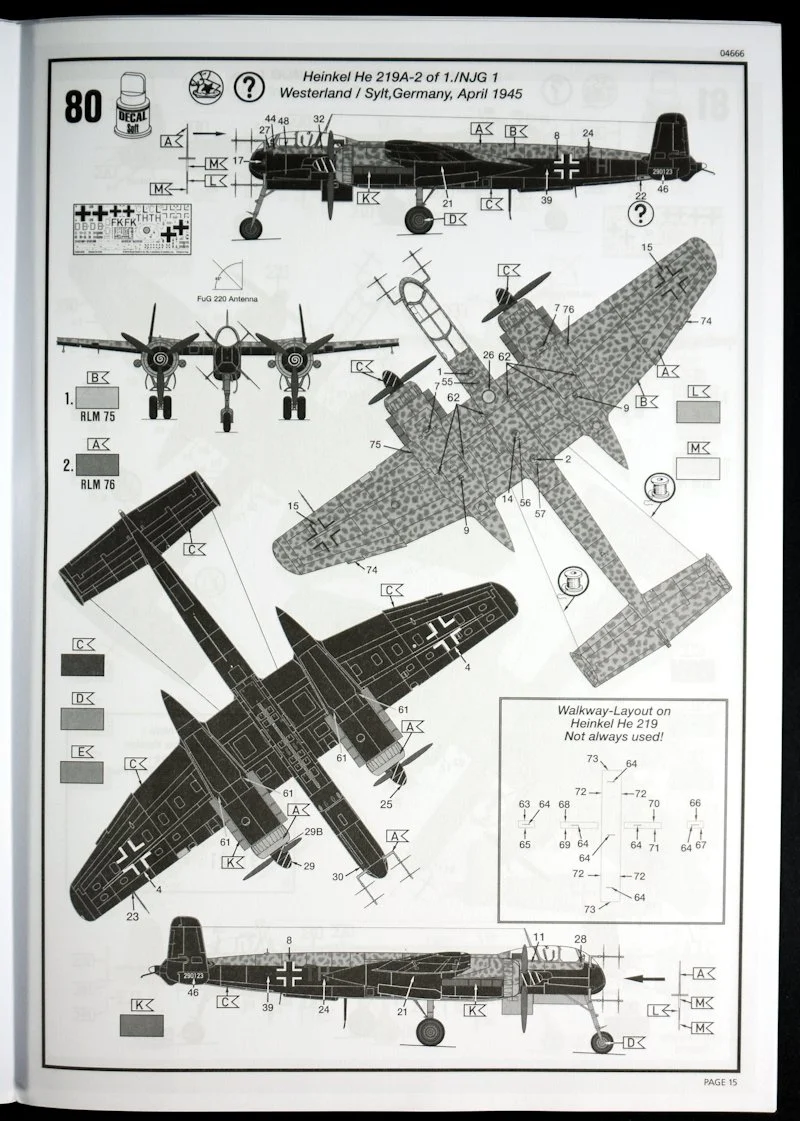

The first of two aircraft in this decal sheet from Sylt air base captured in 1945 – this machine featured a black underside (applied to
aircraft undertaking air to ground night attack duties against the allies) -it
looks certainly different and should be popular- the topsides are the squiggled
RLM 75 over a RLM 76 base again – like the former machine there are attractive
white spinner spirals included in the decal sheet as well.
- Heinkel He 219A-7
of 1./NJG 1 Westland/Sylt, Germany, April 1945


This kite I think has been the subject of some revision or
maybe just an error on the decal sheet – maybe it just saved space I would
think the latter – as the werk number
is to be changed from 310215 to 310213 – it is really hard to tell on
photographs and this may be the reason for the change. Smart thinking if it was
just to save printing costs – something Revell has passed on I think in the end
price point. This aircraft Is the more familiar RLM 75 squiggles over RLM
uppersides and RLM 75 undersides.
- Heinkel He 219A-5
of Stab I./NJG 1 Münster-Handorf, January 1945
 The last choice is again an all over RLM 75
“Lichtblau” with the whole upper surfaces RLM 76 Grauviolett – then squiggled with the
underside colour over the top colour. Again there is an alternate version with a different werk number that brings the total of markings up to five and not four - smart thinking Revell
The last choice is again an all over RLM 75
“Lichtblau” with the whole upper surfaces RLM 76 Grauviolett – then squiggled with the
underside colour over the top colour. Again there is an alternate version with a different werk number that brings the total of markings up to five and not four - smart thinking Revell
With a large kit like this most people probably only want to
buy one of models (for space reasons alone) so the choice of WHICH kit you b will be
important. You must decide I suppose on your modelling philosophy. Undoubtedly the completion kit will be well researched and detailed. But it will be hard to come
anywhere near this kit’s price point and ease of construction. This kit from
Revell is surprisingly simple to make and impressive in it’s basic feature list that gives you more than enough things to show your envious mates, and a great step off point if you want to super detail.
I think this will be the He 219 kit you build first – whether you build a second kit of this type or not depends on you and your wallet I suppose – but Revell have hit the ground running with a stunning looking model that will be the pride of your display stand for a while yet.
I think this will be the He 219 kit you build first – whether you build a second kit of this type or not depends on you and your wallet I suppose – but Revell have hit the ground running with a stunning looking model that will be the pride of your display stand for a while yet.
As much as we could make in the space of this review- its an impressive kit for not much money!

We were pleasantly surprised by the detail, fit and surface quality in
this kit – well done Revell for making an easy to assemble
and attractive large scale aircraft that modellers have been wanting to see for
ages.
Revell model kits are
available from all good toy and model retailers. For further information visit www.revell.eu