

This large twin cannon that saw action on the Flakturm of Nazi Germany’s largest
cities is the subject of one of Takom’s latest kit in a massive 1/35th scale -
how would this kit – with a 30 cm height when fully elevated go together?
Clayton has built it before painting and he thought he would share the build
with us in today’s build review…

WWII German 12.8cm Flak 40 Zwilling
Takom
#TKO2023
1/35 Scale
Plastic injection moulded sprues & Photo Etched Parts
Markings for four different gun emplacements
Available from Hobbylink Japan for ¥7,600 / USD
$61.10/ €55.36
HISTORY
Just when you thought the 88mm was as mean and nasty as it
came, along comes the 12.8cm Flak 40.
The Flak 40 was without doubt one of the true heavy hitters of the war
and was the most powerful anti-aircraft gun of the war.

The gun fired a 27.9kg shell at 880m/s to a maximum ceiling
of 14800m. The 128 used a powder charge 4 times greater than that of the 88.
Even with all that extra firepower, the shell’s flight time was only a third as
long as the 88. This however meant that
this weapon was able to attack faster moving targets with greater accuracy.


The Zwilling variant of this gun saw two flak 40’s mounted
to the one chassis. The gun was capable of firing 20 round per minute.
A total of 34 128’s were produced during the war with the
initial order of 10 being the twin Zwilling version.

Whilst a number of sites were present protecting Berlin,
Hamburg and Vienna, the 128 is probably most famous in its mounts on the Zoo
Flak Tower. This fortified flak tower
existed in Berlin between 1941 – 1947. Its primary role was as a gun platform
to protect the Government building district against the Allied bombing raids.

The Zoo flak tower in Berlin ( one of 4) was around the size of a 13 story building. The facility was also used as a hospital, a civilian air raid shelter and a
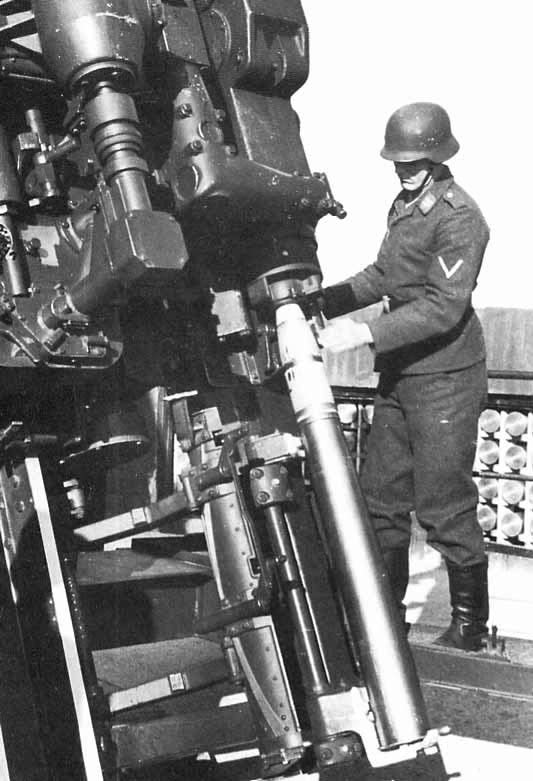
radio transmitter station. It was also even used to store Nazi art treasures. 4 Twin mounts 12.8cm Zwillings were stationed atop of the
Zoo Flak tower in Berlin as you can see in this picture here.

THE KIT
The kit comes in quite a large box – 260mm x 380mm x 90mm. I
guess in the scheme of things that doesn’t really mean anything, but at around
$80Aud I guess that has some expectation around the bulk of the kit.


The kit comes with 8 individual sprues, has one decal sheet,
some poly caps and a small, but intricate sheet of photo etch.

Also included in the kit is a nicely printed painting guide
from AMMO, offering you 4 different colour schemes.


Step by Step build
Before I start I would like to put on record, I am no
authority on the pieces, parts or the functionality of this weapon. I refer to
parts of the model and identify them as best I can, however, I am quite
prepared to stand corrected on just about any detail other than the fact that I
call a barrel a barrel.

So with that in mind, here is my experience with the build
of Takom’s 12.8cm Flak 40 Zwilling
STEPS – 1 to 3
The barrel is moulded in halves and need to be glued
together. The joins running the length of the barrel are going to take some
cleaning and sanding. I did have to make small adjustments to the straightness
too.
I did have some fit issues with part E59 not allowing the
barrel to slide on the housing properly and needed to trim it down a
little. I later found the loose
amendment to the instructions in the box… That will teach me for not being more
aware of the box contents.
There are some pretty obvious joins in these early stages,
so some clean-up will be required.

Steps 4 – 7
The gun assembly continues. Again I had a few fit issues
with part E58. I found the instructions a little confusing. I decided to omit
the part as it wouldn’t be seen in the final model anyway.

Steps 8-10
In these steps the cradle is attached to the gun. The two
sides of the cradle in sets 9 and 10 really need to sit level and square for
future steps, so exercise caution when fitting these pieces as there is a great
deal of movement in their positioning.
You can also start to see there is going to be a great deal
of cleaning up of joins and connections.

Steps 11-13
The feeding arm and various other parts are attached here.
There were a couple of really nasty scars from the moulds deep in the bucket.
It really needs some serious filler and sanding, but I will pose it with the
ammunition sitting in that position to hide them.

Steps – 14-15
Step 14 is where the bridge at the top of the gun connects
with the left and right cradle as seen in step 10. My fit was far from perfect
and needed a little bit of muscle to manipulate the piece into some form of
reasonable position. The lifting struts for the weapon are fixed to the model
here too. The connecting pieces were a little fiddly to set in place, so I let
them set off a little before fitting the part C6 in them. This piece needs to have motion, so care must
be taken not to glue them in place.
Steps 16-30
Simply repeating the first lot of steps in assembling the
second gun and mount. Everything is more
or less identical however mirrored to the initial construction.
Steps 31-34
Here the gun platform is assembled. Pretty straight forward
build. The gears that will later serve
to move the guns up and down together is supplied in 2 pieces. A little forethought is needed here as there
is a little movement in the fit. I
should have been more careful here I suspect because my guns didn’t end up
being parallel. Only very minor, but I think if I had aligned these gears more
carefully the barrels would have sat parallel.

Step 35
The two-barrel assemblies and lift arms are now attached to
the platform. The instructions suggest
to attach them in one step. I however
found this quite difficult. The way around it for me was to glue the sliding
part of the lifts to the platform first and then left it dry. Once dry you
could slowly slide the lift sleeves over the rods fixed to the base and set
everything in place. Hard to explain,
but you will know what I mean when you get to this step.


The instrument panel and hydraulics are now assembled. Quite a bit of cleaning up and fit not 100%,
but there is some interesting detail. A couple of fine PE pieces in the mix
too. Don’t follow my lead however as the
piece on the right has been stuck on upside down. I really like the little alarm bell here too… nice little
detail I can see myself painting red.
I see there are a couple of instrument dials there too,
Decals would have been a nice touch or at least some details in the mould.

Step 38-41
I believe this is some type of feeding arm for the gun. The
two main halves join together. Again, there is a lot of cleaning up to be done
as the join seams are highly visible.
In step 41, part D6 is to have motion in it, so care must be
taken when gluing. I found it easier to connect E23 and E26 to D6 and let it
dry before attaching it all to the main structure. I think having movement in this piece is
probably unnecessary, but it adds another element to the model.

Steps 43 – 48
This is essentially the mirror image of steps 38-41. This
picture shows the structure attached to the platform. When these side panels
are attached to the platform they give the gun mounts some stability and hold
the structure together.


Steps 49-51
More of the underside is assembled. This platform will house
the steps and working platforms. The PE tread plates add a really nice detail
to the model and fit perfectly into the recesses on the moulded plastic
parts.
The instructions were a little unclear about how exactly a
couple of the parts were to connect with each other. The main tread section and
the step section. I took a guess at, however I have seen other models with it
the other way around. Either way it will have no effect on the model.
Step 52 is a
repeat, but the reverse side.

Step 53
The gunner’s seats are now fitted in place. I later found that the instructions have in
placed in the wrong position on one side….so it would be a good idea to skip
attaching the seats until the end after the platforms have been attached.

Steps 54-55
The platform sections are now attached to the underside
structure of the gun. You can now see the gunners seat on the right hand side
is clearly too close to the stair treads there. It really should have been
about 10mm further to the left.
Attaching those platform sections was also problematic as
parts F12 and F13 didn’t seem to allow them to sit flush and cleanly. I removed the small parts, shaved them down
and reattached. This seemed to help the issue, but the fit was still far from
perfect. You can see from the photo the connection isn’t entirely flush.

I left the incorrect gunners seat in position because quite
frankly it was going to make a mess trying to remove it. Once the glue had set the section was attached to the top
gun section. The fit again was not as clean as it could have been, but
acceptable in the scheme of things.

CONCLUSION
This kit is a little more ambitious than previous Takom
releases I have built. There seems to be more engineering in the model itself
and there is a great deal of detail as well as a number of intricate and moving
parts. I say ambitious because I feel
this kit could have been incredible, but a few fit issues and some nasty mould
lines meant a lot of cleaning up, so it was hard to be overly enthusiastic
about it. A little refinement with some
of the Takom’s production processes would have a dramatic effect on the quality
of these models. I have no doubt some of the market leaders are very much
looking over their shoulders.

This is a big kit and builds into a big model. There is a
surprising amount of building in this kit, so be prepared to work your way
through it.
Some details of the kit...


Turned metal barrels really would have been a beautiful
inclusion in the kit, however I guess it leaves the door open for an
aftermarket manufacturer to knock some out.
Another opportunity exists there for a crew for this beast too. I am sure that would be popular.


My complaints are really quite minor though, and I can be a
little lazy with my modelling. As long as you are prepared to massage, fill and
sand a little you will be happy with this kit.


Takom again have secured their position in the market with
the Zwilling. Takom has fast become the company prepared to try something
different and give the hobby a subject that no one saw coming.
Well done Takom.
Clayton Ockerby
Thanks to Takom
for sending this kit to us to build and review – you can expect this kit to be
painted sometime in the future on these pages as well.
Find more of Clayton’s
work at his website “The Workbench” and his Facebook page as well
