

We have seen some information about the new King Tiger from Takom in 35th scale, now Andy’s got his hands on one that he wants to get building – firstly, he thought he would share what’s in the box with us. Let’s have a look in his review at the “Abt. 505” boxing before the parts are put together…

Sd.Kfz.182 King Tiger Henschel Turret w/Zimmerit – “Abt.505”
From: Takom
Kit# 2047
1/35th scale
Plastic sprues,
photo-etched details
Individual track links
Full interior
Hatches can be built open and closed
Decals for 2 variants inside
Price - £57, ¥7,520, US$72, €64 from Hobbylink Japan
Soon to be available from Takom’s Distributors Worldwide.
From: Takom
Kit# 2047
1/35th scale
Plastic sprues,
photo-etched details
Individual track links
Full interior
Hatches can be built open and closed
Decals for 2 variants inside
Price - £57, ¥7,520, US$72, €64 from Hobbylink Japan
Soon to be available from Takom’s Distributors Worldwide.
Since they appeared on the modelling scene, Takom has made something of a niche for themselves by releasing more unusual and left-field models, and for the most part have steered clear of the more common, and maybe even clichéd subjects that tend to be the bread and butter of other kit manufacturers.

We'll have a quick rundown on the real thing, then delve into the box.

The Tiger II or King Tiger (never an official name) was the successor to the equally famous Tiger I, and combined elements of that tank, together with a sloped hull design reminiscent of the Panther medium tank. It was a heavy old thing, weighing in at 80 tonnes, and armed with the infamous 88mm gun. Developed and manufactured by Henschel, the tank entered front line service in 1944 and first saw limited use in the aftermath of the D-Day landings.

The development of a heavy tank had begun a few years earlier with proposals from both Henschel and Porsche, with Henschel winning the final contract. The turrets for both of these designs were produced by the Krupp company, with their initial version having a rounded profile at the front, which resulted in a prominent shot trap (where an incoming round could get trapped, rather than being deflected). This initial turret design has since been known (somewhat incorrectly) as the 'Porsche turret' and was used for the first 50 King Tigers, after which Krupp designed a more simplified production turret which also removed the shot trap. This version has come to be known as the 'Henschel turret', despite both designs being produced solely by Krupp.

The King Tiger was heavily armoured, with up to 180mm on the turret front, and as such was essentially impervious to just about anything the Allies could throw at it. The tank's own 88mm gun was one of the most feared weapons during the war making the King Tiger a very potent adversary, however, initial unreliability and the fact that the tank simply couldn't be produced in large enough numbers meant that it ultimately was unable to turn the tide of the war for Germany. Despite that, it's gone down in history as one of the most iconic tanks of WWII.

The Model
Enter Takom with their new range of King Tiger models. The first three releases all feature moulded on Zimmerit (the anti-magnetic mine paste, that was applied to the early King Tigers). Takom have really pulled out the stops for these releases, with several special features, the most notable of which being the full interior for both the hull and turret. In addition, we get the aforementioned Zimmerit coating and 'scale thickness' armour, although, in reality, I'm not sure just how much difference that the last feature really makes. This particular boxing is the Panzer Abteilung 505 version, which is the same as the standard Henschel turret release (kit no. 2045) with the exception of a Zimmerit-free square on either side of the turret where the unit emblem, a knight on horseback, was painted

When you pick up the box you get a good idea of just how much plastic there is inside as, although not that much bigger that a regular kit box, it is very deep, and indeed the sprues (all 17) are packed high inside it. They're all well protected, each one individually bagged, with the instructions, decals and photo-etch packed at the bottom to keep them flat. The box itself is also made from a slightly thicker cardboard to give it more strength.
Well, there's a lot of plastic to get through here, so I'm going to keep the waffle to a minimum and let the photos do the speaking. So, first up it's... guess what... yep, you've got it...
Sprue A (x2)
Wheels, suspension, exhausts and other small details. Very clean moulding for the most part. There's a tiny amount of flash between some of the teeth on the sprockets, but nothing worth worrying about.

Sprue B
Side skirts, engine deck components and tow cables are the main parts here. The skirts are single pieces for each side. They'll be easier for fitting that way, but you'll need to cut them up if you want to show some sections missing.

Sprue C
Turret roof and base plates, mantlet parts and the main gun. I think a lot of people will be relieved to see the barrel as a single part moulding. There's a slight mould line to remove on each side, but otherwise, it's ready to go.

Sprue D
Hatches, cupola and other small details including the parts for the muzzle.

Sprue F
Lots of Zimmerit here for the rear of the hull, turret plates and other areas. There are two rear turret hatches included with differing Zimmerit patterns, one linear, one radial. The instructions say to use the hatch with the linear pattern, so presumably the other is for use in one of the other releases (if you hadn't guessed, I'm not a German armour expert).

Sprue G
More small details including the pioneer tools. These have moulded clamps, but the instructions show the option to slice these off and replace them with alternatives from the PE sheet.

Sprue L
Here we've got the parts for the gun breech. There's some nice detail here, let’s hope you can still see some of it at the end of the build.

Sprue M
Not sprue E, as you might have thought from the photo. These are the internal sidewalls for the lower hull along with the rails for the torsion bar suspension. There's some very nice cabling moulded on the sidewalls.

Sprue N
Parts for the Maybach HL 230 V12 and the gearbox. There's also the fighting compartment firewall here.

Sprue P
More interior and engine compartment details, bulkheads, fuel tanks etc. The radio operator's seat is here and features a very nice wrinkled fabric texture.

Sprue Q
Lots more interior details. Again there's a mix of engine and transmission parts along with other general internal fittings.

Sprue R
Parts for the gun mount and some of the included ammunition. There's a total of 84 rounds included with the kit but no individual ones thought. They're all moulded integrally with their racks.

Sprue T (x2)
Here we've got the radiators and fans, and a few more engine components. Some very nicely done open blades on the fans.

Sprue U
The rest of the rounds, and more gun mount and turret interior details.

Sprue Z
The clear sprue which provides the periscopes together with a lens to go behind the slotted cover on the headlight.

That's it for the main sprues, so now we'll have a look at what else you get in the box, starting with the main lower and upper hull.
The lower hull is a fairly simple moulding as most of the detail is added as separate parts. It's very nicely done, and includes an opening for the separate escape hatch. The upper hull is where all the action is as this features the moulded-on Zimmerit. To my eyes, this looks to be very well done, with an even but still hand finished look to it.


As I mentioned above, the Zimmerit coating looks very realistic to me. It will need a little work if you want to represent damaged areas, but nothing too vexing.

Understandably there's not much to see on the underside of the upper hull, as this area will be invisible in the final build, but there is some rivet detail around the driver's hatch.

The other separate part is the main turret. This is essentially just two sides and the back, as the remainder is built up from individual panels. The Zimmerit-free square on the turret side has a very neat edge, possibly too neat since the original coating would have been chipped away leaving a slightly rough edge.


The last of the plastic parts are the individual track links. These come in two types, with and without guide horns, which are alternated on each run, with each type being bagged separately.

The links are already free of any sprue, and ready to use, with 96 of each type supplied, although the instructions make no mention of the required number for each run. These are non-workable links and will need to be glued together then draped around the wheels before the glue sets. The links are well detailed, but they each have four quite prominent ejector pin marks on the inner face which will need removing. The marks are proud so should sand down without the need for filling, but even so, this, combined with the fiddly job of glueing and fitting them, may make a set of aftermarket metal links look more tempting.


Next, we'll have a closer look at some of the parts on the sprues.
Wheels and sprockets


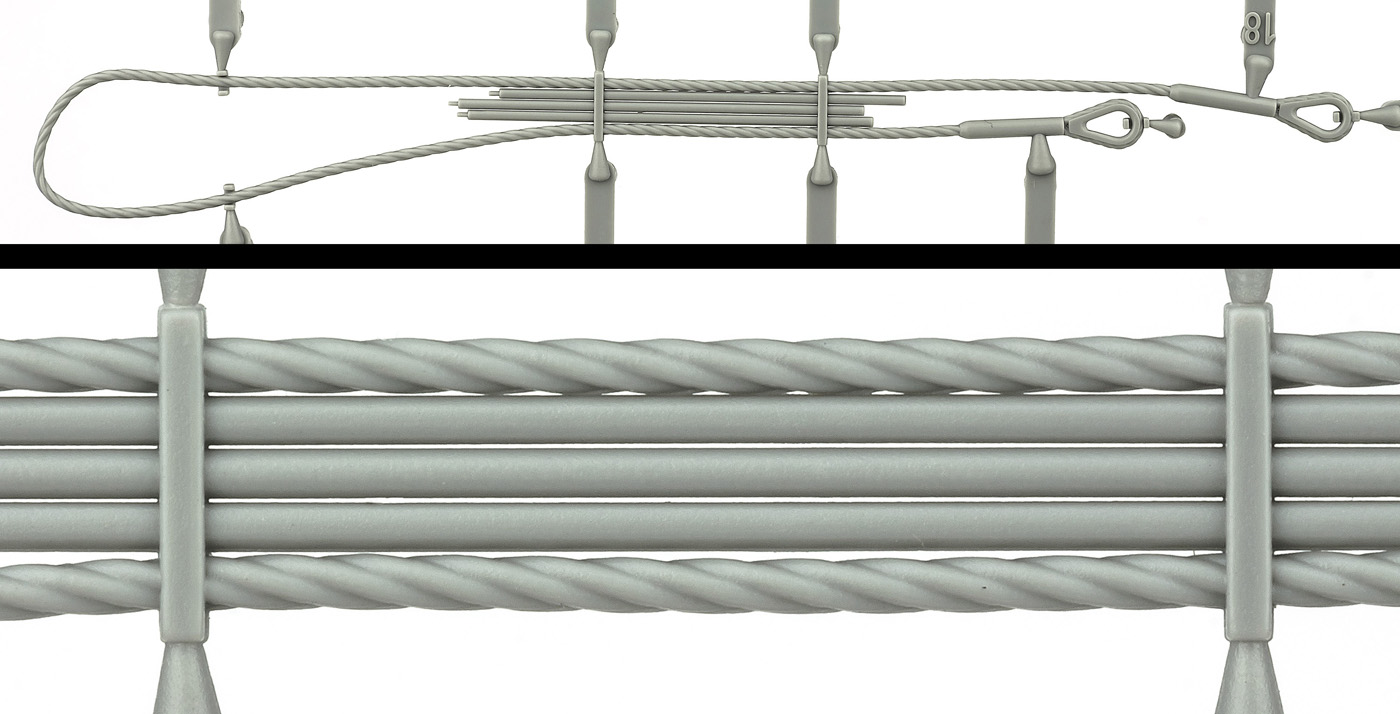
Tow cables
For me, these are a real highlight of the kit. Some people may have preferred a metal cable but I really don't think they would make all that much difference, and the single piece plastic ones are going to be much easier to fit. Takom have even moulded hairline gaps between the barrel rods which make them look like individual pieces.

Pioneer tools
As mentioned above, these have moulded clamps, but there are photo etched alternatives provided on the PE fret.

Zimmerit detailing


Driver's seat
There's some nice texturing on the seat pad, and even a (slightly over-scale) representation on the sprung seat back.

Turret roof plate
There's plenty of detail on both the inner and outer sides of the roof, but the inner side also has a few ejector pin marks to deal with. Not that big a problem, as you won't see this area anyway.


Barrel and muzzle


Engine details


Lower hull inner sidewalls

Radio

Photo-etch
Okay, that's it for the styrene. Next, we've got two sheets of PE brass.

The smaller of the two containing the engine screens, while the larger one has various internal fittings together with some beautifully done end caps for the shells.

Decals
Two decal sheets are supplied. One small sheet carrying the charging knight emblems for Pz. Abt. 505, and a larger one carrying some dials and placards for the interior, together with a set of stencils for the shells. The printing quality looks very good, with the writing on the stencilling being fully legible.


Instruction and Markings
Rounding off the contents we've got the manual, which comes in Takom's customary landscape format with 3D CAD style building steps (75 in all; this is a big build), and two separate painting guides.


There's also an additional correction sheet, so make sure to pin this to the relevant sections in the manual.

The manual doesn't provide any colour call-outs for the interior during the build, but all the relevant colours are shown on a double-sided A4 sheet, which shows the hull interior on one side, and the turret interior on the other. All the paint codes are for AMMO.


The main marking guide features just two options, both of course being from Panzer Abteilung 505. One is in a standard brown over yellow camo, while the other option has the same scheme over-painted with a partial winter whitewash camo. The paint codes again are for the AMMO range.

Also shown on the marking guide are the two new AMMO paints sets that have been released specifically for these Takom King Tigers, and feature all the colours you need to complete the model. One set covers the interior, including metallics for the shells, while the other set covers the exterior camo colours.

So there we have it. Takom's new King Tiger: probably their most significant release so far, and certainly their most commercially viable. From looking through the box they certainly appear to have produced a great looking kit and, given past experience, I've absolutely no doubt it will build well and produce a fantastic model.
I can't quite remove the nagging feeling at the back of my head that the full interior is going to be wasted for a lot of modellers, who are just looking for a straight build. It's one of those things that often gets brought up on forums as a 'must have' feature that every new release should have, but I wonder how many people demanding it will subsequently go on to buy these kits.
Anyway, don't let me put you off with my "bah-humbugging". It's still a great kit, with or without the interior. Stay tuned for the build, coming soon.
Andy Moore
available from Takom’s Distributors Worldwide. Thanks to them for sending this kit to build & review.