Here’s me a year ago: “An F-35 in 1/32 scale? Yeah, sure… That’ll happen.”
Here’s me today: “Hey man, I’m building an F-35 in 1/32" - Cool huh?
- Nico gets to building the new Italeri F-35A Lightning II in 32nd scale.
- Nico gets to building the new Italeri F-35A Lightning II in 32nd scale.
F-35A Lightning II
Italeri Models
1/32nd scale
Kit No# 2506
Model Dim.: 49,0 cm
Box Dim.: 560 x 280 x 115 mm
Markings are provided for six subjects
Photo Etched Parts included
Like with every new thing ever since the existence the invention of ‘social media’ everyone has an opinion on the US’s new fighter jet. While everyone seems to be an expert, I can tell you that it is darn hard to find useful info when you are about to start building this kit! In this first part, I’m going to focus on the cockpit of the kit, I hope you’re ready!
Right, but let me first say something about the kit in general: it’s a better kit than the Mirage III. I’ve built it, it was a lot of work. This F-35 has a great fit, provides quite a bit of detail and is impressive in size. So, we should all thank Italeri that it released this kit. Of course, a kit of an aircraft this new can be a risk, because you can’t get a close-up of all the details, but once built, this will be an impressive kit in any collection. Just one thought: where is that 1/32 scale F-22?? So, I’ve said it, we can go on now.
This is the seat as it is provided in the kit with photo etch harnesses included, it attempts to replicate the MK16US16E ejection seat for the F-35A which was "competitively selected" by Lockheed Martin. The US16E design is common to all F-35 variants. Let’s be honest: this doesn’t look bad at all. The kit provides metal etched seatbelts, and it looks the part. On the right is the M?artin Baker seat. Note that the seat cushion patterns of this chair are varied as in the picture after the next paragraph.
There aren't many photographs available of the cockpit of the Lightning II. At most, you can find some shots of the mock-up cockpit, but hey, that’s just the mock-up, right? Photos of the seat, you can find. And because it is an eye-catcher, I wanted to give it a lot of attention and detail. Some work was done and resulted in this:
You can add a lot of detail, especially to the top and the back of the seat, but I’ve just added what can be seen when the seat is placed in the kit.
The part aft of the head rest is a little too robust, it should be less wide on top, but especially the top needs some work. This extra detail will really make the cockpit look better. The oxygen tank behind it needs to be painted bright green, so that will add some colour to the cockpit.
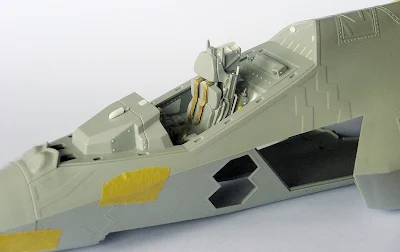
Here is the cockpit tub test fitted inside the fuselage. As you can see, it’s pretty spartan. I’ve added some strip to the back; little details I noticed in some photos. The aircraft doesn't have a head-up display, all necessary information is projected in the new pilot's helmet. But when you look close at some photos, you can add some details to the area.
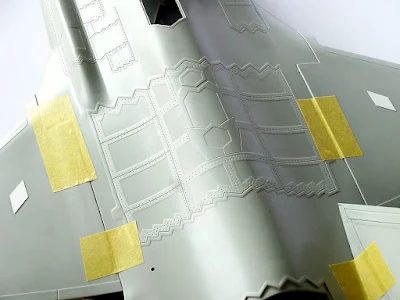
In this photo, you see some of the fuselage detail. It looks good, even though it might be a little too prominent… The V-shape on the air intakes need a little putty; there’s a little sink in the plastic in that area.
There is a crew access ladder provided in the kit, that is sitting behind a door on the port side of the fuselage. I found the door to this panel a little rough and scratched a new one.
Here is a close-up of the same area with the ladder test fitted. It too got a little extra detail, I just added some plasticard to the internal door panel and it looks just that little bit more detailed like the reference picture below.
Here’s a closer look at the F-35’s nose, loosely placed on the kit. Seems like quite a decent fit! Much better that the nose of the Mirage III!
That’s a good thing because the nose is really very flush with the fuselage on the real thing:
On top of the cockpit edge, you have to place a photo-etched framing. That’s good news because it will bring a lot of detail to the area that was going to be hard to add.
I like the look of this jet, especially from the front. As you can see here, the wing-fuselage connection will need some work, though.
See what I mean? This should be flush, so later in the construction, I’ll need some putty here! I also noticed some wing panels on some photos, so I added these with the thinnest plasticard I could find.
Right, back to the cockpit now: here it is with the few details I could find on the cockpit. The rudder pedals are in photo-etched parts, the stick and throttle are separate parts.
This is what it looks like inside the fuselage, ready for some paint!
The landing gear doors of this F-35 A need some work. There are some large injection marks that aren’t hidden behind the structure, so out comes the sander and the putty!
So far, this is an easy and very enjoyable kit, but the next picture sums up the real challenge of this kit. First is the filling and polishing of the wings to fuselage joint. Second is the masking of the panels.
Here’s what is will have to become:
But hey, the polishing and painting, that’s for the next report.
Live long and prosper!
Nicolas
Thanks to Italeri for sending this kit to Nico to build for you all. You can see Italeri’s kits come to life and look at older releases on their website and the Italeri Facebook page...


