


Andy Moore continues to make his MiniArt 35th scale Sharotank - but his will be special - as he is not only painting & weathering the machine, but adding a lit-up interior to the kit to bring it to life. See how the kit goes together in his hands in part II of the construction review...


Manufacturer – MiniArt
Product Number - #40001
Scale - 1/35th
Price - ¥4,800 - US$44 - £34 - €39 from Hobby Link Japan
Product Link on the MiniArt Website

Parts of this Guide:
-In-Box & build Guide Pt. I: Miniart's 35th scale Soviet Ball Tank “Sharotank” Interior
Last time out, we built up the inner framework and engine MiniArt's Sharotank, the first in their new line of “What If...?” kits. It was a fairly involved little build, and quite fiddly to get together at times, but the end result looked very nice despite a few issues such as the undersized seats. Time now to close up that interior and get the main build finished.

In contrast to the interior, the main hull, for want of a better term, is a very simple and straight forward construction. The main components are the two outer shell parts that give the Sharotank its distinctive ball shape. These are essentially half-spheres, but with cut-outs for the main hatches and the weapon mounts. The exterior of the shells are fairly plain, while the interior features some moulded detail, mainly attachment points for other parts.

Various ammo racks and a couple of fuel tanks are then added to the inner sides of the shells, all of which fit very well. The main gun breech sections and the machine guns are best left separate for now to ease painting. There's also a radiator assembly (not shown here) that fits over the grill panel on the rear of the shell. That too is best painted separately and added at the end.

The ball mounts for the main 30mm guns and the machine guns are trapped between inner and outer rings that, if you're careful with the cement, will remain poseable. The downside of doing that is you'll need to paint all areas of the balls, or turning them later will expose areas of unpainted plastic. In my case, I glued them in position for simplicity, as I wasn't bothered about having them movable anyway.

On the outside of the right-hand shell, there's a small indentation just below the radiator grill insert. This lines up with the exhaust pipe on the inside and is clearly meant to represent the outlet for the exhaust gases. As such, I drilled this out to add a little more realism.

The last parts to add to the exterior are the two support struts for the outrigger wheels. These slot into place very easily and lock into a fixed position, so you won't need to worry about getting the left and right struts aligned with each other.

The wheels themselves where assembled, but left unattached for now to make painting easier. They did require some remedial work though, as the fit of the two-part assemblies isn't great. Only the lower section of the wheel and tyre is supplied and this is designed to slide into a shroud that would cover the upper part of the wheel. Unfortunately, the shroud is far too tight to allow the wheel to slot into place.

It's a simple enough issue to fix though. The upper section of the wheel was trimmed back until it slipped easily into the shroud. Quite a lot of plastic needed to be removed to get to that point however, and I'm surprised MiniArt didn't pick up on this in their own test builds.

The two main hatches have fully detailed inner faces complete with the latch mechanism and hinges. While not workable, they can be attached in any position from closed to fully open.

With the parts washed and de-greased ready for painting, I started with the main base coats on the interior. AMMO Matt White (A-MIG-050) was used for the insides of the shell sections, while the hatches were finished in 4BO Green (A.MIG-019). A little Dunkelgelb was then mixed into the 4BO to add some highlights to the hatch panels.

With the painting finished, the interior was given a fairly heavy degree of weathering using various AMMO dirt and grime washes. The effect was intentionally strong to provide some contrast in what would be quite a dark interior.

The guns and ammo were painted in their appropriate colours before being added to the interior. It's not worth going overboard with detail painting here as these parts are difficult to see even with the main hatches open. The 30mm rounds are moulded in strips, but I cut some of these down to give the impression that some of the ammo had already been fired.


Before getting on to the exterior painting, I wanted to address what, as mentioned above, will be a rather dark interior. MiniArt supplies a small part on the clear sprue that's intended to represent an interior light, and that sparked the idea to add some real lights to the inside to show all that internal detail. I got in touch with Warren Monks of Tirydium Models and he prepared a custom lighting kit for me consisting of two 0603 SMD LEDs for the interior, and one tiny 0402 SMD which will go in the headlight. A switched battery box and a miniature circuit board with a potentiometer for adjusting the light intensity completed the lighting kit.

The first thing to install was the LED for the headlight but, before doing so, I needed to slightly modify the headlight housing and build a support bracket for it which, for some reason, has been missed from the kit. The instruction manual clearly shows a bracket attached to the housing, but the part itself has no bracket, nor is there a separate part for it on any of the sprues.

Fortunately, it's a very simple part to make. A small wedge of styrene strip does the job just fine. The headlight housing had a small hole drilled in the base into which a short length of 0.6mm aluminium tube was glued. The protruding end of the tube was then glued into a similar hole in the end of the bracket. A hole was drilled into the main hull just below the headlight bracket and finished off with a lip made from a thin slice of styrene tube. After painting the inside of the housing in silver, the wire from the LED was carefully threaded through the tube in the headlight and in turn through the hole in the hull. A drop of glue on the end of the aluminium tube held the LED in place. All that remained was to add the clear lens to the front of the headlight housing.

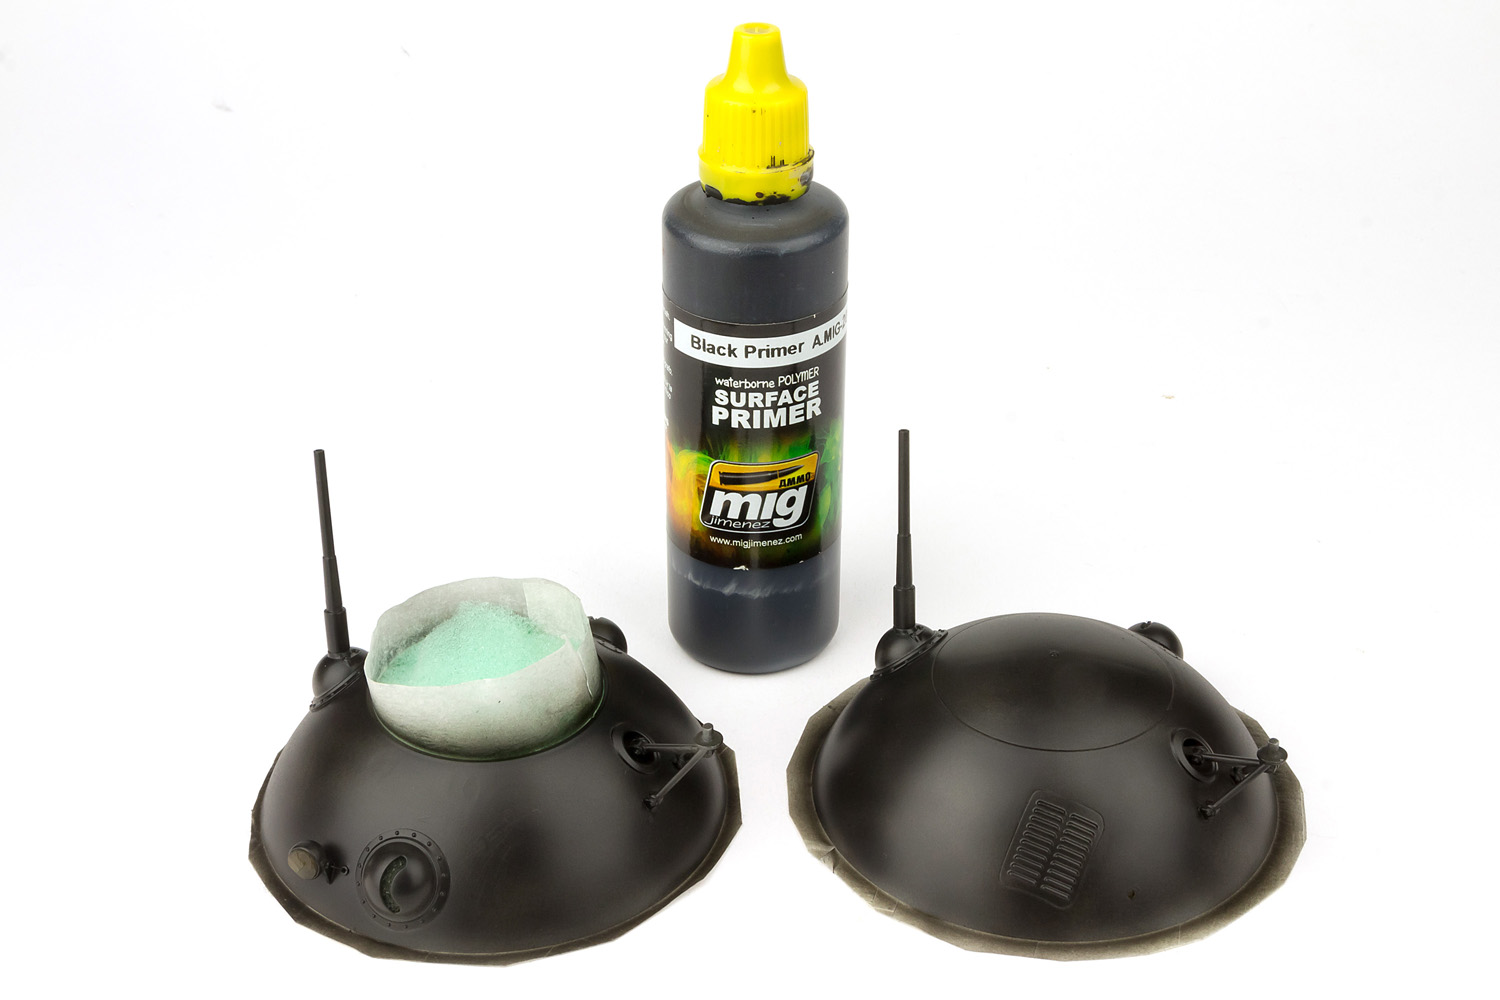
With the headlight wiring finished, I could get on to the main exterior painting, starting with an overall layer of AMMO black primer. The main hatch opening and the slots for the machine guns were masked off from the inside beforehand and the open backs of the hull halves were covered over with masking tape.
AMMO 4BO Green was used again for the exterior colour. This was mottled over the black primer to leave a patchy finish, with a heavier application on the upper areas of the shell sections to give some natural tonal modulation to the sphere shape.

Further tonal variation was created by mixing a little Light Green Khaki (A.MIG-058) into the 4BO. Again, this was concentrated on the upper areas to give further volume to the hull. These paints were all thinned quite heavily allowing the finish to build up gradually.

MiniArt provides a pretty generous selection of marking options with the kit, and the one I chose featured a white band around the centre (equator?) of the hull, along with a red star and some Russian slogans. All of these markings are provided as decals, but I decided they'd look better painted on instead. For the stripe, I cut a length of masking tape to the same width as the decal and used that as a guide to ensure the band would be perfectly central. Once I was happy with the position of the tape strip, I masked the rest of the hull halves up to the edge of the guide strip, before removing the guide and spraying the band with AMMO white.

For the star, I traced the kit decal onto masking tape, cut out the shape and applied the mask to the hull, using the moulded hatch lock to help align the mask. Again, this was sprayed white, in this case, to act as a neutral base for the final red colour.

After spraying the star in red, the white border was hand painted using a fine pointed brush. I didn't try to make this look too perfect, as in reality the markings would have been hand painted anyway.

I used the kit decals for the slogans, but over-painted them in white to make them look a little less neat. A few paint splatters and dribbles were added to the lettering and the stripe, again to accentuate the hand-painted look.

I decided to start the weathering steps while the hull halves were still separate from the inner frame as they were a lot easier to handle at this stage. Some paint chipping was applied over the white markings using the base 4BO green, and further restrained chipping was added to the rest of the hull with a dark brown. The chipping was concentrated on areas that would get the most wear and tear such as the hatch opening and the machine gun ball mounts. After that, a general layer of dirt was added using AMMO Streaking Grime, again concentrating on areas that would naturally get dirty.


The only thing I needed to do now before finally closing up the hull was to fit the main interior lighting. The two LEDs were secured to the roof area of the hull halves using a small drop of epoxy adhesive and the wires carefully threaded through the frames of the interior structure. The hull sections could then be glued in place and the wires run around the outer frames of the interior.


The wires were run down to the bottom of the hull where they could exit through holes drilled in one of the track sections. From there, the wires will run through the base that the model will be mounted on and connect to the battery box which will be mounted under the base.

For the base, I'm just using a cheap photo frame. With the glass removed, a piece of plywood was glued in its place to form the base for the ground work.

A quick test fit to check how the model would sit on the base. I've drilled a hole through the centre of the plywood board for the wiring to pass through. You can also see here that the track sections have been attached. There are four of these sections, and they fit very well. There are very minor hairline gaps on the joints between the sections, but these are very easy to fill.

The groundwork on the base was built up using bits of insulation foam, glued in place with PVA. You can also see that a short length of styrene tube has been glued into the wiring hole in the plywood. That was to ensure the hole came up to the top of the foam terrain.

The contours of the groundwork were then smoothed over with wall filler, followed by a coat of Vallejo texture paste. This won't form the final finish of the terrain. It's just there to provide a suitable base layer for the rest of the ground effects to be applied to.

And that folks is where we'll leave proceedings for today. In the final part we'll complete the base, finalise the weathering on the Sharotank and finish off the scene with a couple of MiniArt figures. In the meantime I'll leave you with some shots of the tank in place on the base and, since I know you'll want to see them, a couple with the lights switched on.


-In-Box & build Guide Pt. I: Miniart's 35th scale Soviet Ball Tank “Sharotank” Interior
Thanks to MiniArt for sending this kit to Andy to review & build for us - For more on this #40001 SOVIET BALL TANK "Sharotank" kit, check out the product link on the MiniArt Website
